three.js 视频融合
MixVideo.js代码:


//视频融合

import * as THREE from '../build/three.module.js';

import { API } from '../js.my/API.js';

import { Msg } from '../js.my/Msg.js';

import { createDebounce } from '../js.my/Utils.js';

import { guiParams, createGuiParams } from '../js.my/MixVideoGui.js'

let api = new API();

let msg = new Msg();

let mesh;

let material;

let videoTexture;

let loadingVideoTexture;

let debounce = createDebounce(2000);

function createGeometry(params, mixVideoBounds) {

    let geometry = new THREE.Geometry();

    if (!params) {

        geometry.vertices.push(new THREE.Vector3(mixVideoBounds[0].x, mixVideoBounds[0].y, mixVideoBounds[0].z));

        geometry.vertices.push(new THREE.Vector3(mixVideoBounds[1].x, mixVideoBounds[1].y, mixVideoBounds[1].z));

        geometry.vertices.push(new THREE.Vector3(mixVideoBounds[2].x, mixVideoBounds[2].y, mixVideoBounds[2].z));

        geometry.vertices.push(new THREE.Vector3(mixVideoBounds[3].x, mixVideoBounds[3].y, mixVideoBounds[3].z));

    } else {

        geometry.vertices.push(new THREE.Vector3(params.bounds0_x, params.bounds0_y, params.bounds0_z));

        geometry.vertices.push(new THREE.Vector3(params.bounds1_x, params.bounds1_y, params.bounds1_z));

        geometry.vertices.push(new THREE.Vector3(params.bounds2_x, params.bounds2_y, params.bounds2_z));

        geometry.vertices.push(new THREE.Vector3(params.bounds3_x, params.bounds3_y, params.bounds3_z));

    }

    let normal = new THREE.Vector3(0, 0, 1);

    let face0 = new THREE.Face3(0, 1, 2, normal);

    let face1 = new THREE.Face3(0, 2, 3, normal);

    geometry.faces.push(face0, face1);

    let t0 = new THREE.Vector2(0, 0);

    let t1 = new THREE.Vector2(1, 0);

    let t2 = new THREE.Vector2(1, 1);

    let t3 = new THREE.Vector2(0, 1);

    let uv1 = [t0, t1, t2];

    let uv2 = [t0, t2, t3];

    geometry.faceVertexUvs[0].push(uv1, uv2);

    geometry.computeFaceNormals();

    geometry.computeVertexNormals();

    return geometry;

}

let changeMaterialMap = () => {

    if (material && videoTexture && material.map === loadingVideoTexture) {

        material.map = videoTexture;

    }

};

function createVideoMesh(scene, fly, video, loadingVideo, cameraId, mixVideoBounds, mixVideoCameraPosition, mixVideoCameraTarge) {

    videoTexture = new THREE.VideoTexture(video);

    videoTexture.minFilter = THREE.LinearFilter;

    videoTexture.magFilter = THREE.LinearFilter;

    videoTexture.format = THREE.RGBFormat;

    loadingVideoTexture = new THREE.VideoTexture(loadingVideo);

    loadingVideoTexture.minFilter = THREE.LinearFilter;

    loadingVideoTexture.magFilter = THREE.LinearFilter;

    loadingVideoTexture.format = THREE.RGBFormat;

    material = new THREE.MeshBasicMaterial({

        map: loadingVideoTexture,

        color: 0xffffff,

        depthTest: false,

        transparent: true,

        opacity: 0.95

    });

    mesh = new THREE.Mesh(createGeometry(undefined, mixVideoBounds), material);

    scene.add(mesh);

    fly.moveCameraOnly(mixVideoCameraPosition, mixVideoCameraTarge);

    createGuiParams(mixVideoBounds, () => {

        mesh.geometry = createGeometry(guiParams);

        let mixVideoBounds = [

            { x: guiParams.bounds0_x, y: guiParams.bounds0_y, z: guiParams.bounds0_z },

            { x: guiParams.bounds1_x, y: guiParams.bounds1_y, z: guiParams.bounds1_z },

            { x: guiParams.bounds2_x, y: guiParams.bounds2_y, z: guiParams.bounds2_z },

            { x: guiParams.bounds3_x, y: guiParams.bounds3_y, z: guiParams.bounds3_z }

        ];

        for (let i = 0; i < mixVideoBounds.length - 1; i++) {

            mixVideoBounds[i].x = parseFloat(mixVideoBounds[i].x.toFixed(6));

            mixVideoBounds[i].y = parseFloat(mixVideoBounds[i].y.toFixed(6));

            mixVideoBounds[i].z = parseFloat(mixVideoBounds[i].z.toFixed(6));

        }

        let data = {

            id: cameraId,

            mix_video_bounds: JSON.stringify(mixVideoBounds),

        }

        debounce(() => {

            api.updatePtCameraInfo(data, () => {

                msg.show("视频融合参数已保存");

            });

        });

    });

}

function mixVideo(scene, fly, cameraIndexCode, cameraId, mixVideoBounds, mixVideoCameraPosition, mixVideoCameraTarge) {

    msg.show("即将加载视频请稍等");

    mesh && scene.remove(mesh);

    //创建DOM

    if ($('#mixVideo').length == 0) {

        //video标签,外层div测试用

        let videoStr = `

            <div id="mixVideoDiv" style="display:none; z-index: -999999; position: absolute; float: left; top: 0; left: 0; background-color: #ff0000;">

                <video id="mixVideo" style="width:100px; height:100px;" loop="loop" poster="images/mix-video/loading.gif">

                    <source src="../../video/videoPlane.mp4" type="video/mp4">

                </video>

                <video id="loadingVideo" style="width:100px; height:100px;" loop="loop" >

                    <source src="data:images/mix-video/loading.mp4" type="video/mp4">

                </video>

            </div>`

        $('body').append(videoStr);

    }

    let video = document.getElementById('mixVideo');

    let loadingVideo = document.getElementById('loadingVideo');

    //取流

    // api.getVideoUrl(cameraIndexCode, data => {

    //     createVideoMesh(scene, fly, video, loadingVideo, cameraId, mixVideoBounds, mixVideoCameraPosition, mixVideoCameraTarge);

    //     hlsPlay(video, loadingVideo, data);

    // }, errMsg => {

    //     playTestMp4(scene, fly, video, loadingVideo, cameraId, mixVideoBounds, mixVideoCameraPosition, mixVideoCameraTarge);

    //     msg.show("取流失败:" + errMsg);

    // });

    //测试播放hls流

    let testUrl = 'http://playertest.longtailvideo.com/adaptive/bipbop/gear4/prog_index.m3u8';

    let testUrl2 = 'https://test-streams.mux.dev/x36xhzz/x36xhzz.m3u8';

    createVideoMesh(scene, fly, video, loadingVideo, cameraId, mixVideoBounds, mixVideoCameraPosition, mixVideoCameraTarge);

    hlsPlay(video, loadingVideo, testUrl);

}

/** 播放hls流 */

function hlsPlay(video, loadingVideo, url) {

    loadingVideo.play();

    if (Hls.isSupported()) {

        const hls = new Hls();

        hls.loadSource(url);

        hls.attachMedia(video);

        hls.on(Hls.Events.MEDIA_ATTACHED, () => {

        });

        hls.on(Hls.Events.MANIFEST_PARSED, () => {

            video.play();

        });

        hls.on(Hls.Events.ERROR, (event, data) => {

        });

        hls.on(Hls.Events.FRAG_LOADED, () => {

            changeMaterialMap();

        });

    } else {

        msg.show("您的浏览器不支持播放该视频流");

    }

}

function playTestMp4(scene, fly, video, loadingVideo, cameraId, mixVideoBounds, mixVideoCameraPosition, mixVideoCameraTarge) {

    loadingVideo.play();

    video.play();

    createVideoMesh(scene, fly, video, loadingVideo, cameraId, mixVideoBounds, mixVideoCameraPosition, mixVideoCameraTarge);

    changeMaterialMap();

}

export { mixVideo }
如何使用:调用mixVideo方法,把scene、fly(用于场景飞行)和其它配置的参数传给它即可
涉及到的变量说明:
video 视频标签DOM
loadingVideo 视频加载出来前的loading动画的DOM,mp4格式
mixVideoBounds 播放视频的Geometry的四个顶点的坐标
mixVideoCameraPosition 场景相机position(PerspectiveCamera对象的position)
mixVideoCameraTarge 场景相机target(OrbitControls.js的OrbitControls对象的target)
mixVideoBounds参数不好调,我做了一个调参的功能,当参数调整时,自动保存到数据库
MixVideoGui.js代码:
//控制视频融合播放范围

import { GUI } from "../js/libs/dat.gui.module.js";

let gui = new GUI({ autoPlace: false, width: 260, hideable: true });

GUI.TEXT_CLOSED = '隐藏';

GUI.TEXT_OPEN = '展开';

let guiParams;

let folderLeftBottom;

let folderRightBottom;

let folderRightTop;

let folderLeftTop;

function createGuiParams(mixVideoBounds, onChange) {

    if (folderLeftBottom) {

        gui.removeFolder(folderLeftBottom);

        gui.removeFolder(folderRightBottom);

        gui.removeFolder(folderRightTop);

        gui.removeFolder(folderLeftTop);

    }

    guiParams = new function () {

        this.bounds0_x = mixVideoBounds[0].x;

        this.bounds0_y = mixVideoBounds[0].y;

        this.bounds0_z = mixVideoBounds[0].z;

        this.bounds1_x = mixVideoBounds[1].x;

        this.bounds1_y = mixVideoBounds[1].y;

        this.bounds1_z = mixVideoBounds[1].z;

        this.bounds2_x = mixVideoBounds[2].x;

        this.bounds2_y = mixVideoBounds[2].y;

        this.bounds2_z = mixVideoBounds[2].z;

        this.bounds3_x = mixVideoBounds[3].x;

        this.bounds3_y = mixVideoBounds[3].y;

        this.bounds3_z = mixVideoBounds[3].z;

    }

    folderLeftBottom = gui.addFolder('左下');

    folderRightBottom = gui.addFolder('右下');

    folderRightTop = gui.addFolder('右上');

    folderLeftTop = gui.addFolder('左上');

    folderLeftBottom.open();

    folderRightBottom.open();

    folderRightTop.open();

    folderLeftTop.open();

    let guiParamsDelta = 1000;

    let guiParamsDeltaY = 1000;

    let step = 0.1;

    let paramCtrls = [

        folderLeftBottom.add(guiParams, "bounds0_x", guiParams.bounds0_x - guiParamsDelta, guiParams.bounds0_x + guiParamsDelta, step),

        folderLeftBottom.add(guiParams, "bounds0_y", guiParams.bounds0_y - guiParamsDeltaY, guiParams.bounds0_y + guiParamsDeltaY, step),

        folderLeftBottom.add(guiParams, "bounds0_z", guiParams.bounds0_z - guiParamsDelta, guiParams.bounds0_z + guiParamsDelta, step),

        folderRightBottom.add(guiParams, "bounds1_x", guiParams.bounds1_x - guiParamsDelta, guiParams.bounds1_x + guiParamsDelta, step),

        folderRightBottom.add(guiParams, "bounds1_y", guiParams.bounds1_y - guiParamsDeltaY, guiParams.bounds1_y + guiParamsDeltaY, step),

        folderRightBottom.add(guiParams, "bounds1_z", guiParams.bounds1_z - guiParamsDelta, guiParams.bounds1_z + guiParamsDelta),

        folderRightTop.add(guiParams, "bounds2_x", guiParams.bounds2_x - guiParamsDelta, guiParams.bounds2_x + guiParamsDelta, step),

        folderRightTop.add(guiParams, "bounds2_y", guiParams.bounds2_y - guiParamsDeltaY, guiParams.bounds2_y + guiParamsDeltaY, step),

        folderRightTop.add(guiParams, "bounds2_z", guiParams.bounds2_z - guiParamsDelta, guiParams.bounds2_z + guiParamsDelta, step),

        folderLeftTop.add(guiParams, "bounds3_x", guiParams.bounds3_x - guiParamsDelta, guiParams.bounds3_x + guiParamsDelta, step),

        folderLeftTop.add(guiParams, "bounds3_y", guiParams.bounds3_y - guiParamsDeltaY, guiParams.bounds3_y + guiParamsDeltaY, step),

        folderLeftTop.add(guiParams, "bounds3_z", guiParams.bounds3_z - guiParamsDelta, guiParams.bounds3_z + guiParamsDelta, step)

    ];

    paramCtrls.forEach(ctrl => ctrl.onChange(onChange));

    if ($('#guiDomElement').length == 0) {

        let guiDomElement = `<div id="guiDomElement" style="position:absolute; z-index:1990; float:left; left:165px; top:220px; width:260px;" ></div> `;

        $('body').append(guiDomElement);

        $('#guiDomElement').append(gui.domElement);

        gui.open();

    }

}

export { gui, guiParams, createGuiParams }
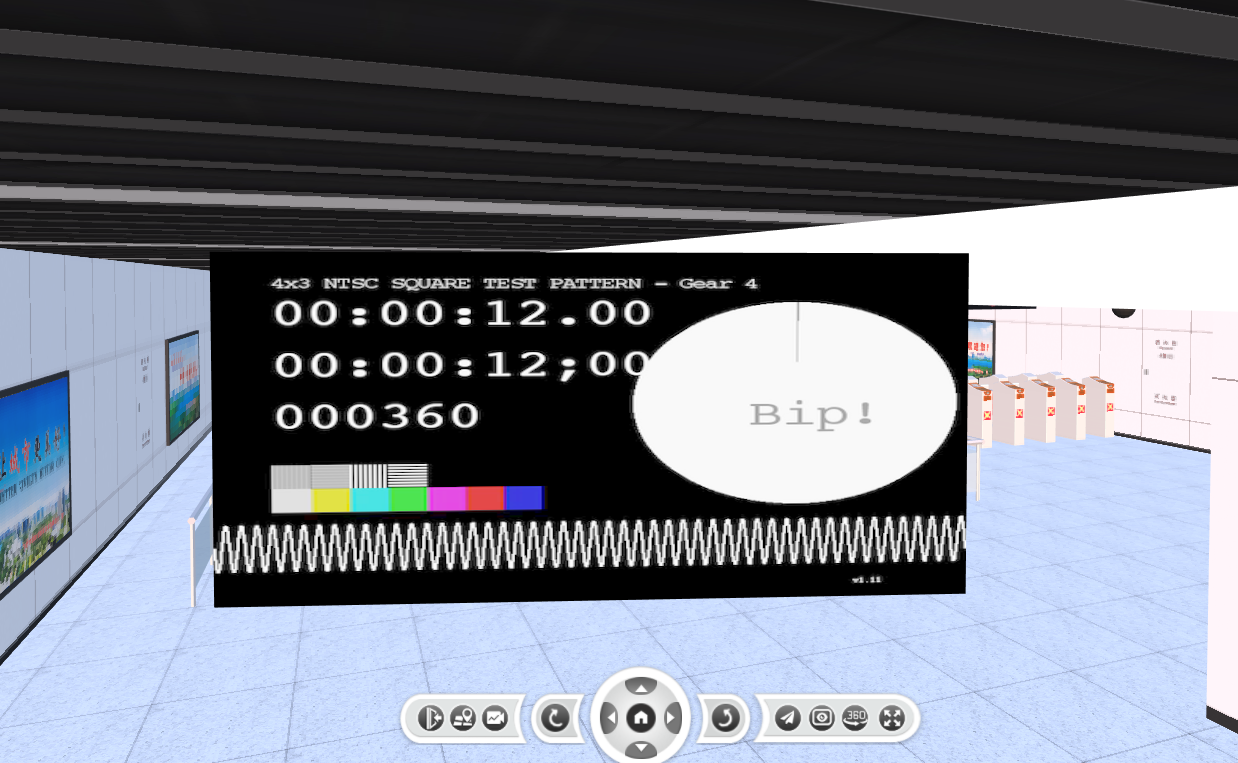
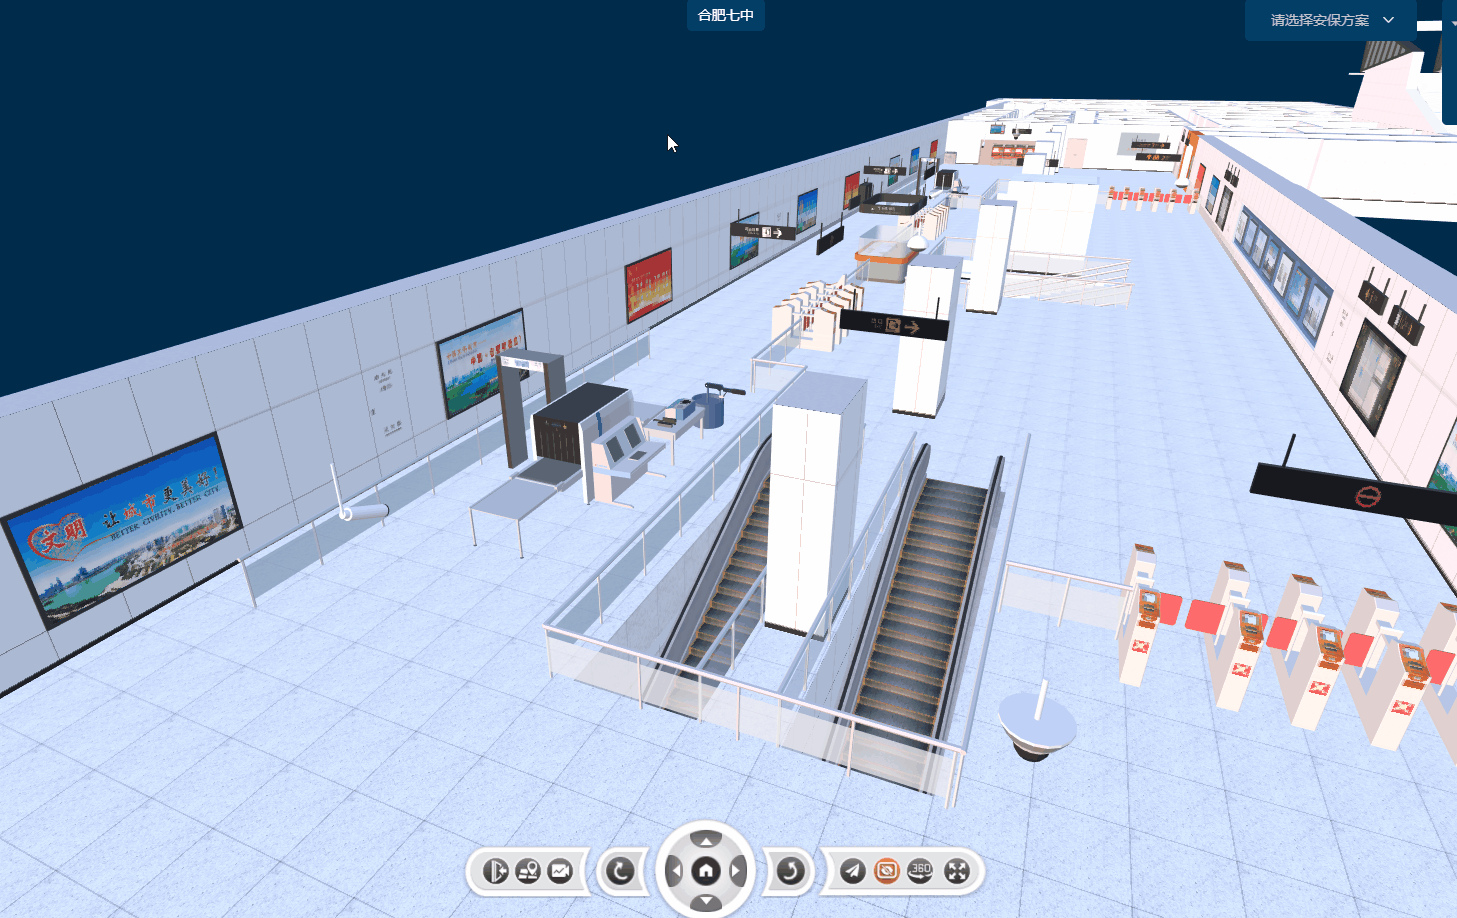
效果图:
没有真实的视频,随便找了个在线的hls流
效果图gif:
说明:第1个模拟的是平视的摄像机,第2个和第3个模拟的是俯视的摄像机,第4个没有配置视频融合相关参数,直接弹出视频播放对话框。
mixVideoBounds参数调整效果图:

现场测试效果图:
效果不怎么样,也可能只是参数没调好。

three.js 视频融合的更多相关文章
- 【 D3.js 视频系列 】 飞速入门
本教程共包含 6 个视频,目的是为了帮助初学者快速入门,以便阅读本站其他文章. 本教程的名称为"飞速入门",是为初学者准备的,其中包括了 D3 开发中最基础的知识.对 D3 掌握得 ...
- 分享:JS视频在线视频教程
作者说明 (1)JS说明 JS是非常重要的一门语言,但是,我们对JS的认识似乎仍然停留在“hello word”或者“alert”的观念上.其实,JS发展到现在已经非常的成熟,功能也非常的强大,因此, ...
- video.js 视频自动全屏播放
1.头部引用脚本 <link href="css/video-js.min.css" rel="stylesheet"> <link href ...
- JS高度融合入门笔记(二)
<!DOCTYPE html><html><head> <meta charset="utf-8"> <title>JS ...
- JS高度融合入门笔记(一)
复制下面的代码到编辑器里,让编辑器自动排版一下格式,效果会好一点,自我感觉我笔记的条理还是比较容易记忆的 <!DOCTYPE html><html><head> & ...
- js视频学习笔记1
1:数组赋值的个数长度定义无效,第4个存储的数还是能原封不动打印出来. js的数组是内部有一个变量名叫0,它的值是1,有一变量名叫1,它的值是2.是这样表示的 2:js是弱类型语言,没有var标识符, ...
- [html][js]视频倍速播放功能
代码 <!DOCTYPE html> <html lang="en"> <head> <meta charset="UTF-8& ...
- 1. web前端开发分享-css,js入门篇
关注前端这么多年,没有大的成就,就入门期间积累了不少技巧与心得,跟大家分享一下,不一定都适合每个人,毕竟人与人的教育背景与成长环境心理活动都有差别,但就别人的心得再结合自己的特点,然后探索适合自己的学 ...
- js、jquery获取当前url中各个参数
首先,先把获取各参数的方式再写一遍,相信大家都耳熟能详,就写几个常用的吧. 以此网址https://i.cnblogs.com/EditPosts.aspx?opt=1为例: 1. var url=w ...
- web前端开发分享-css,js入门篇(转)
转自:http://www.cnblogs.com/jikey/p/3600308.html 关注前端这么多年,没有大的成就,就入门期间积累了不少技巧与心得,跟大家分享一下,不一定都适合每个人,毕竟人 ...
随机推荐
- Codeforces Round 905 (Div. 3)
Codeforces Round 905 (Div. 3) A. Morning 题意:操作:显示,向前走都为一次操作:目标:显示这四个数 思路:0->10,然后依次作差就行 #include ...
- 生命体征监测VSM
参考来源:ADI官网技术文章.知乎(hxl695822705.深圳加1健康科技 ) 缩写 全称 翻译 VSM Vital Signs Monitor 生命体征监测 ECG ElectroCardioG ...
- [ICPC2015WF] Tours
题目描述 The Arca Carania Mountain national park is opening up for tourist traffic. The national park ha ...
- [CF3C] Tic-tac-toe
[题目描述] 显然,我们每个人都熟悉Tic-tac-toe游戏. 这个游戏的规则是:两个人依次在3X3的棋盘上下棋. 当一个人有3个棋子连成一行或一列或一纵列时,则这个人已经获得胜利.这时则停止下棋. ...
- 2023-12-23:用go语言,一支n个士兵的军队正在趁夜色逃亡,途中遇到一条湍急的大河 敌军在T的时长后到达河面,没到过对岸的士兵都会被消灭 现在军队只找到了1只小船,这船最多能同时坐上2个士兵。
2023-12-23:用go语言,一支n个士兵的军队正在趁夜色逃亡,途中遇到一条湍急的大河 敌军在T的时长后到达河面,没到过对岸的士兵都会被消灭 现在军队只找到了1只小船,这船最多能同时坐上2个士兵. ...
- VsCode运行与freopen与快读
运行 g++ -o a a.cpp && ./a g++ b.cpp -o b && ./b g++ c.cpp -o c && ./c freopen ...
- pytest框架中conftest.py的作用
conftest.py 是 pytest 框架中的一个特殊文件.它允许你为测试提供自定义的配置和钩子函数.以下是 conftest.py 的主要作用: 提供全局配置:你可以在 conftest.py ...
- React 类组件转换为函数式
函数式的 React 组件更加现代,并支持有用的 hooks,现在流行把旧式的类组件转换为函数式组件.这篇文章总结了转换的一些通用的步骤和陷阱. 通用替换 定义 从 class (\w+) exten ...
- Config:Spring Cloud分布式配置组件
Config:Spring Cloud分布式配置组件 问题总结 Config? Config工作原理? Config 的特点? Config+Bus 实现配置的动态刷新? 问题答案 Config Co ...
- 如何开发一个ORM数据库框架
如何开发一个ORM框架 ORM(Object Relational Mapping)对象关系映射,ORM的数据库框架有hibernate,mybatis.我该如何开发一个类似这样的框架呢? 为什么会有 ...