
springboot学习笔记-6 springboot整合RabbitMQ
一 RabbitMQ的介绍
RabbitMQ是消息中间件的一种,消息中间件即分布式系统中完成消息的发送和接收的基础软件.这些软件有很多,包括ActiveMQ(apache公司的),RocketMQ(阿里巴巴公司的,现已经转让给apache).
消息中间件的工作过程可以用生产者消费者模型来表示.即,生产者不断的向消息队列发送信息,而消费者从消息队列中消费信息.具体过程如下:
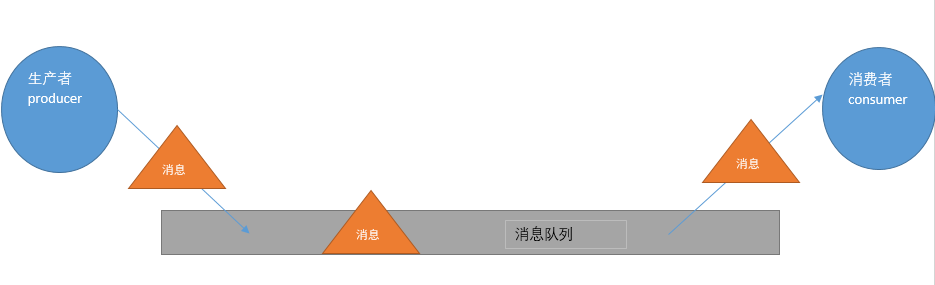
从上图可看出,对于消息队列来说,生产者,消息队列,消费者是最重要的三个概念,生产者发消息到消息队列中去,消费者监听指定的消息队列,并且当消息队列收到消息之后,接收消息队列传来的消息,并且给予相应的处理.消息队列常用于分布式系统之间互相信息的传递.
对于RabbitMQ来说,除了这三个基本模块以外,还添加了一个模块,即交换机(Exchange).它使得生产者和消息队列之间产生了隔离,生产者将消息发送给交换机,而交换机则根据调度策略把相应的消息转发给对应的消息队列.那么RabitMQ的工作流程如下所示:
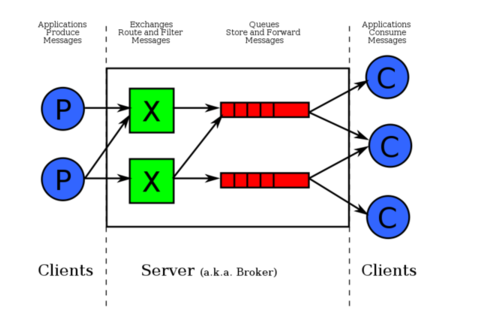
紧接着说一下交换机.交换机的主要作用是接收相应的消息并且绑定到指定的队列.交换机有四种类型,分别为Direct,topic,headers,Fanout.
Direct是RabbitMQ默认的交换机模式,也是最简单的模式.即创建消息队列的时候,指定一个BindingKey.当发送者发送消息的时候,指定对应的Key.当Key和消息队列的BindingKey一致的时候,消息将会被发送到该消息队列中.
topic转发信息主要是依据通配符,队列和交换机的绑定主要是依据一种模式(通配符+字符串),而当发送消息的时候,只有指定的Key和该模式相匹配的时候,消息才会被发送到该消息队列中.
headers也是根据一个规则进行匹配,在消息队列和交换机绑定的时候会指定一组键值对规则,而发送消息的时候也会指定一组键值对规则,当两组键值对规则相匹配的时候,消息会被发送到匹配的消息队列中.
Fanout是路由广播的形式,将会把消息发给绑定它的全部队列,即便设置了key,也会被忽略.
二.SpringBoot整合RabbitMQ(Direct模式)
SpringBoot整合RabbitMQ非常简单!感觉SpringBoot真的极大简化了开发的搭建环境的时间..这样我们程序员就可以把更多的时间用在业务上了,下面开始搭建环境:
首先创建两个maven工程,这是为了模拟分布式应用系统中,两个应用之间互相交流的过程,一个发送者(Sender),一个接收者(Receiver)
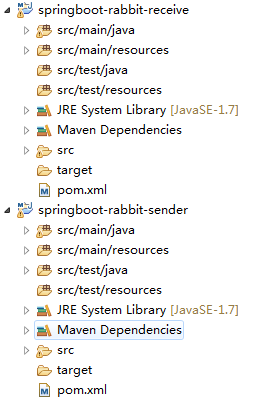
紧接着,配置pom.xml文件,注意其中用到了springboot对于AMQP(高级消息队列协议,即面向消息的中间件的设计)
<parent>

        <groupId>org.springframework.boot</groupId>

        <artifactId>spring-boot-starter-parent</artifactId>

        <version>1.4.0.RELEASE</version>

    </parent>

    <properties>

        <java.version>1.7</java.version>

        <project.build.sourceEncoding>UTF-8</project.build.sourceEncoding>

    </properties>

    <dependencies>

        <dependency>

            <groupId>org.springframework.boot</groupId>

            <artifactId>spring-boot-starter</artifactId>

        </dependency>

        <dependency>

            <groupId>org.springframework.boot</groupId>

            <artifactId>spring-boot-devtools</artifactId>

            <optional>true</optional>

            <scope>true</scope>

        </dependency>

        <dependency>

            <groupId>org.springframework.boot</groupId>

            <artifactId>spring-boot-starter-test</artifactId>

            <scope>test</scope>

        </dependency>

        <dependency>

            <groupId>org.springframework.boot</groupId>

            <artifactId>spring-boot-starter-actuator</artifactId>

        </dependency>

        <!-- 添加springboot对amqp的支持 -->

        <dependency>

            <groupId>org.springframework.boot</groupId>

            <artifactId>spring-boot-starter-amqp</artifactId>

        </dependency>

        <dependency>

            <groupId>org.springframework.boot</groupId>

            <artifactId>spring-boot-starter-tomcat</artifactId>

            <scope>provided</scope>

        </dependency>

        <dependency>

            <groupId>org.apache.tomcat.embed</groupId>

            <artifactId>tomcat-embed-jasper</artifactId>

            <scope>provided</scope>

        </dependency>

    </dependencies>
紧接着,我们编写发送者相关的代码.首先毫无疑问,要书写启动类:
@SpringBootApplication

public class App{

    public static void main(String[] args) {

        SpringApplication.run(App.class, args);

    }

}
接着在application.properties中,去编辑和RabbitMQ相关的配置信息,配置信息的代表什么内容根据键就能很直观的看出了.这里端口是5672,不是15672...15672是管理端的端口!
spring.application.name=spirng-boot-rabbitmq-sender

spring.rabbitmq.host=127.0.0.1

spring.rabbitmq.port=5672

spring.rabbitmq.username=guest

spring.rabbitmq.password=guest
随后,配置Queue(消息队列).那注意由于采用的是Direct模式,需要在配置Queue的时候,指定一个键,使其和交换机绑定.
@Configuration

public class SenderConf {

     @Bean

     public Queue queue() {

          return new Queue("queue");

     }

}
接着就可以发送消息啦!在SpringBoot中,我们使用AmqpTemplate去发送消息!代码如下:
@Component

public class HelloSender {

    @Autowired

    private AmqpTemplate template;

    public void send() {

    template.convertAndSend("queue","hello,rabbit~");

    }

}
编写测试类!这样我们的发送端代码就编写完了~
@SpringBootTest(classes=App.class)

@RunWith(SpringJUnit4ClassRunner.class)

public class TestRabbitMQ {

    @Autowired

    private HelloSender helloSender;

    @Test

    public void testRabbit() {

        helloSender.send();

    }

}
接着我们编写接收端.接收端的pom文件,application.properties(修改spring.application.name),Queue配置类,App启动类都是一致的!这里省略不计.主要在于我们需要配置监听器去监听绑定到的消息队列,当消息队列有消息的时候,予以接收,代码如下:
@Component

public class HelloReceive {

    @RabbitListener(queues="queue")    //监听器监听指定的Queue

    public void processC(String str) {

        System.out.println("Receive:"+str);

    }

}
接下来就可以测试啦,首先启动接收端的应用,紧接着运行发送端的单元测试,接收端应用打印出来接收到的消息,测试即成功!
需要注意的地方,Direct模式相当于一对一模式,一个消息被发送者发送后,会被转发到一个绑定的消息队列中,然后被一个接收者接收!
实际上RabbitMQ还可以支持发送对象:当然由于涉及到序列化和反序列化,该对象要实现Serilizable接口.HelloSender做出如下改写:
public void send() {

        User user=new User();    //实现Serializable接口

        user.setUsername("hlhdidi");

        user.setPassword("123");

        template.convertAndSend("queue",user);

}
HelloReceiver做出如下改写:
@RabbitListener(queues="queue")    //监听器监听指定的Queue

    public void process1(User user) {    //用User作为参数

        System.out.println("Receive1:"+user);

    }
三.SpringBoot整合RabbitMQ(Topic转发模式)
首先我们看发送端,我们需要配置队列Queue,再配置交换机(Exchange),再把队列按照相应的规则绑定到交换机上:
@Configuration

public class SenderConf {

        @Bean(name="message")

        public Queue queueMessage() {

            return new Queue("topic.message");

        }

        @Bean(name="messages")

        public Queue queueMessages() {

            return new Queue("topic.messages");

        }

        @Bean

        public TopicExchange exchange() {

            return new TopicExchange("exchange");

        }

        @Bean

        Binding bindingExchangeMessage(@Qualifier("message") Queue queueMessage, TopicExchange exchange) {

            return BindingBuilder.bind(queueMessage).to(exchange).with("topic.message");

        }

        @Bean

        Binding bindingExchangeMessages(@Qualifier("messages") Queue queueMessages, TopicExchange exchange) {

            return BindingBuilder.bind(queueMessages).to(exchange).with("topic.#");//*表示一个词,#表示零个或多个词

        }

}
而在接收端,我们配置两个监听器,分别监听不同的队列:
@RabbitListener(queues="topic.message")    //监听器监听指定的Queue

    public void process1(String str) {

        System.out.println("message:"+str);

    }

    @RabbitListener(queues="topic.messages")    //监听器监听指定的Queue

    public void process2(String str) {

        System.out.println("messages:"+str);

    }
好啦!接着我们可以进行测试了!首先我们发送如下内容:

方法的第一个参数是交换机名称,第二个参数是发送的key,第三个参数是内容,RabbitMQ将会根据第二个参数去寻找有没有匹配此规则的队列,如果有,则把消息给它,如果有不止一个,则把消息分发给匹配的队列(每个队列都有消息!),显然在我们的测试中,参数2匹配了两个队列,因此消息将会被发放到这两个队列中,而监听这两个队列的监听器都将收到消息!那么如果把参数2改为topic.messages呢?显然只会匹配到一个队列,那么process2方法对应的监听器收到消息!
四.SpringBoot整合RabbitMQ(Fanout Exchange形式)
那前面已经介绍过了,Fanout Exchange形式又叫广播形式,因此我们发送到路由器的消息会使得绑定到该路由器的每一个Queue接收到消息,这个时候就算指定了Key,或者规则(即上文中convertAndSend方法的参数2),也会被忽略!那么直接上代码,发送端配置如下:
@Configuration

public class SenderConf {

        @Bean(name="Amessage")

        public Queue AMessage() {

            return new Queue("fanout.A");

        }

        @Bean(name="Bmessage")

        public Queue BMessage() {

            return new Queue("fanout.B");

        }

        @Bean(name="Cmessage")

        public Queue CMessage() {

            return new Queue("fanout.C");

        }

        @Bean

        FanoutExchange fanoutExchange() {

            return new FanoutExchange("fanoutExchange");//配置广播路由器

        }

        @Bean

        Binding bindingExchangeA(@Qualifier("Amessage") Queue AMessage,FanoutExchange fanoutExchange) {

            return BindingBuilder.bind(AMessage).to(fanoutExchange);

        }

        @Bean

        Binding bindingExchangeB(@Qualifier("Bmessage") Queue BMessage, FanoutExchange fanoutExchange) {

            return BindingBuilder.bind(BMessage).to(fanoutExchange);

        }

        @Bean

        Binding bindingExchangeC(@Qualifier("Cmessage") Queue CMessage, FanoutExchange fanoutExchange) {

            return BindingBuilder.bind(CMessage).to(fanoutExchange);

        }

}
发送端使用如下代码发送:

接收端监听器配置如下:
@Component

public class HelloReceive {

    @RabbitListener(queues="fanout.A")

    public void processA(String str1) {

        System.out.println("ReceiveA:"+str1);

    }

    @RabbitListener(queues="fanout.B")

    public void processB(String str) {

        System.out.println("ReceiveB:"+str);

    }

    @RabbitListener(queues="fanout.C")

    public void processC(String str) {

        System.out.println("ReceiveC:"+str);

    }

}
运行测试代码,发现三个监听器都接收到了数据,测试成功!
springboot学习笔记-6 springboot整合RabbitMQ的更多相关文章
- springboot 学习之路 20 (整合RabbitMQ)
整合RabbitMQ: 我的操作系统是window7 ,所以在整合ribbotMQ之前需要先安装rabbitMq服务:安装步骤请参考:window下安装RabbitMQ 这个详细介绍了安装步骤,请按 ...
- SpringBoot学习笔记(4)----SpringBoot中freemarker、thymeleaf的使用
1. freemarker引擎的使用 如果你使用的是idea或者eclipse中安装了sts插件,那么在新建项目时就可以直接指定试图模板 如图: 勾选freeMarker,此时springboot项目 ...
- springboot学习笔记-5 springboot整合shiro
shiro是一个权限框架,具体的使用可以查看其官网 http://shiro.apache.org/ 它提供了很方便的权限认证和登录的功能. 而springboot作为一个开源框架,必然提供了和sh ...
- 【转】SpringBoot学习笔记(7) SpringBoot整合Dubbo(使用yml配置)
http://blog.csdn.net/a67474506/article/details/61640548 Dubbo是什么东西我这里就不详细介绍了,自己可以去谷歌 SpringBoot整合Dub ...
- SpringBoot学习笔记(16)----SpringBoot整合Swagger2
Swagger 是一个规范和完整的框架,用于生成,描述,调用和可视化RESTful风格的web服务 http://swagger.io Springfox的前身是swagger-springmvc,是 ...
- SpringBoot学习笔记(11)-----SpringBoot中使用rabbitmq,activemq消息队列和rest服务的调用
1. activemq 首先引入依赖 pom.xml文件 <dependency> <groupId>org.springframework.boot</groupId& ...
- SpringBoot学习笔记(9)----SpringBoot中使用关系型数据库以及事务处理
在实际的运用开发中,跟数据库之间的交互是必不可少的,SpringBoot也提供了两种跟数据库交互的方式. 1. 使用JdbcTemplate 在SpringBoot中提供了JdbcTemplate模板 ...
- SpringBoot学习笔记(6) SpringBoot数据缓存Cache [Guava和Redis实现]
https://blog.csdn.net/a67474506/article/details/52608855 Spring定义了org.springframework.cache.CacheMan ...
- SpringBoot学习笔记(15)----SpringBoot使用Druid
直接访问Druid官网wiki,有详细教程,地址如下: SpringBoot支持Druid地址:https://github.com/alibaba/druid/tree/master/druid-s ...
随机推荐
- Java 8 Optional类深度解析(转载)
身为一名Java程序员,大家可能都有这样的经历:调用一个方法得到了返回值却不能直接将返回值作为参数去调用别的方法.我们首先要判断这个返回值是否为null,只有在非空的前提下才能将其作为其他方法的参数. ...
- day10 函数的嵌套执行顺序
函数嵌套的执行顺序,从上往下,一层一层的执行重点注意的是函数和内存的交互原理 NMAE = def yangtuo(): # 2 将整个函数放入内存编译,但是不执行 name = "yang ...
- 用ip代替机器名访问sharepoint 站点
1. aam 里加入一个ip的internet 2. iis里不用加上ip,但不要有host name 出现的问题: 1. 当打开站点里会出现这个错误 file not found 2. 当加授予 ...
- SharePoint 2013 APP 开发示例 (六)服务端跨域访问 Web Service (REST API)
上个示例(SharePoint 2013 APP 开发示例 (五)跨域访问 Web Service (REST API))是基于JavaScript,运行在web browser内去访问REST AP ...
- synchronized的实现原理与应用
Java代码在编译后会变成Java字节码,字节码被类加载器加载到JVM里,JVM执行字节码,最终需要转化为汇编指令在CPU上执行,Java中所使用的并发机制依赖于JVM的实现和CPU的指令. sync ...
- A1029. Median
Given an increasing sequence S of N integers, the median is the number at the middle position. For e ...
- A1071. Speech Patterns
People often have a preference among synonyms of the same word. For example, some may prefer "t ...
- C语言实现KMP模式匹配算法
next: /*! * Description: * author scictor <scictor@gmail.com> * date 2018/7/4 */ #include < ...
- RegExp 对象
什么是 RegExp? RegExp 是正则表达式的缩写. 当您检索某个文本时,可以使用一种模式来描述要检索的内容.RegExp 就是这种模式. 简单的模式可以是一个单独的字符. 更复杂的模式包括了更 ...
- C# 中对于json的解析小结
1.解析之前的json格式 [{ "Name": "冯111", "PID": "130627199202283306" ...