
activemq消息队列的使用及应用docker部署常见问题及注意事项
activemq消息队列的使用及应用docker部署常见问题及注意事项
docker用https://hub.docker.com/r/rmohr/activemq/
配置在/data/docker/activemq/conf
重启命令:docker restart activemq
查看进程:docker ps | grep activemq
$ docker ps | grep activemq
927860512db9 rmohr/activemq:5.15.4-alpine
从上面可以看到版本是activemq:5.15.4-alpine
================
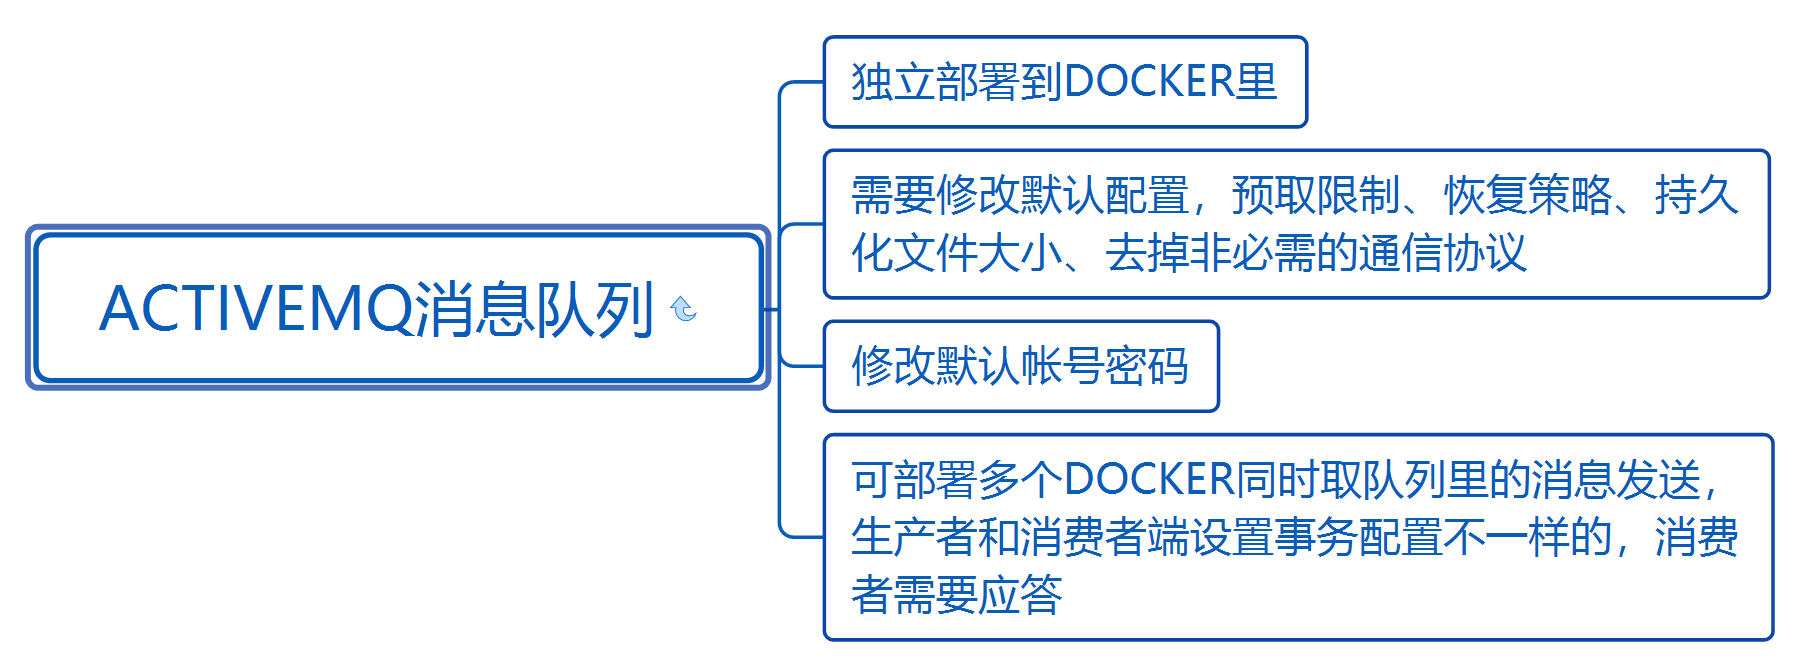
要改activemq的默认配置:
用持久化消息,开启事务模式,将临时文件限制尽可能的调大。
将prefetch设为1,每次处理1条消息,处理完再去取
自己发送消息的逻辑代码,要在方法里加上try catch,避免因程序逻辑错误导致重连才行
activemq.xml
如果帐号在配置文件目录下没有权限上传覆盖文件可以采用sudo vi activemq.xml的命令进行编辑。
1.设置预取限制,指定topic消费者的预取限制。
<policyEntry topic=">" > 改为
<policyEntry topic=">" topicPrefetch="1">
broker为该主题最多保存1000条消息,如果消息数目超过了1000,旧消息将被丢弃
<constantPendingMessageLimitStrategy limit="1000"/>
2.去掉非必需的通信协议(Client与Broker、Broker与Broker之间使用该协议进行通信),只留下TCP协议(61616是broker的监听端口)
3.增加
<subscriptionRecoveryPolicy>
<!--恢复最近30分钟内的信息-->
<timedSubscriptionRecoveryPolicy recoverDuration="1800000"/>
</subscriptionRecoveryPolicy>
4.持久化默认文件大小32M改成128MB
<kahaDB directory="${activemq.data}/kahadb" journalMaxFileLength="128mb"/>
topicPrefetch="10" 这个今天测试了没达到效果,还要再测试下改其他配置
都启动后再发送的消息几个客户端都可以消费
5.持久化消息
activemq上配置使用<broker persistent="true"
生产者代码设置持久化
//设置持久化
producer.setDeliveryMode(DeliveryMode.PERSISTENT);
开启事务模式
//支持事务sender设置为true,receiver则必须设置为Boolean.FALSE, Session.AUTO_ACKNOWLEDGE 才行
session = connection.createSession(Boolean.TRUE, Session.AUTO_ACKNOWLEDGE);
6.run.sh要把ca=`docker rmi sendemail-service`
echo $ca
改成
docker rmi sendemail-service -f &
echo 'docker rmi success'
activemq用的是默认的账号密码admin,admin,从安全角度出发的话,如果外网可以访问到,activemq的账号密码也需要改掉的,生产者,消费者也要用对应的账号密码连接,需要同时改配置和代码
=======================
目录:
一:JMQ的两种消息模式
1.1:点对点的消息模式
1.2:订阅模式
二:点对点的实现代码
2.1:点对点的发送端
2.2:点对点的接收端
三:订阅/发布模式的实现代码
3.1:订阅模式的发送端
3.2:订阅模式的接收端
四:发送消息的数据类型
4.1:传递javabean对象
4.2:发送文件
五:ActiveMQ的应用
5.1:保证消息的成功处理
5.2:避免消息队列的并发
5.3:消息有效期的管理
5.4:过期消息,处理失败的消息如何处理
六:ActiveMQ的安全配置
6.1:管理后台的密码设置
=====================
生产者(发送消息)Java代码:
public static void sendMessage(String data) {

        ConnectionFactory connectionFactory; // ConnectionFactory--连接工厂,JMS用它创建连接

        // Provider 的连接

        Connection connection = null; // Connection :JMS 客户端到JMS

        Session session; // Session: 一个发送或接收消息的线程

        Destination destination; // Destination :消息的目的地;消息发送给谁.

        MessageProducer producer; // MessageProducer:消息发送者

        // 构造ConnectionFactory实例对象,此处采用ActiveMq的实现jar

        connectionFactory = new ActiveMQConnectionFactory(ActiveMQConnection.DEFAULT_USER,

                ActiveMQConnection.DEFAULT_PASSWORD, SendSms.mqconnection);

        try { // 构造从工厂得到连接对象

            connection = connectionFactory.createConnection();

            // 启动

            connection.start();

            // 获取操作连接,生产者事务的要设置为TRUE才行

            session = connection.createSession(Boolean.TRUE, Session.AUTO_ACKNOWLEDGE);

            // 创建队列名称testQueue

            destination = session.createQueue("testQueue");

            // 得到消息生成者【发送者】

            producer = session.createProducer(destination);

            // 设置持久化

            producer.setDeliveryMode(DeliveryMode.PERSISTENT);

            // 构造消息,项目就是参数,或者方法获取

            TextMessage message = session.createTextMessage(data);

            System.out.println("send data to testQueue");

            producer.send(message);

            session.commit();

        } catch (Exception e) {

            e.printStackTrace();

        } finally {

            try {

                if (null != connection)

                    connection.close();

            } catch (Throwable ignore) {

            }

        }

    }
消费者(接收消息)Java代码:
public static void receiverMessage() {

        // ConnectionFactory :连接工厂,JMS 用它创建连接

        ConnectionFactory connectionFactory;

        // Connection :JMS 客户端到JMS Provider 的连接

        Connection connection = null;

        // Session: 一个发送或接收消息的线程

        Session session = null;

        // Destination :消息的目的地;消息发送给谁.

        Destination destination;

        // 消费者,消息接收者

        MessageConsumer consumer;

        connectionFactory = new ActiveMQConnectionFactory(ActiveMQConnection.DEFAULT_USER,

                ActiveMQConnection.DEFAULT_PASSWORD, SendSms.mqconnection);

        try {

            // 构造从工厂得到连接对象

            connection = connectionFactory.createConnection();

            // 启动

            connection.start();

            //receiver则必须设置为Boolean.FALSE, Session.AUTO_ACKNOWLEDGE 才行

            session = connection.createSession(Boolean.FALSE, Session.AUTO_ACKNOWLEDGE);

            // 创建队列名称,需要跟sender的一致

            destination = session.createQueue("testQueue");

            consumer = session.createConsumer(destination);

            SimpleDateFormat sdf=new SimpleDateFormat("yyyy-MM-dd HH:mm:ss");

            Date time = sdf.parse(sdf.format(new Date()));

            System.out.println("start listeningSmsQueueMessage " + time);

            while (true) {

                Date time2 = sdf.parse(sdf.format(new Date()));

                // 设置接收者接收消息的时间

//                TextMessage message = (TextMessage) consumer.receive(receivetime);

                TextMessage message = (TextMessage) consumer.receive();

                if (null != message) {

                    System.out.println(time2 + "getSmsQueueMessage:" + message.getText());

                    SendSms.sender(message.getText());

                } else {

                    System.out.println("getSmsQueueMessage:null");

                }

            }

        } catch (Exception e) {

            System.out.println("receiverMessage error:"+e.getMessage());

            try {

                Thread.sleep(5000);

            } catch (InterruptedException e1) {

                System.out.println("InterruptedException error:"+e1.getMessage());

            }

            //SendSms.listeningSms();//这个是自己发送消息的逻辑代码,要在方法里加上try catch,避免因程序逻辑错误导致重连才行

        } finally {

            System.out.println("finally session close ");

            if(session != null){

                try {

                    session.close();

                } catch (JMSException ignore) {

                    System.out.println("session.close error:"+ignore.getMessage());

                }

            }

            System.out.println("finally connection close ");

            if (null != connection) {

                try {

                    connection.close();

                } catch (JMSException ignore) {

                    System.out.println("connection.close error:"+ignore.getMessage());

                }

            }

        }

    }
activemq.xml 配置内容:
<!--
Licensed to the Apache Software Foundation (ASF) under one or more
contributor license agreements. See the NOTICE file distributed with
this work for additional information regarding copyright ownership.
The ASF licenses this file to You under the Apache License, Version 2.0
(the "License"); you may not use this file except in compliance with
the License. You may obtain a copy of the License at http://www.apache.org/licenses/LICENSE-2.0 Unless required by applicable law or agreed to in writing, software
distributed under the License is distributed on an "AS IS" BASIS,
WITHOUT WARRANTIES OR CONDITIONS OF ANY KIND, either express or implied.
See the License for the specific language governing permissions and
limitations under the License.
-->
<!-- START SNIPPET: example -->
<beans
xmlns="http://www.springframework.org/schema/beans"
xmlns:xsi="http://www.w3.org/2001/XMLSchema-instance"
xsi:schemaLocation="http://www.springframework.org/schema/beans http://www.springframework.org/schema/beans/spring-beans.xsd
http://activemq.apache.org/schema/core http://activemq.apache.org/schema/core/activemq-core.xsd"> <!-- Allows us to use system properties as variables in this configuration file -->
<bean class="org.springframework.beans.factory.config.PropertyPlaceholderConfigurer">
<property name="locations">
<value>file:${activemq.conf}/credentials.properties</value>
</property>
</bean> <!-- Allows accessing the server log -->
<bean id="logQuery" class="io.fabric8.insight.log.log4j.Log4jLogQuery"
lazy-init="false" scope="singleton"
init-method="start" destroy-method="stop">
</bean> <!--
The <broker> element is used to configure the ActiveMQ broker.
-->
<broker xmlns="http://activemq.apache.org/schema/core" persistent="true" brokerName="localhost" dataDirectory="${activemq.data}"> <destinationPolicy>
<policyMap>
<policyEntries>
<policyEntry topic=">" topicPrefetch="1">
<!-- The constantPendingMessageLimitStrategy is used to prevent
slow topic consumers to block producers and affect other consumers
by limiting the number of messages that are retained
For more information, see: http://activemq.apache.org/slow-consumer-handling.html -->
<pendingMessageLimitStrategy>
<constantPendingMessageLimitStrategy limit="1000"/>
</pendingMessageLimitStrategy> <subscriptionRecoveryPolicy>
<timedSubscriptionRecoveryPolicy recoverDuration="1800000"/>
</subscriptionRecoveryPolicy> </policyEntry>
</policyEntries>
</policyMap>
</destinationPolicy> <!--
The managementContext is used to configure how ActiveMQ is exposed in
JMX. By default, ActiveMQ uses the MBean server that is started by
the JVM. For more information, see: http://activemq.apache.org/jmx.html
-->
<managementContext>
<managementContext createConnector="false"/>
</managementContext> <!--
Configure message persistence for the broker. The default persistence
mechanism is the KahaDB store (identified by the kahaDB tag).
For more information, see: http://activemq.apache.org/persistence.html
-->
<persistenceAdapter>
<kahaDB directory="${activemq.data}/kahadb" journalMaxFileLength="128mb"/>
</persistenceAdapter> <!--
The systemUsage controls the maximum amount of space the broker will
use before disabling caching and/or slowing down producers. For more information, see:
http://activemq.apache.org/producer-flow-control.html
-->
<systemUsage>
<systemUsage>
<memoryUsage>
<memoryUsage percentOfJvmHeap="70" />
</memoryUsage>
<storeUsage>
<storeUsage limit="100 gb"/>
</storeUsage>
<tempUsage>
<tempUsage limit="50 gb"/>
</tempUsage>
</systemUsage>
</systemUsage> <!--
The transport connectors expose ActiveMQ over a given protocol to
clients and other brokers. For more information, see: http://activemq.apache.org/configuring-transports.html
-->
<transportConnectors>
<!-- DOS protection, limit concurrent connections to 1000 and frame size to 100MB -->
<transportConnector name="openwire" uri="tcp://0.0.0.0:61616?maximumConnections=1000&wireFormat.maxFrameSize=104857600"/>
<!-- <transportConnector name="amqp" uri="amqp://0.0.0.0:5672?maximumConnections=1000&wireFormat.maxFrameSize=104857600"/>
<transportConnector name="stomp" uri="stomp://0.0.0.0:61613?maximumConnections=1000&wireFormat.maxFrameSize=104857600"/>
<transportConnector name="mqtt" uri="mqtt://0.0.0.0:1883?maximumConnections=1000&wireFormat.maxFrameSize=104857600"/>
<transportConnector name="ws" uri="ws://0.0.0.0:61614?maximumConnections=1000&wireFormat.maxFrameSize=104857600"/> -->
</transportConnectors> <!-- destroy the spring context on shutdown to stop jetty -->
<shutdownHooks>
<bean xmlns="http://www.springframework.org/schema/beans" class="org.apache.activemq.hooks.SpringContextHook" />
</shutdownHooks> </broker> <!--
Enable web consoles, REST and Ajax APIs and demos
The web consoles requires by default login, you can disable this in the jetty.xml file Take a look at ${ACTIVEMQ_HOME}/conf/jetty.xml for more details
-->
<import resource="jetty.xml"/> </beans>
<!-- END SNIPPET: example -->
activemq消息队列的使用及应用docker部署常见问题及注意事项的更多相关文章
- JAVA的设计模式之观察者模式----结合ActiveMQ消息队列说明
1----------------------观察者模式------------------------------ 观察者模式:定义对象间一对多的依赖关系,当一个对象的状态发生改变时,所有依赖于它的 ...
- ActiveMQ消息队列从入门到实践(4)—使用Spring JMS收发消息
Java消息服务(Java Message Service ,JMS)是一个Java标准,定义了使用消息代理的通用API .在JMS出现之前,每个消息代理都有私有的API,这就使得不同代理之间的消息代 ...
- C#实现ActiveMQ消息队列
本文使用C#实现ActiveMQ消息队列功能. 一.首先需要导入两个包,分别是:Apache.NMS 和 Apache.NMS.ActiveMQ 二.创建Winform程序实现生产者功能. 三.Pro ...
- SpringBoot集成ActiveMq消息队列实现即时和延迟处理
原文链接:https://blog.csdn.net/My_harbor/article/details/81328727 一.安装ActiveMq 具体安装步骤:自己谷歌去 二.新建springbo ...
- ActiveMQ 消息队列服务
1 ActiveMQ简介 1.1 ActiveMQ是什么 ActiveMQ是一个消息队列应用服务器(推送服务器).支持JMS规范. 1.1.1 JMS概述 全称:Java Message Serv ...
- ActiveMQ基础教程(四):.net core集成使用ActiveMQ消息队列
接上一篇:ActiveMQ基础教程(三):C#连接使用ActiveMQ消息队列 这里继续说下.net core集成使用ActiveMQ.因为代码比较多,所以放到gitee上:https://gitee ...
- ActiveMQ消息队列的使用及应用
这里就不说怎么安装了,直接解压出来就行了. 谢绝转载,作者保留所有权力 目录: 一:JMQ的两种消息模式 1.1:点对点的消息模式 1.2:订阅模式 二:点对点的实现代码 2.1:点对点的发送端 2 ...
- Spring整合ActiveMq消息队列
ActiveMQ 是Apache出品,最流行的,能力强劲的开源消息总线.ActiveMQ 是一个完全支持JMS1.1和J2EE 1.4规范的 JMS Provider实现,尽管JMS规范出台已经是很久 ...
- JAVAEE——宜立方商城08:Zookeeper+SolrCloud集群搭建、搜索功能切换到集群版、Activemq消息队列搭建与使用
1. 学习计划 1.solr集群搭建 2.使用solrj管理solr集群 3.把搜索功能切换到集群版 4.添加商品同步索引库. a) Activemq b) 发送消息 c) 接收消息 2. 什么是So ...
随机推荐
- 前端用Json传输数据给后台,用postman测试
postman发送json格式的post请求 在地址栏里输入请求url:http://127.0.0.1:8081/getmoney 选择“POST”方式, 在“headers”添加key:Con ...
- linux dmesg 查看系统故障信息
dmesg 可以查看linux 内核信息 dmesg’命令设备故障的诊断是非常重要的.在‘dmesg’命令的帮助下进行硬件的连接或断开连接操作时,我们可以看到硬件的检测或者断开连接的信息.‘dmesg ...
- 前端 HTML 标签嵌套规则
标签嵌套规则 块元素可以包含内联元素或某些块元素,但内联元素却不能包含块元素,它只能包含其它的内联元素,例如: <div><div></div><h1> ...
- OC UITextField只允许输入两位小数
//只能输入两位小数 - (BOOL)textField:(UITextField *)textField shouldChangeCharactersInRange:(NSRange)range r ...
- [转]如何快速转载CSDN中的博客
原文:https://blog.csdn.net/bolu1234/article/details/51867099 前言 对于喜欢逛CSDN的人来说,看别人的博客确实能够对自己有不小的提高,有时 ...
- javascript 及 vue 中的变量前面的美元符号 $ 是什么意思
$ 您会注意到,我们将库代理为以美元符号“$”为前缀的属性名. 你可能还看过其他的属性和方法,例如,$refs, $on, $mount等等也都是以”$”开头. 虽然属性名上添加前缀不是必须的,但是这 ...
- Spark创建空的DataFrame
前言 本文主要给出Spark创建空的DataFrame的代码示例,这里讲的空的DataFrame主要指有列名(可以自己随意指定),但是没有行的DataFrame,因为自己在开发过程中有这个需求,之前并 ...
- Day2 Python基础学习——字符串、列表、元组、字典、集合
Python中文学习大本营:http://www.pythondoc.com/ 一.字符串操作 一.用途:名字,性格,地址 name = 'wzs' #name = str('wzs')print(i ...
- ansible 快速入门
安装 $ sudo apt-get install software-properties-common $ sudo apt-add-repository ppa:ansible/ansible $ ...
- 动手动脑(&课后实验):生成随机数,函数的重载
一.编写一个方法,使用纯随机数生成算法生成指定数目(比如1000个)的随机整数. 1.程序源代码 import java.util.Scanner; import java.util.Random; ...