LTE Module User Documentation(翻译1)——背景、使用概述、基本的仿真程序和配置LTE模型参数
LTE用户文档
2. 使用概述
- 定义仿真场景。
- 编写程序,重建期望的仿真场景拓扑/架构,通过使用 ns3::LteHelper API(定义在 src/lte/helper/lte-helper.h 中)访问 ns-3 LTE 模型库。
- 指定 objects 的配置参数,通过使用 input files(通过 ns3::ConfigStore)或直接在仿真程序中编写。
- 配置仿真器期望的输出。
- 运行仿真。
下面将通过实例解释这些步骤。
3. 基本的仿真程序
#include <ns3/core-module.h>

#include <ns3/network-module.h>

#include <ns3/mobility-module.h>

#include <ns3/lte-module.h>

using namespace ns3;

int main (int argc, char *argv[])

{

  // the rest of the simulation program follows
Ptr<LteHelper> lteHelper = CreateObject<LteHelper> ();
NodeContainer enbNodes;

enbNodes.Create ();

NodeContainer ueNodes;

ueNodes.Create ();
注意上述节点实例此时并没有安装 LTE 协议栈;它们还是空节点。
MobilityHelper mobility;

mobility.SetMobilityModel ("ns3::ConstantPositionMobilityModel");

mobility.Install (enbNodes);

mobility.SetMobilityModel ("ns3::ConstantPositionMobilityModel");

mobility.Install (ueNodes);
上述代码会将所有节点放置在坐标 (0,0,0)。请参考 ns-3 移动性模型文档学习如何设置自己想要的位置或者配置节点运动。
NetDeviceContainer enbDevs;

enbDevs = lteHelper->InstallEnbDevice (enbNodes);
NetDeviceContainer ueDevs;

ueDevs = lteHelper->InstallUeDevice (ueNodes);
lteHelper->Attach (ueDevs, enbDevs.Get ());
enum EpsBearer::Qci q = EpsBearer::GBR_CONV_VOICE;

EpsBearer bearer (q);

lteHelper->ActivateDataRadioBearer (ueDevs, bearer);
Simulator::Stop (Seconds (0.005));
4 配置 LTE 模型参数
CommandLine cmd;

cmd.Parse (argc, argv);

ConfigStore inputConfig;

inputConfig.ConfigureDefaults ();

// parse again so you can override default values from the command line

cmd.Parse (argc, argv);
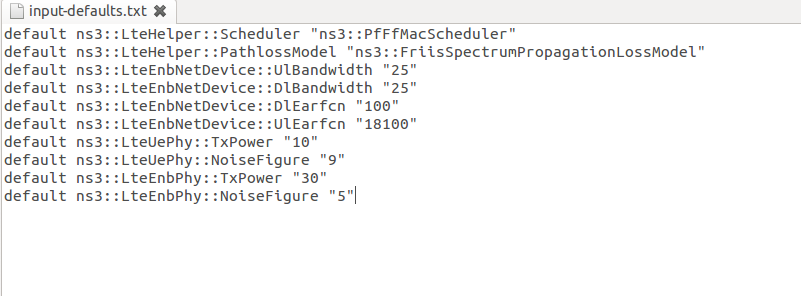
default ns3::LteHelper::Scheduler "ns3::PfFfMacScheduler"

default ns3::LteHelper::PathlossModel "ns3::FriisSpectrumPropagationLossModel"

default ns3::LteEnbNetDevice::UlBandwidth ""

default ns3::LteEnbNetDevice::DlBandwidth ""

default ns3::LteEnbNetDevice::DlEarfcn ""

default ns3::LteEnbNetDevice::UlEarfcn ""

default ns3::LteUePhy::TxPower ""

default ns3::LteUePhy::NoiseFigure ""

default ns3::LteEnbPhy::TxPower ""

default ns3::LteEnbPhy::NoiseFigure ""
./waf --command-template="%s --ns3::ConfigStore::Filename=input-defaults.txt --ns3::ConfigStore::Mode=Load --ns3::ConfigStore::FileFormat=RawText" --run src/lte/examples/lte-sim-with-input
./waf --command-template="%s --ns3::ConfigStore::Filename=input-defaults.txt --ns3::ConfigStore::Mode=Save --ns3::ConfigStore::FileFormat=RawText" --run src/lte/examples/lte-sim-with-input
.png)
 #include "ns3/core-module.h"

 #include "ns3/network-module.h"

 #include "ns3/mobility-module.h"

 #include "ns3/lte-module.h"

 #include "ns3/config-store.h"

 #include <ns3/buildings-helper.h>

 //#include "ns3/gtk-config-store.h"

 using namespace ns3;

 int main (int argc, char *argv[])

 {

   CommandLine cmd;

   cmd.Parse (argc, argv);

   //注意,先load 再 save!

   // to save a template default attribute file run it like this:

   // ./waf --command-template="%s --ns3::ConfigStore::Filename=input-defaults.txt --ns3::ConfigStore::Mode=Save --ns3::ConfigStore::FileFormat=RawText" --run src/lte/examples/lte-sim-with-input

   //

   // to load a previously created default attribute file

   // ./waf --command-template="%s --ns3::ConfigStore::Filename=input-defaults.txt --ns3::ConfigStore::Mode=Load --ns3::ConfigStore::FileFormat=RawText" --run src/lte/examples/lte-sim-with-input

   ConfigStore inputConfig;

   inputConfig.ConfigureDefaults ();

   // Parse again so you can override default values from the command line

   cmd.Parse (argc, argv);

   Ptr<LteHelper> lteHelper = CreateObject<LteHelper> ();

   // Uncomment to enable logging

 //  lteHelper->EnableLogComponents ();

   // Create Nodes: eNodeB and UE

   NodeContainer enbNodes;

   NodeContainer ueNodes;

   enbNodes.Create ();

   ueNodes.Create ();

   // Install Mobility Model

   MobilityHelper mobility;

   mobility.SetMobilityModel ("ns3::ConstantPositionMobilityModel");

   mobility.Install (enbNodes);

   BuildingsHelper::Install (enbNodes);

 //  mobility.SetMobilityModel ("ns3::ConstantPositionMobilityModel");

 //  mobility.Install (ueNodes);

 //  BuildingsHelper::Install (ueNodes);

   mobility.SetPositionAllocator ("ns3::RandomDiscPositionAllocator",

                                  "X", StringValue ("100.0"),

                                  "Y", StringValue ("100.0"),

                                  "Rho", StringValue ("ns3::UniformRandomVariable[Min=0|Max=30]"));

   mobility.SetMobilityModel ("ns3::RandomWalk2dMobilityModel",

                              "Mode", StringValue ("Time"),

                              "Time", StringValue ("2s"),

                              "Speed", StringValue ("ns3::ConstantRandomVariable[Constant=1.0]"),

                              "Bounds", StringValue ("0|200|0|200"));

   mobility.Install(ueNodes);

   BuildingsHelper::Install (ueNodes);

   // Create Devices and install them in the Nodes (eNB and UE)

   NetDeviceContainer enbDevs;

   NetDeviceContainer ueDevs;

   // Default scheduler is PF, uncomment to use RR

   //lteHelper->SetSchedulerType ("ns3::RrFfMacScheduler");

   enbDevs = lteHelper->InstallEnbDevice (enbNodes);

   ueDevs = lteHelper->InstallUeDevice (ueNodes);

   // Attach a UE to a eNB

   lteHelper->Attach (ueDevs, enbDevs.Get ());

   // Activate a data radio bearer

   enum EpsBearer::Qci q = EpsBearer::GBR_CONV_VOICE;

   EpsBearer bearer (q);

   lteHelper->ActivateDataRadioBearer (ueDevs, bearer);

   //lteHelper->EnableTraces ();

   Simulator::Stop (Seconds (1.05));

   // configure all the simulation scenario here...

   lteHelper->EnablePhyTraces ();

   lteHelper->EnableMacTraces ();

   lteHelper->EnableRlcTraces ();

   lteHelper->EnablePdcpTraces ();

   Simulator::Run ();

   // GtkConfigStore config;

   // config.ConfigureAttributes ();

   Simulator::Destroy ();

   return ;

 }

.png)
.png)

.png)
.png)
参考文献
https://www.nsnam.org/docs/models/html/lte-user.html
LTE Module User Documentation(翻译1)——背景、使用概述、基本的仿真程序和配置LTE模型参数的更多相关文章
- LTE Module User Documentation(翻译15)——示例程序、参考场景以及故障检测和调试技巧
LTE用户文档 (如有不当的地方,欢迎指正!) 21 Examples Programs(示例程序) 路径 src/lte/examples/ 包含一些示例仿真程序,这些例子表明如何仿真不 ...
- LTE Module User Documentation(翻译13)——频率复用算法(Frequency Reuse Algorithms)
LTE用户文档 (如有不当的地方,欢迎指正!) 19 Frequency Reuse Algorithms(频率复用算法) 本节我们将描述如何在 LTE 仿真中使用频率复用(FR)算法.共有两 ...
- LTE Module User Documentation(翻译8)——核心网(EPC)
LTE用户文档 (如有不当的地方,欢迎指正!) 14 Evolved Packet Core (EPC) 我们现在讲解如何编写一个仿真程序——除了 LTE 无线接入网外,还允许仿真 EPC. EP ...
- LTE Module User Documentation(翻译5)——Mobility Model with Buildings
LTE用户文档 (如有不当的地方,欢迎指正!) 8 Mobility Model with Buildings 我们现在通过例子解释如何在 ns-3 仿真程序中使用 buildings 模型(特别 ...
- LTE Module User Documentation(翻译2)——配置LTE MAC 调度器
LTE用户文档 (如有不当的地方,欢迎指正!) 5 配置 LTE MAC 调度器 这里有几种 LTE MAC 调度器用户可以选择.使用下面的代码定义调度器的类型: Ptr<LteHelper ...
- LTE Module User Documentation(翻译14)——Uplink Power Control(上行功率控制)
LTE用户文档 (如有不当的地方,欢迎指正!) 20 Uplink Power Control(上行功率控制) 上行功率控制功能默认是开启的.用户可以通过设置布尔属性 ns3::LteUePhy: ...
- LTE Module User Documentation(翻译12)——X2切换(X2-based handover)
LTE用户文档 (如有不当的地方,欢迎指正!) 18 X2-based handover 正如 3GPP 定义的,切换是改变用户服务小区的连接方式的过程.这一过程中涉及的两个基站通常称为源基站和目 ...
- LTE Module User Documentation(翻译11)——配置用户测量
LTE用户文档 (如有不当的地方,欢迎指正!) 17 Configure UE measurements 仿真中激活的用户测量配置取决于所选的 “consumers”,例如切换算法.用户可能需要添 ...
- LTE Module User Documentation(翻译10)——网络连接(Network Attachment)
LTE用户文档 (如有不当的地方,欢迎指正!) 16 Network Attachment(网络连接) 正如前面章节 Basic simulation program 所述,连接用户到基站时通过调 ...
随机推荐
- Backup: Array in Perl6
Array in Perl6 继承List,而List又继承Iterable,Positional,Cool ARRAY.pop ARRAY.shift ARRAY.push: VALUES ARRA ...
- Android 常用工具类之DeviceInfoUtil
public class DeviceInfoUtil { private static WifiManager wifiManager = null; // wifi是否已连接 public sta ...
- Pascal's Triangle II
class Solution { public: vector<int> getRow(int rowIndex) { vector<int> v; ) return v; v ...
- WinCE Show App Icon
找个图片,例如背景透明的jpg或png,上http://www.pic2icon.com/smartphone_wince_icon_generator.php这个网站转换下. 在项目属性中,设为图标 ...
- VPS常用工具
1.命令行工具 putty 在Mac下,可以直接使用超级终端 ssh username@ipaddress 2.可视化上传文件工具 WinSCP 在Mac下,使用 Cyberduck
- Hibernate API申明事务边界
在Hibernate API中,Session和Transaction接口提供了以下声明事务边界的方法: 声明事务的开始边界: Transaction tx = session.beginTransa ...
- ug-Assertion failure in [MyClass layoutSublayersOfLayer:]
这是在iOS7上,tableview 的sectionHeaderView中报错 *** Assertion failure in -[****.****UITVSectionHeader_Team ...
- [HTML]页面间传值的五种方法
一.QueryString传值:1. 这是最简单的传值方式,但缺点是传的值会显示在浏览器的地址栏中且不能传递对象,只适用于传递简单的且安全性要求不高的整数值,例如: 2. 新建一个WEB项目,添加一个 ...
- Http Basic认证
Http Basic认证就是访问的时候把用户名和密码用base64加密放在request的header的authorization中 服务端直接获取authorization,解析,跟用户名匹配即可. ...
- 【转】学习总结--Cookie & Session总结
转载地址:http://www.phperzone.cn/portal.php?aid=718&mod=view 一.状态管理 1)什么是状态管理? 将浏览器与web服务器之间多次交互过程 ...