
Python大法之告别脚本小子系列—信息资产收集类脚本编写(下)
作者:阿甫哥哥
原文来自:https://bbs.ichunqiu.com/article-1618-1.html
系列文章专辑:
Python大法之告别脚本小子系列
目录:
0×05 高精度字典生成脚本编写
0×06 Queue模块的讲解
0×07 目录扫描脚本编写
0×08 C段扫描脚本编写
0×05 高精度字典生成脚本编写
 思路来自i春秋讲师ADO的课程,传送门:
有人可能会问生成字典有什么卵用??
如果你在爆破中用一个G大小的字典,可能也不会获得到什么信息,但是,如果你通过已知的部分信息生成字典进行爆破,这样你的成功率会大大的提高,本文用到的模块也是exrex,思路也五五开。。。
官方介绍:https://github.com/asciimoo/exrex
安装方法:pip install exrex
建立一个密码字典(无非就是已知的信息)
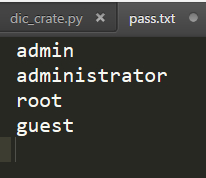
我只是简单的举了个栗子,也用了一个简单的匹配方式
#-*- coding: UTF-8 -*-

import exrex

def dic_create(hosts):

        web_dics = hosts.split('.')

        for web_dic in web_dics:

                f_pass = open('pass.txt',"r")

                for dic_pass in f_pass:

                        dics = list(exrex.generate(web_dic+'[!@#]'+dic_pass))

                        for dic in dics:

                                print dic.strip('\n')

if __name__ == '__main__':

        dic_create('www.ichunqiu.com')
这样就简单的造了一个字典生成器
问题又来了,他把我域名中的http://,www,com都生成了,其实并没有什么卵用。。。所以,就要去掉他
#-*- coding: UTF-8 -*-

import exrex

def dic_create(hosts):

        web_dics = hosts.split('.')

        for web_dic in web_dics:

                if web_dic not in web_white:

                        f_pass = open('pass.txt',"r")

                        for dic_pass in f_pass:

                                dics = list(exrex.generate(web_dic+'[!@#]'+dic_pass))

                                for dic in dics:

                                                print dic.strip('\n')

if __name__ == '__main__':

        web_white = ['com','cn','org','edu','gov','www']

        host = 'www.ichunqiu.com'

        if '://' in host:

                host = host.split('://')[1]

        if '/' in host:

                host = host.replace('/','')

        dic_create(host)
然后就差不多了,顶多加个判断,排除简单的密码组合
#-*- coding: UTF-8 -*-

import exrex

def dic_create(hosts):

        web_dics = hosts.split('.')

        for web_dic in web_dics:

                if web_dic not in web_white:

                        f_pass = open('pass.txt',"r")

                        for dic_pass in f_pass:

                                dics = list(exrex.generate(web_dic+'[!@#]'+dic_pass))

                                for dic in dics:

                                        if len(dic) > 5:

                                                print dic.strip('\n')

if __name__ == '__main__':

        web_white = ['com','cn','org','edu','gov','www']

        host = raw_input('PLEASE INPUT YOUR TARGET:')

        if '://' in host:

                host = host.split('://')[1]

        if '/' in host:

                host = host.replace('/','')

        dic_create(host)
0×06 Queue模块的讲解
自带的模块,不用安装,你们可以去看官方文档学习,我也只是简单的说一下
创建一个队列
D:\ichunqiu\items>python

Python 2.7 (r27:82525, Jul  4 2010, 09:01:59) [MSC v.1500 32 bit (Intel)] on win32

Type "help", "copyright", "credits" or "license" for more information.

>>> import Queue

>>> queue = Queue.Queue()
将值放入队列中
>>> for i in range(8):

...     queue.put(i)

...
返回队列大小
>>> queue.qsize()

8
取出队列中的值
>>> queue.get()

0

>>> queue.get()

1

>>> queue.get()

2
Threading与Queue的结合
#-*- coding: UTF-8 -*-

import threading

import Queue

class DemoRUN(threading.Thread):

    def __init__(self,queue):

        threading.Thread.__init__(self)

        self._queue = queue

    def run(self):

        while not self._queue.empty():

            key = self._queue.get()

            print key

def main():

    threads = []

    threadnum = 20        #线程数

    queue = Queue.Queue()

    for i in range(1,9):

        queue.put(i)

    for i in xrange(threadnum):

        threads.append(DemoRUN(queue))

    for t in threads:

        t.start()

    for t in threads:

        t.join()

if __name__ == '__main__':

    main()
这就是一个大概的模块
0×07 目录扫描脚本编写

目录扫描,顾名思义,就是目录扫描,在信息收集中也算重要的一环了
所以我先简单放出一个单线程版,大概思路就是引入字典,URl+字典内容,访问,状态码是200就保留
#-*- coding: UTF-8 -*-

import requests

def scan_target_url_exists(target_url):

    headers={

        'Accept': 'text/html,application/xhtml+xml,application/xml;q=0.9,*/*;q=0.8',

        'User-Agent': 'Mozilla/5.0 (Windows NT 10.0; WOW64) AppleWebKit/537.36 (KHTML, like Gecko) Chrome/55.0.2883.87 Safari/537.36',

        'Accept-Language': 'zh-CN,zh;q=0.9,en;q=0.8',

        'Accept-Encoding': 'gzip, deflate',

        'Referer': 'http://www.google.com'

        }

    status_codes = [200]

    all_lines=open(dir_file,'r').readlines()

    for i in all_lines:

            url = target_url+'/'+str(i)

        req=requests.head(url.strip(),timeout=8,headers=headers)

        if req.status_code in status_codes:

            print 'CODE:%s,URL:%s'%(str(req.status_code),url.strip('\n').strip('\r'))

            open('exists_target_url.txt','a').write(url)

if __name__ == '__main__':

    dir_file='demo.txt'

    target_url='localhost'

    if target_url.startswith('http://') or target_url.startswith('https://'):

        pass

    else:

        target_url = 'http://' + target_url

    scan_target_url_exists(target_url)
没有什么知识点,直接看吧,接下来,是多线程的
用到了queue,优化了一下code
#-*- coding: UTF-8 -*-

import requests

from threading import Thread, activeCount

import Queue

queue = Queue.Queue()

dir_file='demo.txt'

def scan_target_url_exists(target_url):

    headers={

        'Accept': 'text/html,application/xhtml+xml,application/xml;q=0.9,*/*;q=0.8',

        'User-Agent': 'Mozilla/5.0 (Windows NT 10.0; WOW64) AppleWebKit/537.36 (KHTML, like Gecko) Chrome/55.0.2883.87 Safari/537.36',

        'Accept-Language': 'zh-CN,zh;q=0.9,en;q=0.8',

        'Accept-Encoding': 'gzip, deflate',

        'Referer': 'http://www.google.com'}

    status_codes = [200]

    try:

        req=requests.head(target_url.strip(),timeout=8,headers=headers)

        if req.status_code in status_codes:

            print 'CODE:%s,URL:%s'%(str(req.status_code),target_url.strip('\n').strip('\r'))

            open('exists_target_url.txt','a').write(target_url)

    except:

        pass

def open_pathfile(file):

    all_lines=open(file,'r').readlines()

    for line in all_lines:

        if target_url.endswith('/'):

            if line.startswith('/'):

                queue.put(target_url+line[1:])

            else:

                queue.put(target_url + line)

        else:

            if line.startswith('/'):

                queue.put(target_url + line)

            else:

                queue.put(target_url + '/' + line)

if __name__ == '__main__':

    print '''

 ____  _      ____

|  _ \(_)_ __/ ___|  ___ __ _ _ __

| | | | | '__\___ \ / __/ _` | '_ \

| |_| | | |   ___) | (_| (_| | | | |

|____/|_|_|  |____/ \___\__,_|_| |_|

    '''

    target_url=raw_input('Please input your target:')

    threadnum = raw_input('Please input your threadnum:')

    if target_url.startswith('http://') or target_url.startswith('https://'):

        pass

    else:

        target_url = 'http://' + target_url

    print 'The number of threads is %s' % threadnum

    print 'Matching.......'

    open_pathfile(dir_file)

    while queue.qsize() > 0:

        if activeCount() <= int(threadnum):

            Thread(target=scan_target_url_exists,args=(queue.get(),)).start()
当然了,阅读原文查看你们想要的目录扫描的字典>>>>https://bbs.ichunqiu.com/article-1618-1.html
Python大法之告别脚本小子系列—信息资产收集类脚本编写(下)的更多相关文章
- Python大法之告别脚本小子系列—各类URL采集器编写
本文作者:i春秋签约作家——阿甫哥哥 系列文章专辑:https://bbs.ichunqiu.com/forum.php?mod=collection&action=view&ctid ...
- 5. Python大法之告别脚本小子--各类URL采集器编写
在i春秋上面,有很多不错的脚本: https://bbs.ichunqiu.com/forum.php?mod=collection&action=view&ctid=137 http ...
- Unity3D脚本中文系列教程(五)
http://dong2008hong.blog.163.com/blog/static/4696882720140302848544/?suggestedreading&wumii Unit ...
- 【MonkeyRunner】[技术博客]用python编写脚本查看设备信息
[MonkeyRunner]用python编写脚本查看设备信息 原以为是个简单的操作,在实践的时候发现了一些问题. python脚本 test.py: from com.android.monkeyr ...
- [Python] 利用Django进行Web开发系列(二)
1 编写第一个静态页面——Hello world页面 在上一篇博客<[Python] 利用Django进行Web开发系列(一)>中,我们创建了自己的目录mysite. Step1:创建视图 ...
- 第二弹:超全Python学习资源整理(进阶系列)
造一个草原要一株三叶草加一只蜜蜂.一株三叶草,一只蜂,再加一个梦.要是蜜蜂少,光靠梦也行. - 狄金森 "成为编程大牛要一门好语言加一点点天分.一门好语言,一点点天分,再加一份坚持.要是天分 ...
- 脚本小子学习--vulnhub靶机DC8
@ 目录 前言 一.环境搭建 二.目标和思路 三.实际操作 1.信息收集 2.getshell 总结 前言 通过一些靶机实战练习,学习使用现有的工具来成为脚本小子. 一.环境搭建 靶机:Linux虚拟 ...
- Unity3D脚本中文系列教程(十六)
Unity3D脚本中文系列教程(十五) ◆ function OnPostprocessAudio (clip:AudioClip):void 描述:◆ function OnPostprocess ...
- Unity3D脚本中文系列教程(十四)
http://dong2008hong.blog.163.com/blog/static/469688272014032134394/ WWWFrom 类Unity3D脚本中文系列教程(十三)辅助类. ...
随机推荐
- matlab中变量问题——readonly 索引超出矩阵维度 workspacefunc 215
matlab程序运行过程中会出现如上提示,在网上检索未果,键入dbstop if error语句也无法定错误之处,就想这个错误不是一般的错误. 通过间隔打断点的方式最后定位错误为一句exist = f ...
- 从一个简单的约束看规范性的SQL脚本对数据库运维的影响
之前提到了约束的一些特点,看起来也没什么大不了的问题,http://www.cnblogs.com/wy123/p/7350265.html以下以实际生产运维中遇到的一个问题来说明规范的重要性. 如下 ...
- JS游戏控制时间代码
var canvas = new HGAME.canvas();var testBox=document.getElementById('boxRender');testBox.appendChild ...
- [leetcode]46. Permutations全排列(给定序列无重复元素)
Given a collection of distinct integers, return all possible permutations. Input: [1,2,3] Output: [ ...
- java并发编程艺术
cas算法 概要 刚开始看这本书的时候很经常看到cas算法,个人觉得cas算法在并发编程中也是挺重要的的一部分,cas是比较并交换的意思(compare and swap),campareAndSwa ...
- TUN/TAP编程实现
其实关于这两种设备的编程,基本上属于八股文,大家一般都这么干. 启动设备之前 有的linux 并没有将tun 模块编译到内核之中,所以,我们要做的第一件事情就是检查我们的系统是否支持 TUN/TAP ...
- redis应用实践
晚些时候自己总结,先贴出看到的一篇文章. https://www.cnblogs.com/NiceCui/p/7794659.html
- git stash错误小记
git出错小记 想要push代码,我们经常这样做. 1.查看状态 git status 2.隐藏本地编辑的新内容 git stash 3.拉远程的代码 git pull 这一步操作有的时候会报错,没有 ...
- # 2019-2020-3 《Java 程序设计》第三周总结
2019-2020-3 <Java 程序设计>第三周知识总结 1.类的定义 语法格式如下(加[]表示可选项): [修饰符] class 类名 { 属性定义(声明) 方法定义(声明)} 2. ...
- jQuery三级联动
<!DOCTYPE html><html lang="en"><head> <meta charset="UTF-8" ...