Windows 10 IoT Serials 5 - 如何为树莓派应用程序添加语音识别与交互功能
都说语音是人机交互的重要手段,虽然个人觉得在大庭广众之下,对着手机发号施令会显得有些尴尬。但是在资源受限的物联网应用场景下(无法外接鼠标键盘显示器),如果能够通过语音来控制设备,与设备进行交互,那还是很实用的。继上一篇《Windows 10 IoT Serials 4 - 如何在树莓派上使用Cortana语音助手》之后,本文将详细讲述如何为运行Windows 10 IoT Core系统的树莓派添加语音识别和语音交互功能。
1. 硬件准备
- 树莓派2/树莓派3、5V/2A电源、TF卡(8GB以上)
- 麦克风:Microsoft LifeCam HD 3000(该摄像头集成了麦克风),也可以使用其他麦克风,如Blue Snowball iCE Condenser Microphone, Cardioid, Sound Tech CM-1000USB Table Top Conference Meeting Microphone
- 受控对象:这里以两个LED灯为例。用户可以根据实际需求添加受控对象,比如添加继电器模块以后,可以控制强电设备。
- 音频输出设备(可选):Windows 10 IoT Core系统的树莓派只支持3.5mm接口的音频输出,HDMI的音频输出不支持。所以,可以接一个普通的3.5mm接口的耳机就可以。
- 显示设备(可选):可以接HDMI接口的显示器,或者使用有源HDMI转VGA模块,转接VGA接口的显示器。
注意,这里音频输出设备和显示设备是可选的,并不是必须的。
2. 硬件连接
这里将LED连接到树莓派的GPIO5和GPIO6两个引脚,同时,把麦克风设备插入到树莓派的USB接口。如果准备了音频输出设备(如耳机或音响)和显示设备(显示器),请连接到树莓派的3.5mm音频接口和HDMI接口。
3. 程序编写
本应用程序使用的开发环境是Windows 10+Visual Studio 2015 Community,注意,Visual Studio需要包含Universal Windows App Development Tools组件。
3.1 新建工程和添加资源
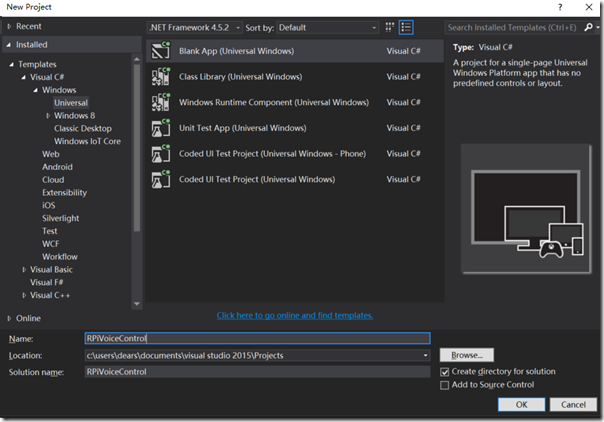
新建工程时,选用Universal模板,工程命名为RPiVoiceControl,如下图所示。
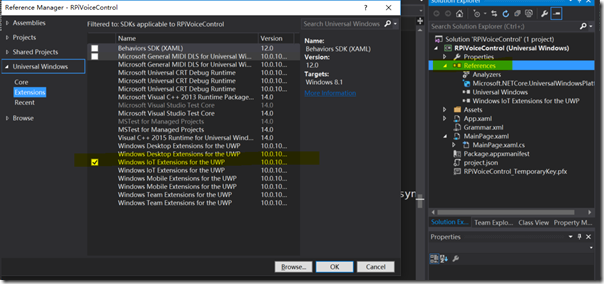
因为要用到GPIO引脚控制LED,所以需要为工程添加Windows IoT Extension for UWP引用,如下图所示。
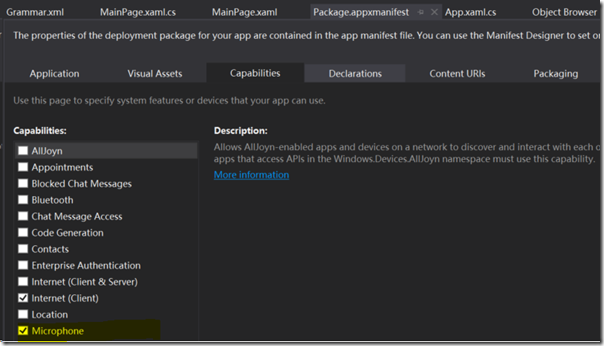
由于需要使用Microphone,所以需要在工程的Package.appxmanifest文件中,勾选Microphone,如下图所示。
另外,由于需要使用到语音识别、LED和UI控件等资源,需要为应用程序引入命名空间,如下:
using System;
using System.Diagnostics;
此处省略若干…
using Windows.Devices.Gpio; //LED
using Windows.Media.SpeechRecognition;//语音识别
using Windows.Media.SpeechSynthesis;
using Windows.Storage;
using Windows.ApplicationModel;
3.2 新建语音指令定义文件
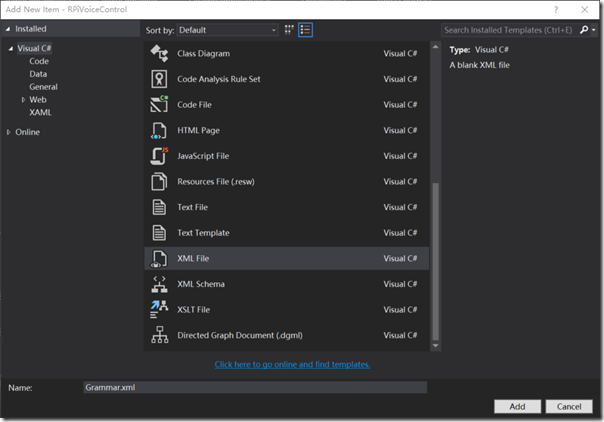
为项目添加新的xml文件,命名为Grammar.xml,用于定义语音指令。项目中用到的语音指令符合Speech Recognition Grammar Specification Version 1.0 (SRGS)标准,其具体协议可以参考MSDN上的这个文档:Create Grammars Using SRGS XML (Microsoft.Speech)。
之后,打开该文件,为其添加如下语音指令。
<?xml version="1.0" encoding="utf-8" ?>
<grammar
version="1.0"
xml:lang="en-US"
root="automationCommands"
xmlns="http://www.w3.org/2001/06/grammar"
tag-format="semantics/1.0">
<rule id="root">
<item>
<ruleref uri="#automationCommands"/>
<tag>out.command=rules.latest();</tag>
</item>
</rule>
此处省略代码,具体请参考Github上项目的完整代码。
<rule id="deviceActions">
<one-of>
<item>
light <tag> out="LIGHT"; </tag>
</item>
<item>
led <tag> out="LED"; </tag>
</item>
</one-of>
</rule>
</grammar>
3.3 程序界面设计
如果不准备给树莓派接显示器的可以直接忽略这一步,如果需要在程序运行过程中查看状态的,可以加入一些简单的控件,这里只是加入了两个指示LED灯状态的Ellipse 控件、两个指示程序运行状态的TextBlock 控件和一个MediaElement 控件,代码如下。
<Grid Background="{ThemeResource ApplicationPageBackgroundThemeBrush}">
<StackPanel HorizontalAlignment="Center" VerticalAlignment="Center">
<Ellipse x:Name="bedroomLED" Fill="LightGray" Stroke="White" Width="100" Height="100" Margin="10"/>
<Ellipse x:Name="kitchenroomLED" Fill="LightGray" Stroke="White" Width="100" Height="100" Margin="10"/>
<TextBlock x:Name="GpioStatus" Text="Waiting to initialize GPIO..." Margin="10,50,10,10" TextAlignment="Center" FontSize="26.667" />
<TextBlock x:Name="VoiceStatus" Text="Waiting to initialize Microphone" Margin="10,50,10,10" TextAlignment="Center" TextWrapping="Wrap" />
<MediaElement x:Name="mediaElement"></MediaElement>
</StackPanel>
</Grid>
3.4 后台代码
后台代码中,首先需要定义应用程序使用的资源对象,如GPIO、画刷、定时器、部分代码如下,
private const int BedRoomLED_PINNumber = 5;
private GpioPin BedRoomLED_GpioPin;
private GpioPinValue BedRoomLED_GpioPinValue;
private DispatcherTimer bedRoomTimer;
private const int kITCHENLED_PINNumber = 6;
private GpioPin kITCHENLED_GpioPin;
private GpioPinValue kITCHENLED_GpioPinValue;
private DispatcherTimer kITCHENTimer;
private SolidColorBrush redBrush = new SolidColorBrush(Windows.UI.Colors.Red);
private SolidColorBrush grayBrush = new SolidColorBrush(Windows.UI.Colors.LightGray);
然后,在MainPage的构造函数中,添加资源的初始化,部分代码如下:
public MainPage()
{
this.InitializeComponent();
Unloaded += MainPage_Unloaded;
// Initialize Recognizer
initializeSpeechRecognizer();
InitBedRoomGPIO();
InitKITCHENGPIO();
bedRoomTimer = new DispatcherTimer();
bedRoomTimer.Interval = TimeSpan.FromMilliseconds(500);
bedRoomTimer.Tick += BedRoomTimer_Tick;
kITCHENTimer = new DispatcherTimer();
kITCHENTimer.Interval = TimeSpan.FromMilliseconds(500);
kITCHENTimer.Tick += KITCHENTimer_Tick;
}
在initializeSpeechRecognizer函数中,完成语音识别状态改变事件的添加、语音指令文件的加载,部分代码如下:
private async void initializeSpeechRecognizer()
{
// Initialize recognizer
recognizer = new SpeechRecognizer();
// Set event handlers
recognizer.StateChanged += RecognizerStateChanged;
recognizer.ContinuousRecognitionSession.ResultGenerated += RecognizerResultGenerated;
// Load Grammer file constraint
string fileName = String.Format(SRGS_FILE);
StorageFile grammarContentFile = await Package.Current.InstalledLocation.GetFileAsync(fileName);
SpeechRecognitionGrammarFileConstraint grammarConstraint = new SpeechRecognitionGrammarFileConstraint(grammarContentFile);
// Add to grammer constraint
recognizer.Constraints.Add(grammarConstraint);
SpeechRecognitionCompilationResult compilationResult = await recognizer.CompileConstraintsAsync();
Debug.WriteLine("Status: " + compilationResult.Status.ToString());
// If successful, display the recognition result.
if (compilationResult.Status == SpeechRecognitionResultStatus.Success)
{
Debug.WriteLine("Result: " + compilationResult.ToString());
await recognizer.ContinuousRecognitionSession.StartAsync();
}
else
{
Debug.WriteLine("Status: " + compilationResult.Status);
}
}
之后,添加RecognizerResultGenerated和RecognizerStateChanged两个事件的处理,主要用于语音识别结果和状态发生变化的处理。部分代码如下:
private async void RecognizerResultGenerated(SpeechContinuousRecognitionSession session, SpeechContinuousRecognitionResultGeneratedEventArgs args)
{
// Check for different tags and initialize the variables
String location = args.Result.SemanticInterpretation.Properties.ContainsKey(TAG_TARGET) ?
args.Result.SemanticInterpretation.Properties[TAG_TARGET][0].ToString() :
"";
String cmd = args.Result.SemanticInterpretation.Properties.ContainsKey(TAG_CMD) ?
args.Result.SemanticInterpretation.Properties[TAG_CMD][0].ToString() :
"";
String device = args.Result.SemanticInterpretation.Properties.ContainsKey(TAG_DEVICE) ?
args.Result.SemanticInterpretation.Properties[TAG_DEVICE][0].ToString() :
"";
Windows.ApplicationModel.Core.CoreApplication.MainView.CoreWindow.Dispatcher.RunAsync(Windows.UI.Core.CoreDispatcherPriority.Normal, () =>
{
VoiceStatus.Text= "Target: " + location + ", Command: " + cmd + ", Device: " + device;
});
switch (device)
{
case "hiActivationCMD"://Activate device
SaySomthing("hiActivationCMD", "On");
break;
case "LIGHT":
LightControl(cmd, location);
break;
default:
break;
}
}
// Recognizer state changed
private async void RecognizerStateChanged(SpeechRecognizer sender, SpeechRecognizerStateChangedEventArgs args)
{
Windows.ApplicationModel.Core.CoreApplication.MainView.CoreWindow.Dispatcher.RunAsync(Windows.UI.Core.CoreDispatcherPriority.Normal, () =>
{
VoiceStatus.Text = "Speech recognizer state: " + args.State.ToString();
});
}
定义函数SaySomthing,用于反馈的语音生成,这样,用户就可以听到树莓派的语音反馈了。部分代码如下:
private async void SaySomthing(string myDevice, string State, int speechCharacterVoice = 0)
{
if (myDevice == "hiActivationCMD")
PlayVoice($"Hi Jack What can i do for you");
else
PlayVoice($"OK Jack {myDevice} {State}", speechCharacterVoice);
await Windows.ApplicationModel.Core.CoreApplication.MainView.CoreWindow.Dispatcher.RunAsync(Windows.UI.Core.CoreDispatcherPriority.Normal, () =>
{
VoiceStatus.Text = $"OK -> ===== {myDevice} --- {State} =======";
});
}
最后,在两个定时器的溢出事件处理中,加入对LED灯的处理,部分代码如下:
private void BedRoomTimer_Tick(object sender, object e)
{
if (BedRoomLED_GpioPinValue == GpioPinValue.High)
{
BedRoomLED_GpioPinValue = GpioPinValue.Low;
BedRoomLED_GpioPin.Write(BedRoomLED_GpioPinValue);
bedroomLED.Fill = redBrush;
}
else
{
BedRoomLED_GpioPinValue = GpioPinValue.High;
BedRoomLED_GpioPin.Write(BedRoomLED_GpioPinValue);
bedroomLED.Fill = grayBrush;
}
}
4. 应用调试
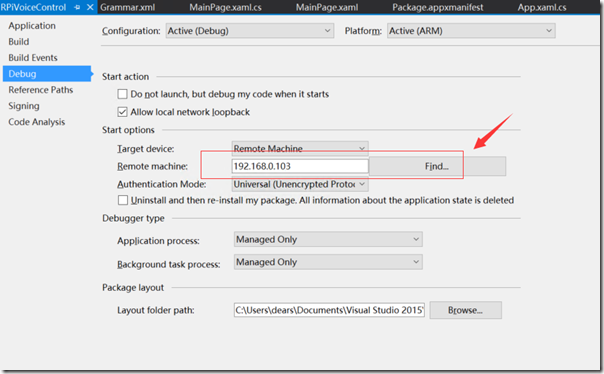
在Visual Studio中设置编译的平台为ARM,调试设备为Remote Machine,在Debug选项卡中,设置树莓派的IP地址,点击调试。如下图所示。
程序运行以后,用户可以通过语音指令与树莓派进行交互。
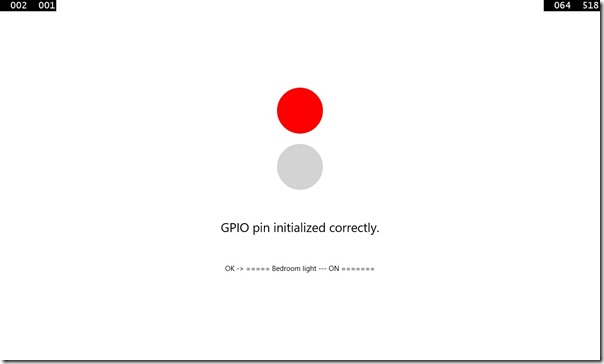
首先,用户可以使用“Hi Jack”与设备交互,可以听到设备有回复,用于确认应用程序是否正确运行。
其次,用户可以使用“Turn On/Off Bedroom Light”和“Turn On/Off kitchen Light ”来控制两个LED灯,同时,在应用程序的界面上还可以看到灯的状态和语音识别的状态,如下图所示。
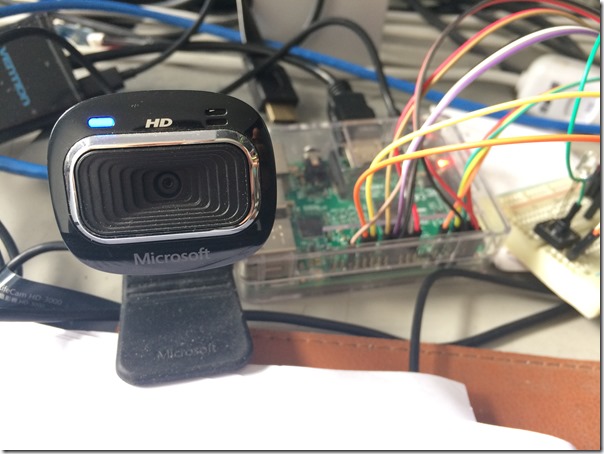
应用程序运行的实物图如下:
5. 代码下载
本项目的代码已经发布到Github上,链接如下:https://github.com/shijiong/RPiVoiceControl,欢迎下载使用。
Windows 10 IoT Serials 5 - 如何为树莓派应用程序添加语音识别与交互功能的更多相关文章
- Windows 10 IoT Serials 4 - 如何在树莓派上使用Cortana语音助手
从Windows 10 IoT Core 14986版本开始,微软已经加入Cortana语音助手功能.之前,我们只能使用本地语音识别,需要编写应用程序,下载到设备中才能实现.从现在开始,微软已经从系统 ...
- Windows 10 IoT Serials 7 – 如何用树莓派制作家庭流媒体播放器
Windows 10平台引入了AllJoyn开源软件框架,它提供了一组服务可以创建动态近端网络,让设备可以相互连接实现功能交互.目前,AllJoyn开源软件框架由AllSeen联盟负责管理.AllSe ...
- Windows 10 IoT Serials 2 - Windows 10 IoT RTM 升级教程
7月29日,微软推出了Windows 10 for PC的正式版,其版本号是Build 10240.近两天官方说已经有4700万的下载安装量,同时这个数字还在不断攀升.另外,除了Windows 10 ...
- Windows 10 IoT Serials 3 - Windows 10 IoT Core Ardunio Wiring Mode
Maker社区和智能硬件的朋友一定知道Arduino,很多3D打印机都是用它做的.为了迎合这一大块市场,微软在基于Intel Galileo的Windows 8.1 IoT中就是使用这种基于Ardui ...
- Windows 10 IoT Serials 1 - 针对Minnow Board MAX的Windows 10 IoT开发环境搭建
目前,微软针对Windows IoT计划支持的硬件包括树莓派2,Minnow Board MAX 和Galileo (Gen 1和Gen 2).其中,Galileo (Gen 1和Gen 2)运行的是 ...
- Windows 10 IoT Serials 9 – 如何利用IoTCoreAudioControlTool改变设备的音频设备
大家知道,在Windows 10 IoT Core上,如果用户外接了USB声卡.带有麦克风的摄像头之类的硬件,就会有多个音频设备可以用.但是,系统目前并没有提供直接的UI来设置音频的输入或者输出设备. ...
- Windows 10 IoT Serials 6 - 如何修改IoTStartupOnBoot.cmd文件
使用Windows 10 IoT Core系统的朋友应该会比较熟悉IoTStartupOnBoot.cmd文件,该文件是系统启动以后加载的批处理文件,一般会包含应用.服务和后台的启动,比如WinRM. ...
- Windows 10 IoT Serials 8 – 如何改变UWP应用的目标平台
Windows Insider计划直接加速了Windows系统的迭代,缩短了系统发布的周期.就Windows 10 IoT Core而言,迭代的速度和Windows 10 for PC.Windows ...
- Windows 10 IoT Serials 10 – 如何使用OCR引擎进行文字识别
1. 引言 OCR (Optical Character Recognition,光学字符识别)是指电子设备(例如扫描仪或数码相机)检查纸上打印的字符,通过检测暗.亮的模式确定其形状,然后用字符识别方 ...
随机推荐
- oracle创建游标和输出
declare cursor c_test_tbl2 is select t2.id, t2.salary from test_tbl2 t2, test_tbl1 t1 w ...
- openstack名称发音收集
MariaDB: maria['mɛərɪr] Corosync: coro[kə'roʊ] sync[sɪŋk] pacemaker: [ˈpesˌmekɚ] galera: ...
- C++异常第二篇---C++标准库异常类exception的使用
1 继承图示 2 具体讲解 C++标准库异常类继承层次中的根类为exception,其定义在exception头文件中,它是C++标准库所有函数抛出异常的基类,exception的接口定义如下: na ...
- 物理机(真实机)能ping通虚拟机,但是虚拟机无法ping通真实机(可能是防火墙问题)
物理机IP地址:192.168.1.209 虚拟机IP地址:192.168.1.5.192.168.1.7.192.168.1.10 物理机设置:
- mvc中上传图片到指定文件夹中
前台: @using (Html.BeginForm("AddImg", "UpFileImg", FormMethod.Post, new { enctype ...
- 处理Block中的self问题(Capturing 'self' strongly in this block is likely to lead to a retain cycle)
警告:ARC Retain Cycle Capturing 'self' strongly in this block is likely to lead to a retain cycle 代码: ...
- Python中下划线---完全解读
Python 用下划线作为变量前缀和后缀指定特殊变量 _xxx 不能用'from module import *'导入 __xxx__ 系统定义名字 __xxx 类中的私有变量名 核心风格:避免用下划 ...
- 【ural1297】 Palindrome
http://acm.timus.ru/problem.aspx?space=1&num=1297 (题目链接) 题意 求最长回文子串 Solution 后缀数组论文题 穷举每一位,然后计算以 ...
- CodeSmith批量生成实体
保存以下文件为ModelBatch.cst <%@ Register Name="Model" Template="D:\Q\web\LHWYVISIT\trunk ...
- sysctl.conf和limit.conf备忘待查
#################################limits.conf设置################################### #修改最大进程和最大文件打开数限制v ...