WCF小实例以及三种宿主
WCF小实例以及三种宿主
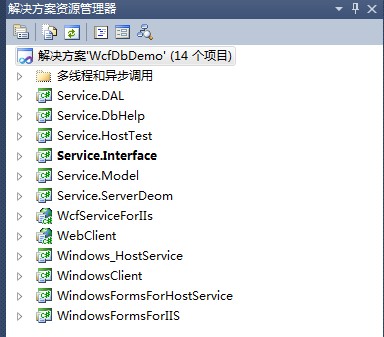
最近一直在学习WCF相关知识,下面将通过一个小实例对所学的知识进行简单的回顾;本实例是一个简单三层操作数据库,并且也简单实现的三种宿主(控制台宿主,IIS宿主以及Windows服务宿主)的练习;还包含一个双工的功能,下图为程序所创建分层结构图;
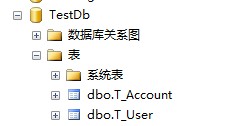
首先了解为这个实例所创建的两张简单表;
 |
 USE [TestDb] USE [TestDb] |
接下来简单了解每一层的作用以及一些注意事项;源代码后面直接提供下载;
1:Service.DAL 是针对数据库操作的一些类;
2:Service.DbHelp 为数据库操作提供助手
3:Service.HostTest 为服务提供自宿主的测试;一般在编码时会用到;此层还用到批量寄存的知识;
4:Service.Interface 为契约层,定义的相关开放接口;
5:Service.Model为实体层也是数据契约层;
6:Service.ServerDemo 为实现契约的服务内容;若有逻辑都放在这一层;
7:WcfServiceForIIs 为宿主在IIS内容;
8:WebClient 为客户端为Web形式
9:Windows_HostService为宿主要Windows服务里的内容;
10:WindowsClient、WindowsFormsForHostService、WindowsFormsForIIS分别是对三种寄存宿主进行测试的客户端;
一:注意点批量寄存宿主;把重点的一些配置一及实现代码贴出;
<configuration>

  <configSections>

    <section name="artech.batchingHosting"

             type="Service.HostTest.Configuration.BatchingHostingSettings, Service.HostTest"/>

  </configSections>

  <appSettings>

    <add key="ConnectionString" value="server=.;database=TestDb;uid=sa;pwd=admin"/>

  </appSettings>

  <system.serviceModel>

    <bindings>

      <netTcpBinding>

        <binding name="portSharingBinding" portSharingEnabled="true"></binding>

      </netTcpBinding>

    </bindings>

    <behaviors>

      <serviceBehaviors>

        <behavior name="UsermetadataBehavior">

          <serviceMetadata httpGetEnabled="true" httpGetUrl="http://127.0.0.1:3721/UserService/metadata"/>

        </behavior>

        <behavior name="AccountmetadataBehavior">

          <serviceMetadata httpGetEnabled="true" httpGetUrl="http://127.0.0.1:3721/AccountService/metadata"/>

        </behavior>

        <behavior name="ExcptDivedeBehavior">

          <serviceDebug includeExceptionDetailInFaults="true"/>

        </behavior>

      </serviceBehaviors>

    </behaviors>

    <services>

      <service name="Service.ServerDeom.UserService" behaviorConfiguration="UsermetadataBehavior">

        <endpoint address="http://127.0.0.1:3721/UserService"

                  binding="wsHttpBinding"

                  contract="Service.Interface.IUser"/>

      </service>

      <service name="Service.ServerDeom.AccountService" behaviorConfiguration="AccountmetadataBehavior">

        <endpoint address="http://127.0.0.1:3721/AccountService"

                  binding="wsHttpBinding"

                  contract="Service.Interface.IAccount"/>

      </service>

      <service name="Service.ServerDeom.DuplexTestService">

        <endpoint address="net.tcp://127.0.0.1:3722/DuplexTestService"

                 binding="netTcpBinding"

                 contract="Service.Interface.IDuplexTest" bindingConfiguration="portSharingBinding"/>

      </service>

      <service name="Service.ServerDeom.ExcptDivideService" behaviorConfiguration="ExcptDivedeBehavior">

        <endpoint address="http://127.0.0.1:3723/ExcptDivideService"

                  binding="wsHttpBinding"

                  contract="Service.Interface.IExcptDivide"/>

      </service>

    </services>

  </system.serviceModel>

  <artech.batchingHosting>

    <add type="Service.ServerDeom.UserService, Service.ServerDeom"/>

    <add type="Service.ServerDeom.AccountService, Service.ServerDeom"/>

    <add type="Service.ServerDeom.DuplexTestService, Service.ServerDeom"/>

    <add type="Service.ServerDeom.ExcptDivideService, Service.ServerDeom"/>

  </artech.batchingHosting>

</configuration>
using System.ServiceModel;

using Service.ServerDeom;

using Service.Interface;

namespace Service.HostTest

{

    class Program

    {

        static void Main(string[] args)

        {

            using (ServiceHostCollection hosts = new ServiceHostCollection())

            {

                foreach (ServiceHost host in hosts)

                {

                    host.Opened += (sender, arg) => Console.WriteLine("服务{0}开始监听", (sender as ServiceHost).Description.ServiceType);

                }

                hosts.Open();

                Console.Read();

            }

        }

    }

}
二:宿主要IIS里的注意内容;
新建一个文本文件然后把它的后缀修改成.svc;并在其头部增加一行调用服务的代码;
<%@ ServiceHost Language="C#" Debug="true" Service="Service.ServerDeom.UserService" %>
其配置如下:
<configuration>

  <appSettings>

    <add key="ConnectionString" value="server=.;database=TestDb;uid=sa;pwd=admin"/>

  </appSettings>

  <system.web>

    <compilation debug="true" targetFramework="4.0" />

  </system.web>

  <system.serviceModel>

    <behaviors>

      <serviceBehaviors>

        <behavior>

          <!-- 为避免泄漏元数据信息,请在部署前将以下值设置为 false 并删除上面的元数据终结点 -->

          <serviceMetadata httpGetEnabled="true"/>

          <!-- 要接收故障异常详细信息以进行调试,请将以下值设置为 true。在部署前设置为 false 以避免泄漏异常信息 -->

          <serviceDebug includeExceptionDetailInFaults="false"/>

        </behavior>

      </serviceBehaviors>

    </behaviors>

    <services>

      <service name="Service.ServerDeom.UserService">

        <endpoint binding="ws2007HttpBinding"

                  contract="Service.Interface.IUser"/>

      </service>

    </services>

    <serviceHostingEnvironment multipleSiteBindingsEnabled="true" />

  </system.serviceModel>

 <system.webServer>

    <modules runAllManagedModulesForAllRequests="true"/>

  </system.webServer>

</configuration>
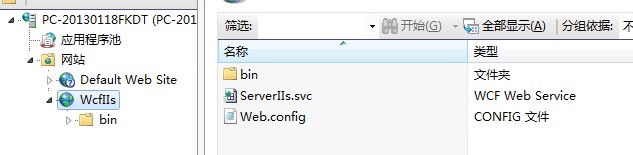
把I宿主部署到IIS里;
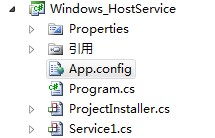
三:宿主在Windows服务;创建一个Windows服务类库,增加相应的配置以及代码;
<configuration>

  <appSettings>

    <add key="ConnectionString" value="server=.;database=TestDb;uid=sa;pwd=admin"/>

  </appSettings>

  <system.serviceModel>

    <bindings>

      <netTcpBinding>

        <binding name="portSharingBinding" portSharingEnabled="true"></binding>

      </netTcpBinding>

    </bindings>

    <behaviors>

      <serviceBehaviors>

        <behavior name="UsermetadataBehavior">

          <serviceMetadata httpGetEnabled="true" httpGetUrl="http://127.0.0.1:3718/UserService/metadata"/>

        </behavior>

      </serviceBehaviors>

    </behaviors>

    <services>

      <service name="Service.ServerDeom.UserService" behaviorConfiguration="UsermetadataBehavior">

        <endpoint address="http://127.0.0.1:3718/UserService"

                  binding="wsHttpBinding"

                  contract="Service.Interface.IUser"/>

      </service>

    </services>

  </system.serviceModel>

</configuration>
using System.ServiceModel;

using Service.ServerDeom;

using Service.Interface;

namespace Windows_HostService

{

    public partial class Service1 : ServiceBase

    {

        private ServiceHost serviceHost = null; //寄宿服务对象

        public Service1()

        {

            InitializeComponent();

        }

        protected override void OnStart(string[] args)

        {

            try

            {

                serviceHost = new ServiceHost(typeof(UserService));

                if (serviceHost.State != CommunicationState.Opened)

                {

                    serviceHost.Open();

                }

            }

            catch (Exception ex)

            {

            }

        }

        protected override void OnStop()

        {

        }

    }

}
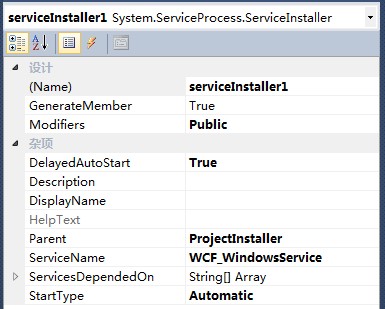
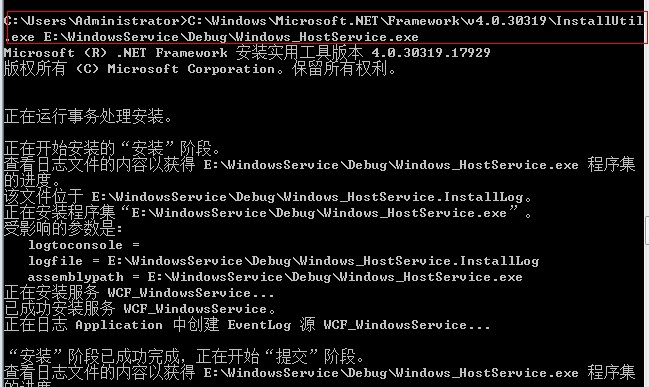
然后安装服务文件的一些属性进行设置,比如服务自动重启,服务名称等;另一些图是对服务进行安装;
 |
 |
若服务安装成功后会在服务里可以看到如下:

客户端调用服务的代码大家就直接看源代码,由于本人也是刚开始学习WCF,实例内容为本人学习所做,若有不足或错误欢迎指正;[源代码下载]
WCF小实例以及三种宿主的更多相关文章
- 获得 LayoutInflater 实例的三种方式
在实际开发中LayoutInflater这个类还是非常有用的,它的作用类似于findViewById().不同点是LayoutInflater是用来找res/layout/下的xml布局文件,并且实例 ...
- [转]获得 LayoutInflater 实例的三种方式
转自:http://www.cnblogs.com/androidez/archive/2013/07/01/3164729.html 获得 LayoutInflater 实例的三种方式 在实际开 ...
- Java Class类以及获取Class实例的三种方式
T - 由此 Class 对象建模的类的类型.例如,String.class 的类型是Class<String>.如果将被建模的类未知,则使用Class<?>. publi ...
- Unity3d UGUI 界面适配 实例解析 三种适配方式
之前做游戏都是用公司自己的引擎,对于界面的适配分Android和IOS两种系统处理. 对于IOS设备,由于数量有限,只要做到 960x640 1024x769 1136x640 (当时还没有ipho ...
- 【转】delphi程序只允许运行一个实例的三种方法:
一. 创建互斥对象 在工程project1.dpr中创建互斥对象 Program project1 Uses Windows,Form, FrmMain in 'FrmMain.pas' ...
- StringBuffer 清空StringBuffer的实例的三种方法
@Test public void testStringbuffer(){ //StringBuffer类没有clear方法,不过可以通过下面两种方法来清空一个StringBuffer的实例: Str ...
- C#创建泛型类T的实例的三种方法
原文链接:https://www.cnblogs.com/lxhbky/p/6020612.html 方法一,通过外部方法传入的实例来实例化: //泛型类: public class MySQLHel ...
- WCF(二)三种通信模式
WCF在通信过程中有三种模式:请求与答复.单向.双工通信 请求与答复模式 客户端发送请求,然后一直等待服务端的响应答复(异步调用除外),期间处于假死状态,直到服务端有了答复后才能继续执行其他程序 请求 ...
- (二)微信小程序的三种传值方式
1.全局变量 app.js里 App({ //全局变量 globalData: { userInfo: null, host: 'http://localhost:8080/data.json' } ...
随机推荐
- nginx跳转
语法规则: location [=|~|~*|^~] /uri/ { - } = 开头表示精确匹配 ^~ 开头表示uri以某个常规字符串开头,理解为匹配 url路径就可以.nginx不正确url做 ...
- sql server int 列 NULLIF,isnull 判断是0还是1 ,如果是0就变成1
SELECT ISNULL(NULLIF(col1,0),1) ISNULL: 第一个表达式 是 null 返回 第二个表达式,否则 返回 第一个 , ISNULL(表达式1,表达式2) if(表达 ...
- OracleServiceORCL服务不见了怎么办
用管理员身份运行命令提示符(CMD) 然后输入“oradim -new -sid orcl”即可
- SSAS系列——【03】多维数据(多维数据集对象)
原文:SSAS系列--[03]多维数据(多维数据集对象) 1.什么是Cube? 简单 Cube 对象由基本信息.维度和度量值组组成. 基本信息包括多维数据集的名称.多维数据集的默认度量值.数据源和存储 ...
- Swift入门教程:基本运算符
基本运算符 Swift所支持的基本运算符 赋值运算符:= 复合赋值运算符:+=.-= 算数运算符:+.-.*./ 求余运算符:% 自增.自减运算符:++.-- 比较运算符:==.!=.>.< ...
- DB2常用sql demo
.查找员工的编号.姓名.部门和出生日期,如果出生日期为空值,显示日期不详,并按部门排序输出,日期格式为yyyy-mm-dd. ),birthday,),'日期不详') birthday from em ...
- C#映射网络驱动器
using System.Runtime.InteropServices; [StructLayout(LayoutKind.Sequential)] public class NetResource ...
- ichartjs 使用BUG,assign_scale:true 解决
今天纯属灌水,好久没灌水的. 最近使用了flotr2 和 ichartjs进行canvas图标的开发,都不能满足需求. 没办法,先将就用用吧.然后,既然其他大神推荐使用ichartjs,为了统一,我也 ...
- 谈谈那些年PHP中屌屌的验证码
验证码已经是现在网站中非常基础的知识点了,验证码的存在可以防止恶意破解密码.刷票.灌水,可以有效的防止暴力破解特定用户. 现在就来了解了解那些年PHP中屌屌的验证码吧. 首先,以四位验证码为例(多位验 ...
- openwrt_git_pull命令提示merger冲突时如何解决?
直接贴代码 tf@ubuntu:~/projects/openwrt1407$ git pull Updating 331ecb0..d12dc6e error: Your local changes ...