Creating your first iOS Framework
转自:https://robots.thoughtbot.com/creating-your-first-ios-framework
If you’ve ever tried to create your own iOS framework, you know that it’s not for the faint of heart – managing dependencies and writing tests doesn’t make it any easier. This tutorial will walk you through creating your first iOS framework from start to finish so that you can go out and create your own.
We’re going to build a framework that exposes a function calledRGBUIColor(red:green:blue) that returns a new UIColor created from those values. We’ll build it using Swift, with Carthage as our dependency manager. Our framework will be consumable using Carthage, CocoaPods, or git submodules.
Let’s begin!
Setting up the Xcode Project
- Select File → New → Project.
- Select iOS → Framework & Library from the left sidebar and select “Cocoa Touch Library” on the right.
- Click “Next” and fill in the option prompts. Make sure to select the “Include Unit Tests” check box.

- Select where you’d like to save your project.
- Uncheck “Create Git repository on My Mac”, we’ll manually set it up later.
- Click “Create” and the project will open in Xcode.
- Go to File → Save As Workspace and save it in the same directory as your Xcode project with the same name. We put the project in a workspace because we’ll be adding our Carthage dependencies as submodules; they must be in a workspace for Xcode to build them.
- Close the Xcode project with File → Close Project.
- Open the workspace with File → Open.
- Click on the scheme on the top left of Xcode and select “Manage Schemes”. We need to mark our scheme as “shared” so that the project can be built with Carthage.
- Locate the “RGB” scheme and check the “Shared” check box and click “Close”.

Let’s jump over to the terminal.
Initializing Git
First, navigate to the directory you saved your project in.
- Run
git initto initialize an empty repository. - Create a
.gitignorewhich will keep out some pesky Xcode and dependency files we don’t want to track in git.
Here’s a standard one for Swift projects with a few modifications. We added .DS_Storeand removed fastlane and extra comments.
## OS X Finder

.DS_Store

## Build generated

build/

DerivedData

## Various settings

*.pbxuser

!default.pbxuser

*.mode1v3

!default.mode1v3

*.mode2v3

!default.mode2v3

*.perspectivev3

!default.perspectivev3

xcuserdata

## Other

*.xccheckout

*.moved-aside

*.xcuserstate

*.xcscmblueprint

## Obj-C/Swift specific

*.hmap

*.ipa

# Swift Package Manager

.build/

# Carthage

Carthage/Build
Adding Carthage and Dependencies
- Create a file in your project directory named
Cartfileand the runtime dependencies to it. We’ll add Curry.
github "thoughtbot/Curry"
- Create a
Cartfile.private. It will house private dependencies like our test frameworks. We’ll use Quick and Nimble.
github "Quick/Quick"

github "Quick/Nimble"
- Create a
bin/setupscript. It’s used to give our contributors (and us) a simple way to set up the project and the dependencies.
mkdir bin

touch bin/setup

chmod +x bin/setup
- Open up
bin/setupand fill it with:
#!/usr/bin/env sh

if ! command -v carthage > /dev/null; then

  printf 'Carthage is not installed.\n'

  printf 'See https://github.com/Carthage/Carthage for install instructions.\n'

  exit 1

fi

carthage update --platform iOS --use-submodules --no-use-binaries
In this script, we make sure the user has Carthage installed and run its update command to install the iOS dependencies.
We’re using --use-submodules so that our dependencies are added as submodules. This allows users to consume our framework outside of Carthage if they want. We use--no-use-binaries so that our dependencies are built on our system.
With bin/setup created, let’s run it so that Carthage will download our dependencies.
- In the terminal, run
bin/setup.
Now we need to set up our project to build and link the new dependencies.
Adding Dependencies to the Workspace
Since our dependencies are submodules, we need to add them to our workspace.
- Open up
Carthage/Checkoutsand add each dependency’s.xcodeprojto the root of the workspace. They can be dragged from Finder into the navigator of the Xcode project.
When you’re done it should look like:
Link Runtime Dependencies
- With “RGB” selected in the Navigator and the “RGB” target selected on the middle sidebar, select the “Build Phases” tab and expand the “Link binary with libraries” section.
- Click the “+” icon and select the
Curry.frameworkfrom theCurry-iOStarget. - Click “Add”.
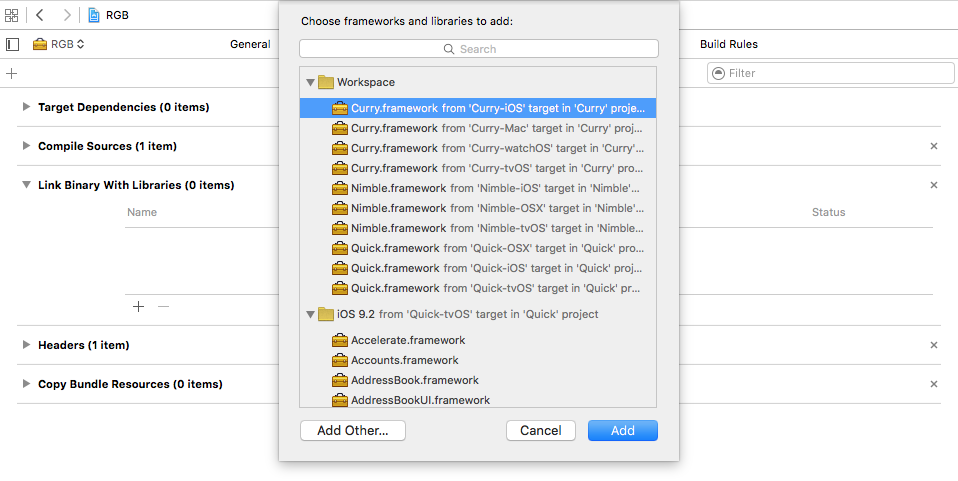
Link Development Dependencies
- Select the “RGBTests” target from the middle sidebar.
- Using the same process as before, add the Quick and Nimble frameworks to the “Link binary with libraries” section for this target.
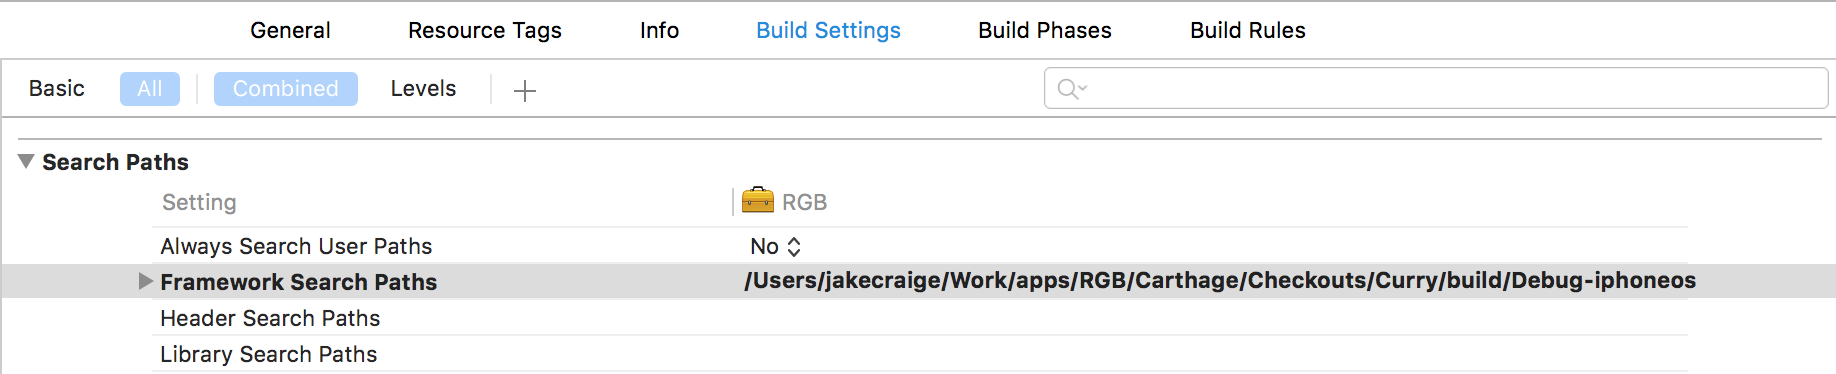
When adding dependencies to each target, Xcode will automatically add them to the “Framework Search Paths” under the “Build Settings” tab. We can remove these from the “RGB” and “RGBTests” target because Xcode treats them as implicit dependencies due to them being in the same workspace.
- Select the target, locate the “Framework Search Paths” setting, highlight it, and press “backspace” on your keyboard.
- Next, look in the “RGB” project in the Navigator; you’ll see there are three new frameworks at the root level. To keep this area organized, highlight all three, right click and select “New group from selection” to place them in a named group. I’ll call mine “Frameworks”.
Now that Carthage is set up, let’s add CocoaPods.
Adding CocoaPods support
To add CocoaPods support, we need to create a .podspec at the root of our project and fill in our project info.
- Create a file named
RGB.podspec. - Copy and paste the sample below into the file.
- Fill in the options with your project’s details. There are a lot more options available to you, but these are what’s needed for this project.
Pod::Spec.new do |spec|

  spec.name = "RGB"

  spec.version = "1.0.0"

  spec.summary = "Sample framework from blog post, not for real world use."

  spec.homepage = "https://github.com/jakecraige/RGB"

  spec.license = { type: 'MIT', file: 'LICENSE' }

  spec.authors = { "Your Name" => 'your-email@example.com' }

  spec.social_media_url = "http://twitter.com/thoughtbot"

  spec.platform = :ios, "9.1"

  spec.requires_arc = true

  spec.source = { git: "https://github.com/jakecraige/RGB.git", tag: "v#{spec.version}", submodules: true }

  spec.source_files = "RGB/**/*.{h,swift}"

  spec.dependency "Curry", "~> 1.4.0"

end
One line to pay attention to is spec.dependency "Curry", '~> 1.4.0'. Because we’re supporting CocoaPods, we expect the consumers of our framework to be using it instead of Carthage, so we have to specify dependencies here and in the Cartfile.
Once this is set up we can run the pod lib lint command to test that everything is configured properly. If all goes well, we’ll see something like this:

With the project and dependencies set up, we’re almost ready to write some code. Before we do that, let’s create our first commit.
git commit -am "Project and dependencies set up"
Writing the First Test
Open RGBTests/RGBTests.swift so that we can take a look at the default template. It uses @testable and XCTest, but we’ll be changing both of these.
We’ll remove @testable because we want to test the public API that consumers of the framework will use. As our framework grows, we may need @testable to test parts that are not exposed publicly; generally we want to avoid that so we are testing what’s exposed to the consumer. This feature is most useful in testing applications rather than frameworks.
From the Apple Docs on Testability:
With testability, you are now able to write tests of Swift 2.0 frameworks and apps without having to make all of your internal routines public. Use @testable import {ModuleName} in your test source code to make all public and internal routines usable by XCTest targets, but not by other framework and app targets.
We’ll use Quick and Nimble for testing. Quick provides a nicer testing interface with a behavior-driven style that is very similar to RSpec and Specta; Nimble gives us many powerful assertions and the ability to write asynchronous code with less boilerplate.
Once those changes are made, the test file should look like:
import Quick

import Nimble

import RGB

class RGBTests: QuickSpec {

    override func spec() {

        describe("RGB") {

            it("works") {

                expect(true).to(beTrue())

            }

        }

    }

}
Run the tests with ⌘U or Product → Test and they should be green.
And… we’re done!

Just kidding. Let’s write some real tests.
We expect that calling RGBUIColor(red: 195, green: 47, blue: 52) will return a beautiful “thoughtbot red” UIColor.
In code, this looks like:
describe("RGBUIColor") {

    it("is a correct representation of the values") {

        let thoughtbotRed = UIColor(

            red: CGFloat(195/255),

            green: CGFloat(47/255),

            blue: CGFloat(52/255),

            alpha: 1

        )

        let color = RGBUIColor(red: 195, green: 47, blue: 52)

        expect(color).to(equal(thoughtbotRed))

    }

}
If we run the tests, now they will fail as we expect. Swift’s type checking will prevent us from running the tests because we never defined the RGBUIColor function.
Let’s do that.
Writing the Implementation
Right click on the “RGB” group in the Navigator and select “New File”.
Create a Swift file called RGBUIColor.swift and save it. Fill it with this implementation:
import Curry

func RGBUIColor(red red: Int, green: Int, blue: Int) -> UIColor {

    return curry(createColor)(red)(green)(blue)

}

private func createColor(red: Int, green: Int, blue: Int) -> UIColor {

    return UIColor(

        red: CGFloat(red/255),

        green: CGFloat(green/255),

        blue: CGFloat(blue/155),

        alpha: 1

    )

}
The use of curry here is used as an example of using a runtime dependency. This is a non-standard use and doesn’t provide any value here.
Now let’s run the tests!

At first glance, this error may seem a bit odd. We clearly defined the RGBUIColorfunction, right?
We did, but it’s not marked as public.
What this means is that if someone tries to use our framework, they won’t be able to see this function. If you want to see the difference in action, add @testable back and your tests will pass.
Experiencing this error is why we removed the @testable from the import at the beginning. It helps us to catch these kinds of errors earlier, before we release our framework to others.
To fix this, let’s mark the function as public like so:
public func RGBUIColor(red red: Int, green: Int, blue: Int) -> UIColor {

    return curry(createColor)(red)(green)(blue)

}
Let’s run the tests!

We’re Green!
Let’s commit this bad boy.
git commit -am "Completed my first iOS framework!"
That’s all folks!
That’s it. There were a lot of steps but we’ve successfully created a marginally usefulframework that could be published to GitHub. As a matter of fact, we published thesource for this framework on GitHub.
We can’t wait to see what kinds of awesome open-source projects you’ll create.
Creating your first iOS Framework的更多相关文章
- [Cordova] Plugin里使用iOS Framework
[Cordova] Plugin里使用iOS Framework 前言 开发Cordova Plugin的时候,在Native Code里使用第三方Library,除了可以加速项目的时程.也避免了重复 ...
- ios framework 分离与合并多种CPU架构,分离与合并模拟器与真机
ios framework 分离与合并多种CPU架构,分离与合并模拟器与真机 如果你所用的framework支持真机和模拟器多种CPU架构,而你需要的是其中的一种或几种,那么可以可以从framewo ...
- ios framework 开发实战 之 参考
WWDC2014之iOS使用动态库 iOS开发——创建你自己的Framework 使用CocoaPods开发并打包静态库 iOS Framework 和CocoaPods TDD的iOS开发初步以及K ...
- ios framework 开发
ios framework 开发 之 参考 ios framework 开发 之 实战 iOS workspace 依次编译多个工程
- (转载)iOS Framework: Introducing MKNetworkKit
This article is available in Serbo-Croatian, Japanese and German. (Translations in Serbo-Croatian b ...
- iOS framework
(一),lipo 命令 1)合并文件: lipo -create xxxX/liblibsql.a xxxx/liblibsql.a -output libsql.a 2)查看Framework 对C ...
- ios framework通用库的制作
这篇文章是在史上最完整的iOS DIY framework 详细教程(一)的基础上加以修改 1.新建一个静态库工程: 2:取自己喜欢的名字: 3.删除向导所生成工程中的 Target: 3.删除Tes ...
- ios framework 开发 之 实战二 ,成功
1. 新建工程.引入cocoapod略过不提 2. 更改cocoapod类名 这是因为,引用framework的工程中,也有一个同样的文件,及文件里同样的类. 这个文件不能删除,但是可以重命名. 3. ...
- ios framework 开发 之 实战 一,合并失败了
保证public 文件目录独立 在 XCode 7 中,这一条已经自动实现了 Build Settings>Public Headers Folder Path "$(PROJECT_ ...
随机推荐
- 使用 vue-element-admin 动态路由渲染
附上:vue-element-admin 官方文档 vue-element-admin https://panjiachen.github.io/vue-element-admin-site/zh/g ...
- 使用ASP.NET Core 3.x 构建 RESTful API - 3.1 资源命名
之前讲了RESTful API的统一资源接口这个约束,里面提到了资源是通过URI来进行识别的,每个资源都有自己的URI.URI里还涉及到资源的名称,而针对资源的名称却没有一个标准来进行规范,但是业界还 ...
- go中的数据结构接口-interface
1. 接口的基本使用 golang中的interface本身也是一种类型,它代表的是一个方法的集合.任何类型只要实现了接口中声明的所有方法,那么该类就实现了该接口.与其他语言不同,golang并不需要 ...
- linux系统LAMP环境部署
一.安装虚拟机 二.安装CentOS7 注意:以下安装,用的root权限. 三.安装Apache 1.安装 yum -y install httpd 2.开启apache服务 systemctl st ...
- thinkphp两表,多表联合查询及分页的连贯操作写法
ThinkPHP中关联查询(即多表联合查询)可以使用 table() 方法或和join方法,具体使用如下例所示: 1.原生查询示例: 代码如下: $Model = new Model(); $sql ...
- go中的关键字-select
1. select的使用 定义:在golang里头select的功能与epoll(nginx)/poll/select的功能类似,都是坚挺IO操作,当IO操作发生的时候,触发相应的动作. 1.1 一些 ...
- 多线程编程(3)——synchronized原理以及使用
一.对象头 通常在java中一个对象主要包含三部分: 对象头 主要包含GC的状态..类型.类的模板信息(地址).synchronization状态等,在后面介绍. 实例数据:程序代码中定义的各种类型的 ...
- WeTest明星工具-移动端性能测试PerfDog初探
在十一月初,腾讯就官宣了一则消息,腾讯WeTest明星工具-PerfDog面向全球发布.官宣介绍如下:https://wetest.qq.com/lab/view/475.html.我在看到该新闻时, ...
- linux内核的tiny rcu, tree rcu
kernel中有两个rcu的实现,一个是tiny rcu,另一个是tree rcu.这两种rcu的前身都是classic rcu.如果要阅读classic rcu的实现代码,必须找kernel 2.6 ...
- 菜鸟手把手学Shiro之shiro授权流程
一.首先我们从整体去看一下授权流程,然后再根据源码去分析授权流程.如下图: 流程如下: 1.首先调用 Subject.isPermitted*/hasRole*接口,其会委托给 SecurityMan ...