
如何制作一个Nginx镜像
1,从这里你将学到编写Dockerfile的4个重要指令RUN,EXPOSE,ADD,ENTRYPOINT
2,在Dockerfile中编写拷贝文件至容器的方法
3, 安装一个nginx server,并修改默认的站点路径
环境:CentOS7,Docker CE
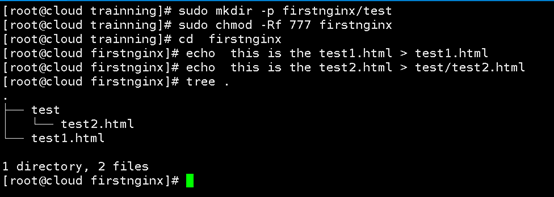
1,Use below commands to prepare folders and testing files.
使用如下指令准备文件夹和测试文件
sudo mkdir -p firstnginx/test

sudo chmod -Rf  firstnginx

cd  firstnginx

echo  this is the test1.html > test1.html

echo  this is the test2.html > test/test2.html
2,Edit Dockerfile
编辑Dockerfile
sudo mkdir -p docker

sudo chmod -Rf  docker

sudo vi docker/Dockerfile
Copy the the content below to the dockerfile:
#拷贝如下内容至Dockerfile
FROM centos:

MAINTAINER Liping<tlping@.com>

#add nginx repo and install nginx package

RUN bash -c "rpm -ivh http://nginx.org/packages/centos/6/noarch/RPMS/nginx-release-centos-6-0.el6.ngx.noarch.rpm && \

yum install -y nginx.x86_64"

#copy your customized nginx.conf to the container

ADD ./docker/nginx.conf /etc/nginx/nginx.conf

#create nginx log folder

RUN mkdir -p /etc/nginx/logs

#copy full project to nginx web site folder

ADD ./ /var/www/html/public/

# publish the container port

EXPOSE

#copy your shell script to the container

COPY ./docker/my-init.sh /usr/bin/my-init.sh

#set execution access right

RUN chmod +x /usr/bin/my-init.sh

#refresh the the container folder files

RUN bash -c 'touch /var/www/html/*'

#execute the initializaton script

ENTRYPOINT ["my-init.sh"]
3,Edit nginx.conf file ,we need change the default website location of nginxserver
sudo vi docker/nginx.conf
Copy below content to the nginx.conf and Save.
#拷贝如下内容至nginx.conf 并且保存
user  nginx;

worker_processes  1;

error_log  /var/log/nginx/error.log warn;

pid        /var/run/nginx.pid;

events {

    worker_connections  1024;

}

http {

    include       /etc/nginx/mime.types;

    default_type  application/octet-stream;

    log_format  main  '$remote_addr - $remote_user [$time_local] "$request" '

                      '$status $body_bytes_sent "$http_referer" '

                      '"$http_user_agent" "$http_x_forwarded_for"';

    access_log  /var/log/nginx/access.log  main;

    sendfile        on;

    #tcp_nopush     on;

    keepalive_timeout  65;

    #gzip  on;

     server {

        listen       80;

        server_name  localhost;

        #charset koi8-r;

        #access_log  logs/host.access.log  main;

        set $root    "/var/www/html/public";

		root $root;

        location / {

		    root    $root;

            index  index.html index.htm index.php l.php;

            try_files  $uri  /index.php$uri;

        }

        error_log    /var/www/html/err.txt    error;

        #error_page  404              /404.html;

        error_page   500 502 503 504  /50x.html;

        location = /50x.html {

            root  "/var/www/html";

        }

        location ~ \.php(.*)$  {

	        root    $root;

            fastcgi_pass   127.0.0.1:9000;

            fastcgi_index  index.php;

            fastcgi_split_path_info  ^((?U).+\.php)(/?.+)$;

            fastcgi_param  SCRIPT_FILENAME  $document_root$fastcgi_script_name;

            fastcgi_param  PATH_INFO  $fastcgi_path_info;

            fastcgi_param  PATH_TRANSLATED  $document_root$fastcgi_path_info;

            include        fastcgi_params;

        }

    }

#this statement must be put as the last line

include /etc/nginx/conf.d/*.conf;

}
4,edit my-init.sh file
编辑my-init.sh
sudo vi docker/my-init.sh
copy the content below to the file and save(拷贝如下内容至文件并保存)
#!/bin/sh

echo 'start nginx message now'

service nginx start

echo 'finish'

read
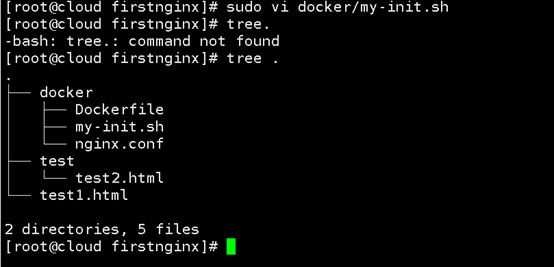
after you finish all above ,your current folder structure should be like this,
在你完成所有以上操作后,当前文件夹结构如下,
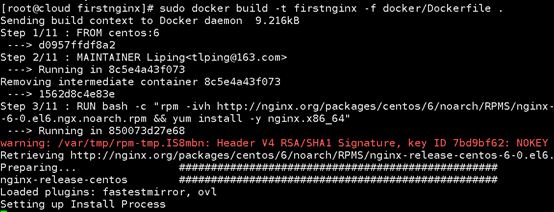
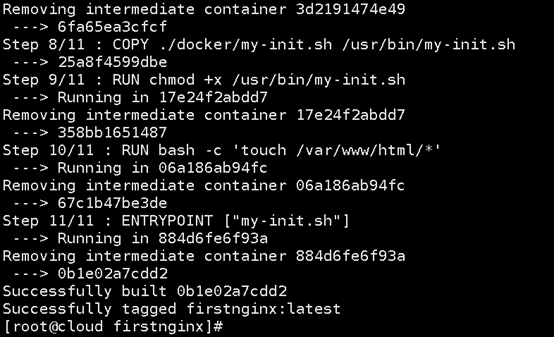
5,build the dockerfile(编译Dockerfile)
sudo docker build -t firstnginx -f docker/Dockerfile .
6,run the image to start a container(运行Docker镜像以启动容器)
sudo docker run -td --name first_nginx -p : firstnginx
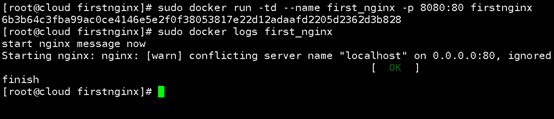
7,
sudo docker ps -a | grep first_nginx

8,
Verfiy the test1.html and test/test2.html
Open browser
http://localhost:8080/test1.html
http://localhost:8080/test/test2.html
here use your docker host ip address to replace sys.beserp.com
打开浏览器验证test1.html, test/test2.html文件是否可以被正常访问


The nginx container is working!!
Nginx 运行起来了!
文章版权归属千分网络科技(重庆)有限公司
如何制作一个Nginx镜像的更多相关文章
- 【URLOS应用开发基础】10分钟制作一个nginx静态网站环境应用
URLOS开发者功能已上线有一段时间了,目前通过部分开发者的使用体验来看,不得不说URLOS在服务器软件开发效率方面确实有着得天独厚的优势,凭借docker容器技术与其良好的应用生态环境,URLOS必 ...
- 制作一个docker镜像:mysql-8-x64-linux
因为个人学习需要,为软件系统的虚拟容器化,以下将mysql制作为docker镜像,并记录下详细步骤. 欢迎大家学习交流和转载,同时写作不易,如果各位觉得不错,请点赞支持. 备注:以下代码和文章,欢迎复 ...
- Docker下制作一个容器镜像
操作过程描述: (1)先基于centos的镜像启动一个centos容器 (2)在这个容器中安装nginx (3)然后把这个已经安装了nginx的容器制作成一个docker的镜像 操作:docker c ...
- vagrant package制作一个box镜像
1.进入virtualbox安装目录,查看虚拟机的名称(第一列为虚拟机名称) # vboxmanage list vms 2. vagrant package 打包命令 vagrant packag ...
- 使用Dockerfile创建一个tomcat镜像,并运行一个简单war包
docker已经看了有一段时间了,对镜像和容器也有了一个大致了解,参考书上的例子制作一个tomcat镜像,并简单运行一个HelloWorld.war 1.首先下载linux环境的tomcat和jdk, ...
- Docker: docker 启动一个Nginx容器
本文演示从官方镜像仓库拉取一个nginx镜像并启动docker run -d –p 8800:80 nginx (同一个镜像,可以启动N个容器, 比如说,一个nginx服务,可以在这个docker主机 ...
- docker学习之路-nginx镜像(翻译)
本篇来自https://hub.docker.com/_/nginx/?tab=description 它是docker hub上nginx的官方网站,上面有关于nginx的使用描述等.从这里你可以找 ...
- 最简单的dockerfile使用教程 - 创建一个支持SSL的Nginx镜像
什么是dockerfile?简单的说就是一个文本格式的脚本文件,其内包含了一条条的指令(Instruction),每一条指令负责描述镜像的当前层(Layer)如何构建. 下面通过一个具体的例子来学习d ...
- Docker 制作Nginx镜像
参考文章:https://www.jianshu.com/p/dc4cd0547d1e 镜像的制作方式有两种,一种是下载别人的镜像之后再制作成自己的镜像,一种是从头开始制作自己的镜像 第一种,下载别人 ...
随机推荐
- H5调用相机和相册更换头像
需求:H5调用手机的相机和相册从而实现更换头像的功能 这个功能是很常用的一个功能,因此做一个记录. 1.在头像img下加一个文件输入框 <input type="file" ...
- JVM体系结构详解
每个Java开发人员都知道字节码将由JRE (Java运行时环境)执行.但是很多人不知道JRE是Java Virtual Machine(JVM)的实现,它分析字节码.解释代码并执行代码.作为开发者, ...
- Collection集合与Map集合的知识点梳理
在Java中集合分为单列集合(Collection)与双列集合(Map),本文主要对两种集合的常用实现类作一介绍,如果有不足,恳请指教更正. 1.前言 说到集合肯定要介绍下集合的概念与特点:集合是一个 ...
- Fire Balls 07——砖块的淡出,消失以及砖塔的下落
版权申明: 本文原创首发于以下网站: 博客园『优梦创客』的空间:https://www.cnblogs.com/raymondking123 优梦创客的官方博客:https://91make.top ...
- kafka消息分发策略分析
当我们使用kafka向指定Topic发送消息时,如果该Topic具有多个partition,无论消费者有多少,最终都会保证一个partition内的消息只会被一个Consumer group中的一个C ...
- C# 生产者与消费者模式
情景:一个线程不断获取数据,另一个线程不断处理这些数据. 常规方法:数据列表加锁,两个线程获取锁,拿到操作权:类似代码如下:(不推荐) static void Main(string[] args) ...
- HDU 5324 Boring Class CDQ分治
题目传送门 题目要求一个3维偏序点的最长子序列,并且字典序最小. 题解: 这种题目出现的次数特别多了.如果不需要保证字典序的话直接cdq就好了. 这里需要维护字典序的话,我们从后往前配对就好了,因为越 ...
- 牛客小白月赛6 F 发电 树状数组单点更新 求区间乘积 模板
链接:https://www.nowcoder.com/acm/contest/136/F来源:牛客网 HA实验是一个生产.提炼“神力水晶”的秘密军事基地,神力水晶可以让机器的工作效率成倍提升. ...
- codeforces 486 D. Valid Sets(树形dp)
题目链接:http://codeforces.com/contest/486/problem/D 题意:给出n个点,还有n-1条边的信息,问这些点共能构成几棵满足要求的树,构成树的条件是. 1)首先这 ...
- Xshell配置公钥,免密码登陆
下面讲解如何通过xshell配置使用PubKey 来登录服务器,可以减少通过password登录的麻烦. 1.先到用户的家目录, cd ~ 2.执行ssh-keygen -t dsa(or rsa) ...