【zabbix部署】基于linux安装zabbix监控服务和被监控服务
环境配置
zabbix_server:10.0.0.1
zabbix_agentd:10.0.0.1,10.0.0.2(暂定)
操作系统:centos7.6
安装环境配置
1. LNMP环境
zabbix监控管理基于web页面展示出来的,并且需要使用mysql来存储数据,需先配置好LNMP环境
# 安装环境包

[root@tanbaobao ~]# yum -y install gcc pcre-devel openssl-devel

# 安装nginx,这里我之前安装好了(https://www.cnblogs.com/HeiDi-BoKe/p/11417155.html)

[root@VM_0_10_centos tmp]# tar -zxf nginx-1.16.1.tar.gz

# 切换到解压目录

[root@VM_0_10_centos nginx-1.16.1]# mkdir -p /var/tmp/nginx

# 配置
./configure \

--prefix=/usr/local/nginx \

--pid-path=/var/run/nginx/nginx.pid \

--lock-path=/var/lock/nginx.lock \

--error-log-path=/var/log/nginx/error.log \

--http-log-path=/var/log/nginx/access.log \

--with-http_gzip_static_module \

--http-client-body-temp-path=/var/tmp/nginx/client \

--http-proxy-temp-path=/var/tmp/nginx/proxy \

--http-fastcgi-temp-path=/var/tmp/nginx/fastcgi \

--http-uwsgi-temp-path=/var/tmp/nginx/uwsgi \

--http-scgi-temp-path=/var/tmp/nginx/scgi \

--with-http_stub_status_module \

--with-http_ssl_module \

--with-http_realip_module

# 编译安装

[root@VM_0_10_centos nginx-1.16.1]# make

[root@VM_0_10_centos nginx-1.16.1]# make install

# 启动服务

[root@VM_0_10_centos nginx]# cd sbin/

[root@VM_0_10_centos sbin]# pwd

/usr/local/nginx/sbin

[root@VM_0_10_centos sbin]# ./nginx -c /usr/local/nginx/conf/nginx.conf

[root@VM_0_10_centos sbin]# ./nginx -s reload

# 安装php

[root@tanbaobao ~]# yum -y install php php-mysql mariadb mariadb-devel mariadb-server php-fpm
2. 修改nginx配置文件
1)主配置文件
[root@tanbaobao zabbix-3.4.4]# cat /usr/local/nginx/conf/nginx.conf

#user  nobody;

worker_processes  1;

#error_log  logs/error.log;

#error_log  logs/error.log  notice;

#error_log  logs/error.log  info;

#pid        logs/nginx.pid;

events {

    worker_connections  1024;

}

http {

    include       mime.types;

    default_type  application/octet-stream;

    log_format  main  '$remote_addr - $remote_user [$time_local] "$request" '

                      '$status $body_bytes_sent "$http_referer" '

                      '"$http_user_agent" "$http_x_forwarded_for"';

    sendfile        on;

    keepalive_timeout  65;

   # 缓存php生成页面内容,8个16k

   # fastcgi_buffers 8 16k;

   # 缓存php生成的头部信息

   # fastcgi_buffers_size 32k;

   # 连接php的超时时间

   # fastcgi_connect_timeout 300;

   # 发送请求的超时时间

   # fastcgi_send_timeout 300;

   # 读取请求的超时时间

   # fastcgi_read_timeout 300;

   # 连接外部conf文件

   include /usr/local/nginx/conf/thy/*.conf;

}
2)外部文件
[root@tanbaobao zabbix-3.4.4]# cat /usr/local/nginx/conf/thy/other.conf

server{

        listen 80;

        server_name 10.0.0.1;

        location / {

                root html;

                # Turn on nginx state

#        stub_status on;

        index index.html index.htm index.php;

        }

    location /nginx_status {

                stub_status on;

                access_log   off;

            allow 10.0.0.1;

        allow 10.0.0.2;

        deny all;

    }

   # 缓存php生成页面内容,8个16k

   # fastcgi_buffers 8 16k;

   # 缓存php生成的头部信息

   # fastcgi_buffers_size 32k;

   # 连接php的超时时间

   # fastcgi_connect_timeout 300;

   # 发送请求的超时时间

   # fastcgi_send_timeout 300;

   # 读取请求的超时时间

   # fastcgi_read_timeout 300;

      location ~ \.php$ {

          root           html;

          fastcgi_pass   127.0.0.1:9000;

          fastcgi_index  index.php;

          #fastcgi_param  SCRIPT_FILENAME  /scripts$fastcgi_script_name;

          fastcgi_param  SCRIPT_FILENAME  $document_root$fastcgi_script_name;

          include        fastcgi_params;

      }

}
3)启动服务
# 确保防火墙已关闭,selinux为disabled

[root@tanbaobao zabbix-3.4.4]# /usr/local/nginx/sbin/nginx -s reload

[root@tanbaobao zabbix-3.4.4]# systemctl restart mariadb

[root@tanbaobao zabbix-3.4.4]# systemctl restart php-fpm
4)测试PHP页面网页连通性
# 编写test测试页面

[root@tanbaobao zabbix-3.4.4]# cat /usr/local/nginx/html/test.php

<?php

 phpinfo();

?>

# 通过浏览器或curl访问

[root@tanbaobao zabbix-3.4.4]# curl http://10.0.0.1/test.php
部署监控服务zabbix_server
1. 源码安装zabbix server
1)安装依赖包
[root@tanbaobao zabbix-3.4.4]# yum -y install net-snmp-devel curl-devel libevent-devel
# 将下载好的zabbix源码包解压编译安装zabbix_server

[root@tanbaobao zabbix-3.4.4]# tar -zxvf zabbix-3.4.4.tar.gz

[root@tanbaobao zabbix-3.4.4]# cd zabbix-3.4.4/

[root@tanbaobao zabbix-3.4.4]# ./configure --enable-server \

> --enable-proxy \

> --enable-agent \

> --with-mysql=/usr/bin/mysql_config \

> --with-netsnmp \

> --with-libcurl

[root@tanbaobao zabbix-3.4.4]# make && make install

2)初始化zabbix
创建数据库,上线zabbix web页面
创建数据库:
# 创建zabbix数据库,支持中文集,并授予相应权限

[root@tanbaobao zabbix-3.4.4]# mysql

MariaDB [(none)]> create database zabbix character set utf8;

Query OK, 1 row affected (0.00 sec)

MariaDB [(none)]> grant all privileges on zabbix.* to zabbix@'localhost' identified by '密码';

Query OK, 0 rows affected (0.00 sec)

MariaDB [(none)]> flush privileges;

Query OK, 0 rows affected (0.00 sec)

# 上面创建的是空数据库,数据在/usr/local/src/zabbix-3.4.4/database/mysql目录下,导入数据注意顺序

[root@tanbaobao zabbix-3.4.4]# cd /usr/local/src/zabbix-3.4.4/database/mysql/

[root@tanbaobao mysql]# ls

data.sql  images.sql  schema.sql

[root@tanbaobao mysql]# mysql -uzabbix -p数据库密码 zabbix < schema.sql

[root@tanbaobao mysql]# mysql -uzabbix -p数据库密码 zabbix < images.sql

[root@tanbaobao mysql]# mysql -uzabbix -p数据库密码 zabbix < data.sql
上线的web页面:
# 将zabbix的php页面代码复制到nginx发布目录下

[root@tanbaobao src]# cd /usr/local/src/zabbix-3.4.4/frontends/php/

[root@tanbaobao php]# cp -r * /usr/local/nginx/html/

[root@tanbaobao php]# chmod -R 777 /usr/local/nginx/html/
修改zabbix_server配置文件相关参数:
[root@tanbaobao php]# cat /usr/local/etc/zabbix_server.conf | grep -v '^$' | grep -v "^#"
LogFile=/tmp/zabbix_server.log # 日志设置
DBHost=localhost # 数据库主机,默认注释
DBName=zabbix # 数据库名称
DBUser=zabbix # 数据库用户
DBPassword=密码 # 数据库密码,默认注释
Timeout=4
LogSlowQueries=3000 # 创建zabbix用户
[root@tanbaobao php]# useradd -s /sbin/nologin zabbix # 启动zabbix_server服务
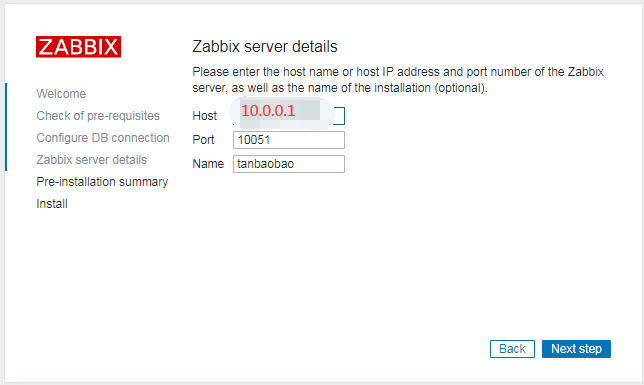
[root@tanbaobao php]# zabbix_server
# 查看服务是否正常启动,如果没有启动,先用killall 服务名之后再重新启动服务
[root@tanbaobao php]# ss -ntulp | grep zabbix_server
tcp LISTEN 0 128 *:10051 *:* users:(("zabbix_server"......
修改zabbix_agentd配置文件:
[root@tanbaobao php]# cat /usr/local/etc/zabbix_agentd.conf | grep -v '^$' | grep -v "^#"

LogFile=/tmp/zabbix_agentd.log    # 日志设置

Server=127.0.0.1,10.0.0.1    # 允许哪些主机可以监控本机

ServerActive=127.0.0.1,10.0.0.1    # 允许哪些主机通过主动模式监控本机

Hostname=tanbaobao    # 设置本机主机名

UnsafeUserParameters=1    # 开启允许自定义key

# 启动agentd服务

[root@tanbaobao php]# zabbix_agentd

[root@tanbaobao php]# ss -ntulp | grep zabbix_agentd

tcp    LISTEN     0      128       *:10050                 *:*                   users:(("zabbix_agentd"........
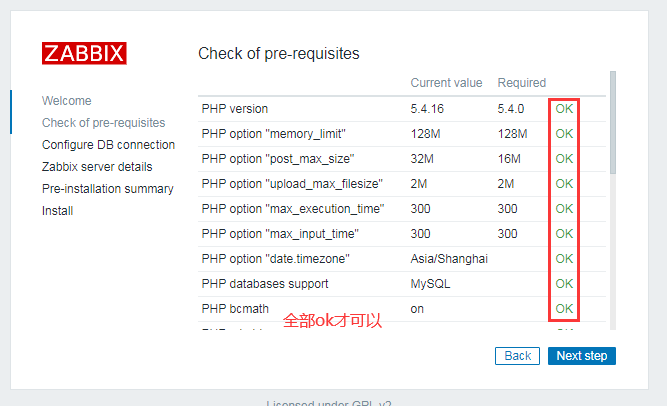
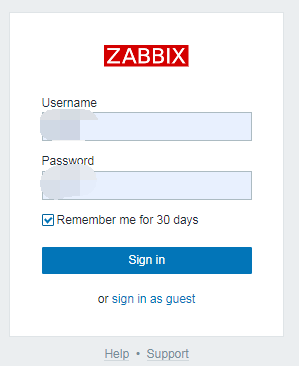
浏览器访问页面:http://ip/index.php


点击下一步根据错误提示:


[root@tanbaobao html]# yum -y install php-gd php-xml php-bcmath php-mbstring
修改/etc/php.ini文件如下内容:

# 重启php-fpm服务

[root@tanbaobao html]# systemctl restart php-fpm
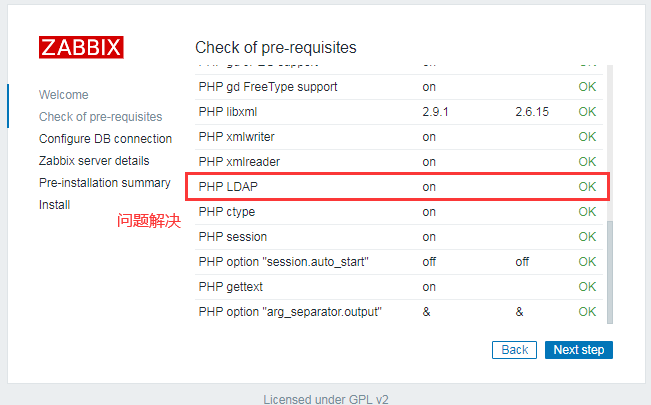
发现有个警告:(当然这个warning不解决也没关系,但是我这边还是解决比较好点)

解决:
# 查看是否有该模块(发现并没有该模块)

[root@tanbaobao html]# find / -name "ldap.so"

# 安装ldap模块(参考https://www.cnblogs.com/bigdevilking/p/9440098.html)

[root@tanbaobao html]# yum -y install php-ldap

# 再次查看发现ldap模块已经存在了

[root@tanbaobao html]# find / -name "ldap.so"

/usr/lib64/php/modules/ldap.so

# 重启服务

[root@tanbaobao html]# systemctl restart php-fpm
初始化数据库页面:

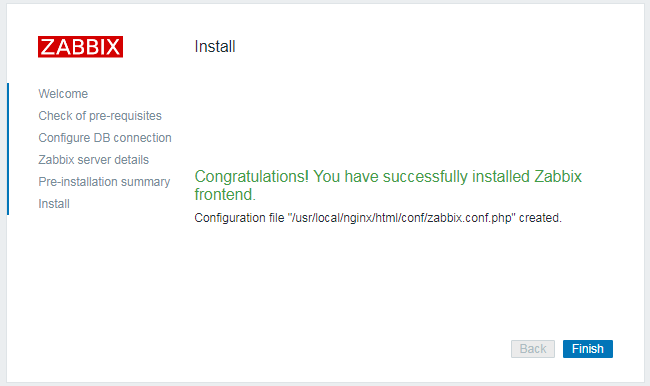
使用用户名和密码登录zabbix(登录之后可以设置界面语言环境为中文):
2. 搭建被监控端zabbix_agentd
[root@VM_0_16_centos zabbix-3.4.4]# useradd -s /sbin/nologin zabbix

[root@VM_0_16_centos zabbix-3.4.4]# tar -zxvf zabbix-3.4.4.tar.gz

[root@VM_0_16_centos src]# cd zabbix-3.4.4/

[root@VM_0_16_centos zabbix-3.4.4]# ./configure --enable-agent

[root@VM_0_16_centos zabbix-3.4.4]# make && make install

[root@VM_0_16_centos zabbix-3.4.4]# cat /usr/local/etc/zabbix_agentd.conf

Server=监控服务ip    # 被动模式

ServerActive=监控服务ip    # 主动模式

Hostname=VM_0_16_centos    # 被监控主机自己主机名

EnableRemoteCommands=1    # 监控异常后,允许远程登录执行命令
3.配置使用zabbix监控系统
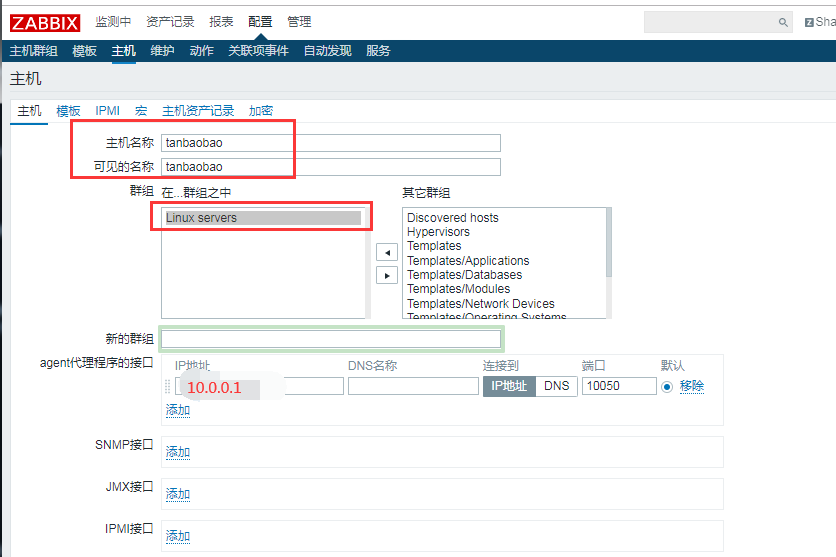
1)添加监控主机
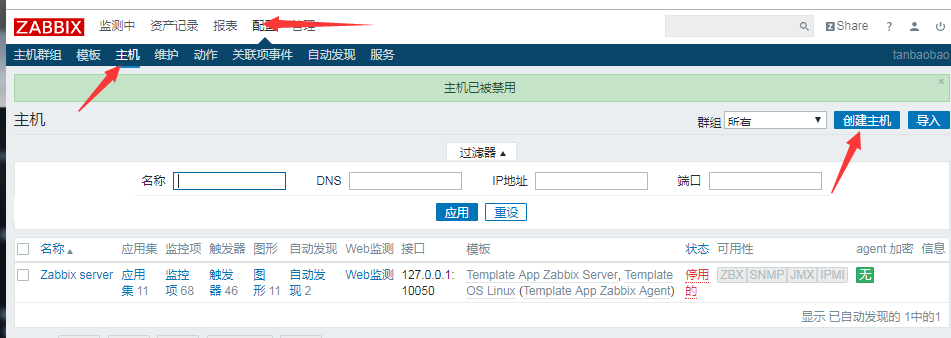
添加监控主机,名称建议和主机名一致,也可以不一致
2)为被监控主机添加模板
选择模板并连接到主机
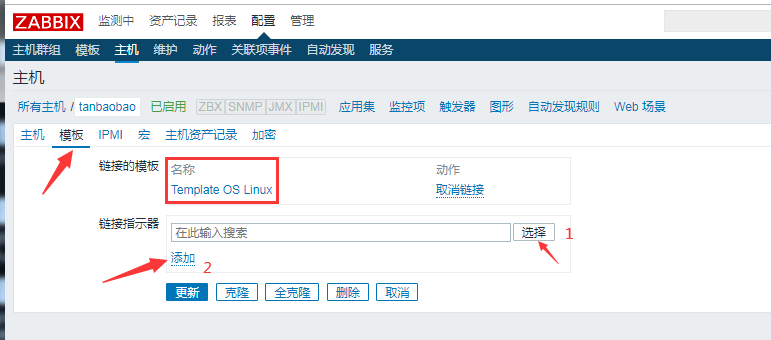
到此,监控端主机添加完成
【zabbix部署】基于linux安装zabbix监控服务和被监控服务的更多相关文章
- Linux 安装zabbix
Linux 安装zabbix zabbix是基于web界面的开源分布式监控平台,可以监控各种服务器的配置参数,支持自定义配置和自定义告警,并且可以实现邮件.短信等方式的告警,zabbix基本组件如 ...
- linux安装Zabbix监控
源码包3.4.0下载 https://nchc.dl.sourceforge.net/project/zabbix/ZABBIX%20Latest%20Stable/3.4.0/zabbix-3.4 ...
- zabbix源码编译安装以及添加第一台host监控
基础准备 硬件需求 数据库需求 软件需求 其他软件需求 安装 安装方式 source code 编译好的二进制包 rpm或者deb 源码编译安装部署zabbix以及附件 前提准备 最小化安装操作系 ...
- linux安装zabbix的tar包和另外一个并存
在安装zabbix客户端的时候,发现存在一个zabbix客户端,现在我们要重新建一个来与之并存 第一步安装: cd /data0/software/ tar xf zabbix-3.0.28.tar. ...
- 基于Oracle安装Zabbix
软件版本 Oracle Enterprise Linux 7.1 64bit Oracle Enterprise Edition 12.1.0.2 64bit Zabbix 3.2.1 准备工作 上传 ...
- (转)基于CentOS 7安装Zabbix 3.4和Zabbix4.0
原文:https://blog.csdn.net/leshami/article/details/78708049 CentOS 7环境下Zabbix4.0的安装和配置实例-----------htt ...
- 使用Ubuntu系统编译安装Zabbix企业级监控系统
使用Ubuntu系统编译安装Zabbix企业级监控系统 作者:尹正杰 版权声明:原创作品,谢绝转载!否则将追究法律责任. Ubuntu系统部署笔记:https://www.cnblogs.com/ ...
- Centos 源码安装zabbix 2.4.5
Zabbix简介 Zabbix是一个基于WEB界面的提供分布式系统监视以及网络监视功能的企业级的开源解决方案.zabbix能监视各种网络参数,保证服务器系统 的安全运营:并提供柔软的通知机制以让系统管 ...
- CentOS 7 源码安装 Zabbix 6.0
Zabbix 主要有以下几个组件组成: Zabbix Server:Zabbix 服务端,是 Zabbix 的核心组件.它负责接收监控数据并触发告警,还负责将监控数据持久化到数据库中. Zabbix ...
随机推荐
- Ansible Playbooks 介绍 和 使用 二
目录 handlers playbook 案例 2 handlers vars 变量 setup facts 变量使用 案例 inventory 中定义变量 案例 条件测试 when 语句 案例 迭代 ...
- sql 删除表数据并使ID自增重置
方法1:truncate table 你的表名//这样不但将数据全部删除,而且重新定位自增的字段 方法2:delete from 你的表名dbcc checkident(你的表名,reseed,0) ...
- CSS块级-内联元素,盒子模型
CSS元素 元素分类和区别 常用的块状元素有: <div>.<p>.<h1>~<h6>.<ol>.<ul>.<li> ...
- 配置防盗链、访问控制Directory和FilesMatch
5月31日任务 课程内容: 11.25 配置防盗链11.26 访问控制Directory11.27 访问控制FilesMatch扩展几种限制ip的方法 http://ask.apelearn.com/ ...
- 不止面试-JVM垃圾回收面试题详解
第一部分:面试题 本次分享我们将尝试回答以下问题: GC 是什么? 为什么要有 GC? 简单说一下java的垃圾回收机制. JVM的常见垃圾回收算法有哪些? 为什么要使用分代回收机制? 如何判断一个对 ...
- 【原创】002 | 搭上SpringBoot事务源码分析专车
前言 如果这是你第二次看到师长,说明你在觊觎我的美色! 点赞+关注再看,养成习惯 没别的意思,就是需要你的窥屏^_^ 专车介绍** 该趟专车是开往Spring Boot事务源码分析的专车 专车问题 为 ...
- Hive Hadoop 解析 orc 文件
解析 orc 格式 为 json 格式: ./hive --orcfiledump -d <hdfs-location-of-orc-file> 把解析的 json 写入 到文件 ./hi ...
- java中List、Map、Set、Stack、Queue、Collections等的使用
java中List.Map.Set.Stack.Queue.Collections等的使用 List 创建方法: List<String> list=new ArrayList<&g ...
- R语言计算IV值
更多大数据分析.建模等内容请关注公众号<bigdatamodeling> 在对变量分箱后,需要计算变量的重要性,IV是评估变量区分度或重要性的统计量之一,R语言计算IV值的代码如下: Ca ...
- Windows安装MSYS2_切换zsh_整合cmder
MSYS2是什么 MSYS2 (Minimal SYStem 2) 是一个MSYS的独立改写版本,主要用于 shell 命令行开发环境.同时它也是一个在Cygwin (POSIX 兼容性层) 和 Mi ...