
[译]Vulkan教程(29)组合的Image采样器
[译]Vulkan教程(29)组合的Image采样器
Combined image sampler 组合的image采样器
Introduction 入门
We looked at descriptors for the first time in the uniform buffers part of the tutorial. In this chapter we will look at a new type of descriptor: combined image sampler. This descriptor makes it possible for shaders to access an image resource through a sampler object like the one we created in the previous chapter.
在本教程的uniform buffer部分,我们首次认识了描述符。本章,我们将认识一个新类型的描述符:组合的image采样器(译者注:后文简称CIS)。这个描述符让shader通过采样器对象(例如我们在上一章创建的那个)存取image资源成为可能。
We'll start by modifying the descriptor layout, descriptor pool and descriptor set to include such a combined image sampler descriptor. After that, we're going to add texture coordinates to Vertex and modify the fragment shader to read colors from the texture instead of just interpolating the vertex colors.
开始,我们修改描述符布局,描述符池和描述符set,以包含这样一个CIS描述符。之后,我们要添加纹理坐标到Vertex ,修改Fragment shader来从纹理读取颜色,而不是从顶点颜色插值。
Updating the descriptors 更新描述符
Browse to the createDescriptorSetLayout function and add a VkDescriptorSetLayoutBinding for a combined image sampler descriptor. We'll simply put it in the binding after the uniform buffer:
找到createDescriptorSetLayout 函数,为CIS描述符添加一个VkDescriptorSetLayoutBinding 。我们简单地将其放到uniform buffer后面的binding:
VkDescriptorSetLayoutBinding samplerLayoutBinding = {};

samplerLayoutBinding.binding = 1;

samplerLayoutBinding.descriptorCount = 1;

samplerLayoutBinding.descriptorType = VK_DESCRIPTOR_TYPE_COMBINED_IMAGE_SAMPLER;

samplerLayoutBinding.pImmutableSamplers = nullptr;

samplerLayoutBinding.stageFlags = VK_SHADER_STAGE_FRAGMENT_BIT;

std::array<VkDescriptorSetLayoutBinding, 2> bindings = {uboLayoutBinding, samplerLayoutBinding};

VkDescriptorSetLayoutCreateInfo layoutInfo = {};

layoutInfo.sType = VK_STRUCTURE_TYPE_DESCRIPTOR_SET_LAYOUT_CREATE_INFO;

layoutInfo.bindingCount = static_cast<uint32_t>(bindings.size());

layoutInfo.pBindings = bindings.data();
Make sure to set the stageFlags to indicate that we intend to use the combined image sampler descriptor in the fragment shader. That's where the color of the fragment is going to be determined. It is possible to use texture sampling in the vertex shader, for example to dynamically deform a grid of vertices by a heightmap.
确保设置stageFlags to表示我们想在Fragment shader中用CIS描述符。那是决定Fragment颜色的地方。可以在顶点shader中用纹理采样,例如用于使顶点网格动态变形by heightmap。
If you would run the application with validation layers now, then you'll see that it complains that the descriptor pool cannot allocate descriptor sets with this layout, because it doesn't have any combined image sampler descriptors. Go to the createDescriptorPool function and modify it to include a VkDescriptorPoolSize for this descriptor:
如果你现在启用验证层运行程序,那么你会看到它抱怨说描述符池不能分配这个布局下的描述符set,因为它没有任何CIS描述符。找到createDescriptorPool 函数,修改它to包含VkDescriptorPoolSize for这个描述符:
std::array<VkDescriptorPoolSize, 2> poolSizes = {};

poolSizes[0].type = VK_DESCRIPTOR_TYPE_UNIFORM_BUFFER;

poolSizes[0].descriptorCount = static_cast<uint32_t>(swapChainImages.size());

poolSizes[1].type = VK_DESCRIPTOR_TYPE_COMBINED_IMAGE_SAMPLER;

poolSizes[1].descriptorCount = static_cast<uint32_t>(swapChainImages.size());

VkDescriptorPoolCreateInfo poolInfo = {};

poolInfo.sType = VK_STRUCTURE_TYPE_DESCRIPTOR_POOL_CREATE_INFO;

poolInfo.poolSizeCount = static_cast<uint32_t>(poolSizes.size());

poolInfo.pPoolSizes = poolSizes.data();

poolInfo.maxSets = static_cast<uint32_t>(swapChainImages.size());
The final step is to bind the actual image and sampler resources to the descriptors in the descriptor set. Go to the createDescriptorSets function.
最后一步是,绑定image和采样器资源到描述符set中的描述符。找到createDescriptorSets 函数。
for (size_t i = 0; i < swapChainImages.size(); i++) {

    VkDescriptorBufferInfo bufferInfo = {};

    bufferInfo.buffer = uniformBuffers[i];

    bufferInfo.offset = 0;

    bufferInfo.range = sizeof(UniformBufferObject);

    VkDescriptorImageInfo imageInfo = {};

    imageInfo.imageLayout = VK_IMAGE_LAYOUT_SHADER_READ_ONLY_OPTIMAL;

    imageInfo.imageView = textureImageView;

    imageInfo.sampler = textureSampler;

    ...

}
The resources for a combined image sampler structure must be specified in a VkDescriptorImageInfo struct, just like the buffer resource for a uniform buffer descriptor is specified in a VkDescriptorBufferInfo struct. This is where the objects from the previous chapter come together.
CIS结构体的资源必须在VkDescriptorImageInfo 结构体中指定,就像buffer资源for uniform buffer描述符在VkDescriptorBufferInfo 结构体中指定一样。这就与上一章的对象联系起来了。
std::array<VkWriteDescriptorSet, 2> descriptorWrites = {};

descriptorWrites[0].sType = VK_STRUCTURE_TYPE_WRITE_DESCRIPTOR_SET;

descriptorWrites[0].dstSet = descriptorSets[i];

descriptorWrites[0].dstBinding = 0;

descriptorWrites[0].dstArrayElement = 0;

descriptorWrites[0].descriptorType = VK_DESCRIPTOR_TYPE_UNIFORM_BUFFER;

descriptorWrites[0].descriptorCount = 1;

descriptorWrites[0].pBufferInfo = &bufferInfo;

descriptorWrites[1].sType = VK_STRUCTURE_TYPE_WRITE_DESCRIPTOR_SET;

descriptorWrites[1].dstSet = descriptorSets[i];

descriptorWrites[1].dstBinding = 1;

descriptorWrites[1].dstArrayElement = 0;

descriptorWrites[1].descriptorType = VK_DESCRIPTOR_TYPE_COMBINED_IMAGE_SAMPLER;

descriptorWrites[1].descriptorCount = 1;

descriptorWrites[1].pImageInfo = &imageInfo;

vkUpdateDescriptorSets(device, static_cast<uint32_t>(descriptorWrites.size()), descriptorWrites.data(), 0, nullptr);
The descriptors must be updated with this image info, just like the buffer. This time we're using the pImageInfo array instead of pBufferInfo. The descriptors are now ready to be used by the shaders!
描述符必须用这个image信息更新,就像buffer那样。这次我们要用pImageInfo数组,而不是pBufferInfo。描述符现在准备好被shader使用了!
Texture coordinates 纹理坐标
There is one important ingredient for texture mapping that is still missing, and that's the actual coordinates for each vertex. The coordinates determine how the image is actually mapped to the geometry.
还有一个元素for纹理映射that没有提到,那就是每个顶点的纹理坐标。这个坐标决定了image如何映射到几何体上。
struct Vertex {

    glm::vec2 pos;

    glm::vec3 color;

    glm::vec2 texCoord;

    static VkVertexInputBindingDescription getBindingDescription() {

        VkVertexInputBindingDescription bindingDescription = {};

        bindingDescription.binding = 0;

        bindingDescription.stride = sizeof(Vertex);

        bindingDescription.inputRate = VK_VERTEX_INPUT_RATE_VERTEX;

        return bindingDescription;

    }

    static std::array<VkVertexInputAttributeDescription, 3> getAttributeDescriptions() {

        std::array<VkVertexInputAttributeDescription, 3> attributeDescriptions = {};

        attributeDescriptions[0].binding = 0;

        attributeDescriptions[0].location = 0;

        attributeDescriptions[0].format = VK_FORMAT_R32G32_SFLOAT;

        attributeDescriptions[0].offset = offsetof(Vertex, pos);

        attributeDescriptions[1].binding = 0;

        attributeDescriptions[1].location = 1;

        attributeDescriptions[1].format = VK_FORMAT_R32G32B32_SFLOAT;

        attributeDescriptions[1].offset = offsetof(Vertex, color);

        attributeDescriptions[2].binding = 0;

        attributeDescriptions[2].location = 2;

        attributeDescriptions[2].format = VK_FORMAT_R32G32_SFLOAT;

        attributeDescriptions[2].offset = offsetof(Vertex, texCoord);

        return attributeDescriptions;

    }

};
Modify the Vertex struct to include a vec2 for texture coordinates. Make sure to also add a VkVertexInputAttributeDescription so that we can use access texture coordinates as input in the vertex shader. That is necessary to be able to pass them to the fragment shader for interpolation across the surface of the square.
修改Vertex 结构体to包含一个vec2 for纹理坐标。确保也添加一个VkVertexInputAttributeDescription ,这样我们可以用纹理坐标作为顶点shader的输入。这对于传递它们到Fragment shader后在四边形上插值是必要的。
const std::vector<Vertex> vertices = {

    {{-0.5f, -0.5f}, {1.0f, 0.0f, 0.0f}, {1.0f, 0.0f}},

    {{0.5f, -0.5f}, {0.0f, 1.0f, 0.0f}, {0.0f, 0.0f}},

    {{0.5f, 0.5f}, {0.0f, 0.0f, 1.0f}, {0.0f, 1.0f}},

    {{-0.5f, 0.5f}, {1.0f, 1.0f, 1.0f}, {1.0f, 1.0f}}

};
In this tutorial, I will simply fill the square with the texture by using coordinates from 0, 0 in the top-left corner to 1, 1 in the bottom-right corner. Feel free to experiment with different coordinates. Try using coordinates below 0 or above 1 to see the addressing modes in action!
本教程中,我们将简单地填入四边形with这个纹理by使用坐标-从左上角的0, 0到右下角的1, 1。你可以随意体验不同的坐标。尝试使用低于0或高于1的坐标to实际看看取址模式!
Shaders
The final step is modifying the shaders to sample colors from the texture. We first need to modify the vertex shader to pass through the texture coordinates to the fragment shader:
最后一步是修改shader来从纹理中采样颜色。我们首先需要修改顶点shader来传入纹理坐标到Fragment shader:
layout(location = 0) in vec2 inPosition;

layout(location = 1) in vec3 inColor;

layout(location = 2) in vec2 inTexCoord;

layout(location = 0) out vec3 fragColor;

layout(location = 1) out vec2 fragTexCoord;

void main() {

    gl_Position = ubo.proj * ubo.view * ubo.model * vec4(inPosition, 0.0, 1.0);

    fragColor = inColor;

    fragTexCoord = inTexCoord;

}
Just like the per vertex colors, the fragTexCoord values will be smoothly interpolated across the area of the square by the rasterizer. We can visualize this by having the fragment shader output the texture coordinates as colors:
就像逐顶点的颜色一样,fragTexCoord 值会在四边形上被光栅器平滑地插值。我们可以看到这个by让Fragment shader输出纹理坐标为颜色:
#version 450

#extension GL_ARB_separate_shader_objects : enable

layout(location = 0) in vec3 fragColor;

layout(location = 1) in vec2 fragTexCoord;

layout(location = 0) out vec4 outColor;

void main() {

    outColor = vec4(fragTexCoord, 0.0, 1.0);

}
You should see something like the image below. Don't forget to recompile the shaders!
你会看到下图所示的内容。别忘记重编译shader!

The green channel represents the horizontal coordinates and the red channel the vertical coordinates. The black and yellow corners confirm that the texture coordinates are correctly interpolated from 0, 0 to 1, 1 across the square. Visualizing data using colors is the shader programming equivalent of printf debugging, for lack of a better option!
绿色通道代表水平坐标,红色通道代表竖直坐标。黑色和黄色的角落确认了that纹理坐标被正确得在四边形上从0, 0到1, 1插值了。彩色可视化数据是shader编程中等价于printf 的调试方式,如果没有更好的选择!
A combined image sampler descriptor is represented in GLSL by a sampler uniform. Add a reference to it in the fragment shader:
一个CIS描述符在GLSL中用一个采样器uniform变量代表。在Fragment shader中添加对它的引用:
layout(binding = 1) uniform sampler2D texSampler;
There are equivalent sampler1D and sampler3D types for other types of images. Make sure to use the correct binding here.
对其他类型的image,有等价的sampler1D 和sampler3D 。确保这里使用正确的绑定。
void main() {

    outColor = texture(texSampler, fragTexCoord);

}
Textures are sampled using the built-in texture function. It takes a sampler and coordinate as arguments. The sampler automatically takes care of the filtering and transformations in the background. You should now see the texture on the square when you run the application:
纹理通过内置的texture 函数进行采样。它接收一个sampler 和坐标作为参数。采样器自动在后台处理过滤和变换问题。你现在可以看到纹理在四边形上when你运行程序:
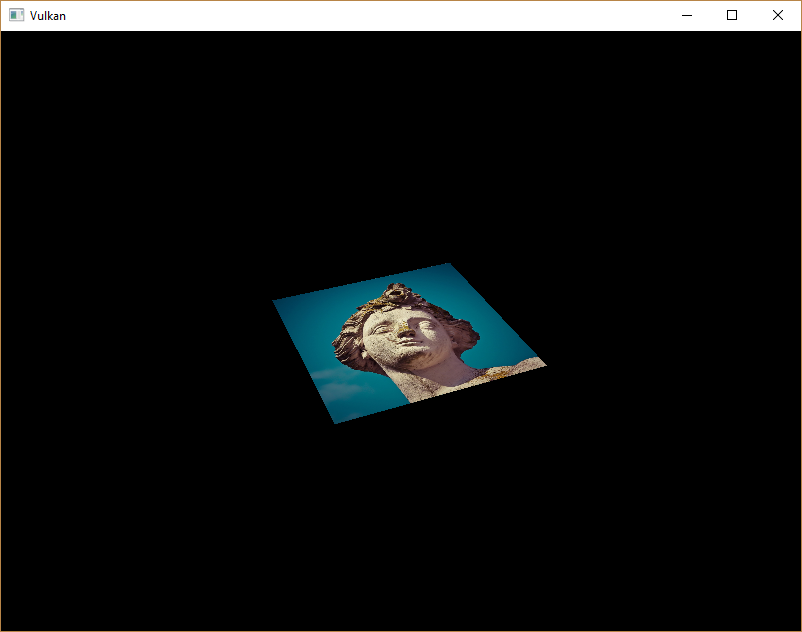
Try experimenting with the addressing modes by scaling the texture coordinates to values higher than 1. For example, the following fragment shader produces the result in the image below when using VK_SAMPLER_ADDRESS_MODE_REPEAT:
尝试试验取址模式by缩放纹理坐标到大于1的值。例如,下述Fragment shader会产生下述image-when使用VK_SAMPLER_ADDRESS_MODE_REPEAT模式:
void main() {

    outColor = texture(texSampler, fragTexCoord * 2.0);

}

You can also manipulate the texture colors using the vertex colors:
你也可以修改纹理颜色-使用顶点颜色:
void main() {

    outColor = vec4(fragColor * texture(texSampler, fragTexCoord).rgb, 1.0);

}
I've separated the RGB and alpha channels here to not scale the alpha channel.
我将RGB和alhpa通道分开了to不缩放alpha通道。

You now know how to access images in shaders! This is a very powerful technique when combined with images that are also written to in framebuffers. You can use these images as inputs to implement cool effects like post-processing and camera displays within the 3D world.
现在你指定如何在shader中读取image了!这是个非常强大的技术whne结合写入帧缓存的image。你可以用这些image作为输入来实现很酷的效果-例如后处理和3D世界的摄像机显示。
C++ code / Vertex shader / Fragment shader
[译]Vulkan教程(29)组合的Image采样器的更多相关文章
- [译]Vulkan教程(28)Image视图和采样器
[译]Vulkan教程(28)Image视图和采样器 Image view and sampler - Image视图和采样器 In this chapter we're going to creat ...
- [译]Vulkan教程(27)Image
[译]Vulkan教程(27)Image Images Introduction 入门 The geometry has been colored using per-vertex colors so ...
- [译]Vulkan教程(14)图形管道基础之固定功能
[译]Vulkan教程(14)图形管道基础之固定功能 Fixed functions 固定功能 The older graphics APIs provided default state for m ...
- [译]Vulkan教程(32)生成mipmap
[译]Vulkan教程(32)生成mipmap Generating Mipmaps 生成mipmap Introduction 入门 Our program can now load and ren ...
- [译]Vulkan教程(31)加载模型
[译]Vulkan教程(31)加载模型 Loading models 加载模型 Introduction 入门 Your program is now ready to render textured ...
- [译]Vulkan教程(30)深度缓存
[译]Vulkan教程(30)深度缓存 Depth buffering 深度缓存 Introduction 入门 The geometry we've worked with so far is pr ...
- [译]Vulkan教程(25)描述符布局和buffer
[译]Vulkan教程(25)描述符布局和buffer Descriptor layout and buffer 描述符布局和buffer Introduction 入门 We're now able ...
- [译]Vulkan教程(21)顶点input描述
[译]Vulkan教程(21)顶点input描述 Vertex input description 顶点input描述 Introduction 入门 In the next few chapters ...
- [译]Vulkan教程(16)图形管道基础之总结
[译]Vulkan教程(16)图形管道基础之总结 Conclusion 总结 We can now combine all of the structures and objects from the ...
随机推荐
- .net(C#数据库访问) Mysql,Sql server,Sqlite,Access四种数据库的连接方式
便签记录Mysql,Sql server,Sqlite,Access四种数据库的简单连接方式 //using MySql.Data.MySqlClient; #region 执行简单SQL语句,使用M ...
- 【高可用架构】用Nginx实现负载均衡(三)
前言 在上一篇,已经用Envoy工具统一发布了Deploy项目代码.本篇我们来看看如何用nginx实现负载均衡 负载均衡器IP 192.168.10.11 [高可用架构]系列链接:待部署的架构介绍 演 ...
- grid行高亮显示
grid var grid = new Ext.RSEGrid({ //数据显示面板 id: 'O005_grid', title: '图纸目录', loadMask: true, autoScrol ...
- 微服务分布式 spring cloud springboot 框架源码 activiti工作流 前后分离
1.代码生成器: [正反双向](单表.主表.明细表.树形表,快速开发利器)freemaker模版技术 ,0个代码不用写,生成完整的一个模块,带页面.建表sql脚本.处理类.service等完整模块2. ...
- Win10系统重做
一.准备工作: 1.电脑(台式电脑.笔记本电脑): 2.U盘(内存大于4G): 3.软碟通(UltraISO):下载地址:https://pan.baidu.com/s/1tpCiIyIwK_7LaL ...
- Ubuntu18.04搭建测试环境
前言 说一下我的情况,之前由于我的云服务器数据库的root账号密码123456太简单,而在之前的博客中也泄露出了我的云服务器的IP地址,导致有人远程连接我的数据库,删除了项目数据库里的数据只剩下WAR ...
- IT兄弟连 HTML5教程 CSS3属性特效 遮罩
CSS遮罩提供一种基于像素级别的,可以控制元素透明度的能力,类似于png24位或png32位中的alpha透明通道的效果.遮罩有三个属性可以设置,分别是mask-image.mask-position ...
- python网络爬虫之解析网页的BeautifulSoup(爬取电影图片)[三]
目录 前言 一.BeautifulSoup的基本语法 二.爬取网页图片 扩展学习 后记 前言 本章同样是解析一个网页的结构信息 在上章内容中(python网络爬虫之解析网页的正则表达式(爬取4k动漫图 ...
- 【2019的idea插件jreber使用】
前言 前面的idea安装说明已经可以完全使用了,没有安装的2019版idea的小伙伴可以去参考我上面的博客:https://www.cnblogs.com/liwangwang/p/11348434. ...
- 从源码角度看 PHP 字符串类型转换
PHP 的类型转换是比较方便的,但是越是容易使用的东西,底层的实现越是复杂,而且在使用中像我这样的新手也往往不清楚转换后的结果到底是什么.有时候,对于 Java 这种强类型的语言,使用的时候需要强制进 ...