SpringBoot开发案例之打造十万博文Web篇

前言
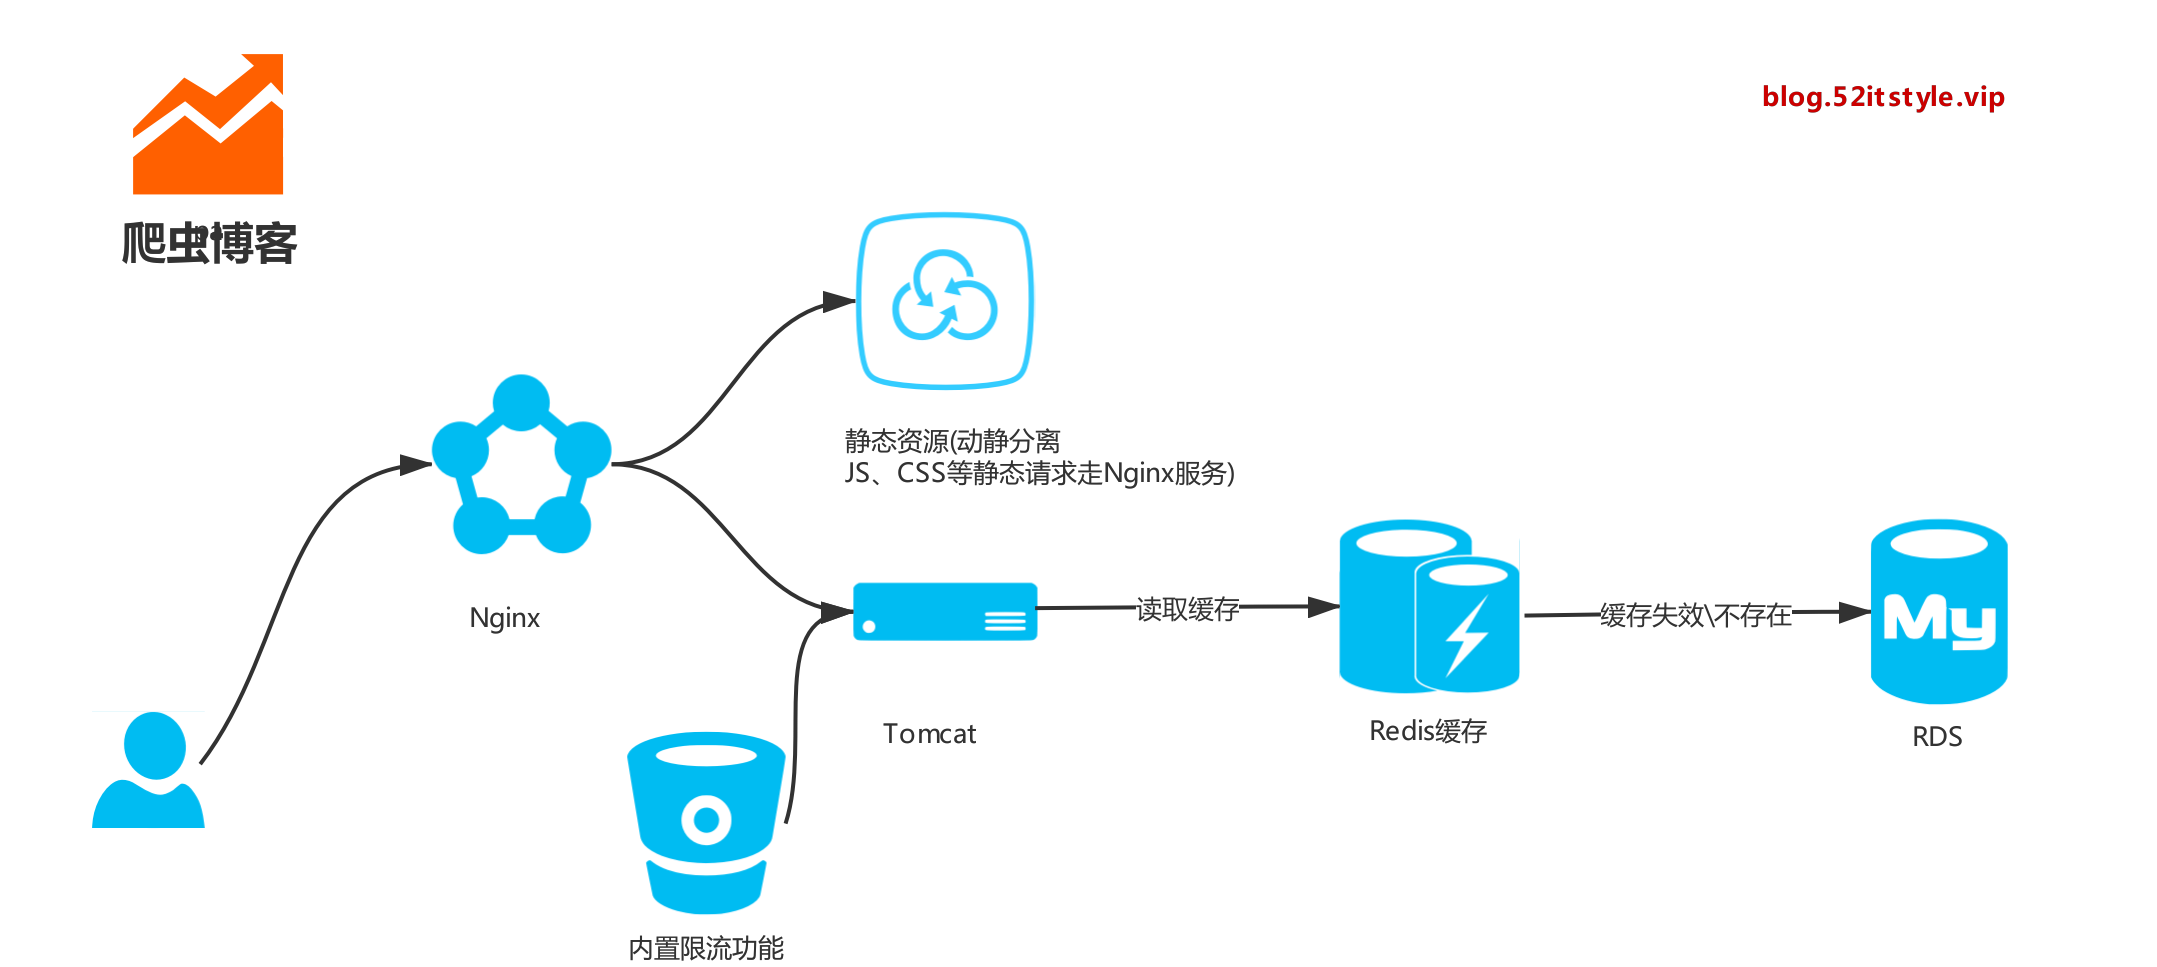
通过 Python 爬取十万博文之后,最重要的是要让互联网用户访问到,那么如何做呢?
选型
从后台框架、前端模板、数据库连接池、缓存、代理服务、限流等组件多个维度选型。
- 后台框架 SpringBoot2+、JPA
- 前端框架 Vue
- 模块框架 Thymeleaf
- 数据库连接池 HikariCP
- 缓存 Redis
- 限流 Guava
- 代理服务 Nginx
- 文章编辑 Markdown
架构
博文
我们可以通过以下方式访问:
https://blog.52itstyle.top/49.html
亦或是:
https://blog.52itstyle.top/49.shtml
当然,如果你愿意你也可以显示为:
https://blog.52itstyle.top/49.php

https://blog.52itstyle.top/49.asp

https://blog.52itstyle.top/49.jsp
只需要在后台配置对应的映射关系即可:
/**

* 博文

*/

@RequestMapping("{id}.html")

public String blog(@PathVariable("id") Long id, ModelMap model) {

   Blog blog = blogService.getById(id);

   model.addAttribute("blog",blog);

   return  "article";

}
由于数据库存储的是 markedown 格式的数据,前台我们通过 editormd 转为 html 代码显示,这里只展示部分代码:
<script type='text/javascript' src='js/jquery.min.js'></script>

<!--省略部分代码-->

<script type='text/javascript' src="editor/editormd.min.js"></script>

<!--省略部分代码-->

<div id="article">

	<textarea  th:text="${blog.content}"  style="display:none;" placeholder="markdown语言">

	</textarea>

</div>

<!--省略部分代码-->

<script>

editormd.markdownToHTML("article", {

	htmlDecode      : "style,script,iframe",

	emoji           : true,

	taskList        : true,

	tex             : true,  // 默认不解析

	flowChart       : true,  // 默认不解析

	sequenceDiagram : true  // 默认不解析

});

</script>
缓存
爬取的博文一般、基本、大概不会修改,所以我们完全可以缓存起来,避免跟数据库直接交互,顺便提升一下访问速速。正好手头有个 256MB 的阿里云 Redis 服务,拿来就用了。
首相引入以下组件:
<dependency>

     <groupId>org.springframework.boot</groupId>

     <artifactId>spring-boot-starter-cache</artifactId>

</dependency>

<dependency>

     <groupId>org.springframework.boot</groupId>

     <artifactId>spring-boot-starter-data-redis</artifactId>

</dependency>
配置 redis:
spring.redis.database=1

spring.redis.host=r-m5e4873fd882de14.redis.rds.aliyuncs.com

spring.redis.port=6379

spring.redis.password=6347888

spring.redis.pool.max-active=8

spring.redis.pool.max-wait=-1

spring.redis.pool.max-idle=8

spring.redis.pool.min-idle=0

spring.redis.timeout=3000ms

spring.cache.type = redis
接口实现,引入 Cacheable 注解:
@Override

@Cacheable(cacheNames ="blog")

public Blog getById(Long id) {

     String nativeSql = "SELECT * FROM blog WHERE id=?";

     return dynamicQuery.nativeQuerySingleResult(Blog.class,nativeSql,new Object[]{id});

}
配置完成之后,我们打开数据库配置,多次访问博文地址,如果只是初次打印 SQL 说明配置成功:
spring.jpa.show-sql = true
限流
万一哪天流量暴涨亦或是有人恶意攻击,尔等小服务器根本扛不住,所以有时候我们需要一定的手段进行限流,比如限制IP访问的频率次数。
这里我们使用开源的第三方组件库,引入以下组件:
<dependency>

     <groupId>com.google.guava</groupId>

     <artifactId>guava</artifactId>

     <version>25.1-jre</version>

</dependency>
自定义注解:
/**

 * 自定义注解  限流

 */

@Target({ElementType.PARAMETER, ElementType.METHOD})

@Retention(RetentionPolicy.RUNTIME)

@Documented

public  @interface ServiceLimit {

    /**

     * 描述

     */

    String description()  default "";

    /**

     * key

     */

    String key() default "";

    /**

     * 类型

     */

    LimitType limitType() default LimitType.CUSTOMER;

    enum LimitType {

        /**

         * 自定义key

         */

        CUSTOMER,

        /**

         * 根据请求者IP

         */

        IP

    }

}
限流逻辑:
/**

 * 限流 AOP

 */

@Aspect

@Configuration

public class LimitAspect {

    //根据IP分不同的令牌桶, 每天自动清理缓存

    private static LoadingCache<String, RateLimiter> caches = CacheBuilder.newBuilder()

            .maximumSize(1000)

            .expireAfterWrite(1, TimeUnit.DAYS)

            .build(new CacheLoader<String, RateLimiter>() {

                @Override

                public RateLimiter load(String key){

                    // 新的IP初始化 每秒只发出5个令牌

                    return RateLimiter.create(5);

                }

            });

    //Service层切点  限流

    @Pointcut("@annotation(com.itstyle.blog.common.limit.ServiceLimit)")

    public void ServiceAspect() {

    }

    @Around("ServiceAspect()")

    public  Object around(ProceedingJoinPoint joinPoint) {

        MethodSignature signature = (MethodSignature) joinPoint.getSignature();

        Method method = signature.getMethod();

        ServiceLimit limitAnnotation = method.getAnnotation(ServiceLimit.class);

        ServiceLimit.LimitType limitType = limitAnnotation.limitType();

        String key = limitAnnotation.key();

        Object obj;

        try {

            if(limitType.equals(ServiceLimit.LimitType.IP)){

                key = IPUtils.getIpAddr();

            }

            RateLimiter rateLimiter = caches.get(key);

            Boolean flag = rateLimiter.tryAcquire();

            if(flag){

                obj = joinPoint.proceed();

            }else{

                throw new RrException("小同志,你访问的太频繁了");

            }

        } catch (Throwable e) {

            throw new RrException("小同志,你访问的太频繁了");

        }

        return obj;

    }

}
收录
完事具备,就差被搜索引擎收录了,我们可以通过手动生成网站地图,提交给百度。
/**

 * 生成地图

 * 参见:https://blog.52itstyle.top/sitemap.xml

 */

@Component

public class SitemapTask {

    @Autowired

    private DynamicQuery dynamicQuery;

    protected Logger logger = LoggerFactory.getLogger(getClass());

    @Value("${blog.url}")

    private  String blogUrl;

    //每天23点执行一次

    @Scheduled(cron = "0 0 23 * * ?")

    public void createSitemap() {

        logger.info("定时提交百度收录开始");

        StringBuffer xml = new  StringBuffer();

        xml.append("<?xml version='1.0' encoding='utf-8'?>\n");

        xml.append("<urlset>\n");

        String nativeSql = "SELECT id,create_time FROM blog";

        List<Object[]> list = dynamicQuery.query(nativeSql,new Object[]{});

        list.forEach(blog -> {

            String url = blogUrl+blog[0]+".html";

            xml.append("   <url>\n");

            xml.append("       <loc>"+url+"</loc>\n");

            xml.append("       <lastmod>"+blog[1]+"</lastmod>\n");

            xml.append("   </url>\n");

        });

        xml.append("</urlset>\n");

        saveAsFileWriter(xml.toString());

        logger.info("定时提交百度收录结束");

    }

    private static void saveAsFileWriter(String content) {

        String path = ClassUtils.getDefaultClassLoader().getResource("").getPath();

        String filePath = path + "static"+ SystemConstant.SF_FILE_SEPARATOR+"sitemap.xml";

        FileWriter fwriter = null;

        try {

            fwriter = new FileWriter(filePath, false);

            fwriter.write(content);

        } catch (IOException ex) {

            ex.printStackTrace();

        } finally {

            try {

                fwriter.flush();

                fwriter.close();

            } catch (IOException ex) {

                ex.printStackTrace();

            }

        }

    }

}
打包
尽量不要以Jar包形式部署,为了以后方便部署,最好放置到 外置Tomcat 下。
pom.xml 中移除内置 Tomcat:
<dependency>

      <groupId>org.springframework.boot</groupId>

      <artifactId>spring-boot-starter-tomcat</artifactId>

      <scope>provided</scope>

</dependency>
修改启动类:
/**

 * 启动类

 * 创建者 科帮网

 * 创建时间	2019年7月21日

 */

@SpringBootApplication

@EnableCaching

@EnableScheduling

public class Application extends SpringBootServletInitializer {

    private static final Logger logger = LoggerFactory.getLogger(Application.class);

    public static void main(String[] args) {

        SpringApplication.run(Application.class, args);

        logger.info("项目启动");

    }

    @Override

    protected SpringApplicationBuilder configure(SpringApplicationBuilder application) {

        return application.sources(Application.class);

    }

}
代理
项目部署后,最好加一层代理服务,这里我们使用Nginx:
server {

    listen 80;

    server_name blog.52itstyle.top;

    return 301 https://$server_name$request_uri;

}

server{

    listen 443 ssl;

    server_name blog.52itstyle.top;

    #证书路径

    ssl_certificate    /usr/local/openresty/nginx/cert/2543486_blog.52itstyle.top.pem;

    #私钥路径

    ssl_certificate_key   /usr/local/openresty/nginx/cert/2543486_blog.52itstyle.top.key;

    #缓存有效期

    ssl_session_timeout 5m;

    #可选的加密算法,顺序很重要,越靠前的优先级越高.

    ssl_ciphers ECDHE-RSA-AES128-GCM-SHA256:ECDHE:ECDH:AES:HIGH:!NULL:!aNULL:!MD5:!ADH:!RC4;

    #安全链接可选的加密协议

    ssl_protocols TLSv1 TLSv1.1 TLSv1.2;

    ssl_prefer_server_ciphers on;

    location = /500.html {

        root   /usr/local/openresty/nginx/html;

    }

    error_page 500 502 503 504 = /503/503.html;

    location / {

        proxy_pass  http://127.0.0.1:8080;

    }

    location ~ /\.ht {

        deny  all;

    }

}
动静分离,将静态文件交由Nginx处理,加速博客访问:
#静态文件交给nginx处理

location ~ .*\.(js|css|gif|jpg|jpeg|png|bmp)?$

{

   root /home/tomcat8/webapps/ROOT/WEB-INF/classes/static;

   expires 2h;

}
源码:https://gitee.com/52itstyle/Python
列表:https://blog.52itstyle.top/index
详情:https://blog.52itstyle.top/49.shtml
小结
撸完整个项目,基本能接触的都用上了,前后端框架、连接池、限流、缓存、动静分离,HTTPS安全认证、百度收录等等,特别适合有一定开发基础的小伙伴!
源码
https://gitee.com/52itstyle/spring-boot-blog
SpringBoot开发案例之打造十万博文Web篇的更多相关文章
- SpringBoot开发案例之打造私有云网盘
前言 最近在做工作流的事情,正好有个需求,要添加一个附件上传的功能,曾找过不少上传插件,都不是特别满意.无意中发现一个很好用的开源web文件管理器插件 elfinder,功能比较完善,社区也很活跃,还 ...
- 「玩转Python」打造十万博文爬虫篇
前言 这里以爬取博客园文章为例,仅供学习参考,某些AD满天飞的网站太浪费爬虫的感情了. 爬取 使用 BeautifulSoup 获取博文 通过 html2text 将 Html 转 Markdown ...
- SpringBoot开发案例从0到1构建分布式秒杀系统
前言 最近,被推送了不少秒杀架构的文章,忙里偷闲自己也总结了一下互联网平台秒杀架构设计,当然也借鉴了不少同学的思路.俗话说,脱离案例讲架构都是耍流氓,最终使用SpringBoot模拟实现了部分秒杀场 ...
- SpringBoot开发案例之多任务并行+线程池处理
前言 前几篇文章着重介绍了后端服务数据库和多线程并行处理优化,并示例了改造前后的伪代码逻辑.当然了,优化是无止境的,前人栽树后人乘凉.作为我们开发者来说,既然站在了巨人的肩膀上,就要写出更加优化的程序 ...
- SpringBoot开发案例之整合Activiti工作流引擎
前言 JBPM是目前市场上主流开源工作引擎之一,在创建者Tom Baeyens离开JBoss后,JBPM的下一个版本jBPM5完全放弃了jBPM4的基础代码,基于Drools Flow重头来过,目前官 ...
- SpringBoot开发案例之整合Dubbo分布式服务
前言 在 SpringBoot 很火热的时候,阿里巴巴的分布式框架 Dubbo 不知是处于什么考虑,在停更N年之后终于进行维护了.在之前的微服务中,使用的是当当维护的版本 Dubbox,整合方式也是使 ...
- SpringBoot开发案例之整合Kafka实现消息队列
前言 最近在做一款秒杀的案例,涉及到了同步锁.数据库锁.分布式锁.进程内队列以及分布式消息队列,这里对SpringBoot集成Kafka实现消息队列做一个简单的记录. Kafka简介 Kafka是由A ...
- 转载-SpringBoot开发案例之整合日志管理
转载:https://cloud.tencent.com/developer/article/1097579 有一种力量无人能抵挡,它永不言败生来倔强.有一种理想照亮了迷茫,在那写满荣耀的地方. 00 ...
- SpringBoot开发案例之分布式集群共享Session
前言 在分布式系统中,为了提升系统性能,通常会对单体项目进行拆分,分解成多个基于功能的微服务,如果有条件,可能还会对单个微服务进行水平扩展,保证服务高可用. 那么问题来了,如果使用传统管理 Sessi ...
随机推荐
- JAVA复习笔记01
学了一学期的JAVA,临近期末,整理了一些JAVA考试中需要掌握的点,记录在这里. 1.编译多个JAVA文件,运行程序 (1) javac .java .java java Main (2) java ...
- 5分钟快速部署ownCloud私有云盘存储系统
ownCloud 是一个开源免费专业的私有云存储项目,它能帮你快速在个人电脑或服务器上架设一套专属的私有云文件同步网盘,可以像 Dropbox 那样实现文件跨平台同步.共享.版本控制.团队协作等等.o ...
- navicat远程连接mysql10060
navicat连接mysql时,出现2003-Can't connect to MySql server on '47.106.228.160'(10060"Unknow error&quo ...
- php中对象类型与数组之间的转换
1.刚看视频学习的时候看到一个困扰很久的问题, 有时候我们在进行做项目的时候会碰到的一个小问题.举一个小例子. 获取一个xml文件里面的数据. xml.xml文件如下: <?xml versi ...
- Easy doesn't enter into grown-up life
Hi xinlu, good afternoon, my name is xx, you can also call me andrew. i'm 31 years old, and i'm from ...
- .Net Core 学习依赖注入自定义Service
1. 定义一个服务,包含一个方法 public class TextService { public string Print(string m) { return m; } } 2. 写一个扩展方法 ...
- 简单说一下SS的原理
假设有主机A和B还有C.主机A是客户机,就是你的电脑,主机B是服务器,也就是位于日本的那台电脑.主机C是你需要访问的网站.在没有SS的情况下,数据传输的流程是:A-->C.在有SS的情况下,概括 ...
- 别混淆了sizeof(数组名)和sizeof(指针)
我们在挨个儿输出一个数组中的元素时,最常用的就是用一个for循环来实现,简单了事.比如类似下面的代码片段: for(i = 0; i< length; i++) { printf("数 ...
- a=re.findall('b',c)报错提示:TypeError:expected string or buffer
目的:想通过findall选取某个unicode编码的字符串列表(列表里面有元组) 问题:报错[TypeError:expected string or buffer] 现在测试下: 定义一个有元组的 ...
- [原创]Floodlight安装
Floodlight安装:一.安装环境: ubuntu-12.04-64bit二.安装Floodlight: #apt-get update #apt-get install build-essent ...