spring——自动装配【非常详细】
什么是自动装配?
自动装配就是让应用程序上下文为你找出依赖项的过程。说的通俗一点,就是Spring会在上下文中自动查找,并自动给bean装配与其关联的属性!
spring中实现自动装配的方式有两种,一种是通过xml文件、另一种是通过注解。下面将为大家介绍这两种方式实现自动装配。
为了更简单的让大家理解,我们通过例子来说明:
有以下三个实体类,People类,Dog类,Cat类,分别代表人、狗、猫。人养了一只狗和一只猫,猫和狗都会叫。
public class Cat {

    public void shout(){

        System.out.println("miao~");

    }

}
Cat类
public class Dog {

    public void shout(){

        System.out.println("wang wang~");

    }

}
Dog类
public class Peopel {

    private Cat cat;

    private Dog dog;

    private String name;

    public Cat getCat() {

        return cat;

    }

    public void setCat(Cat cat) {

        this.cat = cat;

    }

    public Dog getDog() {

        return dog;

    }

    public void setDog(Dog dog) {

        this.dog = dog;

    }

    public String getName() {

        return name;

    }

    public void setName(String name) {

        this.name = name;

    }

    @Override

    public String toString() {

        return "Peopel{" +

                "cat=" + cat +

                ", dog=" + dog +

                ", name='" + name + '\'' +

                '}';

    }

}
people类
手动装配
讲自动装配之前,我们先来说一下手动装配,手动装配又是什么?手动装配就是手动的将bean中所关联的其他bean装配进去。用代码表示:
<?xml version="1.0" encoding="UTF-8"?>
    <beans xmlns="http://www.springframework.org/schema/beans"
           xmlns:xsi="http://www.w3.org/2001/XMLSchema-instance"
           xsi:schemaLocation="http://www.springframework.org/schema/beans
        https://www.springframework.org/schema/beans/spring-beans.xsd">
    <bean id="cat" class="com.kuang.pojo.Cat"/>

    <bean id="dog" class="com.kuang.pojo.Dog"/>

    <bean id="people" class="com.kuang.pojo.Peopel">

        <property name="name" value="张三"/>

        <property name="cat" ref="cat"/>

        <property name="dog" ref="dog"/>

    </bean>
</beans>
在id=people的bean(以后id=xx的bean我们就叫xxBean)中,我们给peopleBean手动装配了与之关联的catBean和dogBean,这就叫做手动装配。
那么有没有什么办法,我们可以不用去手动装配关联的bean,让spring帮我们自动把关联的bean装配进去呢?答案是肯定的。自动装配就可以帮助我们解决这个问题。实现自动装配有两种方式。一种是使用注解的方式、另一种是通过xml文件的方式。下面我们俩讲实现自动装配的两种方式。
方式一:通过xml文件实现自动装配
我们只需要在xml配置文件中的bean标签中加入一个属性autowire即可,例如:
<bean id="people" class="com.kuang.pojo.Peopel" autowire="byName">

        <property name="name" value="张三"/>

</bean>
使用autowire关键字声明bean的自动装配方式。其可选值为byName、byType、constructor,default,no;这里讲前边两个。
1.byName
设置autowire属性为byName,那么Spring会根据class属性找到实体类,然后查询实体类中所有setter方法的名字,根据setter方法后面的名字(例如SetDog,则setter方法后面的名字为dog)再到配置文件中寻找一个与该名字相同id的Bean,注入进来。如图:

2.byType
设置autowire属性为byType,那么Spring会自动寻找一个与该属性类型相同的Bean,注入进来。

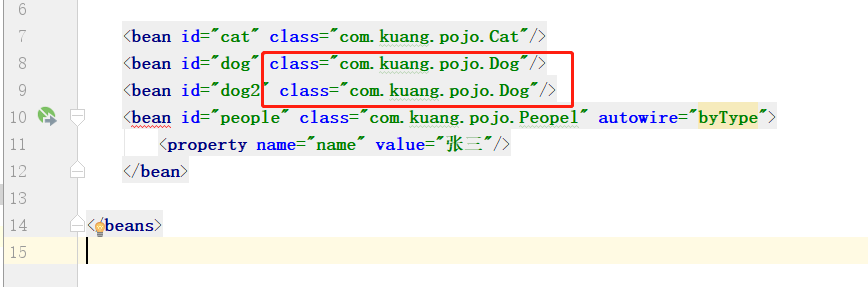
*注意:使用byType这种方式,必须保证配置文件中所有bean的class属性的值是唯一的,否则就会报错
例如:下边这种方式是错误的,因为两个bean中的class属性的值重复了,会报错
方式二:通过注解实现自动装配
注解是通过反射来实现的。
1.使用注解前的准备:
要使用注解,xml文件要使用如下的文件头:
<?xml version="1.0" encoding="UTF-8"?>

<beans xmlns="http://www.springframework.org/schema/beans"

       xmlns:xsi="http://www.w3.org/2001/XMLSchema-instance"

       xmlns:context="http://www.springframework.org/schema/context"

       xsi:schemaLocation="http://www.springframework.org/schema/beans

        https://www.springframework.org/schema/beans/spring-beans.xsd

        http://www.springframework.org/schema/context

        https://www.springframework.org/schema/context/spring-context.xsd">

    <context:annotation-config/>

</beans>
注意:
<conteext:annotation-config/> 必须要写在xml中,这是用来开启注解的支持,如果不加上注解就无效。

2.使用

2.1  Autowired注解【常用】
首先xml配置文件如下:
<?xml version="1.0" encoding="UTF-8"?>

<beans xmlns="http://www.springframework.org/schema/beans"

       xmlns:xsi="http://www.w3.org/2001/XMLSchema-instance"

       xmlns:context="http://www.springframework.org/schema/context"

       xsi:schemaLocation="http://www.springframework.org/schema/beans

        https://www.springframework.org/schema/beans/spring-beans.xsd

        http://www.springframework.org/schema/context

        https://www.springframework.org/schema/context/spring-context.xsd">

    <context:annotation-config/>

    <bean id="cat" class="com.kuang.pojo.Cat"/>

    <bean id="dog" class="com.kuang.pojo.Dog"/>

    <bean id="people" class="com.kuang.pojo.Peopel">

        <property name="name" value="张三"/>

    </bean>

</beans>
然后在实体类的对应属性上添加@Autowired注解(也可以把注解放到对应属性的setter上),people类中依赖Dog类和Cat类。所以在people类中的dog和cat属性上要加上@Autowired,实现自动装配。
例如:
public class Peopel {

    @Autowired

    private Cat cat;

    @Autowired

    private Dog dog;

    private String name;

    public Cat getCat() {

        return cat;

    }

    public void setCat(Cat cat) {

        this.cat = cat;

    }

    public Dog getDog() {

        return dog;

    }

    public void setDog(Dog dog) {

        this.dog = dog;

    }

    public String getName() {

        return name;

    }

    public void setName(String name) {

        this.name = name;

    }

    @Override

    public String toString() {

        return "Peopel{" +

                "cat=" + cat +

                ", dog=" + dog +

                ", name='" + name + '\'' +

                '}';

    }

}
**重点:
(1)注解方法装配属性的过程:spring会默认优先根据(被注解修饰的)属性类型去容器中找对应的组件(bean),找到就赋值;若找到多个相同类型的组件,再将属性的名称作为组件(bean)的id去容器中查找。
(2)@Qualifier注解可以和使用Autowired搭配使用:@Qualifier指定需要装配的组件的id,而不是使用属性名。例如下边例子,spring就会优先在容器中查找id为“abcd”的组件。
public class Peopel {

    @Autowired

    @Qualifier(value = "cat")

    private Cat cat;

}
什么情况会使用到@Qualifier注解:当ioc容器根据属性类型去容器中找找到多个相同类型的组件,再将属性的名称作为组件(bean)的id去容器中查找找不到时就是用这两个注解搭配,指定需要装配的bean的id。
(3)在默认情况下使用 @Autowired 注释进行自动注入时,Spring 容器中匹配的候选 Bean 数目必须有且仅有一个。当找不到一个匹配的 Bean 时,Spring 容器将抛出 BeanCreationException 异常,并指出必须至少拥有一个匹配的 Bean。当不能确定 Spring 容器中一定拥有某个类的 Bean 时,可以在需要自动注入该类 Bean 的地方可以使用@Autowired(required= false)。这等于告诉 Spring:在找不到匹配 Bean 时也不报错。
2.2. Resource注解【不常用】
@Resource:可以和@Autowired一样实现自动装配功能,但是跟@Autowired不一样的是,它默认是按照组件名称进行装配的,按照组件名称找不到在根据属性类型去查找,再找不到就报错;他们另一个不同的地方就是@Autowired是Spring定义的; @Resource是java规范。
spring——自动装配【非常详细】的更多相关文章
- Spring 自动装配 Bean
Spring3系列8- Spring 自动装配 Bean 1. Auto-Wiring ‘no’ 2. Auto-Wiring ‘byName’ 3. Auto-Wiri ...
- spring 自动装配 default-autowire="byName/byType"
<PRE class=html name="code">spring 自动装配 default-autowire="byName/byType" ...
- Spring自动装配Bean详解
1. Auto-Wiring ‘no’ 2. Auto-Wiring ‘byName’ 3. Auto-Wiring ‘byType 4. Auto-Wirin ...
- Spring自动装配----注解装配----Spring自带的@Autowired注解
Spring自动装配----注解装配----Spring自带的@Autowired注解 父类 package cn.ychx; public interface Person { public voi ...
- Spring系列七:Spring 自动装配
相思相见知何日?此时此夜难为情. 概述 在Spring框架中,在配置文件中声明bean的依赖关系是一个很好的做法,因为Spring容器能够自动装配协作bean之间的关系.这称为spring自动装配. ...
- Spring自动装配(二)
为什么Spring要支持Autowire(自动装配) 先写几个类,首先定义一个Animal接口表示动物: 1 public interface Animal { 2 3 public void eat ...
- Spring自动装配歧义性笔记
Spring自动装配歧义性笔记 如果系统中存在两个都实现了同一接口的类,Spring在进行@Autowired自动装配的时候,会选择哪一个?如下: // 一下两个类均被标记为bean @Compone ...
- spring自动装配
spring提供了自动装配(autowiring)和自动检测(autodiscovery)用来减少XML的配置数量. 自动装配bean属性 byName——把与Bean的属性具有相同名字(或ID)的其 ...
- Spring自动装配与扫描注解
1 javabean的自动装配 自动注入,减少xml文件的配置信息. <?xml version="1.0" encoding="UTF-8"?> ...
随机推荐
- cf534D 枚举握手次数
题意: 有n个学生进教室,先后顺序不同,每个人进去后会和当前在教室里的人握手,并且记录人数,而且当教室里有超过三个人的时候 他们有可能组队去参加比赛,后来的人看不到他们. 思路: ...
- UVA11078开放式学分制(前面-后面的最大值)
题意: 给你一个长度为n的整数序列a0 a1 a2..找出两个整数ai,aj(i<j),使得ai-aj最大. 思路: 简单题目,想象一下,对于每一个数我们只要用他前面的最 ...
- 【python】Leetcode每日一题-最大数
[python]Leetcode每日一题-最大数 [题目描述] 给定一组非负整数 nums,重新排列每个数的顺序(每个数不可拆分)使之组成一个最大的整数. 注意:输出结果可能非常大,所以你需要返回一个 ...
- 【opencv】VideoCapture打不开本地视频文件或者网络IP摄像头
1.前提:成功打开本地USB摄像头 // 创建VideoCapture对象 VideoCapture vc = new VideoCapture(); // 可以成功打开本地USB摄像头 // 参数可 ...
- Xshell、Xftp评估过期的解决办法
介绍一个 FTP客户端-IIS7服务器管理工具作为FTP客户端,它支持批量管理ftp站点.定时上传和定时下载,定时备份,且操作简洁.同时iis7服务器管理工具还是vnc客户端.并且支持批量管理 ...
- ppt技巧--线条
声明:本文所有截图来源于网易云课堂--<和秋叶一起学PPT>,只做个人复习之用,特此声明! 线条的五种用途:
- SAP ABAP ALV 颜色设置(两个ALV函数例子) 列 行 单元格
@[TOC](设置ALV颜色)# 前言淦! 要求花花绿绿的ALV ,那就淦他! 需要的参数和对应颜色放在最后.稍微改改就能用. 介绍两个常用的ALV函数实现1.REUSE_ALV_GRID_DISPL ...
- 细数 C++ 那些比起 C语言 更爽的特性
结构体定义 C: typedef struct Vertex { int x, y, z; } Vertex; Vertex v1 = { 0 }; // or struct Vertex { int ...
- python函数默认值只初始化一次
当在函数中定义默认值时,值初始化只会进行一次,就是执行到def methodname时执行.看下面代码: from datetime import datetime def test(t=dateti ...
- Python正则表达式的七个使用范例
本文由 伯乐在线 - 左手的灵魂 翻译.未经许可,禁止转载!英文出处:thegeekstuff.欢迎加入翻译组.http://blog.jobbole.com/74844/ 作为一个概念而言,正则表达 ...