Mysql实现数据库主从复制架构
MySQL复制
(1)扩展方式: Scale Up ,Scale Out
(2)MySQL的扩展
读写分离

复制:每个节点都有相同的数据集

       向外扩展

       二进制日志

       单向
(3)复制的功用:
数据分布

负载均衡读

备份

高可用和故障切换

MySQL升级测试
一主多从
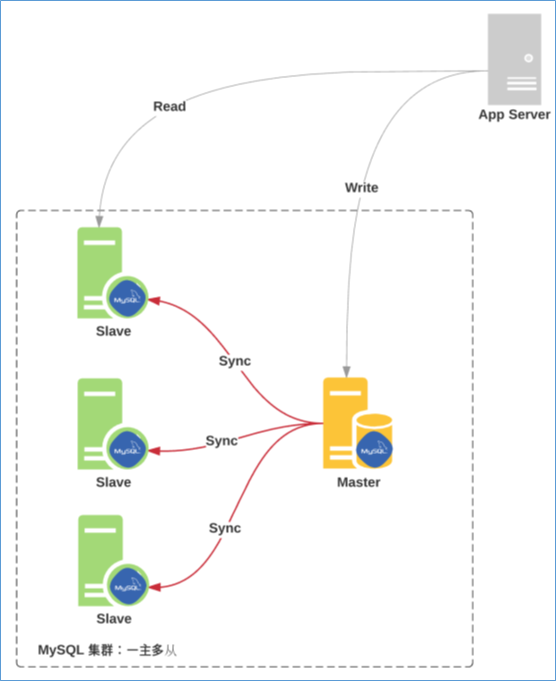
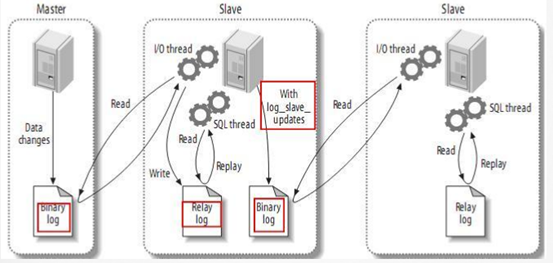
主从复制原理
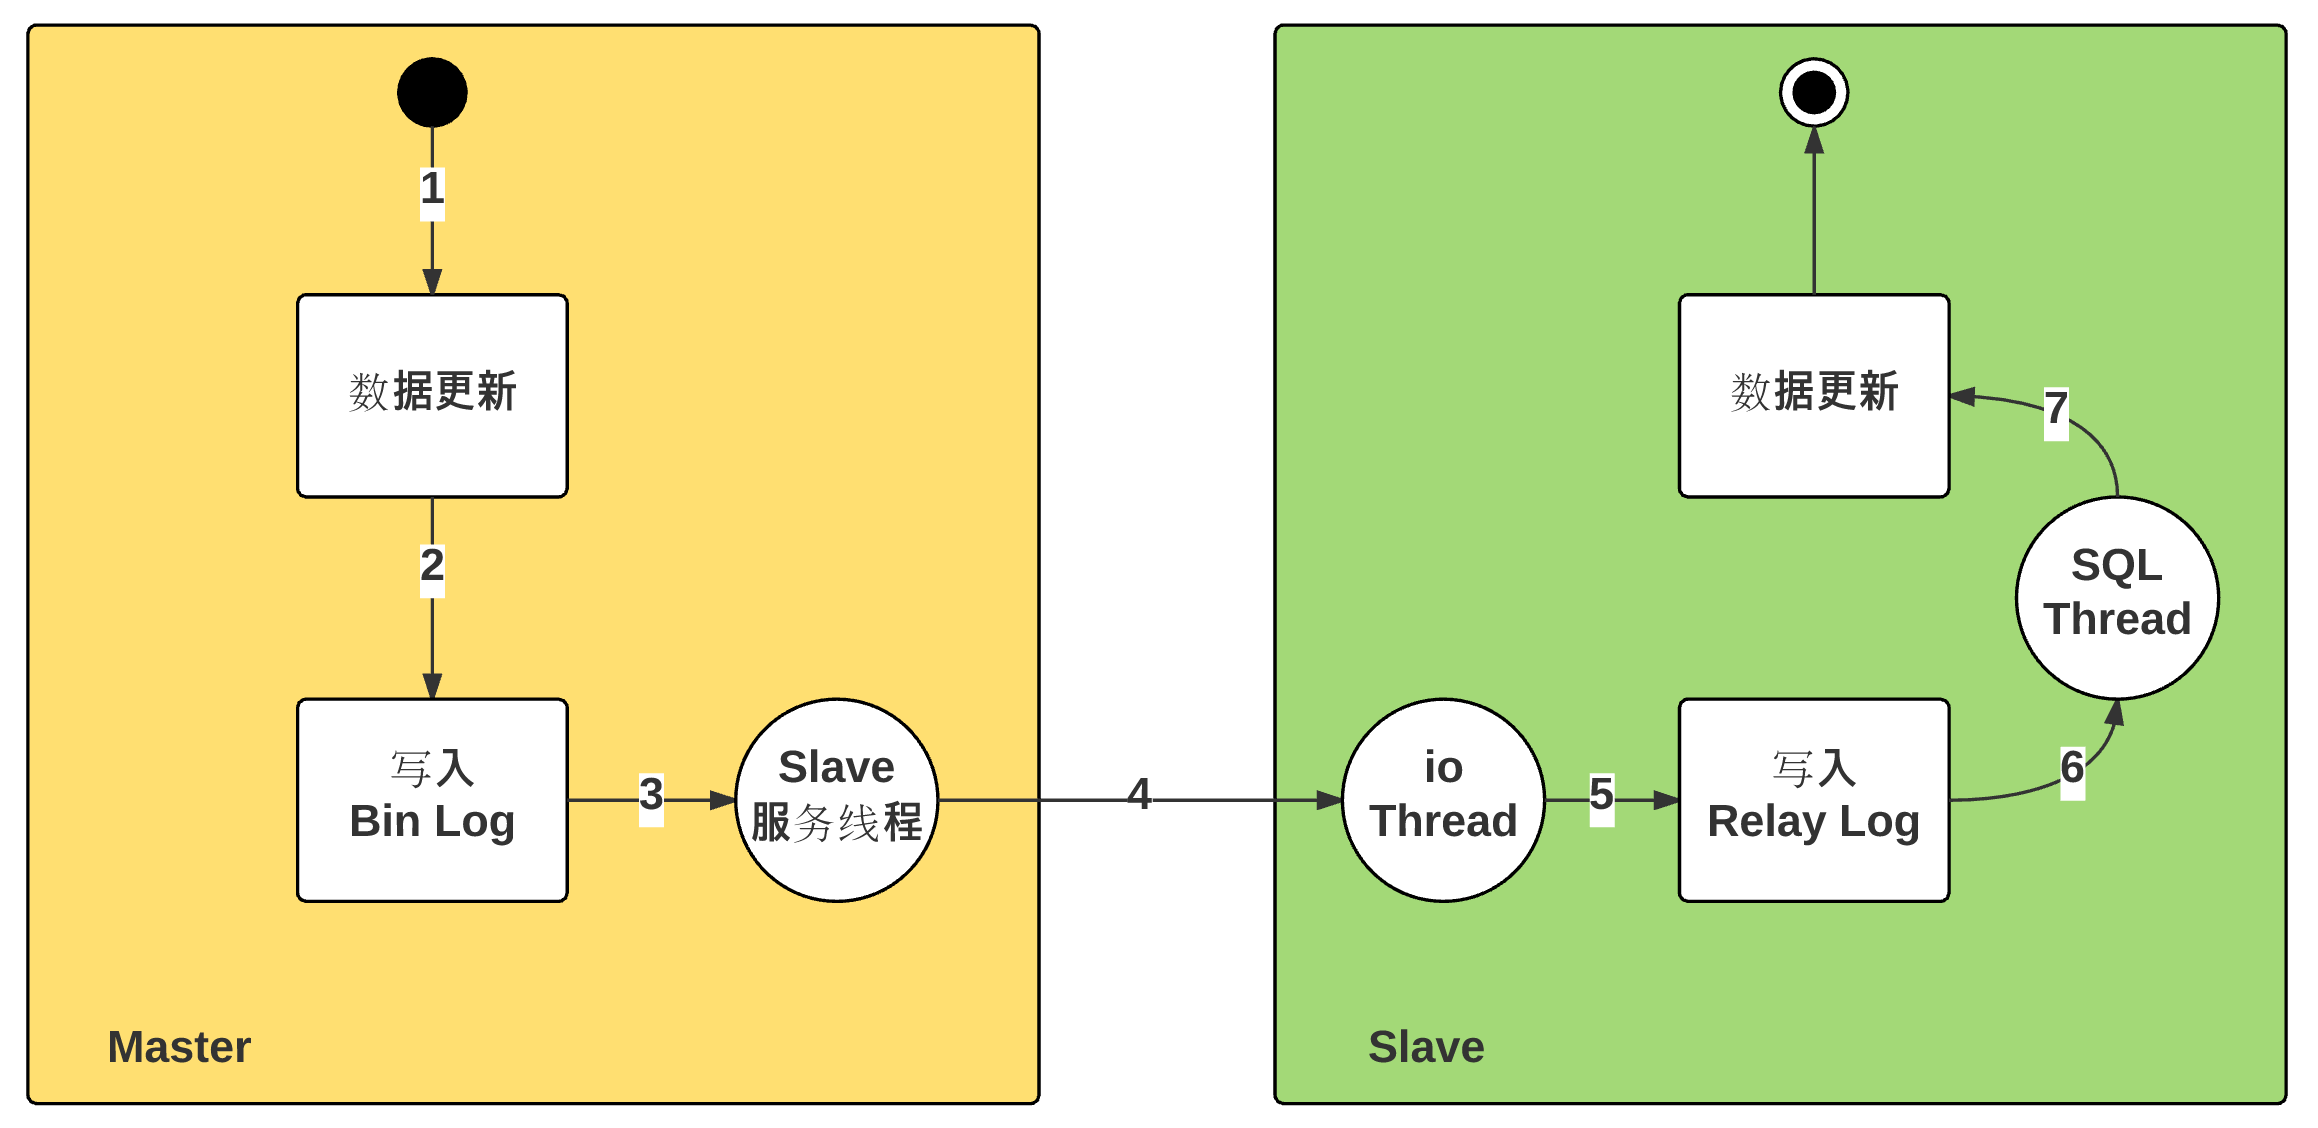
(1)从库生成两个线程,一个I/O线程,一个SQL线程;

(2)i/o线程去请求主库 的binlog,并将得到的binlog日志写到relay log(中继日志) 文件中;主库会生成一个 log dump 线程,用来给从库 i/o线程传binlog;

(3)SQL 线程,会读取relay log文件中的日志,并解析成具体操作,来实现主从的操作一致,而最终数据一致;
主从复制线程:
主节点:
dump Thread:为每个Slave的I/O Thread启动一个dump线程,用于向其发送binary log events
从节点:
I/O Thread:向Master请求二进制日志事件,并保存于中继日志中

SQL Thread:从中继日志中读取日志事件,在本地完成重放
跟复制功能相关的文件:
master.info:用于保存slave连接至master时的相关信息,例如账号、密码、服务器地址等

relay-log.info:保存在当前slave节点上已经复制的当前二进制日志和本地replay log日志的对应关系
主从复制特点:
异步复制

主从数据不一致比较常见
复制架构:
Master/Slave, Master/Master, 环状复制

一主多从

从服务器还可以再有从服务器

一从多主:适用于多个不同数据库

主主
复制需要考虑二进制日志事件记录格式
STATEMENT(5.0之前)

ROW(5.1之后,推荐)

MIXED
主从配置过程:参看官网
https://mariadb.com/kb/en/library/setting-up-replication/
https://dev.mysql.com/doc/refman/5.5/en/replication-configuration.html
实现主从复制架构:
(1)先在B主机(从服务器)相关的配置文件,配置数据库文件时,最好确保主从的数据库为空
[root@centos7-1data]#vim /etc/my.cnf

[mysqld]

read-only     # 只读权限,对于普通用户无法修改,但是root用户可以进行修改

server-id=2

log_bin=/data/logbin/mysql-bin # 指定二进制日志路径

binlog_format=row  # 二进制日志保存格式

relay_log=relay-log  # 开启中继日志

log_slave_updates = 1  # 默认是关闭状态,打开后才能复制主服务器的二进制日志,此项很重要
(2)配置A主机(主服务器)的配置文件
[mysqld]

server-id=1

log_bin=/data/logbin/mysql-bin

binlog_format=ROW 将二进制日志按行显示,保证二进制日志不丢失

skip-name-resolve   # 不将IP地址解析为名称
(3)重启机器A(主服务器)的mysql服务并在mysql数据库中创建从复制权限的用户账号
[root@centos7data]#systemctl restart mariadb

[root@centos7data]#mysql

Welcome to the MariaDB monitor.  Commands end with ; or \g.

Your MariaDB connection id is 2

Server version: 5.5.60-MariaDB MariaDB Server

Copyright (c) 2000, 2018, Oracle, MariaDB Corporation Ab and others.

Type 'help;' or '\h' for help. Type '\c' to clear the current input statement.

MariaDB [(none)]> show master logs;  # 复制之前查看要复制文件的起始位置与文件大小。

+------------------+-----------+

| Log_name         | File_size |

+------------------+-----------+

| mysql-bin.000001 |     26756 |

| mysql-bin.000002 |    921736 |

| mysql-bin.000003 |       245 |

+------------------+-----------+

MariaDB [(none)]> grant replication slave  on *.* to repluser@'192.168.34.%'  identified by 'centos';  创建复制权限的用户账号

Query OK, 0 rows affected (0.00 sec)

MariaDB [(none)]>
在主服务导入一个数据库模板,准备让从服务器进行复制
[root@centos7~]#mysql < hellodb_innodb.sql
(4)重启从服务器的mysql数据库,在从服务器上设置,使用有复制权限的用户账号连接至主服务器,并启动复制线程
可以在help帮助中查看模板,方便写入重要信息:
MariaDB [(none)]> help change master to  帮助可以看到相关模板

CHANGE MASTER TO

  MASTER_HOST='master2.mycompany.com',  主服务器地址

  MASTER_USER='replication',  主服务器创建有复制权限的服务名

  MASTER_PASSWORD='bigs3cret',  密码

  MASTER_PORT=3306,

  MASTER_LOG_FILE='master2-bin.001',  二进制日志

  MASTER_LOG_POS=4,    从二进制日志多大开始复制

MariaDB [(none)]> CHANGE MASTER TO

    ->   MASTER_HOST='192.168.34.101',

    ->   MASTER_USER='repluser',

    ->   MASTER_PASSWORD='centos',

    ->   MASTER_PORT=3306,

    ->   MASTER_LOG_FILE='mysql-bin.000003',

    ->   MASTER_LOG_POS=245;
查看导入的模板信息:
MariaDB [(none)]> show slave status\G

*************************** 1. row ***************************

               Slave_IO_State:

                  Master_Host: 192.168.34.101  主服务器IP地址

                  Master_User: repluser   主服务器名

                  Master_Port: 3306

                Connect_Retry: 60

              Master_Log_File: mysql-bin.000003  从000003开始复制

          Read_Master_Log_Pos: 245

               Relay_Log_File: mariadb-relay-bin.000001  复制过来的数据库名

                Relay_Log_Pos: 4

        Relay_Master_Log_File: mysql-bin.000003

             Slave_IO_Running: No

            Slave_SQL_Running: No
(5)在从服务器开始复制
MariaDB [(none)]> start slave;

Query OK, 0 rows affected (0.03 sec)
此时可以跟踪一下从服务器复制状态,出现的是I/O线程过程
MariaDB [(none)]> show processlist;

+----+-------------+-----------+------+---------+------+-----------------------------------------------------------------------------+------------------+----------+

| Id | User        | Host      | db   | Command | Time | State                                                                       | Info             | Progress |

+----+-------------+-----------+------+---------+------+-----------------------------------------------------------------------------+------------------+----------+

|  5 | root        | localhost | NULL | Query   |    0 | NULL                                                                        | show processlist |    0.000 |

|  6 | system user |           | NULL | Connect |   69 | Waiting for master to send event                                            | NULL             |    0.000 |

|  7 | system user |           | NULL | Connect | 1817 | Slave has read all relay log; waiting for the slave I/O thread to update it | NULL             |    0.000 |

+----+-------------+-----------+------+---------+------+-----------------------------------------------------------------------------+------------------+----------+

3 rows in set (0.00 sec)
(6)此时在从服务器查看复制后的数据库内容,已经将主服务器的数据库内容全部复制过来
MariaDB [(none)]> show databases;

+--------------------+

| Database           |

+--------------------+

| information_schema |

| hellodb            |

| mysql              |

| performance_schema |

| test               |

+--------------------+

5 rows in set (0.00 sec)
(7)查看主服务器当前的线程情况,出现的就是dump线程过程
MariaDB [(none)]> show processlist

    -> ;

+----+----------+----------------------+------+-------------+------+-----------------------------------------------------------------------+------------------+----------+

| Id | User     | Host                 | db   | Command     | Time | State                                                                 | Info             | Progress |

+----+----------+----------------------+------+-------------+------+-----------------------------------------------------------------------+------------------+----------+

|  2 | root     | localhost            | NULL | Query       |    0 | NULL                                                                  | show processlist |    0.000 |

|  8 | repluser | 192.168.34.102:56744 | NULL | Binlog Dump |  218 | Master has sent all binlog to slave; waiting for binlog to be updated | NULL             |    0.000 |

+----+----------+----------------------+------+-------------+------+-----------------------------------------------------------------------+------------------+----------+
若要继续添加新salve,实现一主多从
(1)在第二个从服务器上修改配置文件
[root@centos7-1data]#vim /etc/my.cnf

[mysqld]

read-only     # 只读权限,对于普通用户无法修改,但是root用户可以进行修改

server-id=3  # server ID要不一致

log_bin=/data/logbin/mysql-bin # 指定二进制日志路径

binlog_format=row  # 二进制日志保存格式

relay_log=relay-log  # 开启中继日志

log_slave_updates = 1 # 使主服务器的数据写进二进制日志中
(2)重启第二个从服务器mysql数据库
[root@10-9-122-130~]#systemctl restart mariadb
(3)在生产中,如果之前的数据库数据已经很大,需要新加一个slave数据库,可以将之前的数据库进行完全备份,对新的数据进行主从复制:在主服务器上备份当前的数据库信息
MariaDB [(none)]> show master logs;  # 备份前,可以看到主服务器的起始二进制日志文件大小是245,mysql-bin.000004

+------------------+-----------+

| Log_name         | File_size |

+------------------+-----------+

| mysql-bin.000001 |     26756 |

| mysql-bin.000002 |    921736 |

| mysql-bin.000003 |      7583 |

| mysql-bin.000004 |       245 |

+------------------+-----------+

4 rows in set (0.00 sec)

[root@centos7~]#mysqldump -A -F --single-transaction --master-data=1 > /data/all_bak.sql  主服务器上备份数据库信息,--master-data=1的1适用于主从复制中

[root@centos7~]#scp /data/all_bak.sql  192.168.34.103:/data/  然后将备份的数据库传到第二个从服务器的data目录下

all_bak.sql
修改复制到第二个从服务器的备份数据,将主机名、账号、密码及端口写入即可,而实际的二进制文件的大小和文件名已经存在,在第二个从服务器导入时,就不需要再写change master to
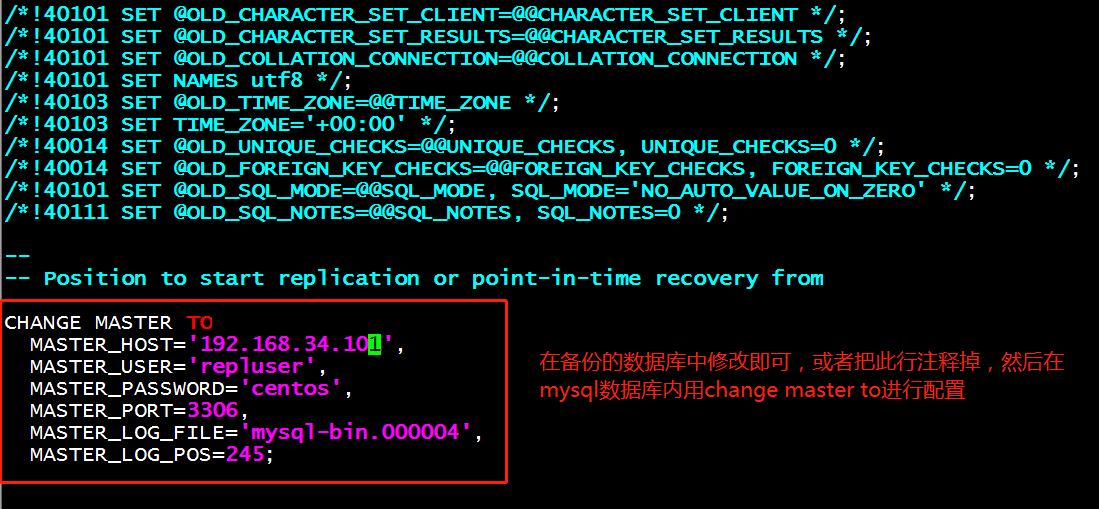
(4)在第二个从服务器修改备份数据内容,作为从服务器启动复制线程
CHANGE MASTER TO

  MASTER_HOST='192.168.34.101',

  MASTER_USER='repluser',

  MASTER_PASSWORD='centos',

  MASTER_PORT=3306,

  MASTER_LOG_FILE='mysql-bin.000004', MASTER_LOG_POS=245;
(5)在第二个从服务器上修改完备份内容后,直接导入到mysql数据库中,并进行复制主服务器数据库
[root@centos7-2 data]# mysql < all_bak.sql  将备份数据库存放在mysql数据库中

MariaDB [(none)]> start slave;  启动从服务器复制

MariaDB [(none)]> show databases;查看此时的数据库已经复制过来

+--------------------+

| Database           |

+--------------------+

| information_schema |

| hellodb            |

| mysql              |

| performance_schema |

| test               |

+--------------------+

5 rows in set (0.00 sec)
验证一主多从服务器关系
在主服务器上创建新的数据库:
MariaDB [(none)]> create database db1;

Query OK, 1 row affected (0.00 sec)

MariaDB [(none)]> show databases;

+--------------------+

| Database           |

+--------------------+

| information_schema |

| db1                |

| hellodb            |

| mysql              |

| performance_schema |

| test               |

+--------------------+

6 rows in set (0.00 sec)
在从服务器1上查看是否复制了数据库db1
MariaDB [(none)]> show databases;

+--------------------+

| Database           |

+--------------------+

| information_schema |

| db1                |

| hellodb            |

| mysql              |

| performance_schema |

| test               |

+--------------------+

6 rows in set (0.00 sec)
在从服务器2上查看是否复制了数据库db1
MariaDB [(none)]> show databases;

+--------------------+

| Database           |

+--------------------+

| information_schema |

| db1                |

| hellodb            |

| mysql              |

| performance_schema |

| test               |

+--------------------+

6 rows in set (0.00 sec)
解除主从关系,恢复独立的服务器,并将从服务器作为主节点服务器
现在,当主服务器down机后,可以将从服务器1作为主服务器,从服务器2作为从服务器
如果主节点已经运行了一段时间,且有大量数据时,如何配置并启动slave节点
通过备份恢复数据至从服务器

复制起始位置为备份时,二进制日志文件及其POS
(1)将从服务器1的复制线程停止
MariaDB [(none)]> stop slave;
(2)将从服务器1节点全部删除,准备做为主服务器
MariaDB [(none)]> reset slave all;

MariaDB [(none)]> show slave status; 此时查看没有从服务器节点
(3)在从服务器1修改为以下配置文件内容:vim /etc/my.cnf
[mysqld]

server-id=2

log_bin=/data/logbin/mysql-bin

binlog_format=row

relay_log=relay-log

skip-name-resolve
(4)在从服务器1上查看当前的二进制日志信息,做为第二个从服务器复制的起始文件大小和名称
MariaDB [(none)]> show master logs;

+--------------------+-----------+

| Log_name           | File_size |

+--------------------+-----------+

| mariadb-bin.000001 |       245 |

+--------------------+-----------+

1 row in set (0.00 sec)
(5)在从服务器2清除master.info ,relay-log.info, relay log ,开始新的relay log ,注意:需要先STOP SLAVE
stop slave;

reset  slave all;
(6)在从服务器2上开启复制线程
MariaDB [(none)]> CHANGE MASTER TO

    ->   MASTER_HOST='192.168.34.102',  # 当前主服务器的IP地址

    ->   MASTER_USER='repluser',

    ->   MASTER_PASSWORD='centos',

    ->   MASTER_PORT=3306,

    ->   MASTER_LOG_FILE='mariadb-bin.000001',

    ->   MASTER_LOG_POS=245;
(7)启动从服务器2的复制功能
start slave
验证主从复制结果
MariaDB [(none)]> create database haha1;   #在主服务器上新建数据库

Query OK, 1 row affected (0.00 sec)

MariaDB [(none)]> show databases;

+--------------------+

| Database           |

+--------------------+

| information_schema |

| db1                |

| haha               |

| haha1              |

| hellodb            |

| lisi               |

| mysql              |

| performance_schema |

| test               |

+--------------------+

9 rows in set (0.01 sec)
查看从服务器复制的结果
MariaDB [(none)]> show databases;

+--------------------+

| Database           |

+--------------------+

| information_schema |

| db1                |

| hellodb            |

| mysql              |

| performance_schema |

| test               |

+--------------------+

6 rows in set (0.00 sec)
实验:主从级联复制
实现原理:在主从复制的基础上,主从之间存在一个级联复制的从服务器,当级联复制的主机复制了主服务器的数据,级联复制主机充当为主服务器,从服务器复制级联复制主机的数据及二进制日志数据。
注意:中间级联复制的主机无法将二进制日志传递到其他从服务器上,因此需要加上log_slave_updates选项,目的是为了将主服务器的二进制日志文件能写入到从服务器上。
如果要启用级联复制,需要在从服务器启用以下配置,log_slave_updates很关键,为了实时更新主服务器的二进制日志信息。
环境准备:
A机器作为主服务器:192.168.34.101
B机器作为中间级联复制从服务器:192.168.34.102
C机器作为从服务器 :192.168.34.103
在A主服务器上配置相关文件:
(1)配置mysql数据库配置文件中进行相关配置
vim /etc/my.cnf

[mysqld]

server-id=1

log_bin=/data/logbin/mysql-bin

binlog_format=ROW
(2)启动数据库服务
systemctl start mariadb
将之前缓存的二进制日志全部清除
show master logs;  查看二进制日志

reset master;  清空二进制日志
(3)查看主服务器的二进制日志信息
MariaDB [(none)]> show master logs;

+------------------+-----------+

| Log_name         | File_size |

+------------------+-----------+

| mysql-bin.000001 |       245 |

+------------------+-----------+

1 row in set (0.00 sec)
(4)登陆mysql账号,并创建一个只有复制权限的账号
MariaDB [(none)]> grant replication slave on *.* to rpl@'192.168.34.%' identified by 'centos';
在从服务器B上修改相关配置文件
(1)修改mysql配置文件
vim  /etc/my.cnf

[mysqld]

server-id=2

binlog_format=ROW

log_bin=/data/logbin/mysql-bin

read-only

log_slave_updates # 将主服务器的二进制日志更新到本机的级联主机上,下一个从服务器进行复制二进制日志
(2)启动mysql服务器
[root@centos7-1~]#systemctl start mariadb
最好先看看中间级联复制的而二进制日志的起始位置,虽然默认是从服务器从245起点开始复制级联机器的数据,有时系统起始复制位置不是245,从节点有可能无法从245开始复制级联复制机器的数据。
[root@centos7 ~]# mysql

Welcome to the MariaDB monitor.  Commands end with ; or \g.

Your MariaDB connection id is 11

Server version: 10.3.10-MariaDB-log MariaDB Server

Copyright (c) 2000, 2018, Oracle, MariaDB Corporation Ab and others.

Type 'help;' or '\h' for help. Type '\c' to clear the current input statement.

MariaDB [(none)]> show master logs;

+------------------+-----------+

| Log_name         | File_size |

+------------------+-----------+

| mysql-bin.000001 |       351 |

| mysql-bin.000002 |       328 |

+------------------+-----------+

2 rows in set (0.001 sec)

MariaDB [(none)]> reset master ;

Query OK, 0 rows affected (0.009 sec)

MariaDB [(none)]> show master logs;

+------------------+-----------+

| Log_name         | File_size |

+------------------+-----------+

| mysql-bin.000001 |       245 |

+------------------+-----------+

1 row in set (0.000 sec)
(3)启动复制线程
MariaDB [(none)]> CHANGE MASTER TO

    ->   MASTER_HOST='192.168.34.101',

    ->   MASTER_USER='rpl',

    ->   MASTER_PASSWORD='centos',

    ->   MASTER_PORT=3306,

    ->   MASTER_LOG_FILE='mysql-bin.000001',

    ->   MASTER_LOG_POS=245;  注意:指定数据库从头开始复制

Query OK, 0 rows affected (0.01 sec)
(4)启动slave,并查看当前的启动状态
MariaDB [(none)]> start slave;   开启slave功能

Query OK, 0 rows affected, 1 warning (0.00 sec)

MariaDB [(none)]> show slave status\G;

*************************** 1. row ***************************

               Slave_IO_State: Waiting for master to send event

                  Master_Host: 192.168.34.101

                  Master_User: rpl

                  Master_Port: 3306

                Connect_Retry: 60

              Master_Log_File: mysql-bin.000001

          Read_Master_Log_Pos: 395

               Relay_Log_File: centos7-1-relay-bin.000002

                Relay_Log_Pos: 690

        Relay_Master_Log_File: mysql-bin.000001

             Slave_IO_Running: Yes  #yes就是表示开启

            Slave_SQL_Running: Yes
对比主从复制结果
(1)在主服务器上导入数据库内容
[root@centos7~]#mysql < hellodb_innodb.sql  导入数据库

MariaDB [(none)]> show databases;   查看数据库内容

+--------------------+

| Database           |

+--------------------+

| information_schema |

| hellodb            |

| mysql              |

| performance_schema |

| test               |

+--------------------+

5 rows in set (0.01 sec)
(2)在从服务器查看已经复制了主服务器的数据库内容
[root@centos7-1mysql]#mysql

Welcome to the MariaDB monitor.  Commands end with ; or \g.

Your MariaDB connection id is 24

Server version: 10.2.29-MariaDB-log MariaDB Server

Copyright (c) 2000, 2018, Oracle, MariaDB Corporation Ab and others.

Type 'help;' or '\h' for help. Type '\c' to clear the current input statement.

MariaDB [(none)]> show databases;  此时看到已经复制了主服务器的数据库内容

+--------------------+

| Database           |

+--------------------+

| hellodb            |

| information_schema |

| mysql              |

| performance_schema |

| test               |

+--------------------+

5 rows in set (0.01 sec)
在从服务器C上配置相关文件
(1)配置第二个从服务器配置文件
vim  /etc/my.cnf

[mysqld]

server-id=3

read-only
重启mysql服务
systemctl restart mariadb
(2)查看B从服务器的二进制日志信息,此时的日志大小已经是7308,如果从7308开启复制进程,前面复制的数据库全部都不会复制,因此,我们前面已经查出级联机器是从245有二进制日志,默认的数据是从245开始复制,如果级联复制不是从245开始,就需要从查到的开始进行复制。
MariaDB [(none)]> show master logs;

+--------------------+-----------+

| Log_name           | File_size |

+--------------------+-----------+

| mariadb-bin.000001 |      7308 |

+--------------------+-----------+
(3)在C主机配置复制线程文件,并开启复制线程
MariaDB [(none)]> CHANGE MASTER TO

    ->   MASTER_HOST='192.168.34.102', #指向B主机的IP地址

    ->   MASTER_USER='rpl',

    ->   MASTER_PASSWORD='centos',

    ->   MASTER_PORT=3306,

    ->   MASTER_LOG_FILE='mariadb-bin.000001',

    ->   MASTER_LOG_POS=245;
(4)在C主机开启slave开关
start slave
(5)在C主机查看slave开启状态
MariaDB [(none)]> show slave status\G;

*************************** 1. row ***************************

               Slave_IO_State: Waiting for master to send event

                  Master_Host: 192.168.34.102

                  Master_User: rpl

                  Master_Port: 3306

                Connect_Retry: 60

              Master_Log_File: mariadb-bin.000001

          Read_Master_Log_Pos: 7308

               Relay_Log_File: mariadb-relay-bin.000002

                Relay_Log_Pos: 7594

        Relay_Master_Log_File: mariadb-bin.000001

             Slave_IO_Running: Yes

            Slave_SQL_Running: Yes
此时在C从服务器中查看已经复制了B从服务器的数据库信息
MariaDB [hellodb]> show  databases;

+--------------------+

| Database           |

+--------------------+

| hellodb            |

| information_schema |

| mysql              |

| performance_schema |

| test               |

+--------------------+
复制架构中应该注意的问题:
1、限制从服务器为只读
在从服务器上设置read_only=ON 最好使用read_only选项
注意:此限制对拥有SUPER权限的用户均无效
阻止所有用户, 包括主服务器复制的更新
mysql> FLUSH TABLES WITH READ LOCK; 最好不要加此选项,会阻止从服务器复制的更新
2、RESET SLAVE
在从服务器清除master.info ,relay-log.info, relay log ,开始新的relay log ,注意:需要先STOP SLAVE RESET SLAVE ALL 清除所有从服务器上设置的主服务器同步信息如:PORT, HOST, USER和 PASSWORD 等
3、sql_slave_skip_counter = N # 从服务器忽略几个主服务器的复制事件,global变量,生产中比较实用,可以忽略错误继续往下复制,否则因为一个错误不能往下复制,会导致后续的数据不能复制。
如何保证主从复制的事务安全
参看https://mariadb.com/kb/en/library/server-system-variables/
在master节点启用参数:
sync_binlog=1                      # 每次写后立即同步二进制日志到磁盘,性能差

如果用到的为InnoDB存储引擎:

innodb_flush_log_at_trx_commit=1   # 每次事务提交立即同步日志写磁盘

innodb_support_xa=ON               # 默认值,分布式事务MariaDB10.3.0废除

sync_master_info=#                 #次事件后master.info同步到磁盘
在slave节点启用服务器选项:
skip_slave_start=ON # 不自动启动slave,skip是忽略slave启动,不要关闭。
在slave节点启用参数:
sync_relay_log=# #次写后同步relay log到磁盘

sync_relay_log_info=# #次事务后同步relay-log.info到磁盘
实验:sql_slave_skip_counter跳过复制错误用法
在主服务器上查看一个表的详细情况
MariaDB [hellodb]> select * from teachers;  可以看到此时的teachers表序列号是4

+-----+---------------+-----+--------+

| TID | Name          | Age | Gender |

+-----+---------------+-----+--------+

|   1 | Song Jiang    |  45 | M      |

|   2 | Zhang Sanfeng |  94 | M      |

|   3 | Miejue Shitai |  77 | F      |

|   4 | Lin Chaoying  |  93 | F      |

+-----+---------------+-----+--------+

4 rows in set (0.00 sec)

MariaDB [hellodb]> desc teachers;  我们可以看到序列号是自动增长,TID为主键

+--------+----------------------+------+-----+---------+----------------+

| Field  | Type                 | Null | Key | Default | Extra          |

+--------+----------------------+------+-----+---------+----------------+

| TID    | smallint(5) unsigned | NO   | PRI | NULL    | auto_increment |

| Name   | varchar(100)         | NO   |     | NULL    |                |

| Age    | tinyint(3) unsigned  | NO   |     | NULL    |                |

| Gender | enum('F','M')        | YES  |     | NULL    |                |

+--------+----------------------+------+-----+---------+----------------+
在从服务器上查看一个表的详细情况
MariaDB [hellodb]> select * from teachers;  可以看到此时的teachers表序列号是4

+-----+---------------+-----+--------+

| TID | Name          | Age | Gender |

+-----+---------------+-----+--------+

|   1 | Song Jiang    |  45 | M      |

|   2 | Zhang Sanfeng |  94 | M      |

|   3 | Miejue Shitai |  77 | F      |

|   4 | Lin Chaoying  |  93 | F      |

+-----+---------------+-----+--------+

4 rows in set (0.00 sec)

MariaDB [hellodb]> desc teachers;  我们可以看到序列号是自动增长,TID为主键

+--------+----------------------+------+-----+---------+----------------+

| Field  | Type                 | Null | Key | Default | Extra          |

+--------+----------------------+------+-----+---------+----------------+

| TID    | smallint(5) unsigned | NO   | PRI | NULL    | auto_increment |

| Name   | varchar(100)         | NO   |     | NULL    |                |

| Age    | tinyint(3) unsigned  | NO   |     | NULL    |                |

| Gender | enum('F','M')        | YES  |     | NULL    |                |

+--------+----------------------+------+-----+---------+----------------+
下来我们先在B从服务器的teachers表添加数据,添加的haha的TID是6,就会与主服务器的TID存在冲突,就无法复制主无服务器的信息
MariaDB [hellodb]> insert teachers(name)value('biubiu');

Query OK, 1 row affected, 1 warning (0.01 sec)

MariaDB [hellodb]> select * from teachers;

+-----+---------------+-----+--------+

| TID | Name          | Age | Gender |

+-----+---------------+-----+--------+

|   1 | Song Jiang    |  45 | M      |

|   2 | Zhang Sanfeng |  94 | M      |

|   3 | Miejue Shitai |  77 | F      |

|   4 | Lin Chaoying  |  93 | F      |

|   5 | lisi          |   0 | NULL   |

|   6 | haha          |   0 | NULL   |

|   7 | biubiu        |   0 | NULL   |

+-----+---------------+-----+--------+
我们在主服务器的teachers表添加数据,此时添加的wang的TID是6
MariaDB [hellodb]> insert teachers(name)value('wang');

Query OK, 1 row affected, 1 warning (0.02 sec)

MariaDB [hellodb]> select * from teachers;

+-----+---------------+-----+--------+

| TID | Name          | Age | Gender |

+-----+---------------+-----+--------+

|   1 | Song Jiang    |  45 | M      |

|   2 | Zhang Sanfeng |  94 | M      |

|   3 | Miejue Shitai |  77 | F      |

|   4 | Lin Chaoying  |  93 | F      |

|   5 | lisi          |   0 | NULL   |

|   6 | wang          |   0 | NULL   |

+-----+---------------+-----+--------+
下来我们在B从服务器上查看slave状态,可以明确的看到错误信息,是因为主键6存在错误
MariaDB [hellodb]> show slave status\G

*************************** 1. row ***************************

               Slave_IO_State: Waiting for master to send event

                  Master_Host: 192.168.34.101

                  Master_User: rpl

                  Master_Port: 3306

                Connect_Retry: 60

              Master_Log_File: mysql-bin.000001

          Read_Master_Log_Pos: 7924

               Relay_Log_File: mariadb-relay-bin.000002

                Relay_Log_Pos: 8014

        Relay_Master_Log_File: mysql-bin.000001

             Slave_IO_Running: Yes

            Slave_SQL_Running: No

              Replicate_Do_DB:

          Replicate_Ignore_DB:

           Replicate_Do_Table:

       Replicate_Ignore_Table:

      Replicate_Wild_Do_Table:

  Replicate_Wild_Ignore_Table:

                   Last_Errno: 1062

                   Last_Error: Could not execute Write_rows event on table hellodb.teachers; Duplicate entry '6' for key 'PRIMARY', Error_code: 1062; handler error HA_ERR_FOUND_DUPP_KEY; the event's master log mysql-bin.000001, end_log_pos 7897

                 Skip_Counter: 0

          Exec_Master_Log_Pos: 7730

              Relay_Log_Space: 8504

              Until_Condition: None

               Until_Log_File:

                Until_Log_Pos: 0

           Master_SSL_Allowed: No

           Master_SSL_CA_File:

           Master_SSL_CA_Path:

              Master_SSL_Cert:

            Master_SSL_Cipher:

               Master_SSL_Key:

        Seconds_Behind_Master: NULL

Master_SSL_Verify_Server_Cert: No

                Last_IO_Errno: 0

                Last_IO_Error:

               Last_SQL_Errno: 1062  错误编号

               Last_SQL_Error: Could not execute Write_rows event on table hellodb.teachers; Duplicate entry '6' for key 'PRIMARY', Error_code: 1062; handler error HA_ERR_FOUND_DUPP_KEY; the event's master log mysql-bin.000001, end_log_pos 7897

  Replicate_Ignore_Server_Ids:

             Master_Server_Id: 1
停止slave,然后再设置跳过此次的错误信息
MariaDB [hellodb]> stop slave;
我们在B服务器上进行修改跳过一个错误的操作
MariaDB [hellodb]> set global sql_slave_skip_counter=1; 由于只有一个错误,就修改为1
查看跳过的信息
MariaDB [hellodb]> select @@sql_slave_skip_counter;

+--------------------------+

| @@sql_slave_skip_counter |

+--------------------------+

|                        1 |

+--------------------------+
开启slave
MariaDB [hellodb]> start slave;
启动slave,查看slave状态,并查看复制的结果,此时会跳过主服务器冲突的TID,从服务器继续复制之后的信息
MariaDB [hellodb]> show slave status\G;  查看当前slave状态

*************************** 1. row ***************************

               Slave_IO_State: Waiting for master to send event

                  Master_Host: 192.168.34.101

                  Master_User: rpl

                  Master_Port: 3306

                Connect_Retry: 60

              Master_Log_File: mysql-bin.000001

          Read_Master_Log_Pos: 8508

               Relay_Log_File: mariadb-relay-bin.000004

                Relay_Log_Pos: 529

        Relay_Master_Log_File: mysql-bin.000001

             Slave_IO_Running: Yes

            Slave_SQL_Running: Yes

              Replicate_Do_DB:

          Replicate_Ignore_DB:

           Replicate_Do_Table:

       Replicate_Ignore_Table:

      Replicate_Wild_Do_Table:

  Replicate_Wild_Ignore_Table:

                   Last_Errno: 0

                   Last_Error:

                 Skip_Counter: 0

          Exec_Master_Log_Pos: 8508

              Relay_Log_Space: 1693

              Until_Condition: None

               Until_Log_File:

                Until_Log_Pos: 0

           Master_SSL_Allowed: No

           Master_SSL_CA_File:

           Master_SSL_CA_Path:

              Master_SSL_Cert:

            Master_SSL_Cipher:

               Master_SSL_Key:

        Seconds_Behind_Master: 0

Master_SSL_Verify_Server_Cert: No

                Last_IO_Errno: 0

                Last_IO_Error:

               Last_SQL_Errno: 0

               Last_SQL_Error:

  Replicate_Ignore_Server_Ids:

             Master_Server_Id: 1

MariaDB [hellodb]> select * from teachers; 此时跳过了冲突的TID,不会复制主服务器冲突TID的信息,直接复制下面的信息

+-----+---------------+-----+--------+

| TID | Name          | Age | Gender |

+-----+---------------+-----+--------+

|   1 | Song Jiang    |  45 | M      |

|   2 | Zhang Sanfeng |  94 | M      |

|   3 | Miejue Shitai |  77 | F      |

|   4 | Lin Chaoying  |  93 | F      |

|   5 | lisi          |   0 | NULL   |

|   6 | haha          |   0 | NULL   |

|   7 | biubiu        |   0 | NULL   |

|   8 | zhangsan      |   0 | NULL   |

|   9 | wo            |   0 | NULL   |

+-----+---------------+-----+--------+
冲突的TID=6,可以手动在B从服务器上修改,保证与主服务器一致
MariaDB [hellodb]> update teachers set name='wang' where tid=6; 修改tid=6的相关信息

Query OK, 1 row affected (0.00 sec)

Rows matched: 1  Changed: 1  Warnings: 0

MariaDB [hellodb]> select * from teachers;

+-----+---------------+-----+--------+

| TID | Name          | Age | Gender |

+-----+---------------+-----+--------+

|   1 | Song Jiang    |  45 | M      |

|   2 | Zhang Sanfeng |  94 | M      |

|   3 | Miejue Shitai |  77 | F      |

|   4 | Lin Chaoying  |  93 | F      |

|   5 | lisi          |   0 | NULL   |

|   6 | wang          |   0 | NULL   |

|   7 | biubiu        |   0 | NULL   |

|   8 | zhangsan      |   0 | NULL   |

|   9 | wo            |   0 | NULL   |

+-----+---------------+-----+--------+
主主复制
主主复制:互为主从
(1)容易产生的问题:数据不一致;因此慎用
(2)考虑要点:自动增长id
配置一个节点使用奇数id
auto_increment_offset=1 开始点

auto_increment_increment=2 增长幅度
另一个节点使用偶数id
auto_increment_offset=2

auto_increment_increment=2
主主复制的配置步骤:
(1) 各节点使用一个惟一server_id

(2) 都启动binary log和relay log

(3) 创建拥有复制权限的用户账号

(4) 定义自动增长id字段的数值范围各为奇偶

(5) 均把对方指定为主节点,并启动复制线程
实验:主主复制
先在A主服务器上修改mysql配置文件
vim /etc/my.cnf

[mysqld]

server-id=1

log_bin=/data/logbin/mysql-bin

binlog_format=ROW

auto_increment_offset=1

auto_increment_increment=2
重启A机器mysql服务器
systemctl reatart mariadb
在B主服务器上修改mysql配置文件
vim /etc/my.cnf

[mysqld]

server-id=2

log_bin

binlog_format=ROW

auto_increment_offset=2

auto_increment_increment=2
重启B主机的mysql服务
systemctl restart mariadb
在A主机上创建复制权限的账号
MariaDB [(none)]> grant replication slave on *.* to rpl@'192.168.34.%' identified by 'centos';
查看A主机当前的二进制日志文件大小
MariaDB [(none)]> show master logs;

+------------------+-----------+

| Log_name         | File_size |

+------------------+-----------+

| mysql-bin.000001 |       245 |

+------------------+-----------+
然后在B主机上启动复制线程
MariaDB [(none)]> CHANGE MASTER TO

    ->   MASTER_HOST='192.168.34.101',

    ->   MASTER_USER='rpl',

    ->   MASTER_PASSWORD='centos',

    ->   MASTER_PORT=3306,

    ->   MASTER_LOG_FILE='mysql-bin.000001', 指定A主机的二进制日志初始文件

    ->   MASTER_LOG_POS=245;  初始的二进制日志文件大小
在B主机上启动slave
MariaDB [(none)]> start slave; 启动slave

MariaDB [(none)]> show slave status\G;

*************************** 1. row ***************************

               Slave_IO_State: Waiting for master to send event

                  Master_Host: 192.168.34.101

                  Master_User: rpl

                  Master_Port: 3306

                Connect_Retry: 60

              Master_Log_File: mysql-bin.000001

          Read_Master_Log_Pos: 401

               Relay_Log_File: mariadb-relay-bin.000002

                Relay_Log_Pos: 685

        Relay_Master_Log_File: mysql-bin.000001

             Slave_IO_Running: Yes  查看此时已经启动IO_slave

            Slave_SQL_Running: Yes   已经启动SQL_slave
在A主机上导入数据库,并查看数据库内容
[root@centos7~]#mysql < hellodb_innodb.sql

[root@centos7~]#mysql

MariaDB [(none)]> show databases;

+--------------------+

| Database           |

+--------------------+

| information_schema |

| hellodb            |

| mysql              |

| performance_schema |

| test               |

+--------------------+
在B主机上查看复制A主机的数据库是否成功,此时已经复制成功,实现主主单向复制,下来我们还需要实现主主双向复制
MariaDB [(none)]> show databases;

+--------------------+

| Database           |

+--------------------+

| information_schema |

| hellodb            |

| mysql              |

| performance_schema |

| test               |
在B主机上查看二进制日志情况
MariaDB [(none)]> show master logs;

+--------------------+-----------+

| Log_name           | File_size |

+--------------------+-----------+

| mariadb-bin.000001 |       245 |

+--------------------+-----------+
然后在A主机上开启复制线程,指定B主机的详细信息
MariaDB [(none)]> CHANGE MASTER TO

    ->   MASTER_HOST='192.168.34.102',

    ->   MASTER_USER='rpl',

    ->   MASTER_PASSWORD='centos',

    ->   MASTER_PORT=3306,

    ->   MASTER_LOG_FILE='mariadb-bin.000001',

    ->   MASTER_LOG_POS=245;
启动A主机的slave,并查看状态
MariaDB [(none)]> start slave;  开启slave

Query OK, 0 rows affected (0.01 sec)

MariaDB [(none)]> show slave status\G

*************************** 1. row ***************************

               Slave_IO_State: Waiting for master to send event

                  Master_Host: 192.168.34.102

                  Master_User: rpl

                  Master_Port: 3306

                Connect_Retry: 60

              Master_Log_File: mariadb-bin.000001

          Read_Master_Log_Pos: 245

               Relay_Log_File: mariadb-relay-bin.000002

                Relay_Log_Pos: 531

        Relay_Master_Log_File: mariadb-bin.000001

             Slave_IO_Running: Yes  此时已经开启IO

            Slave_SQL_Running: Yes  此时开启SQL
此时,我们来看一下A主机创建一个表,并插入表信息,此时的ID号以奇数开始增涨
MariaDB [hellodb]> create table  t1(id int auto_increment primary key,name char(10));  创建表t1

Query OK, 0 rows affected (0.03 sec)

MariaDB [hellodb]> insert t1(name)value('a');  插入a信息

Query OK, 1 row affected (0.01 sec)

MariaDB [hellodb]> insert t1(name)value('b');  插入b信息

Query OK, 1 row affected (0.00 sec)

MariaDB [hellodb]> select * from t1;

+----+------+

| id | name |

+----+------+

|  1 | a    |

|  3 | b    |

+----+------+
在B主机上插入表格信息,此时在B主机上插入信息,会以偶数递增序列号,不会和A主机存在冲突
MariaDB [hellodb]> insert t1(name)value('a');  在B主机上插入a信息

Query OK, 1 row affected (0.01 sec)

MariaDB [hellodb]> insert t1(name)value('b');  在B主机上插入b信息

Query OK, 1 row affected (0.00 sec)

MariaDB [hellodb]> select * from t1;  查看此时未出现冲突情况,但是ID顺序会比较乱

+----+------+

| id | name |

+----+------+

|  1 | a    |

|  3 | b    |

|  4 | a    |

|  6 | b    |

+----+------+
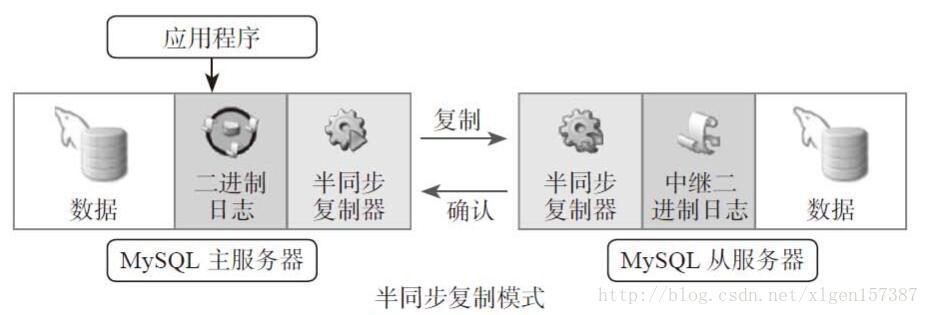
主从复制的半同步复制
原理:介于异步复制和全同步复制之间,主库在执行完客户端提交的事务后不是立刻返回给客户端,而是等待至少一个从库接收到并写到relay log中才返回给客户端。相对于异步复制,半同步复制提高了数据的安全性,同时它也造成了一定程度的延迟,这个延迟最少是一个TCP/IP往返的时间。所以,半同步复制最好在低延时的网络中使用。
默认情况下,MySQL的复制功能是异步的,异步复制可以提供最佳的性能,主库把binlog日志发送给从库即结束,并不验证从库是否接收完毕。这意味着当主服务器或从服务器端发生故障时,有可能从服务器没有接收到主服务器发送过来的binlog日志,这就会造成主服务器和从服务器的数据不一致,甚至在恢复时造成数据的丢失
实验:先配置主从复制,再配置半同步复制(生产中常用此配置)
A机器为主服务器
B为第一个从服务器
C为第二个从服务器
启动三个服务器的mysql服务
# systemctl start mariadb
配置主服务器的相关配置
(1)配置主服务器的mysql配置
[root@centos7~]#vim /etc/my.cnf

[mysqld]

server-id=1

log_bin=/data/logbin/mysql-bin

binlog_format=ROW
(2)清空之前实验的二进制日志文件,(注意,在生产环境中不要这么做),并查看当前的二进制日志情况
MariaDB [(none)]> reset master;

MariaDB [(none)]> show master logs;

+------------------+-----------+

| Log_name         | File_size |

+------------------+-----------+

| mysql-bin.000001 |       245 |

+------------------+-----------+
(3)主服务器上创建授权复制账号
[root@centos7~]#mysql

Welcome to the MariaDB monitor.  Commands end with ; or \g.

Your MariaDB connection id is 2

Server version: 5.5.60-MariaDB MariaDB Server

Copyright (c) 2000, 2018, Oracle, MariaDB Corporation Ab and others.

Type 'help;' or '\h' for help. Type '\c' to clear the current input statement.

MariaDB [(none)]> grant replication slave on *.*  to rpl@'192.168.34.%' identified by 'centos';
在从服务器配置相关文件
(1)在B从服务器mysql数据库配置文件
server-id=2       #配置server-id,让从服务器有唯一ID号

relay_log = relay-log   #打开Mysql中继日志,日志格式为二进制

read_only = 1    #设置只读权限

log_bin = /data/mysql/mysql-bin         #开启从服务器二进制日志(非必须)

log_slave_updates = 1  #使得更新的数据写进二进制日志中
(2)在B从服务器mysql数据库中启动复制线程
MariaDB [(none)]> CHANGE MASTER TO

    ->   MASTER_HOST='192.168.34.101',  配置主服务器的IP地址

    ->   MASTER_USER='rpl',

    ->   MASTER_PASSWORD='centos',

    ->   MASTER_PORT=3306,

    ->   MASTER_LOG_FILE='mysql-bin.000001',指定主服务器二进制日志的文件

    ->   MASTER_LOG_POS=245;  指定初始二进制日志的文件大小
开启slave并查看slave状态
start slave
查看slave状态
MariaDB [(none)]> show slave status\G;

*************************** 1. row ***************************

               Slave_IO_State: Waiting for master to send event

                  Master_Host: 192.168.34.101

                  Master_User: rpl

                  Master_Port: 3306

                Connect_Retry: 60

              Master_Log_File: mysql-bin.000001

          Read_Master_Log_Pos: 396

               Relay_Log_File: mariadb-relay-bin.000002

                Relay_Log_Pos: 680

        Relay_Master_Log_File: mysql-bin.000001

             Slave_IO_Running: Yes   查看IO已开启

            Slave_SQL_Running: Yes  查看SQL已开启
(4)在C从服务器上设置mysql配置文件
server-id=3       #配置server-id,让从服务器有唯一ID号

relay_log = relay-log  #打开Mysql中继日志,日志格式为二进制

read_only = 1    #设置只读权限

log_bin = /data/logbin/mysql-bin         #开启从服务器二进制日志,(非必须)

log_slave_updates = 1  #使得更新的数据写进二进制日志中
(5)在C从服务器mysql数据库中启动复制线程
CHANGE MASTER TO

  MASTER_HOST='192.168.34.101',  指定主服务器IP地址

  MASTER_USER='rpl',

  MASTER_PASSWORD='centos',

  MASTER_PORT=3306,

  MASTER_LOG_FILE='mysql-bin.000001',

  MASTER_LOG_POS=245;  主服务器的二进制日志初始值
(6)启动slave并查看状态
MariaDB [(none)]> start slave; 启动slave

MariaDB [(none)]> show slave status\G;

*************************** 1. row ***************************

               Slave_IO_State: Waiting for master to send event

                  Master_Host: 192.168.34.102

                  Master_User: rpl

                  Master_Port: 3306

                Connect_Retry: 60

              Master_Log_File: mariadb-bin.000001

          Read_Master_Log_Pos: 245

               Relay_Log_File: mariadb-relay-bin.000002

                Relay_Log_Pos: 531

        Relay_Master_Log_File: mariadb-bin.000001

             Slave_IO_Running: Yes  此时的IO已开启

            Slave_SQL_Running: Yes  此时的SQL已开启
验证主从复制效果:
(1)在主服务器导入数据库
[root@centos7~]#mysql < hellodb_innodb.sql

MariaDB [(none)]> show databases;

+--------------------+

| Database           |

+--------------------+

| information_schema |

| hellodb            |

| mysql              |

| performance_schema |

| test               |

+--------------------+

5 rows in set (0.00 sec)
在B从服务器查看复制结果
MariaDB [(none)]> show databases;

+--------------------+

| Database           |

+--------------------+

| information_schema |

| hellodb            |

| mysql              |

| performance_schema |

| test               |

+--------------------+

5 rows in set (0.00 sec)
在C从服务器查看复制结果
MariaDB [(none)]> show databases;

+--------------------+

| Database           |

+--------------------+

| information_schema |

| hellodb            |

| mysql              |

| performance_schema |

| test               |

+--------------------+

5 rows in set (0.00 sec)
下来查询半同步插件配置,并配置半同步相关实
/usr/lib64/mysql/plugin/semisync_master.so

/usr/lib64/mysql/plugin/semisync_slave.so
(1)在主服务器上安装插件
MariaDB [(none)]> INSTALL PLUGIN rpl_semi_sync_master SONAME 'semisync_master.so';
(2)查看安装后的插件名
MariaDB [(none)]> show plugins;

| Name                                        | Status   | Type               | Library            | License

rpl_semi_sync_master(对用插件文件名)           | ACTIVE   | REPLICATION        | semisync_master.so | GPL
(3)启动插件
MariaDB [(none)]> show global variables like 'rpl_semi%';  查看是否开启

MariaDB [(none)]> set global rpl_semi_sync_master_enabled = on;   开启插件,此时看见只是临时启动,要长久使用需要加入到配置文件中
将插件永久启动:写入配置文件中
[mysqld]

server-id=1

log_bin=/data/logbin/mysql-bin

binlog_format=ROW

rpl_semi_sync_master_enabled
重新启动mysql服务
systemctl restart mariadb
设置超时时长
mysql>SET GLOBAL rpl_semi_sync_master_timeout = 1000;超时长为1s
查看变量信息
mysql>SHOW GLOBAL VARIABLES LIKE '%semi%';

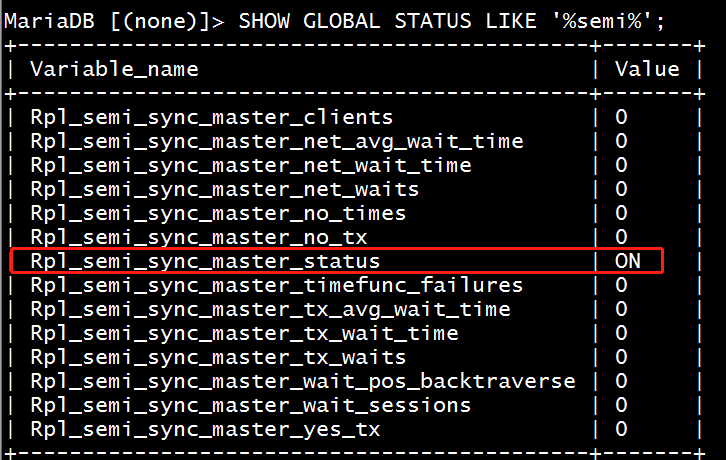
查看状态变量
mysql>SHOW GLOBAL STATUS LIKE '%semi%';
在B从服务器上设置相关配置:
(1)安装从节点插件
mysql> INSTALL PLUGIN rpl_semi_sync_slave SONAME 'semisync_slave.so';
(2)启动插件,将插件写入配置文件中,永久保存
mysql> SET GLOBAL rpl_semi_sync_slave_enabled=1;临时启动插件
永久保存在文件中,并重启mysql服务 systemctl restart mariadb
vim /etc/m.cnf

[mysqld]

server-id=2

read-only

log_bin

rpl_semi_sync_slave_enabled
查看B从服务器的插件状态是否启用
SHOW GLOBAL STATUS LIKE '%semi%';
在C从服务器上做相同的配置
(1)安装插件
MariaDB [(none)]> INSTALL PLUGIN rpl_semi_sync_slave SONAME 'semisync_slave.so';
(2)启动插件,最好将插件保存在配置文件中
mysql> SET GLOBAL rpl_semi_sync_slave_enabled=1;临时启动插件
修改在配置文件中,永久保存,并重启mysql服务:systemctl restart mariadb
vim /etc/m.cnf

[mysqld]

server-id=3

read-only

rpl_semi_sync_slave_enabled
查看C从服务器状态是否已经启用插件:
SHOW GLOBAL STATUS LIKE '%semi%';
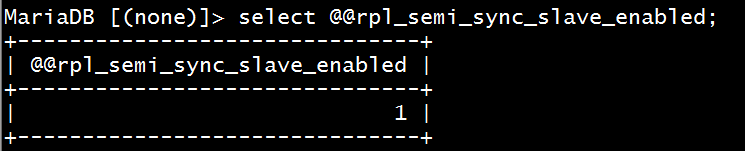
查看插件启用状态:
MariaDB [(none)]> select @@rpl_semi_sync_slave_enabled;
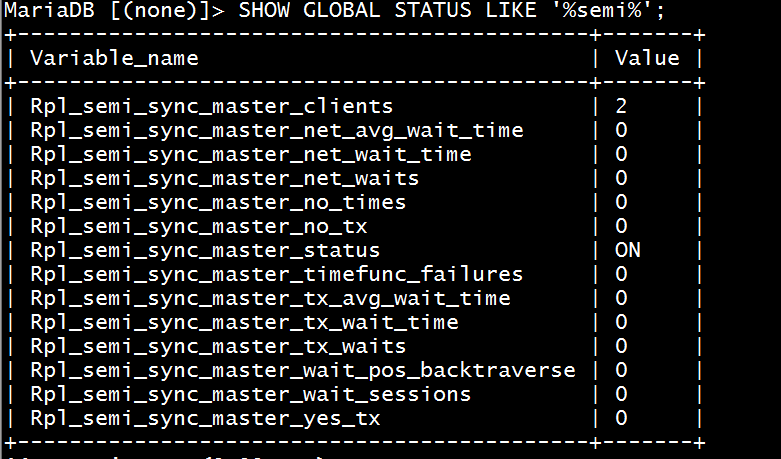
在主节点上查看此时开启的插件状态
下来我们要实现半同步实验,必须将两个从服务器的slave功能重启才可以生效
# stop slave;

# start slave;
超时时间默认是10s,我们可以将此选项设置2s,提升用户感知,修改完之后重启mysql服务即可
vim /etc/my.cnf

[mysqld]

rpl_semi_sync_master_timeout=2000
实现主从从架构及复制过滤器
复制过滤原理:复制过滤器:(黑、白名单)仅复制有限一个或几个数据库相关的数据,而非所有;由复制过滤器进行;
有两种实现思路:
(1) 服务器选项:主服务器仅向二进制日志中记录与特定数据库相关的事件

注意:此项和binlog_format相关

参看:https://mariadb.com/kb/en/library/mysqld-options/#-binlog-ignore-db

binlog_do_db = 数据库白名单列表,多个数据库需多行实现

binlog_ignore_db = 数据库黑名单列表

问题:基于二进制还原将无法实现;不建议使用

(2) 从服务器SQL_THREAD在replay中继日志中的事件时,仅读取与特定数据库(特定表)相关的事件并应用于本地

问题:会造成网络及磁盘IO浪费  建议使用此方法,在从服务器上配置

  从服务器上的复制过滤器相关变量

  replicate_do_db= # 指定复制库的白名单,仅允许从复制这个库的二进制日志

  replicate_ignore_db= # 指定复制库黑名单,除了这个数据库,其他都允许复制

  replicate_do_table= # 指定复制表的白名单

  replicate_ignore_table= # 指定复制表的黑名单

  replicate_wild_do_table= foo%.bar% 支持通配符

  replicate_wild_ignore_table=
查看复制过滤器相关变量
MariaDB [hellodb]> show variables like 'replicate%';

+----------------------------------+-----------+

| Variable_name                    | Value     |

+----------------------------------+-----------+

| replicate_annotate_row_events    | OFF       |

| replicate_do_db                  |           |

| replicate_do_table               |           |

| replicate_events_marked_for_skip | replicate |

| replicate_ignore_db              |           |

| replicate_ignore_table           |           |

| replicate_wild_do_table          |           |

| replicate_wild_ignore_table      |           |

+----------------------------------+-----------+
第一种方法:在从服务器上指定特定数据库进行复制(推荐)
(1)在B从服务器修改/etc/my.cnfl配置文件并重启mysql服务器
server-id=2       #配置server-id,让从服务器有唯一ID号

relay_log = relay-log    #打开Mysql日志,日志格式为二进制

read_only = 1    #设置只读权限

log_bin = /data/logbin/mysql-bin         #开启从服务器二进制日志,(必须)

log_slave_updates = 1  #使得更新的数据写进二进制日志中

replicate_do_db=hellodb  # 过滤hellodb数据库,只复制此数据库
(2)在C服务器修改mysql配置文件并重启mysql服务器
server-id=3       #配置server-id,让从服务器有唯一ID号

relay_log = relay-log    #打开Mysql日志,日志格式为二进制

read_only = 1    #设置只读权限

log_bin = /data/logbin/mysql-bin         #开启从服务器二进制日志,(必须)

log_slave_updates = 1  #使得更新的数据写进二进制日志中

replicate_do_db=hellodb  # 过滤hellodb数据库,只复制此数据库
验证过滤hellodb数据库结果
在A主服务器上hellodb数据库的teachers表中插入内容
MariaDB>use hellodb;

MariaDB [hellodb]> insert teachers(name)value('biu');在hellodb数据库的teachers表中插入内容
在A从服务器mysql数据库创建一个db1数据库
MariaDB [hellodb]> create database db1;

Query OK, 1 row affected (0.00 sec)

MariaDB [hellodb]> show databases;

+--------------------+

| Database           |

+--------------------+

| information_schema |

| db1                |

| hellodb            |

| mysql              |

| performance_schema |

| test               |

+--------------------+

6 rows in set (0.00 sec)
在B从服务msyql服务器中查看A主服务器创建的数据库内容
MariaDB [hellodb]> select * from teachers;

ERROR 2006 (HY000): MySQL server has gone away

No connection. Trying to reconnect...

Connection id:    4

Current database: hellodb

+-----+---------------+-----+--------+

| TID | Name          | Age | Gender |

+-----+---------------+-----+--------+

|   1 | Song Jiang    |  45 | M      |

|   2 | Zhang Sanfeng |  94 | M      |

|   3 | Miejue Shitai |  77 | F      |

|   4 | Lin Chaoying  |  93 | F      |

|   5 | a             |   0 | NULL   |

|   6 | biu           |   0 | NULL   |

+-----+---------------+-----+--------+
此时查看新建的db1数据库无法复制
MariaDB [hellodb]> show databases;

+--------------------+

| Database           |

+--------------------+

| information_schema |

| hellodb            |

| mysql              |

| performance_schema |

| test               |

+--------------------+
在C从服务器查看A主服务器创建的数据库
MariaDB [hellodb]> select * from teachers;

ERROR 2006 (HY000): MySQL server has gone away

No connection. Trying to reconnect...

Connection id:    4

Current database: hellodb

+-----+---------------+-----+--------+

| TID | Name          | Age | Gender |

+-----+---------------+-----+--------+

|   1 | Song Jiang    |  45 | M      |

|   2 | Zhang Sanfeng |  94 | M      |

|   3 | Miejue Shitai |  77 | F      |

|   4 | Lin Chaoying  |  93 | F      |

|   5 | a             |   0 | NULL   |

|   6 | biu           |   0 | NULL   |

+-----+---------------+-----+--------+
此时查看新建的db1数据库无法复制
MariaDB [hellodb]> show databases;

+--------------------+

| Database           |

+--------------------+

| information_schema |

| hellodb            |

| mysql              |

| performance_schema |

| test               |

+--------------------+
第二种方法:在主服务器上设置复制指定的数据库和二进制日志(生产中不推荐)
vim /etc/my.cnf

[mysqld]

[mysqld]

server-id=1

log_bin=/data/logbin/mysql-bin

binlog_format=ROW

binlog_do_db=hellodb  # 只复制hellodb数据库及二进制日志

binlog_do_db=db1     # 只复制db1数据库及二进制日志
重启msyql服务:systemctl restart mariadb
删除B和C从服务器的配置文件:replicate_do_db=hellodb 并重启mysql服务:systemctl restart mariadb,做此实验室需要将以上的实验配置文件先删除。
由于上面做的实验,创建了db1,当时从服务器未复制db1数据库,此时我们可以在主服务器上删除db1重新创建db1
(1)在A主服务器上删除db1数据库
drop database db1;
(2)在B和C从服务器都操作slave,跳过当前错误复制过程
MariaDB [hellodb]> stop slave;  先停止slave

MariaDB [hellodb]> set global sql_slave_skip_counter=1;  跳过当前复制错误

MariaDB [hellodb]> start slave;  开启slave
(3)此时在A主服务器上创建db1数据库
MariaDB [hellodb]> create database db1;
(4)查看此时B和C从服务器的数据库复制情况
MariaDB [hellodb]> show databases;

+--------------------+

| Database           |

+--------------------+

| information_schema |

| db1                |

| hellodb            |

| mysql              |

| performance_schema |

| test               |

+--------------------+
(5)在A主服务器上查询白名单状态
MariaDB [hellodb]> show master status;

+------------------+----------+--------------+------------------+

| File             | Position | Binlog_Do_DB | Binlog_Ignore_DB |

+------------------+----------+--------------+------------------+

| mysql-bin.000003 |      599 | hellodb,db1  |                  |

+------------------+----------+--------------+------------------+
MySQL复制加密
基于SSL复制:
在默认的主从复制过程或远程连接到MySQL/MariaDB所有的链接通信中的数据都是明文的,外网里访问数据或则复制,存在安全隐患。通过SSL/TLS加密的方式进行复制的方法,来进一步提高数据的安全性
配置实现:
参看:https://mariadb.com/kb/en/library/replication-with-secure-connections/
主服务器开启SSL:[mysqld] 加一行ssl

主服务器配置证书和私钥;并且创建一个要求必须使用SSL连接的复制账号

从服务器使用CHANGER MASTER TO 命令时指明ssl相关选项
实验:开始对mysql复制加密
(1)在A主服务器创建一个存放文件的目录ssl
[root@centos7~]#cd /etc/my.cnf.d

[root@centos7my.cnf.d]#ls

client.cnf  mysql-clients.cnf  server.cnf

[root@centos7my.cnf.d]#mkdir ssl  创建一个ssl目录

[root@centos7my.cnf.d]#cd ssl
(2)在A主服务器生成私钥文件
[root@centos7ssl]#(umask 066;openssl genrsa 2048 >cakey.pem)

Generating RSA private key, 2048 bit long modulus

..............................................................+++

.................+++

e is 65537 (0x10001)

[root@centos7ssl]#ll

total 4

-rw------- 1 root root 1679 Nov 26 16:55 cakey.pem
(3)在A主服务器创建自签名证书
[root@centos7ssl]#openssl  req  -new  -x509   -key  cakey.pem  -out  cacert.pem  -days 3650

You are about to be asked to enter information that will be incorporated

into your certificate request.

What you are about to enter is what is called a Distinguished Name or a DN.

There are quite a few fields but you can leave some blank

For some fields there will be a default value,

If you enter '.', the field will be left blank.

-----

Country Name (2 letter code) [XX]:CN

State or Province Name (full name) []:beijing

Locality Name (eg, city) [Default City]:beijing

Organization Name (eg, company) [Default Company Ltd]:magedu

Organizational Unit Name (eg, section) []:devops

Common Name (eg, your name or your server's hostname) []:ca.magedu.com

Email Address []:
(4)A主服务器申请证书
[root@centos7ssl]#openssl req -newkey rsa:2048 -days 365 -nodes  -keyout master.key > master.csr   此时的-nodes是私钥不加密的意思

Generating a 2048 bit RSA private key

...........+++

................................................................................+++

writing new private key to 'master.key'

-----

You are about to be asked to enter information that will be incorporated

into your certificate request.

What you are about to enter is what is called a Distinguished Name or a DN.

There are quite a few fields but you can leave some blank

For some fields there will be a default value,

If you enter '.', the field will be left blank.

-----

Country Name (2 letter code) [XX]:CN

State or Province Name (full name) []:beijing

Locality Name (eg, city) [Default City]:beijing

Organization Name (eg, company) [Default Company Ltd]:magedu

Organizational Unit Name (eg, section) []:devops

Common Name (eg, your name or your server's hostname) []:master.magedu.com

Email Address []:

Please enter the following 'extra' attributes

to be sent with your certificate request

A challenge password []:

An optional company name []:
(5)在A主服务器上替从服务器申请证书
[root@centos7ssl]#openssl req -newkey rsa:2048 -days 365 -nodes  -keyout slave.key > slave.csr

Generating a 2048 bit RSA private key

...........................................................................................................+++

.............................................+++

writing new private key to 'slave.key'

-----

You are about to be asked to enter information that will be incorporated

into your certificate request.

What you are about to enter is what is called a Distinguished Name or a DN.

There are quite a few fields but you can leave some blank

For some fields there will be a default value,

If you enter '.', the field will be left blank.

-----

Country Name (2 letter code) [XX]:CN

State or Province Name (full name) []:beijing

Locality Name (eg, city) [Default City]:beijing

Organization Name (eg, company) [Default Company Ltd]:magedu

Organizational Unit Name (eg, section) []:devops

Common Name (eg, your name or your server's hostname) []:slave.magedu.com

Email Address []:

Please enter the following 'extra' attributes

to be sent with your certificate request

A challenge password []:

An optional company name []:
(6)在A主服务器颁发CA证书
[root@centos7ssl]#openssl x509 -req -in master.csr  -CA cacert.pem -CAkey cakey.pem  -set_serial  01 > master.crt  给master.csr文件颁发CA证书,编号为01,保存为master.csr文件

Signature ok

subject=/C=CN/ST=beijing/L=beijing/O=magedu/OU=devops/CN=master.magedu.com

Getting CA Private Key
(7)查看颁发CA证书信息
[root@centos7ssl]#openssl x509 -in master.crt -noout  -text;

Certificate:

    Data:

        Version: 1 (0x0)

        Serial Number: 1 (0x1)

    Signature Algorithm: sha256WithRSAEncryption

        Issuer: C=CN, ST=beijing, L=beijing, O=magedu, OU=devops, CN=ca.magedu.com

        Validity

            Not Before: Nov 26 09:08:12 2019 GMT

            Not After : Dec 26 09:08:12 2019 GMT

        Subject: C=CN, ST=beijing, L=beijing, O=magedu, OU=devops, CN=master.magedu.com

        Subject Public Key Info:

            Public Key Algorithm: rsaEncryption

                Public-Key: (2048 bit)

                Modulus:

                    00:ca:62:10:3d:a6:63:e2:ed:eb:3c:19:30:66:4e:

                    2a:cf:2e:8f:1c:86:31:70:f5:c8:8c:4d:e3:78:5a:

                    96:2b:4f:68:fb:e7:27:d6:43:a5:8b:67:5a:25:af:

                    2a:a9:5e:d4:65:8d:30:83:e0:7b:b5:9d:7b:9b:a9:

                    2d:b9:4b:ca:88:23:13:20:a4:6f:82:5b:ce:42:89:

                    82:6f:02:9f:0a:64:55:99:2f:60:7c:ad:ce:56:16:

                    4a:73:06:86:c7:04:b1:39:e2:f4:cb:45:f1:8f:1d:

                    1a:7d:b3:a8:1b:58:e0:a7:69:78:9e:f5:81:a8:2a:

                    f5:f1:73:c4:a9:e6:79:28:b1:ad:a9:5a:d0:94:9e:

                    ec:ce:3f:58:7d:46:7c:6a:d9:4e:7a:ee:eb:47:ed:

                    f0:04:cb:c8:f4:11:74:2a:ff:e5:22:b4:9d:d6:7e:

                    71:ff:7f:87:ad:4e:29:01:97:dd:85:9e:3b:87:1a:

                    04:99:02:2a:86:bf:1c:20:c2:6a:8f:9c:08:ce:a4:

                    8a:42:5a:90:8d:19:92:e5:c8:b6:ec:ac:b4:01:34:

                    7a:47:81:95:33:67:b4:a1:32:0a:09:d9:9b:f5:68:

                    88:0c:6f:d0:49:1c:36:af:95:b5:4b:51:04:ab:a3:

                    ca:49:ed:b9:35:fc:20:b9:9c:64:0f:cc:e6:7f:1e:

                    2d:a3

                Exponent: 65537 (0x10001)

    Signature Algorithm: sha256WithRSAEncryption

         68:07:4c:1f:c3:dc:73:43:f5:24:06:1c:cd:00:ce:59:9c:77:

         65:92:20:29:e9:a1:d6:3b:c3:91:58:7e:e8:ca:84:32:9f:87:

         0a:8b:37:a5:bf:11:25:9e:fe:a7:69:97:68:f3:76:33:3a:67:

         b5:86:41:cd:3c:09:47:2a:3c:59:26:0b:7d:91:d7:bb:27:2d:

         6c:2d:c5:db:f2:0a:8a:3c:ba:c0:36:45:42:77:20:19:1e:ea:

         a8:bf:86:2f:bf:de:b5:19:5a:75:78:e1:3e:be:36:ea:4d:a3:

         22:4b:24:a7:5a:86:ed:4e:a6:41:5f:23:23:c2:1c:db:95:7b:

         6a:89:87:9d:ed:e5:44:19:2c:bc:44:2b:66:da:dd:41:08:43:

         80:e3:bb:3a:2b:cf:87:0a:ec:32:c4:b6:1c:3c:e5:00:e7:ee:

         d7:b4:6f:10:93:af:cd:e0:a6:c4:da:43:5f:5c:32:08:b6:73:

         bc:6d:fd:e7:1d:b8:eb:92:e5:08:45:c0:ea:bb:1c:87:9f:8c:

         45:be:97:dd:bb:48:c2:39:b7:1f:56:a7:6d:a3:d7:a0:07:ab:

         67:05:33:91:f6:d3:16:f0:de:be:d4:72:2e:7d:3c:25:da:e8:

         cb:d7:97:6d:1a:46:ef:d4:cf:dc:e1:81:16:e7:de:34:2b:34:

         1b:99:cf:b4
(8)给从服务器颁发CA证书
[root@centos7ssl]#openssl x509 -req -in slave.csr  -CA cacert.pem -CAkey cakey.pem  -set_serial  01 > slave.crt

Signature ok

subject=/C=CN/ST=beijing/L=beijing/O=magedu/OU=devops/CN=slave.magedu.com

Getting CA Private Key
(9)在A主服务器验证颁发证书的有效性
[root@centos7ssl]#openssl verify -CAfile cacert.pem master.crt slave.crt

master.crt: OK

slave.crt: OK
(10)在B和C从服务器上分别创建ssl文件,并在A主服务器远程复制当前的证书文件
[root@centos777~]#mkdir /etc/my.cnf.d/ssl  在从服务器上新建ssl文件

[root@centos7ssl]#scp cacert.pem slave.crt slave.key 192.168.34.102:/etc/my.cnf.d/ssl/ 主服务器上远程复制到B从服务器上

root@192.168.34.102's password:

cacert.pem 100% 1330 354.2KB/s 00:00

slave.crt 100% 1204 547.1KB/s 00:00

slave.key 100% 1704 384.6KB/s 00:00

[root@centos7ssl]#scp cacert.pem slave.crt slave.key 192.168.34.103:/etc/my.cnf.d/ssl/  主服务器远程复制到C从服务器上

cacert.pem 100% 1330 719.5KB/s 00:00

slave.crt 100% 1204 592.7KB/s 00:00

slave.key 100% 1704 338.3KB/s 00:00
(11)在A主服务器上查看msyql数据库证书文件信息,此时加密部分为空,没有加密
MariaDB [(none)]> show variables like '%ssl%';

+---------------+----------+

| Variable_name | Value    |

+---------------+----------+

| have_openssl  | DISABLED |

| have_ssl      | DISABLED |

| ssl_ca        |          |

| ssl_capath    |          |

| ssl_cert      |          |

| ssl_cipher    |          |

| ssl_key       |          |

+---------------+----------+
(12)在A主服务器的mysql数据库中添加配置文件,保存配置文件
vim /etc/my.cnf

[mysqld]

server-id=1

log_bin=/data/logbin/mysql-bin

binlog_format=ROW

ssl-ca=/etc/my.cnf.d/ssl/cacert.pem

ssl-cert=/etc/my.cnf.d/ssl/master.crt

ssl-key=/etc/my.cnf.d/ssl/master.key
重启mysql服务:
systemctl restart mariadb
(13)此时查看,证书信息,已经支持了加密
MariaDB [(none)]> show variables like '%ssl%';

ERROR 2006 (HY000): MySQL server has gone away

No connection. Trying to reconnect...

Connection id:    2

Current database: *** NONE ***

+---------------+------------------------------+

| Variable_name | Value                        |

+---------------+------------------------------+

| have_openssl  | YES                          |

| have_ssl      | YES                          |

| ssl_ca        | /etc/my.cnf.d/ssl/cacert.pem |

| ssl_capath    |                              |

| ssl_cert      | /etc/my.cnf.d/ssl/master.crt |

| ssl_cipher    |                              |

| ssl_key       | /etc/my.cnf.d/ssl/master.key |

+---------------+------------------------------+
(14)创建一个新的账号,并赋予复制权限,此时创建的用户只能用加密方式登录
MariaDB [(none)]> grant replication slave on *.* to rplssl@'192.168.34.%' identified by 'centos' require ssl;
(15)此时,我们可以在B从服务器通过验证CA证书进行登录创建的rplssl账号
--ssl-ca=/etc/my.cnf.d/ssl/cacert.pem   验证从服务器CA证书的文件

--ssl-cert=/etc/my.cnf.d/ssl/slave.crt  验证从服务器的证书文件

--ssl-key=/etc/my.cnf.d/ssl/slave.key   验证从服务器的私钥文件
[root@centos777~]#mysql -urplssl -pcentos -h192.168.34.101  --ssl-ca=/etc/my.cnf.d/ssl/cacert.pem  --ssl-cert=/etc/my.cnf.d/ssl/slave.crt  --ssl-key=/etc/my.cnf.d/ssl/slave.key

Welcome to the MariaDB monitor.  Commands end with ; or \g.

Your MariaDB connection id is 6

Server version: 5.5.60-MariaDB MariaDB Server

Copyright (c) 2000, 2018, Oracle, MariaDB Corporation Ab and others.

Type 'help;' or '\h' for help. Type '\c' to clear the current input statement.

MariaDB [(none)]>
验证基于mysql加密的主从复制
(1)将B和C从服务器上先停掉之前的slave,并清除slave数据
stop slave;

reset slave all;
(2)查看A主服务器此时的二进制日志文件大小,此时最近的是410
MariaDB [(none)]> show master logs;

+------------------+-----------+

| Log_name         | File_size |

+------------------+-----------+

| mysql-bin.000001 |      7396 |

| mysql-bin.000002 |       729 |

| mysql-bin.000003 |       618 |

| mysql-bin.000004 |       264 |

| mysql-bin.000005 |       410 |

+------------------+-----------+
(3)在B和C从服务器上开始打开复制线程并开启ssl加密路径,
或者将以下路径存在/etc/my.cnf配置文件中,重启数据库也可以。
/etc/my.cnf.d/ssl/cacert.pem
/etc/my.cnf.d/ssl/master.crt
/etc/my.cnf.d/ssl/master.key
[root@centos7 ~]# mysql

Welcome to the MariaDB monitor.  Commands end with ; or \g.

Your MariaDB connection id is 4

Server version: 5.5.64-MariaDB MariaDB Server

Copyright (c) 2000, 2018, Oracle, MariaDB Corporation Ab and others.

Type 'help;' or '\h' for help. Type '\c' to clear the current input statement.

MariaDB [(none)]>

MariaDB [(none)]> CHANGE MASTER TO

    ->   MASTER_HOST='192.168.34.101',

    ->   MASTER_USER='rplssl',

    ->   MASTER_PASSWORD='centos',

    ->   MASTER_PORT=3306,

    ->   MASTER_LOG_FILE='mysql-bin.000005',

    ->   MASTER_LOG_POS=410,

    -> MASTER_SSL=1, # 加密编号

    -> MASTER_SSL_CA = '/etc/my.cnf.d/ssl/cacert.pem',

    -> MASTER_SSL_CERT = '/etc/my.cnf.d/ssl/slave.crt',

    -> MASTER_SSL_KEY = '/etc/my.cnf.d/ssl/slave.key';
(4)在B从服务器开启slave,并查看slave状态
MariaDB [(none)]> start slave;

Query OK, 0 rows affected (0.01 sec)

MariaDB [(none)]> show slave status\G;

*************************** 1. row ***************************

               Slave_IO_State: Waiting for master to send event

                  Master_Host: 192.168.34.101

                  Master_User: rplssl

                  Master_Port: 3306

                Connect_Retry: 60

              Master_Log_File: mysql-bin.000005

          Read_Master_Log_Pos: 410

               Relay_Log_File: mariadb-relay-bin.000002

                Relay_Log_Pos: 694

        Relay_Master_Log_File: mysql-bin.000005

             Slave_IO_Running: Yes

            Slave_SQL_Running: Yes
(5)在C从服务器开启slave,并查看slave状态
MariaDB [(none)]> start slave;

Query OK, 0 rows affected (0.01 sec)

MariaDB [(none)]> show slave status\G;

*************************** 1. row ***************************

               Slave_IO_State: Waiting for master to send event

                  Master_Host: 192.168.34.101

                  Master_User: rplssl

                  Master_Port: 3306

                Connect_Retry: 60

              Master_Log_File: mysql-bin.000005

          Read_Master_Log_Pos: 410

               Relay_Log_File: mariadb-relay-bin.000002

                Relay_Log_Pos: 694

        Relay_Master_Log_File: mysql-bin.000005

             Slave_IO_Running: Yes

            Slave_SQL_Running: Yes
(6)在A主服务器插入一个文件,验证复制效果。
MariaDB [(none)]> insert teachers(name)value('wang');

ERROR 1046 (3D000): No database selected

MariaDB [(none)]> use hellodb

Reading table information for completion of table and column names

You can turn off this feature to get a quicker startup with -A

Database changed

MariaDB [hellodb]> insert teachers(name)value('wang');

Query OK, 1 row affected, 1 warning (0.01 sec)

MariaDB [hellodb]> select * from teachers;

+-----+---------------+-----+--------+

| TID | Name          | Age | Gender |

+-----+---------------+-----+--------+

|   1 | Song Jiang    |  45 | M      |

|   2 | Zhang Sanfeng |  94 | M      |

|   3 | Miejue Shitai |  77 | F      |

|   4 | Lin Chaoying  |  93 | F      |

|   5 | a             |   0 | NULL   |

|   6 | biu           |   0 | NULL   |

|   7 | mage          |   0 | NULL   |

|   8 | wang          |   0 | NULL   |

+-----+---------------+-----+--------+
(7)查看B和C从服务器的复制结果,两个从服务器都已将teachers表中的wang复制过去
MariaDB [(none)]> use hellodb

Reading table information for completion of table and column names

You can turn off this feature to get a quicker startup with -A

Database changed

MariaDB [hellodb]> select * from teachers;

+-----+---------------+-----+--------+

| TID | Name          | Age | Gender |

+-----+---------------+-----+--------+

|   1 | Song Jiang    |  45 | M      |

|   2 | Zhang Sanfeng |  94 | M      |

|   3 | Miejue Shitai |  77 | F      |

|   4 | Lin Chaoying  |  93 | F      |

|   5 | a             |   0 | NULL   |

|   6 | biu           |   0 | NULL   |

|   7 | mage          |   0 | NULL   |

|   8 | wang          |   0 | NULL   |

+-----+---------------+-----+--------+
复制的监控和维护
(1) 清理日志
PURGE { BINARY | MASTER } LOGS { TO 'log_name' | BEFORE datetime_expr }

RESET MASTER  清空二进制日志,尽量不要使用

RESET SLAVE  清空slave
(2) 复制监控
SHOW MASTER STATUS  查看master状态

SHOW BINLOG EVENTS  查看详细的二进制日志

SHOW BINARY LOGS    查看日志文件

SHOW SLAVE STATUS  查看slave的状态

SHOW PROCESSLIST  查看增加文件情况
(3) 从服务器是否落后于主服务,可能是mysql设计缺陷问题导致,主服务器的压力很大,无法及时调度到从服务器,导致从服务器无法复制。
Seconds_Behind_Master: 0
(4) 如何确定主从节点数据是否一致
percona-tools
(5) 数据不一致如何修复:删除从服务器的数据库,将主服务器的数据进行完全备份,然后导入到从服务器,以主服务器最新的二进制日志开始复制。
删除从数据库,重新复制
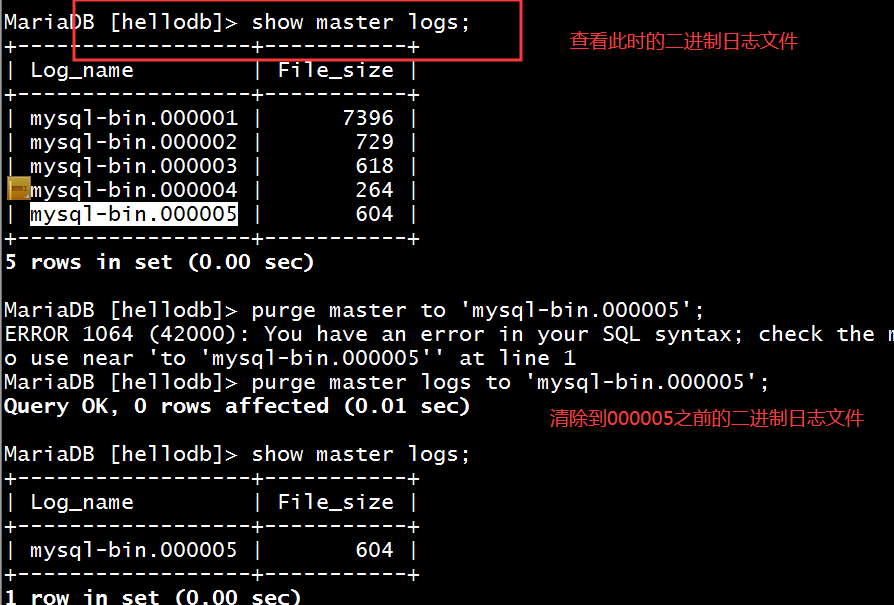
示例:清理指定的二进制日志
MariaDB [hellodb]> show master logs;

+------------------+-----------+

| Log_name         | File_size |

+------------------+-----------+

| mysql-bin.000001 |      7396 |

| mysql-bin.000002 |       729 |

| mysql-bin.000003 |       618 |

| mysql-bin.000004 |       264 |

| mysql-bin.000005 |       604 |

+------------------+-----------+

5 rows in set (0.00 sec)

MariaDB [hellodb]> purge master logs to 'mysql-bin.000005'; #清理5之前的二进制日志文件

Query OK, 0 rows affected (0.01 sec)

MariaDB [hellodb]> show master logs;

+------------------+-----------+

| Log_name         | File_size |

+------------------+-----------+

| mysql-bin.000005 |       604 |

+------------------+-----------+
Mysql实现数据库主从复制架构的更多相关文章
- Mysql实现企业级数据库主从复制架构实战
场景 公司规模已经形成,用户数据已成为公司的核心命脉,一次老王一不小心把数据库文件删除,通过mysqldump备份策略恢复用了两个小时,在这两小时中,公司业务中断,损失100万,老王做出深刻反省,公司 ...
- 项目实战7—Mysql实现企业级数据库主从复制架构实战
Mysql实现企业级数据库主从复制架构实战 环境背景:公司规模已经形成,用户数据已成为公司的核心命脉,一次老王一不小心把数据库文件删除,通过mysqldump备份策略恢复用了两个小时,在这两小时中,公 ...
- MySQL 数据库主从复制架构
前文<MySQL 数据库事务与复制>分析了 MySQL 复制过程中如何保证 binlog 和事务数据之间的一致性,本文进一步分析引入从库后需要保证主从的数据一致性需要考虑哪些方面. 原生复 ...
- PHP移动互联网的发展票据(6)——MySQL召回数据库基础架构[1]
原文地址 :http://www.php100.com/html/php/api/2014/0326/6707.html 一.数据类型 1.整型 数据类型 存储空间 说明 取值范围 TINYINT 1 ...
- 高可用Mysql架构_Mysql主从复制、Mysql双主热备、Mysql双主双从、Mysql读写分离(Mycat中间件)、Mysql分库分表架构(Mycat中间件)的演变
[Mysql主从复制]解决的问题数据分布:比如一共150台机器,分别往电信.网通.移动各放50台,这样无论在哪个网络访问都很快.其次按照地域,比如国内国外,北方南方,这样地域性访问解决了.负载均衡:M ...
- MySQL数据的主从复制、半同步复制和主主复制详解
一.MySQL复制概述 ⑴.MySQL数据的复制的基本介绍 目前MySQL数据库已经占去数据库市场上很大的份额,其一是由于MySQL数据的开源性和高性能,当然还有重要的一条就是免费~不过不知道还能免费 ...
- MySQL主从数据库同步延迟问题解决(转)
最近在做MySQL主从数据库同步测试,发现了一些问题,其中主从同步延迟问题是其中之一,下面内容是从网上找到的一些讲解,记录下来以便自己学习: MySQL的主从同步是一个很成熟的架构,优点为:①在从服务 ...
- MySQL数据的主从复制、半同步复制和主主复制详解-转
一.MySQL复制概述 ⑴.MySQL数据的复制的基本介绍 目前MySQL数据库已经占去数据库市场上很大的份额,其一是由于MySQL数据的开源性和高性能,当然还有重要的一条就是免费~不过不知道还能免费 ...
- (8) MySQL主从复制架构使用方法
一. 单个数据库服务器的缺点 数据库服务器存在单点问题 数据库服务器资源无法满足增长的读写请求 高峰时数据库连接数经常超过上限 二. 如何解决单点问题 增加额外的数据库服务器,组建数据库集群 同一集群 ...
随机推荐
- (一)Rational Rose 2007 下载安装
因为有画UML图的需求,所以得在电脑上安装Rational Rose.开始准备安装Rational Rose 2003,但是破解过程过于繁琐而且似乎一直遇到各种问题,就决定安装Rational Ros ...
- weblogic12.1.3安装
weblogic weblogic12.1.3安装 环境: centos7.5 ip: 192.168.0.94 1.安装jdk 2.安装 weblogic 下载.解压安装包 wls1213_dev. ...
- selenium3 web自动化测试框架 四:Unittest介绍及项目实战中的运用
unittest介绍及运用,可以参考之前写的文章,除了未结合web自动化演示,基础知识都有了 https://www.cnblogs.com/wuzhiming/p/8858305.html unit ...
- [多转合成] 使用pycaffe保存各个层的特征图
# coding=utf-8 #python2 caffe_visualize.py import numpy as np import matplotlib.pyplot as plt import ...
- 《剑指offer》数学题及其它 (牛客11.05)
比较多的思维题,涉及位运算.快速幂.二进制.约瑟夫问题.队列.贪心.dp等等. 难度 题目 知识点 ☆ 12.数值的整数次方 细节,快速幂 ☆☆ 47.求1+2+3+···+n 思维发散 ☆☆ 48. ...
- java面试准备策略
我将结合网络教学视频,根据java以下几个特性进行学习. 平台无关性 GC 语言特性 面向对象 类库 异常处理
- liunx -bash:ls:command not found,执行命令总是报找不到
解决办法: 使用绝对命令vi打开profile /bin/vi /etc/profile 添加: export PATH=/usr/local/sbin:/usr/local/bin:/sbin:/ ...
- PAT甲级 字符串处理题_C++题解
字符串处理题 目录 <算法笔记> 重点摘要 1001 A+B Format (20) 1005 Spell It Right (20) 1108 Finding Average (20) ...
- LIUNX随堂学习-1 用户及查看信息
1.useradd #创建用户 例如:useradd ljj 创建一个名为ljj的用户 2.userdel -r #删除用户 例如:userd ...
- vue-cookies的使用
安装vue-cookies npm install vue-cookies --save 使用vue-cookies // 在main.js中 // require var Vue = require ...