golang restful api
https://medium.com/@petrousov/how-to-build-a-restful-api-in-go-for-phonebook-app-d55f7234a10
----------------------------------------
How to build a RESTful API in Go for phonebook app

TL;DR
In this tutorial I am going to show you how I created a RESTful API for a hypothetical phonebook application and how you can create your own APIs based on this example. All the code is stored on github.
Disclaimer
- This is a project to learn Go myself
- The storage of data (database) and file structure is out of the scope of this tutorial and was not implemented
Phonebook API
A phonebook application stores records of peoples contact information.
The models
In our context, a person’s record includes the first and last names and contact details such as the city, the zipcode and the phone number. To model this in Go we are going to write the following structs and create a slice where we are going to store our records.
package main

import (
	"encoding/json"
)
type Person struct {
	ID          string `json:"id,omitempty"`
	Firstname   string `json:"firstname,omitempty"`
	Lastname    string `json:"lastname,omitempty"`
	Contactinfo `json:"contactinfo,omitempty"`
}
type Contactinfo struct {
	City    string `json:"city,omitempty"`
	Zipcode string `json:"Zipcode,omitempty"`
	Phone   string `json:"phone,omitempty"`
}
var people []Person
There are a couple of things worth mentioning about the above snippet. The fields of the structs need to begin with an uppercase letter so they can be exported. This is necessary because the JSON library we are going to use to encode/decode our data can only access exported values. See https://blog.golang.org/json-and-go for more details.
The other thing worth mentioning is the parameter next to our field types enclosed in backquotes. This is a special parameter which specifies the name of the key our fields are going to have in the JSON format. For example, the value of the field Firstname in our struct will be referenced with the key firstname in the JSON format. For more information, checkout the Marshal() function from the official documentation https://golang.org/pkg/encoding/json/#Marshal.
The handlers
Our backend needs to be able to perform the following 5 operations on our records.
- retrieve the records of all the people
- retrieve the record of a specific person
- create a new person record in the catalog
- update a person’s record information
- delete a person’s record from the catalog
We are going to analyze the function used to update a person’s information (4) since the rest follow a similar implementation. Given the updated record of a person, this handler will look for this person in our slice and if it finds a matching id, will update the record.
func UpdatePersonEndpoint(w http.ResponseWriter, r *http.Request) {
	var person Person
	_ = json.NewDecoder(r.Body).Decode(&person)
	params := mux.Vars(r)
	for i, p := range people {
		if p.ID == params["id"] {
			people[i] = person
			json.NewEncoder(w).Encode(person)
			break
		}
	}
}
The first thing we must notice is the that this function’s name starts with an uppercase letter which means it’s exported. This is not necessary for our example since we store everything in one main.go file. However, if we had a separate file or package called handlers, we would need to be able to call those handlers from a different namespace (main). This is only possible if we have them exported.
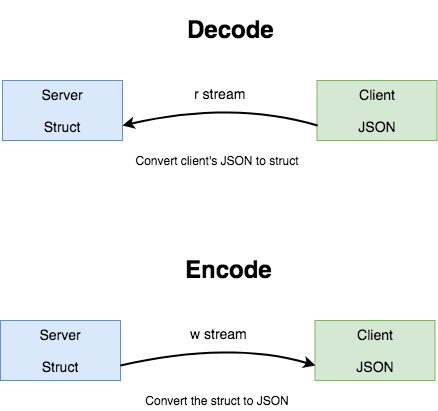
All of our functions/handlers accept the same 2 parameters (w, r). These parameters represent data streams which our handlers use to retrieve information from (r) and send information to (w). Consider them as the STDIO (keyboard and monitor) of our backend. It’s not necessary to know the implementation of these interfaces, but if you are curious, check out the official documentation https://golang.org/pkg/net/http/#ResponseWriter
In order to implement communication through these data streams, we use two assistive functions, json.NewDecoder() and json.NewEncoder(). These functions allow us to send and receive our data.
The first function is associated with the data stream we use to read from (r) and returns a decoder element. Using the Decode() function on this element, we retrieve the information from the body of a HTTP request and store it in the person variable we created. This information is in JSON, which is human readable format, so we “decode” it into our struct which is readable by our server. A struct variable is a “pass by value” element, so we need pass the address of the variable person to the Decode() function so it can store the values in it.
The second function is associated with the stream we use to write information to (w) and returns an encoder element. Using the Encode() function on this element, we respond to a HTTP request. So, we transform our person variable into JSON and send it back to the responder.
If needed, checkout the docs for more information on the above functions https://golang.org/pkg/encoding/json/#NewDecoder
The last thing to mention about the update handler is that it identifies the record to update by it’s id which is passed as a parameter through the URL when we make the HTTP request. We extract all the variables from the URL using the mux.Vars() function, which returns a map, and reference them using their keys.
The rest of the handlers use the same components to implement our API’s functionality.
func GetPeopleEndpoint(w http.ResponseWriter, r *http.Request) {
	json.NewEncoder(w).Encode(people)
}
func GetPersonEndpoint(w http.ResponseWriter, r *http.Request) {
	params := mux.Vars(r)
	for _, p := range people {
		if p.ID == params["id"] {
			json.NewEncoder(w).Encode(p)
			return
		}
	}
	json.NewEncoder(w).Encode("Person not found")
}
func CreatePersonEndpoint(w http.ResponseWriter, r *http.Request) {
	var person Person
	_ = json.NewDecoder(r.Body).Decode(&person)
	people = append(people, person)
	json.NewEncoder(w).Encode(person)
}
func DeletePersonEndpoint(w http.ResponseWriter, r *http.Request) {
	params := mux.Vars(r)
	for i, p := range people {
		if p.ID == params["id"] {
			copy(people[i:], people[i+1:])
			people = people[:len(people)-1]
			break
		}
	}
	json.NewEncoder(w).Encode(people)
}
The router
We now have our models and handlers which are able to receive and respond to HTTP requests and convert the data from JSON into our models and back. The next thing we need to implement is the mapping which shows the correspondence of a URL and HTTP request type to our handlers.
- /people (GET) -> GetPeopleEndpoint()
- /people/{id} (GET) -> GetPersonEndpoint()
- /people (POST) -> CreatePersonEndpoint()
- /people/{id} (PUT) -> UpdatePersonEndpoint()
- /people/{id} (DELETE) -> DeletePersonEndpoint()
This mapping shows that an HTTP GET call to the /people URL will execute the GetPeopleEndpoint() handler. Another HTTP PUT call to /people/{id} will execute the UpdatePersonEndpoint() handler so on and so forth.
For the implementation of the router, we are going to use the gorilla/mux package and write the following code.
import (
	"encoding/json"
	"net/http"

	"github.com/gorilla/mux"
)
func main() {
 router := mux.NewRouter()
 router.HandleFunc("/people", GetPeopleEndpoint).Methods("GET")
 router.HandleFunc("/people/{id}", GetPersonEndpoint).Methods("GET")
 router.HandleFunc("/people", CreatePersonEndpoint).Methods("POST")
 router.HandleFunc("/people/{id}", DeletePersonEndpoint).Methods("DELETE")
 router.HandleFunc("/people/{id}", UpdatePersonEndpoint).Methods("PUT")
}
The logic is pretty straightforward, we initially create a new router instance. Then, we proceed to map our URL endpoints to the handlers we wrote earlier. As we can see, our handlers now have also the HTTP method they require in order to be called defined with the Methods() function.
All these functions are provided by the mux package and its documentation can be found online http://www.gorillatoolkit.org/pkg/mux
Populating with dummy data
For the sake of simplicity we are not going to use a database to store our data. Instead, everything will be stored locally in our slice named people. So, in order to populate our API with some dummy data, we are going to create a couple of entries.
people = append(people, Person{ID: "1", Firstname: "Bruce", Lastname: "Wayne", Contactinfo: Contactinfo{City: "Gotham", Zipcode: "735", Phone: "012345678"}})
people = append(people, Person{ID: "2", Firstname: "Clark", Lastname: "Kent", Contactinfo: Contactinfo{City: "Metropolis", Zipcode: "62960", Phone: "9876543210"}})
}
The server
The last thing left to complete our API is to make it accessible from the network, in other words serve it. To accomplish this, we are going to use the ListenAndServe() function from the http package which starts a HTTP server.
package main

import (
	"fmt"
	"log"
	"net/http"

	"github.com/gorilla/mux"
)
func main() {
	fmt.Println("Starting server on port 8000...")
	log.Fatal(http.ListenAndServe(":8000", router))
}
Our server is going to be listening on port 8000. The last line wraps the server function in a log function which will print an error message and return a non-zero code (1) if something goes wrong. The documentation for it can be found online https://golang.org/pkg/log/#Fatal
Testing
A working version of our API is available online from github. Let’s fire up our server by running the go run command.
go run main.go
Starting server on port 8000...
For our tests, we are going to use Postman and fire up all the HTTP requests to confirm the functionality of our handlers.
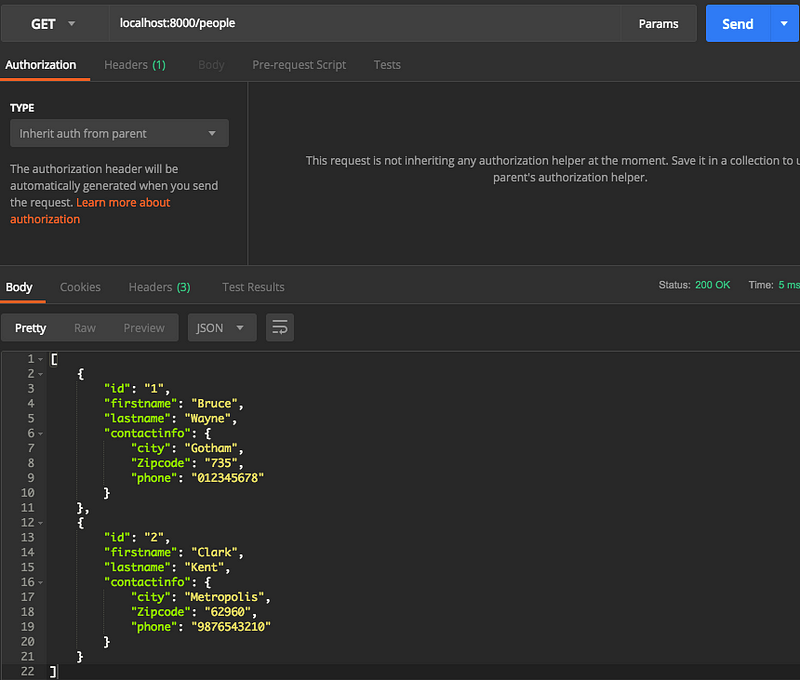
- Retrieve the records of all the people (GET)
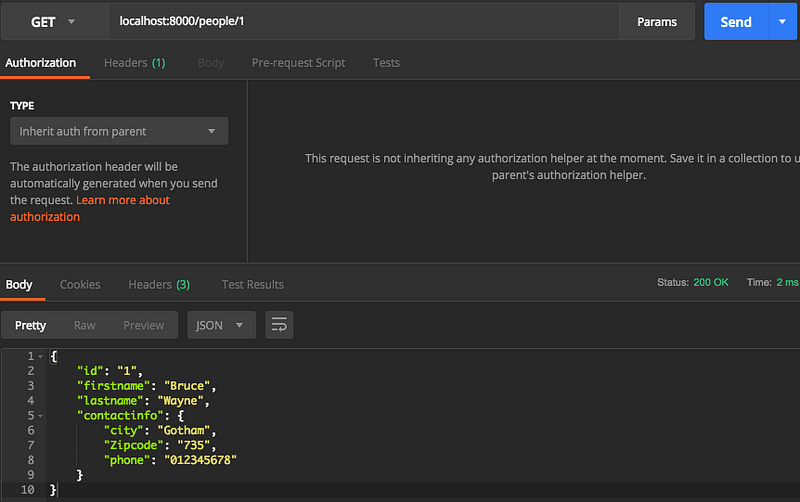
2. Retrieve the record of a specific person (GET)
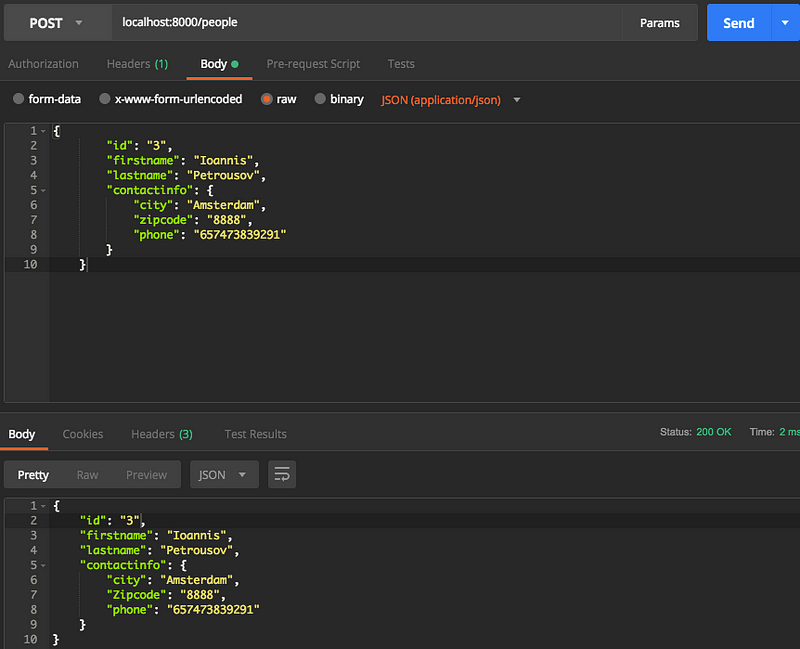
3. Create a new person record in the catalog (POST)
4. Update a person’s record information (PUT)

5. Delete a person’s record from the catalog (DELETE)
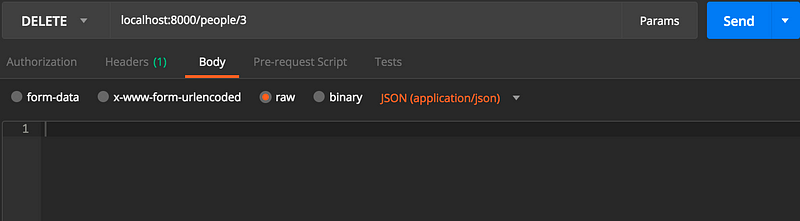
Delete a person’s record using it’s id
Conclusion
In this post I showed you how you can build a simple API in Go which can respond to HTTP requests. Following along you should be able to modify the phonebook API to serve your purpose and follow the documentation if necessary to clear some clouds.
References
golang restful api的更多相关文章
- Go实战--通过gin-gonic框架搭建restful api服务(github.com/gin-gonic/gin)
生命不止,继续 go go go !!! 先插播一条广告,给你坚持学习golang的理由: <2017 软件开发薪酬调查:Go 和 Scala 是最赚钱的语言> 言归正传! 之前写过使用g ...
- 使用 Beego 搭建 Restful API 项目
1 环境准备 首先你需要在你的环境安装以下软件: go:编程语言运行环境 git:版本控制工具 beego:go 语言流行的开发框架 bee:beego 配套的快速搭建工具 你喜欢的数据库:这里以 M ...
- RESTful 架构 && RESTful API
RESTful 架构 && RESTful API REpresentational State Transfer (REST) 具象状态传输https://en.wikipedia. ...
- (转载) RESTful API 设计指南
作者: 阮一峰 日期: 2014年5月22日 网络应用程序,分为前端和后端两个部分.当前的发展趋势,就是前端设备层出不穷(手机.平板.桌面电脑.其他专用设备......). 因此,必须有一种统一的机制 ...
- Node.js实现RESTful api,express or koa?
文章导读: 一.what's RESTful API 二.Express RESTful API 三.KOA RESTful API 四.express还是koa? 五.参考资料 一.what's R ...
- Restful Api 最佳实践
Web APIs has become an very important topic in the last year. We at M-Way Solutions are working ever ...
- 基于轻量型Web服务器Raspkate的RESTful API的实现
在上一篇文章中,我们已经了解了Raspkate这一轻量型Web服务器,今天,我们再一起了解下如何基于Raspkate实现简单的RESTful API. 模块 首先让我们了解一下"模块&quo ...
- RESTful Api 身份认证安全性设计
REST是一种软件架构风格.RESTful Api 是基于 HTTP 协议的 Api,是无状态传输.它的核心是将所有的 Api 都理解为一个网络资源.将所有的客户端和服务器的状态转移(动作)封装到 H ...
- 深入理解 RESTful Api 架构
转自https://mengkang.net/620.html 一些常见的误解 不要以为 RESTful Api 就是设计得像便于 SEO 的伪静态,例如一个 Api 的 URL 类似于 http: ...
随机推荐
- Linear regression with one variable - Model representation
摘要: 本文是吴恩达 (Andrew Ng)老师<机器学习>课程,第二章<单变量线性回归>中第6课时<模型概述>的视频原文字幕.为本人在视频学习过程中逐字逐句记录下 ...
- NDK学习笔记-gdb调试
在做开发的时候,难免会crash,那么在这时候需要进行调试,在C/C++的代码调试中,gdb是很常用的gdb在这不做过多介绍,之前在C语言中已经做过总结,这里简要回顾一下 要使用gdb,在编译的时候需 ...
- VSCode插件Prettier配置
参考链接:https://blog.csdn.net/wengou3033/article/details/88749448 Prettier格式化配置
- POJ2195 Going Home【KM最小匹配】
题目链接:http://poj.org/problem?id=2195 Going Home Time Limit: 1000MS Memory Limit: 65536K Total Submi ...
- 学习笔记:CentOS7学习之十八:Linux系统启动原理及故障排除
目录 学习笔记:CentOS7学习之十八:Linux系统启动原理及故障排除 18.1 centos6系统启动过程及相关配置文件 18.1.1 centos6系统启动过程 18.1.2 centos6启 ...
- [转帖]System Dynamic Management Views
System Dynamic Management Views https://docs.microsoft.com/en-us/sql/relational-databases/system-dyn ...
- nginx文件服务器搭建
一.安装 (CentOS 7) yum install nginx -y 如果报错: [u3@L3 /]$ sudo yum install nginx -y Loaded plugins: fast ...
- 【AtCoder】AGC009
AGC009 A - Multiple Array 从后往前递推即可 #include <bits/stdc++.h> #define fi first #define se second ...
- 【调试经验】C++和C的混合编程以及库调用
问题背景 这两天在移植一个开源的库,偏底层的那种,所以对架构有一些依赖.源码的编译是通过Makefile来构建,怎奈公司的架构用的是CMAKE,所以就在开源的顶层和子目录分别构建了CMakeList, ...
- Flask-WTF的使用
Flask-WTF的使用 一.安装Flask-WTF Flask-WTF 对 WTForms 进行了封装使它能够在 Flask 框架中可以被调用,其中 Flask-WTF 的功能都是继承自 WTFor ...