ubuntu NGINX uwsgi https 部署Django 遇到的问题
搞了3天终于把Django成功部署到Ubuntu,记录一下;
引用来自泡泡茶壶:
Ubuntu下的Nginx + Uwsgi + Django项目部署详细流程
前提说明:
Django作为小程序的后端,因小程序的请求到后端的都是https请求,所以Django必须支持https请求
写在前面:
部署Django项目前,先用Django自带服务器运行一下看有没有问题,再部署;否则可能项目本身有问题,却以为是部署不正确导致的
运行命令:python manage.py runserver .....
各种配置:
1、nginx支持https请求
1)项目对象的nginx.conf配置
# the upstream component nginx needs to connect to

upstream django {

    # unix:///home/breavo/PyWorkSpace/mysite_code_shuffle/config/eshop.sock

    server xx.xx.xx.xx:8002; # xx.xx.xx.xx是服务器的ip,若是腾讯云服务器,则是服务器外部ip,这里的ip和端口是和uwsgi通信的方式,所以和uwsgi.ini配置文件中一致

}

# configuration of the server

server {

    # the port your site will be served on

    listen 90 ssl; # 监听端口可以是任何端口,但不要和已使用端口冲突

    # listen 8003;

    # the domain name it will serve for

    server_name  indoor.crazymonkey.ml; # 这里可以是域名也可以是本机ip,同上面的xx.xx.xx.xx

    charset     utf-8;

    # max upload size

    client_max_body_size 75M;   # adjust to taste

    # ssl configuration

    ssl on; # 打开了ssl验证,支持https请求

    ssl_certificate /root/hewenjuan/Indoor_Localization/2446810_www.preciselocation.top.pem; # ssl证书放的位置

    ssl_certificate_key /root/hewenjuan/Indoor_Localization/2446810_www.preciselocation.top.key; # 使用绝对路径肯定没错啦

    # Django media

    location /media  {

        alias /root/hewenjuan/Indoor_Localization/media; # your Django project's media files - amend as required,有图片等,

    }

    location /static {

        # alias /path/to/your/mysite/static; # your Django project's static files - amend as required

        alias /root/hewenjuan/Indoor_Localization/static; # 静态文件位置,Django项目admin静态文件

    }

    # Finally, send all non-media requests to the Django server.

    location / {

        uwsgi_pass  django; # 这个就是引用了上面的upstream django配置了

        # include     /home/breavo/PyWorkSpace/mysite_code_shuffle/config/uwsgi_params; # the uwsgi_params file you installed

        include /etc/nginx/uwsgi_params;

    }

}
说明:用nginx -t命令查看上面nginx文件的正确性
2)项目对应的uwsgi.ini配置
# mysite_uwsgi.ini file

[uwsgi]

socket =  xx.xx.xx.xx:8002 # 腾讯云内部ip,端口和nginx.conf配置的Django部分相同

# Django-related settings

# the base directory (full path)

chdir           = /root/hewenjuan/Indoor_Localization  # Django项目所在目录

# Django's wsgi file

module          = Indoor_Localization.wsgi #

# module =  config/hello.py:application

wsgi_file = Indoor_Localization/wsgi.py # Django项目wsgi.py所在位置,相对于上面的chdir目录

# wsgi_file =  /root/hewenjuan/Indoor_Localization/config/hello.py:application

# the virtualenv (full path)

virtualenv = /root/.pyenv/versions/indoorLocation/bin/python3.6  # python虚拟环境绝对位置

# home            = /root/.pyenv

home            = /root/.pyenv/versions/indoorLocation

# process-related settings

# master

master          = true

# maximum number of worker processes

processes       = 10

# the socket (use the full path to be safe

# socket          = /root/hewenjuan/Indoor_Localization/Indoor_Localization.sock

# ... with appropriate permissions - may be needed

chmod-socket    = 666

# clear environment on exit

vacuum          = true

stats           = %(chdir)/config/uwsgi.status

pidfile         = %(chdir)/config/uwsgi.pid

# daemonize = %(chdir)/config/uwsgi.log # 开启该字段,uwsgi会在后台运行,日志保存在该文件中,若没有开启该字段,则在前台运行,日志显示在界面上(调试用方便)

# pidfile = %(chdir)/config/uwsgi.pid

#plugins =  /root/.pyenv/versions/indoorLocation/bin/python3.6
3)每次修改了Django项目文件代码,都需要重启uwsgi和nginx,所以自己写了个启动文件start.sh
killall -9 uwsgi  # 关闭所有uwsgi进程,有时候没有关掉上次的uwsgi进程,启动新的会报错等问题

killall -9 uwsgi  # 额,有时候关闭一次会出现没关掉的情况

uwsgi --ini mysite_uwsgi.ini # 启动mysite_uwsgi.ini文件,即启动uwsgi进程

/etc/init.d/nginx restart # 重启nginx进程
说明:启动start.sh命令:sh start.sh
2、uwsgi支持https请求
1)uwsgi.ini配置
# mysite_uwsgi.ini file

[uwsgi]
# 2446810_www.preciselocation.top.pem,2446810_www.preciselocation.top.key是ssl证书

https = xx.xx.xx.xx:443,2446810_www.preciselocation.top.pem,2446810_www.preciselocation.top.key # xx.xx.xx.xx是腾讯云内部ip

# Django-related settings

# the base directory (full path)

chdir           = /root/hewenjuan/Indoor_Localization

# Django's wsgi file

module          = Indoor_Localization.wsgi

# module =  config/hello.py:application

wsgi_file = Indoor_Localization/wsgi.py

# wsgi_file =  /root/hewenjuan/Indoor_Localization/config/hello.py:application

# the virtualenv (full path)

virtualenv = /root/.pyenv/versions/indoorLocation/bin/python3.6

# home            = /root/.pyenv

home            = /root/.pyenv/versions/indoorLocation

# process-related settings

# master

master          = true

# maximum number of worker processes

processes       = 10

# the socket (use the full path to be safe

# socket          = /root/hewenjuan/Indoor_Localization/Indoor_Localization.sock

# ... with appropriate permissions - may be needed

chmod-socket    = 666

# clear environment on exit

vacuum          = true

stats           = %(chdir)/config/uwsgi.status

pidfile         = %(chdir)/config/uwsgi.pid

# daemonize = %(chdir)/config/uwsgi.log

# pidfile = %(chdir)/config/uwsgi.pid

#plugins =  /root/.pyenv/versions/indoorLocation/bin/python3.6
遇到的问题:
1、每次退出账号重新登录都会提示,pyenv 不存在了

原因:
方法:命令行输入:source ~/.bashrc;即执行.bashrc文件中的语句(包含 了pyenv初始化语句)
2、nginx权限问题:django admin后台样式不显示,查看nginx错误日志(位置:/var/log/nginx/error.log),显示权限拒绝Permission denied
原因:Django项目下的static文件执行权限不够
方法:打开文件/etc/nginx/nginx.conf,修改 user www-data为user root(root:你目前登录的账号名称,也可能是Ubuntu等其他)
参考qingspace:https://www.cnblogs.com/qingspace/p/6838747.html
3、unavailable modifier requested

原因:没有激活python虚拟环境
方法:输入命令:pyenv activate xx,激活xx环境,xx是你项目所在的python虚拟环境
4、安装项目依赖包:pip install -r requirements.txt,遇到一个问题:安装不成功,界面没有显示不成功
出现下面显示的Successfully ...才表示安装成功
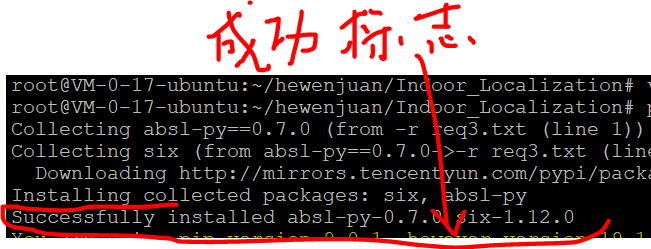
原因:requirements.txt文件中有win_xx的安装包,即有python接入window系统所使用的安装包,类似了win32等,啥除掉即可;
因为有可能写代码使用的是window系统,部署的时候放在了Linux系统
解决方法:删除win32等针对window系统的安装包
ubuntu NGINX uwsgi https 部署Django 遇到的问题的更多相关文章
- centos7下采用Nginx+uwsgi来部署django
之前写过采用Apache和mod_wsgi部署django,因为项目需要,并且想比较一下Nginx和Apache的性能,尝试采用Nginx+uwsgi的模式来部署django. 1.安装uwsgi以及 ...
- 在阿里云 Ubuntu上通过nginx+uwsgi服务器部署Django出现的502错误
https://blog.csdn.net/luojie140/article/details/76919471 https://blog.csdn.net/sinat_21302587/articl ...
- Nginx+uWsgi生产部署Django
部署得过程很简单,部署得核心在于,为什么要这样做,每一个参数代表什么意思,最终的目的是得了解,一些基概念性的东西. uWsgi简介 说Uwsgi之前,先说一下Wsgi. 什么是Wsgi? WSGI: ...
- Python基础 - Ubuntu+Nginx+uwsgi+supervisor部署Flask应用
网上找了许多讲关于Flask应用部署的文章几乎都是一个helloworld的Demo,按照helloworld来部署都没问题,但实际项目部署时还是遇到了不少问题.在这里简单写下自己成功部署的过程,防止 ...
- [技术博客]ubuntu+nginx+uwsgi+Django+https的部署
ubuntu+nginx+uwsgi+Django+https部署文档 配置机器介绍 操作系统:Ubuntu 18.04.2 LTS 64位 python版本:Python 3.6.7 Django版 ...
- ubuntu+nginx+uwsgi部署django web项目
前言 将本地开发的django项目部署至linux上的uwsgi服务器,并配置nginx,完成基于ubuntu+nginx+uwsgi的上线运行.下面整理相关步骤. 服务器配置virtualenv 如 ...
- Ubuntu Nginx uwsgi django 初试
/************************************************************************************** * Ubuntu Ngi ...
- Nginx 和 Gunicorn 部署 Django项目
目录 Nginx 和 Gunicorn 部署 Django项目 配置Nginx 安装配置Gunicorn 通过命令行直接启动 Gunicorn 与 uwsgi 的区别,用哪个好呢 Gunicorn u ...
- django+nginx+uwsgi 项目部署
Django虽然自带一个Server,但只能作为开发时测试使用,我们需要一个可以稳定而持续的服务器对网站进行部署,比如Apache, Nginx, lighttpd等,本篇将利用nginx和uWSGI ...
随机推荐
- css常见双栏和三栏布局
左侧固定右侧自适应 <!DOCTYPE html> <html lang="en"> <head> <meta charset=" ...
- nginx源码安装(CentOS版)
准备工作: 1) 配好网易yum源 登录此网站(http://mirrors.163.com/.help/centos.html),下载相应版本的yum源至服务器的/etc/yum.repos.d/目 ...
- 如何克服社交恐惧症?zz
zhang Bavol 清华大学核能与新能源技术研究院——核科学与技术/电子爱好者 你说的这个恐惧症我也有一点点,不过现在我是只对那种不是很熟悉的七姑八婆之类的亲戚才会有这种憋屈感觉,对朋友和 ...
- Hystrix的概念
Netflix的 Hystrix 是一个帮助解决分布式系统交互时超时处理和容错的类库, 它同样拥有保护系统的能力. Hystrix的设计原则包括:资源隔离.熔断器.命令模 ...
- ubuntu下安装navicat
1.去官网下载 https://www.navicat.com/en/download/navicat-premium 2.命令行输入(解压命令) tar -zxvf xxxxx.tar.gz 3.移 ...
- (八)Spring 事务管理
目录 文章目录 @[toc] **`Spring`** 事务管理 `Api` 介绍之 **`PlatformTransactionManager`** 后记 #Spring 的事务管理 编程式事务管理 ...
- 落网数据库简单查询接口 caddy+php7+mongodb
落网数据库简单查询接口 一个简单的DEMO,使用了caddy + php7 + mongodb 数据库&接口设计 来自 https://github.com/Aedron/Luoo.spide ...
- docker-registry的定制和性能分析
docker-index Web UI Meta-data 元数据存储(附注.星级.公共库清单) 访问认证 token管理 存储镜像.以及镜像层的家族谱系 没有用户账户数据 不知道用户的账户和安全性 ...
- 2-MySQL DBA笔记-MySQL安装部署和入门
第2章 MySQL安装部署和入门 第1章介绍了MySQL的一些基础知识,本章将为读者介绍MySQL的部署.安装及一些常用命令和参数的设置.2.1 如何选择MySQL版本 在选择MySQL的版本时,要根 ...
- c#泛型约束(转载)
博客地址:https://www.cnblogs.com/zhengwk/p/5541921.html 六种类型的约束: T:结构 类型参数必须是值类型.可以指定除 Nullable 以外的任何值类型 ...