Spring Boot 项目实战(三)集成 Swagger 及 JavaMelody
一、前言
上篇介绍了 Logback 的集成过程,总体已经达到了基本可用的项目结构。本篇主要介绍两个常用工具,接口文档工具 Swagger 、项目监控工具 JavaMelody 的集成步骤。
二、Swagger
随着互联网技术的发展,现在的网站架构基本都由原来的后端渲染变成了前端渲染、前后端分离的形态。前后端唯一的联系变成了 API 接口,API 文档成了前后端开发人员联系的纽带,Swagger 就是一款让我们更好书写 API 文档的框架。
2.1 为什么要用 Swagger
在日常开发过程中,有一个问题始终困扰着我们,那就是接口文档的可靠性。想必我们都经历过接口变动但接口文档没更新的窘境。单独维护接口文档不仅费时费力,而且会经常遗漏。Swagger 通过在接口及实体上添加几个注解的方式就能在项目启动后自动生成接口文档,尽管这样会带来一定的代码侵入性,但与其带来的好处相比就微不足道了。
2.2 集成 Swagger
① 首先在项目父 pom 文件中定义 Swagger 的版本号且声明 Swagger 依赖。
<properties>

    ...省略其余部分...

    <swagger.version>2.8.0</swagger.version>

</properties>
<dependencyManagement>

    <dependencies>

        ...省略其余部分...

        <dependency>

            <groupId>io.springfox</groupId>

            <artifactId>springfox-swagger2</artifactId>

            <version>${swagger.version}</version>

        </dependency>

        <dependency>

            <groupId>io.springfox</groupId>

            <artifactId>springfox-swagger-ui</artifactId>

            <version>${swagger.version}</version>

        </dependency>

    </dependencies>

</dependencyManagement>
② 其次在 demo-web 层中的 pom 文件中添加上述依赖
<dependencies>

    ...省略其余部分...

    <dependency>

        <groupId>io.springfox</groupId>

        <artifactId>springfox-swagger2</artifactId>

    </dependency>

    <dependency>

        <groupId>io.springfox</groupId>

        <artifactId>springfox-swagger-ui</artifactId>

    </dependency>

</dependencies>
③ 然后在 com.example.demo.web 包中添加 config 目录并新建 Swagger 配置文件,具体内容如下:
package com.example.demo.web.config;

import org.springframework.beans.factory.annotation.Value;

import org.springframework.context.annotation.Bean;

import org.springframework.context.annotation.Configuration;

import springfox.documentation.builders.ApiInfoBuilder;

import springfox.documentation.builders.PathSelectors;

import springfox.documentation.builders.RequestHandlerSelectors;

import springfox.documentation.service.ApiInfo;

import springfox.documentation.spi.DocumentationType;

import springfox.documentation.spring.web.plugins.Docket;

import springfox.documentation.swagger2.annotations.EnableSwagger2;

/**

 * @author linjian

 * @date 2019/2/2

 */

@Configuration

@EnableSwagger2

public class SwaggerConfig {

    @Value(value = "${swagger.enabled}")

    private Boolean swaggerEnabled;

    @Bean

    public Docket createRestApi() {

        return new Docket(DocumentationType.SWAGGER_2)

                .apiInfo(apiInfo())

                .enable(swaggerEnabled)

                .select()

                .apis(RequestHandlerSelectors.basePackage("com.example.demo.web.controller"))

                .paths(PathSelectors.any())

                .build();

    }

    private ApiInfo apiInfo() {

        return new ApiInfoBuilder()

                .title("接口文档")

                .description("Spring Boot 集成 Swagger")

                .termsOfServiceUrl("https://symonlin.github.io")

                .version("1.0")

                .build();

    }

}
其中 「 swaggerEnabled 」表示是否开启 Swagger,一般线上环境是关闭的,所以可在 application.properties 文件中设置配置项。「 apis 」设置了 controller 的包路径。
④ 随后在先前创建的 DemoController 中添加 Swagger 的相关注解。
package com.example.demo.web.controller;

import com.example.demo.biz.service.DemoService;

import io.swagger.annotations.Api;

import io.swagger.annotations.ApiOperation;

import org.springframework.beans.factory.annotation.Autowired;

import org.springframework.web.bind.annotation.GetMapping;

import org.springframework.web.bind.annotation.RequestMapping;

import org.springframework.web.bind.annotation.RestController;

/**

 * @author linjian

 * @date 2019/1/15

 */

@Api(tags = "demo")

@RestController

@RequestMapping("demo")

public class DemoController {

    @Autowired

    private DemoService demoService;

    @GetMapping("test")

    @ApiOperation("测试")

    public String test() {

        return demoService.test();

    }

}
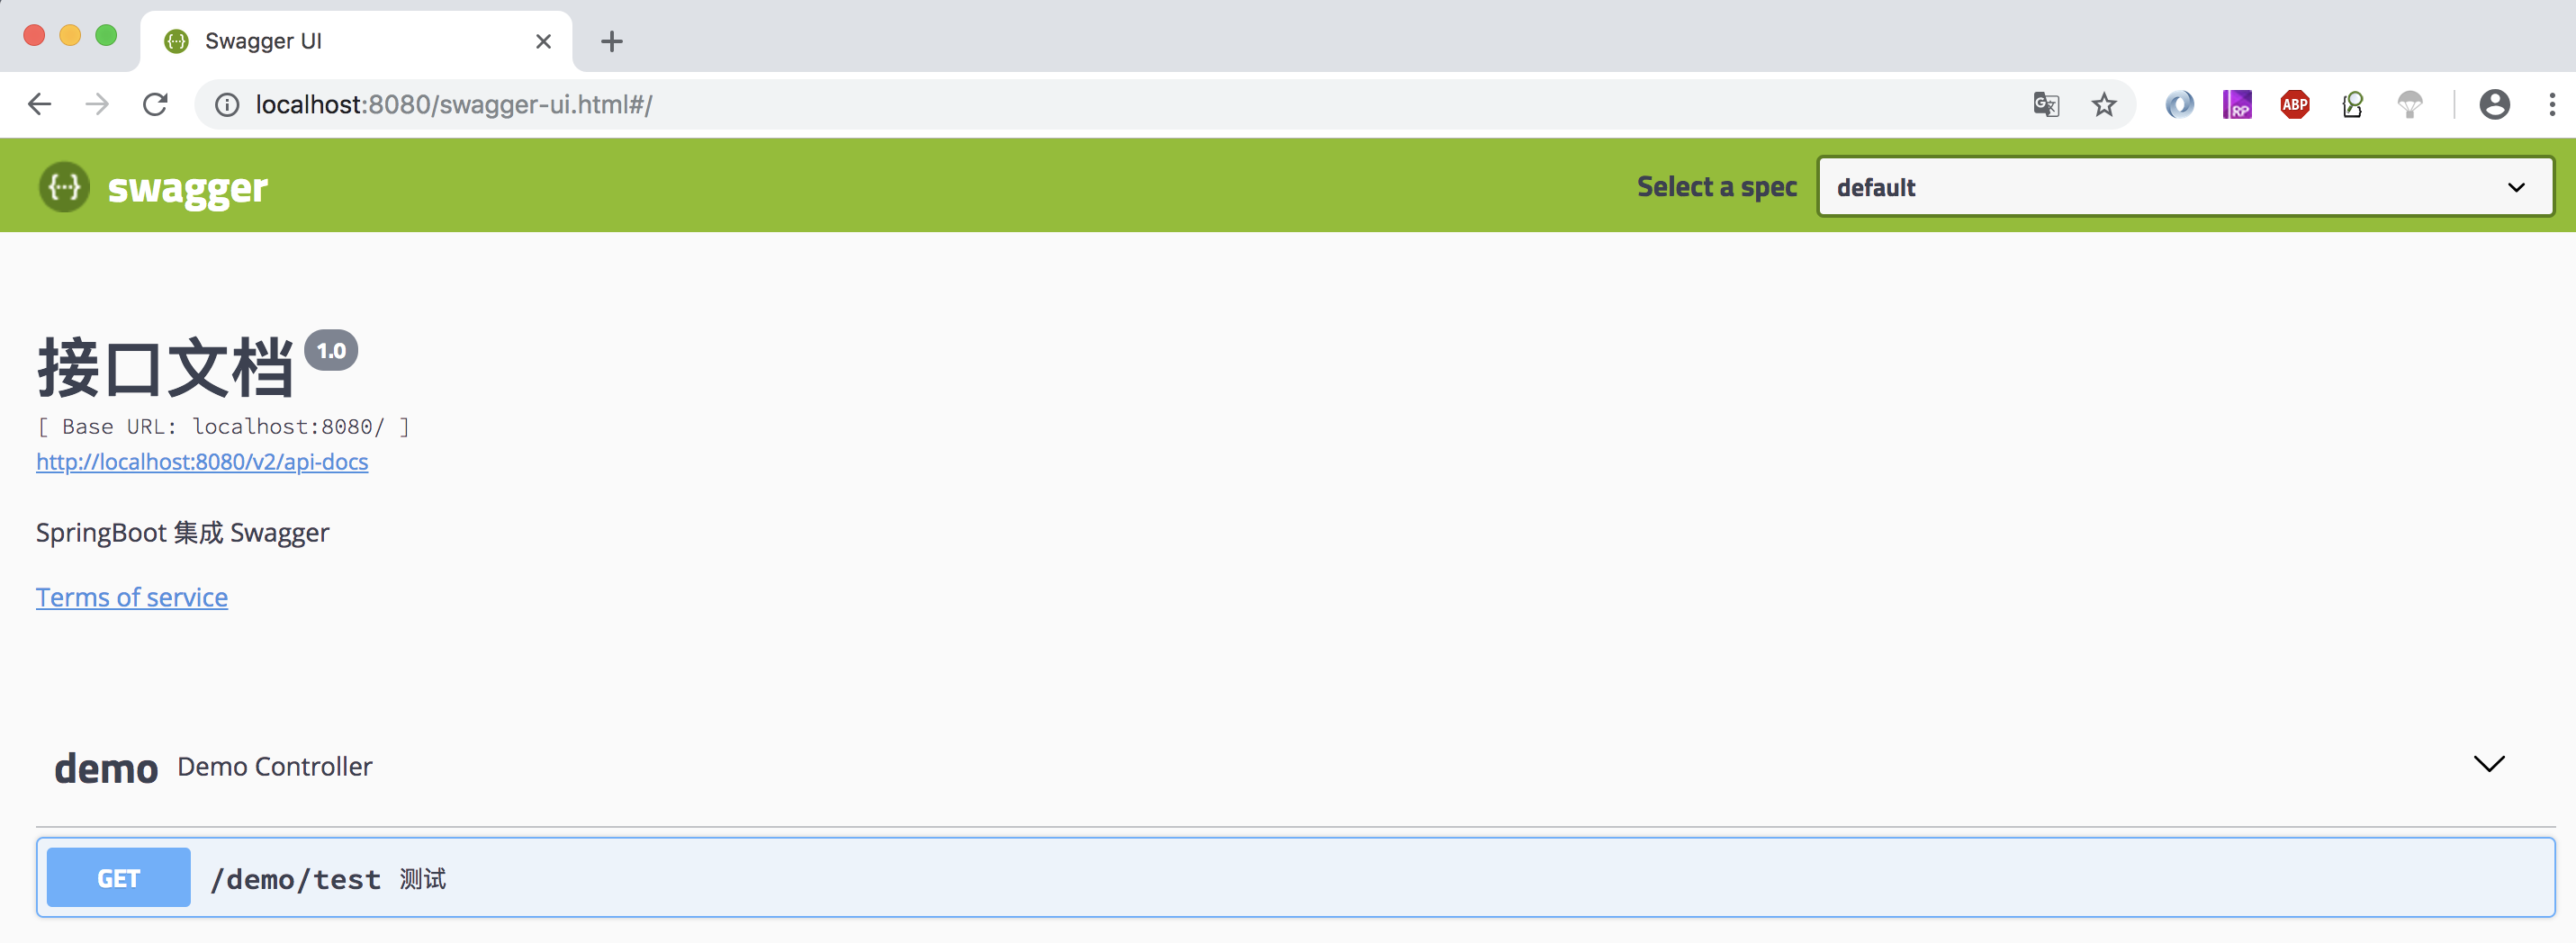
⑤ 最后启动项目,访问 http://localhost:8080/swagger-ui.html 测试 Swagger。
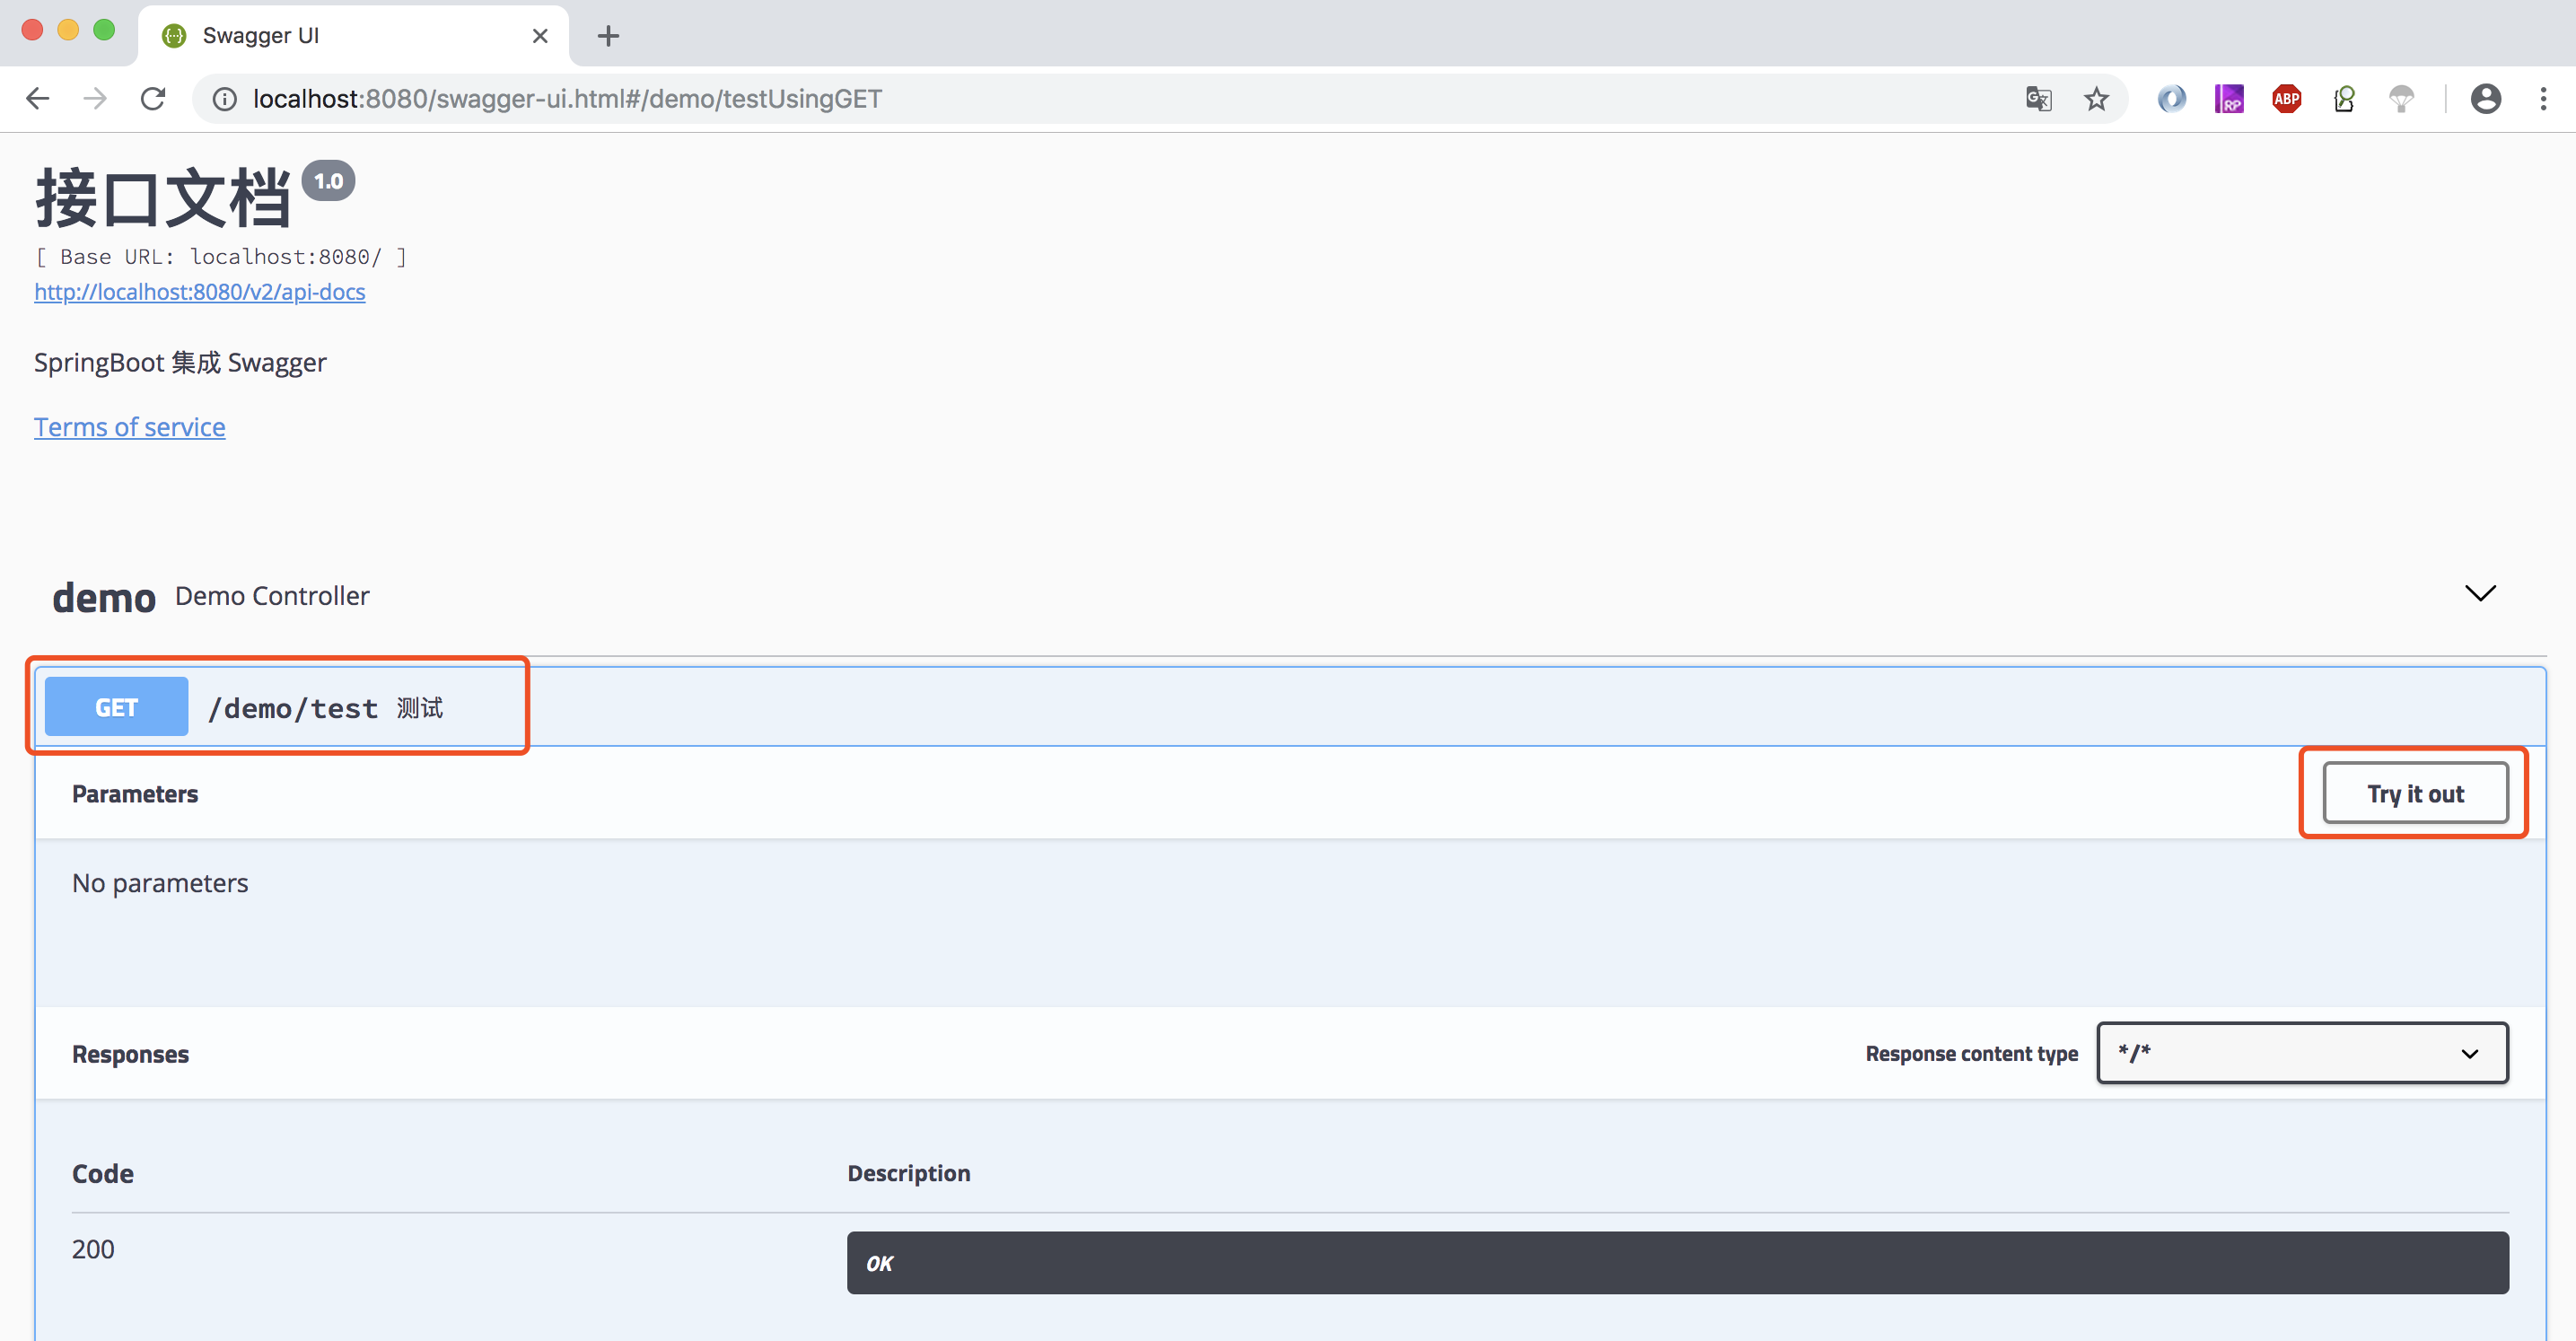
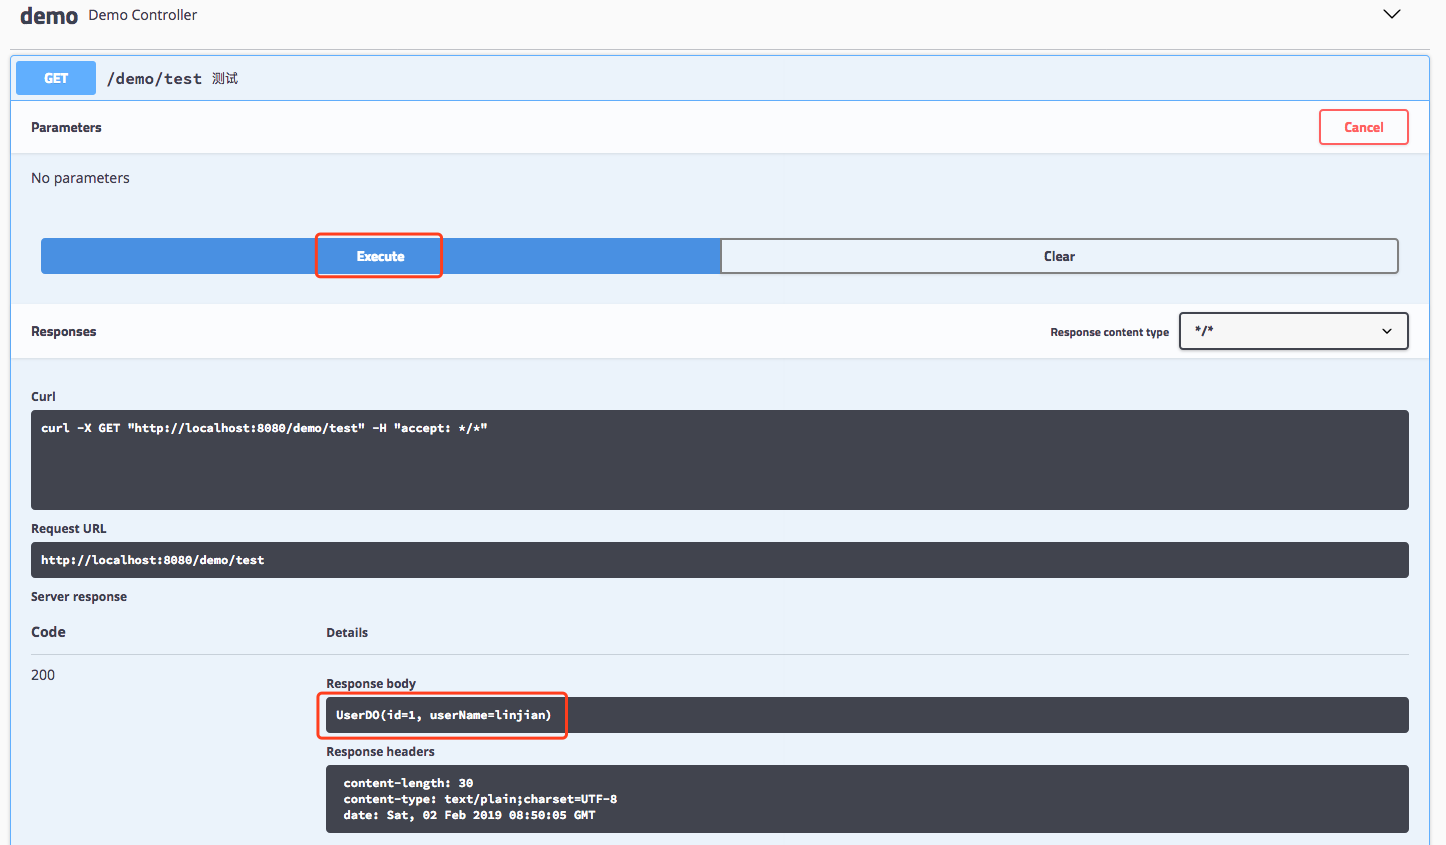
⑥ 使用 Swagger UI 测试 test 接口,点击「 Try it out 」>> 「 Execute 」
2.3 Swagger 常用注解说明
| 注解 | 说明 | 使用位置 |
|---|---|---|
| @Api | 描述 controller 的作用 | 用于 controller 类上 |
| @ApiOperation | 描述 controller 方法的作用 | 用于 controller 方法上 |
| @ApiParam | 描述 controller 方法参数的作用 | 用于 controller 方法的参数上 |
| @ApiModel | 描述对象的作用 | 用于请求对象或者返回结果对象上 |
| @ApiModelProperty | 描述对象里字段的作用 | 用于请求对象或者返回结果对象里的字段上 |
注:其余注解大家可自行查阅文档
三、JavaMelody
3.1 JavaMelody 介绍
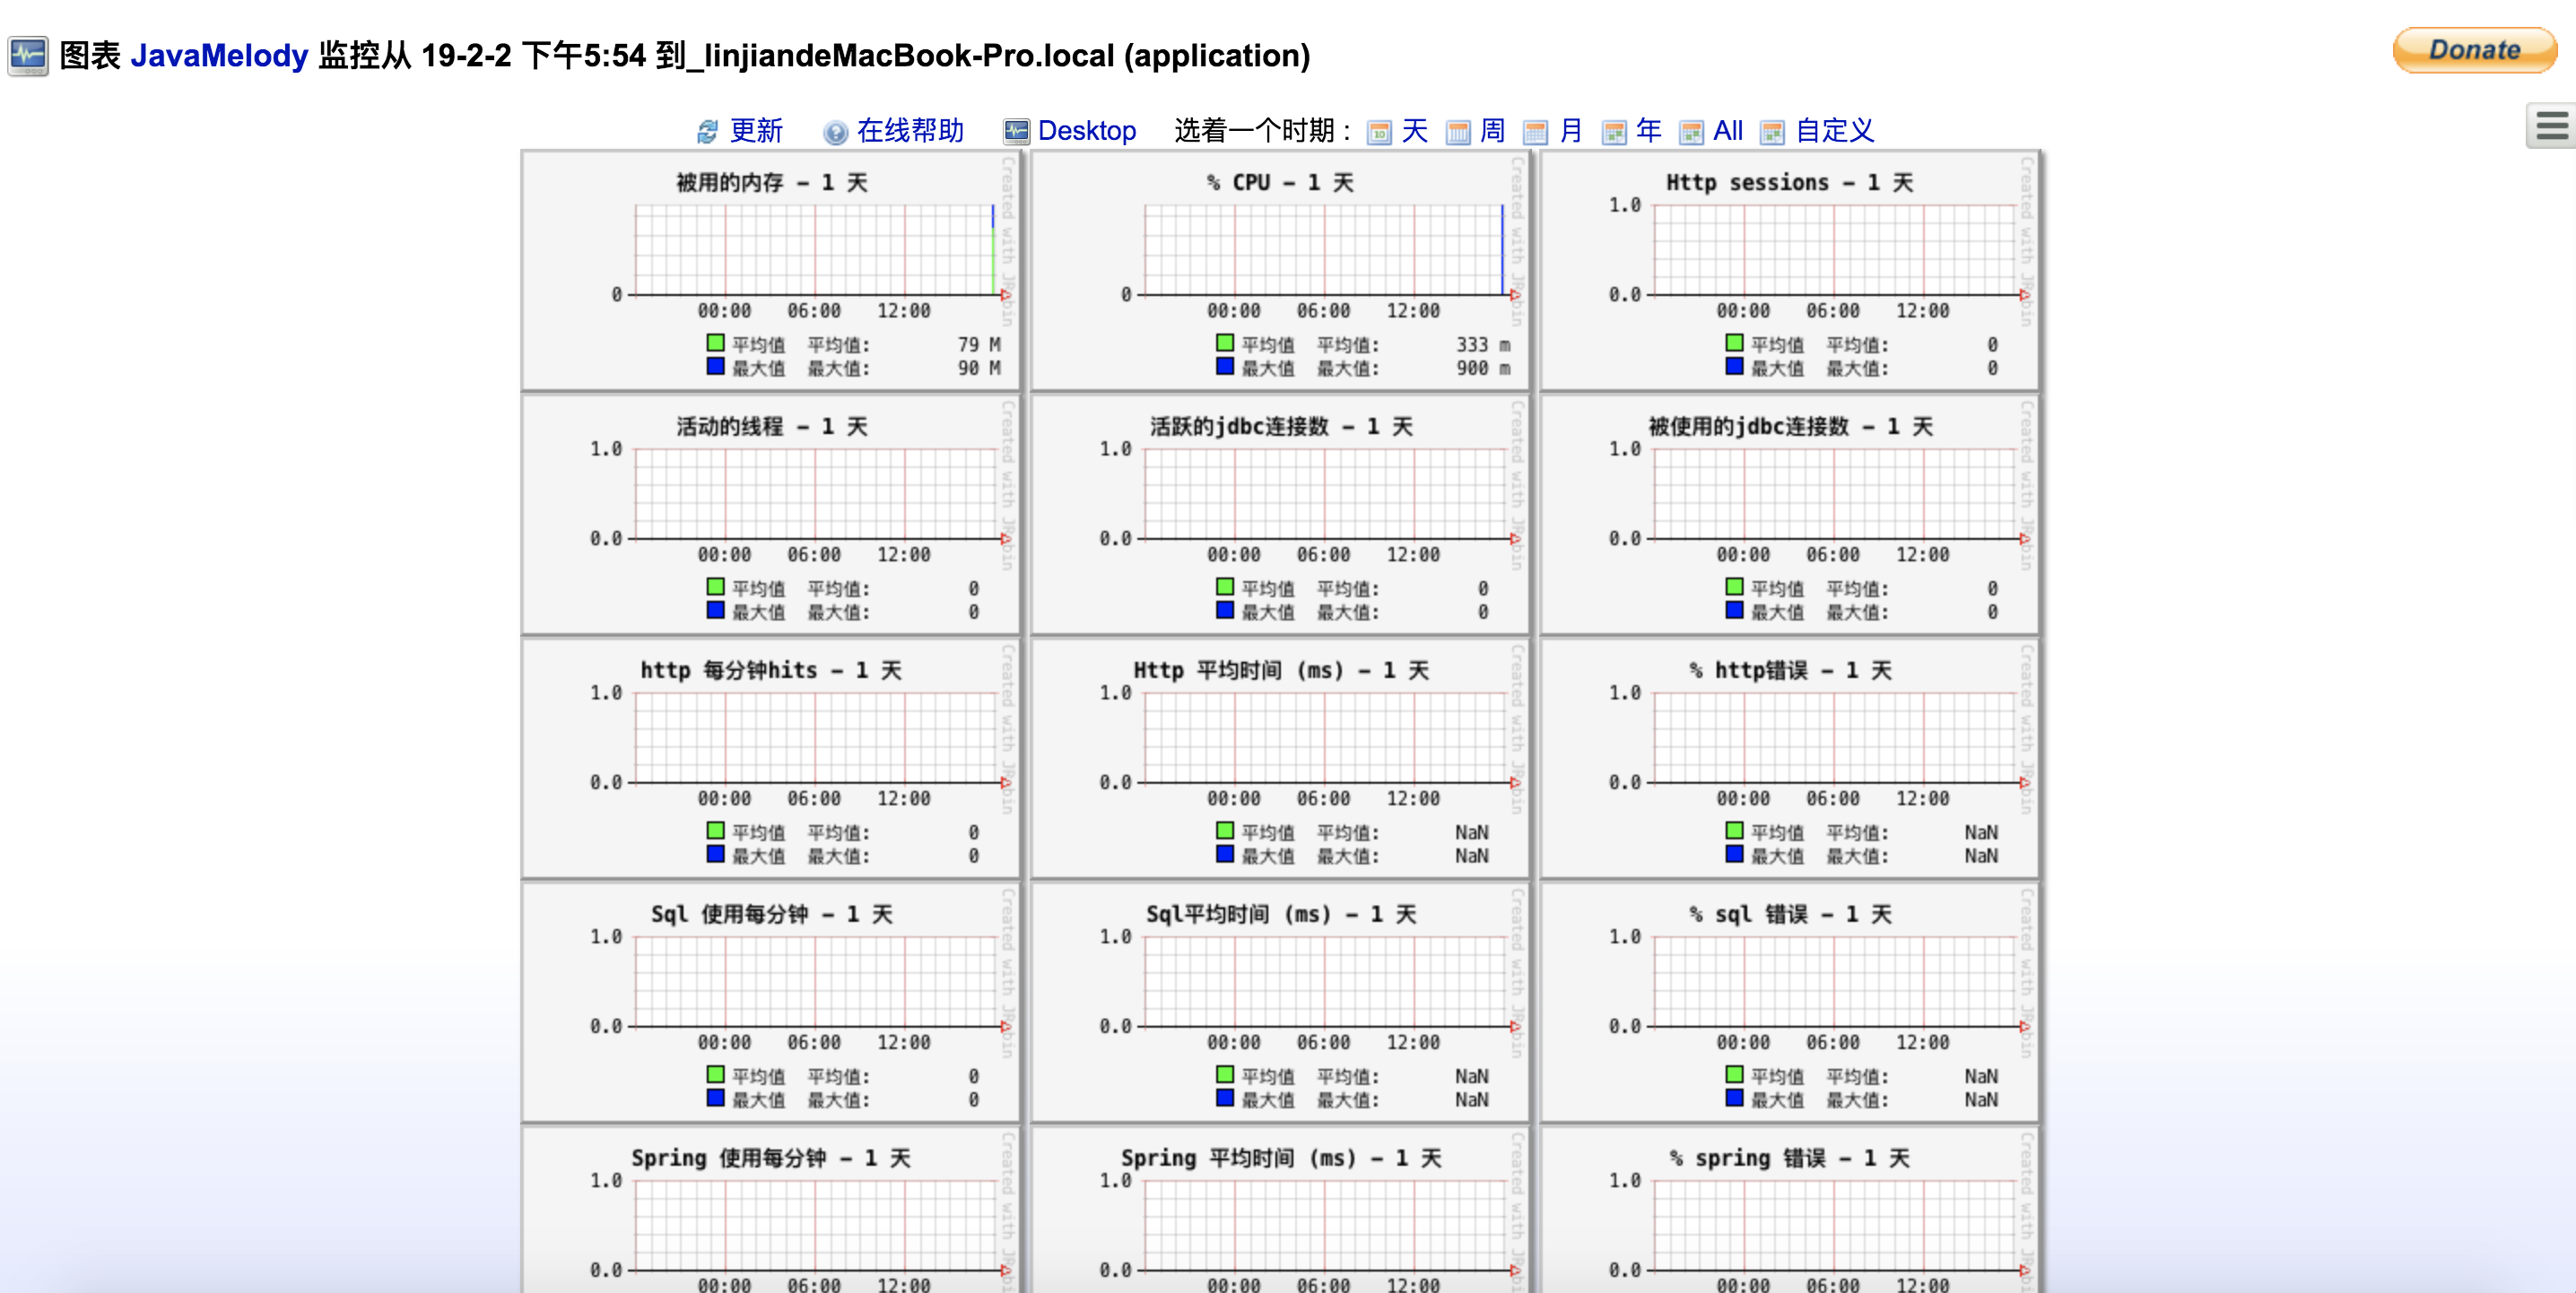
JavaMelody 是用来在 QA 和实际运行生产环境中监控 Java 或 Java EE 应用程序服务器的一个开源框架。它不是一个工具来模拟来自用户的请求,而是一个测量和计算用户在实际操作中应用程序的使用情况的工具,并以图表的形式显示,图表可以按天,周,月,年或自定义时间段查看。
3.2 集成 JavaMelody
① 首先在项目父 pom 文件中声明 JavaMelody 依赖
<dependency>

    <groupId>net.bull.javamelody</groupId>

    <artifactId>javamelody-spring-boot-starter</artifactId>

    <version>1.74.0</version>

</dependency>
② 其次在 demo-web 层中的 pom 文件中添加上述依赖
<dependencies>

    ...省略其余部分...

    <dependency>

        <groupId>net.bull.javamelody</groupId>

        <artifactId>javamelody-spring-boot-starter</artifactId>

    </dependency>

</dependencies>
③ 最后启动项目,访问 http://localhost:8080/monitoring 查看
④ 为了加强安全性,修改默认访问地址以及设置为登录后才可访问,可在 application.properties 文件中添加以下配置项
javamelody.init-parameters.authorized-users = admin:pwd

javamelody.init-parameters.monitoring-path = /demo/monitoring
四、结语
至此,Swagger 及 JavaMelody 的集成步骤已介绍完毕。
Spring Boot 项目实战(三)集成 Swagger 及 JavaMelody的更多相关文章
- Spring Boot 项目实战(五)集成 Dubbo
一.前言 上篇介绍了 Redis 的集成过程,可用于解决热点数据访问的性能问题.随着业务复杂度的提高,单体应用越来越庞大,就好比一个类的代码行数越来越多,分而治之,切成多个类应该是更好的解决方法,所以 ...
- Spring Boot 项目学习 (三) Spring Boot + Redis 搭建
0 引言 本文主要介绍 Spring Boot 中 Redis 的配置和基本使用. 1 配置 Redis 1. 修改pom.xml,添加Redis依赖 <!-- Spring Boot Redi ...
- Spring Boot2 系列教程(二)创建 Spring Boot 项目的三种方式
我最早是 2016 年底开始写 Spring Boot 相关的博客,当时使用的版本还是 1.4.x ,文章发表在 CSDN 上,阅读量最大的一篇有 43W+,如下图: 2017 年由于种种原因,就没有 ...
- Spring Boot 项目实战(四)集成 Redis
一.前言 上篇介绍了接口文档工具 Swagger 及项目监控工具 JavaMelody 的集成过程,使项目更加健壮.在 JAVA Web 项目某些场景中,我们需要用缓存解决如热点数据访问的性能问题,业 ...
- Spring Boot 项目实战(六)集成 Apollo
一.前言 上篇介绍了 Spring Boot 集成 Dubbo,使我们的系统打下了分布式的基础.随着程序功能的日益复杂,程序的配置日益增多:各种功能开关.参数配置.服务器地址等:对程序配置的期望值也越 ...
- Spring Boot 项目实战(二)集成 Logback
一.前言 上篇介绍了 Spring Boot Maven 多模块项目的搭建方法以及 MyBatis 的集成.通常在调试接口或者排查问题时我们主要借助于日志,一个设计合理的日志文件配置能大大降低我们的排 ...
- Spring Boot 项目实战(一)Maven 多模块项目搭建
一.前言 最近公司项目准备开始重构,框架选定为 Spring Boot ,本篇主要记录了在 IDEA 中搭建 Spring Boot Maven 多模块项目的过程. 二.软件及硬件环境 macOS S ...
- Github 上热门的 Spring Boot 项目实战推荐
最近经常被读者问到有没有 Spring Boot 实战项目可以学习,于是,我就去 Github 上找了 10 个我觉得还不错的实战项目.对于这些实战项目,有部分是比较适合 Spring Boot 刚入 ...
- Spring Boot2 系列教程(三)理解 Spring Boot 项目中的 parent
前面和大伙聊了 Spring Boot 项目的三种创建方式,这三种创建方式,无论是哪一种,创建成功后,pom.xml 坐标文件中都有如下一段引用: <parent> <groupId ...
随机推荐
- chrome面板介绍
Chrome开发者工具详解(1):Elements.Console.Sources面板 Chrome 开发者工具详解(2):Network 面板 Chrome开发者工具详解(3):Timeline面板 ...
- django学习~第四篇
django表单 1 今天继续来学学django的表单 首先介绍下http的方法,这是最基本的 GET 方法 GET一般用于获取/查询 资源信息,以?分割URL和传输数据 ...
- DSO windowed optimization 代码 (2)
3 非 Schur Complement 部分信息计算 参考<DSO windowed optimization 公式>,非Schur Complement 部分指 \(H_{XX}\) ...
- LOJ 3093: 洛谷 P5323: 「BJOI2019」光线
题目传送门:LOJ #3093. 题意简述: 有 \(n\) 面玻璃,第 \(i\) 面的透光率为 \(a\),反射率为 \(b\). 问把这 \(n\) 面玻璃按顺序叠在一起后,\(n\) 层玻璃的 ...
- 网络常用的linux系统调用
网络之常用的Linux系统调用 下面一些函数已经过时,被新的更好的函数所代替了(gcc在链接这些函数时会发出警告),但因为兼容的原因还保留着,这些函数将在前面标上“*”号以示区别. 一.进程控制 fo ...
- 笔记软件 notion
笔记软件 notion : https://www.notion.so 注册:zengxinle@126.com 团队:Hopesun
- java web path
1,request.getRealPath("/");这个方法已不推荐用 2,在Servlet 里用this.getServletContext().getRealPath(&qu ...
- certificate expired
最近在测试802.1x,测试过程中,radius服务器端一直显示如下错误: (5) authenticate {(5) eap: Expiring EAP session with state 0 ...
- saltstack自动化运维系列⑧SaltStack实践配置管理安装nginx-1.10.3
saltstack自动化运维系列⑧SaltStack实践配置管理安装nginx-1.10.3 安装nginx-1.10.3.tar.gz # mkdir -p /srv/salt/prod/pkg / ...
- Weex学习资料整合
1.weex weex文档:http://weex.apache.org/cn/guide/index.html Weex Ui awesome-weex WEEX免费视频教程-从入门到放肆 (共17 ...