
新浪微博布局学习——妙用TabHost
前言
为了更好的开发Android应用程序,除了熟练掌握基本的UI组件和API外,还需要掌握一些技巧,而这些技巧可以通过阅读一些代码来提高,本系列将与大家分享一些新浪微博布局方面的收获,欢迎交流!
声明
欢迎转载,但请保留文章原始出处:)
博客园:http://www.cnblogs.com
农民伯伯: http://www.cnblogs.com/over140
版本
新浪微博 weibo_10235010.apk
正文
一、效果图

红色部分是本文要实现的目标。
二、实现
maintabs.xml
<?xml version="1.0" encoding="UTF-8"?>

<TabHost android:id="@android:id/tabhost" android:layout_width="fill_parent" android:layout_height="fill_parent"

  xmlns:android="http://schemas.android.com/apk/res/android">

    <LinearLayout android:orientation="vertical" android:layout_width="fill_parent" android:layout_height="fill_parent">

        <FrameLayout android:id="@android:id/tabcontent" android:layout_width="fill_parent" android:layout_height="0.0dip" android:layout_weight="1.0" />

        <TabWidget android:id="@android:id/tabs" android:visibility="gone" android:layout_width="fill_parent" android:layout_height="wrap_content" android:layout_weight="0.0" />

        <RadioGroup android:gravity="center_vertical" android:layout_gravity="bottom" android:orientation="horizontal" android:id="@id/main_radio" android:background="@drawable/maintab_toolbar_bg" android:layout_width="fill_parent" android:layout_height="wrap_content">

            <RadioButton   android:text="@string/main_home" android:checked="true" android:id="@+id/radio_button0" android:layout_marginTop="2.0dip" android:drawableTop="@drawable/icon_1_n" style="@style/main_tab_bottom" />

            <RadioButton android:id="@+id/radio_button1" android:layout_marginTop="2.0dip" android:text="@string/main_news" android:drawableTop="@drawable/icon_2_n" style="@style/main_tab_bottom" />

            <RadioButton android:id="@+id/radio_button2" android:layout_marginTop="2.0dip" android:text="@string/main_my_info" android:drawableTop="@drawable/icon_3_n" style="@style/main_tab_bottom" />

            <RadioButton android:id="@+id/radio_button3" android:layout_marginTop="2.0dip" android:text="@string/menu_search" android:drawableTop="@drawable/icon_4_n" style="@style/main_tab_bottom" />

            <RadioButton android:id="@+id/radio_button4" android:layout_marginTop="2.0dip" android:text="@string/more" android:drawableTop="@drawable/icon_5_n" style="@style/main_tab_bottom" />

        </RadioGroup>

    </LinearLayout>

</TabHost>
styles.xml
    <style name="main_tab_bottom">

        <item name="android:textSize">@dimen/bottom_tab_font_size</item>

        <item name="android:textColor">#ffffffff</item>

        <item name="android:ellipsize">marquee</item>

        <item name="android:gravity">center_horizontal</item>

        <item name="android:background">@drawable/home_btn_bg</item>

        <item name="android:paddingTop">@dimen/bottom_tab_padding_up</item>

        <item name="android:layout_width">fill_parent</item>

        <item name="android:layout_height">wrap_content</item>

        <item name="android:button">@null</item>

        <item name="android:singleLine">true</item>

        <item name="android:drawablePadding">@dimen/bottom_tab_padding_drawable</item>

        <item name="android:layout_weight">1.0</item>

    </style>
home_btn_bg.xml
        <selector

          xmlns:android="http://schemas.android.com/apk/res/android">

            <item android:state_focused="true" android:state_enabled="true" android:state_pressed="false" android:drawable="@drawable/home_btn_bg_s" />

            <item android:state_enabled="true" android:state_pressed="true" android:drawable="@drawable/home_btn_bg_s" />

            <item android:state_enabled="true" android:state_checked="true" android:drawable="@drawable/home_btn_bg_d" />

            <item android:drawable="@drawable/transparent" />

        </selector>
代码说明:
1. 需要注意的是他这里把TabWidget的Visibility设置成了gone!也就是默认难看的风格不见了: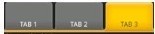 ,取而代之的是5个带风格的单选按钮.
2. 注意为单选按钮设置的style,其中最重要的是为其background设置了home_btn_bg.xml,也就是自定义了选中效果。
Java文件
public class MainTabActivity extends TabActivity implements

        OnCheckedChangeListener {

    private TabHost mHost;

    private Intent mMBlogIntent;

    private Intent mMoreIntent;

    private Intent mInfoIntent;

    private Intent mSearchIntent;

    private Intent mUserInfoIntent;

    @Override

    protected void onCreate(Bundle savedInstanceState) {

        super.onCreate(savedInstanceState);

        requestWindowFeature(Window.FEATURE_NO_TITLE);

        setContentView(R.layout.maintabs);

        // ~~~~~~~~~~~~ 初始化

        this.mMBlogIntent = new Intent(this, HomeListActivity.class);

        this.mSearchIntent = new Intent(this, SearchSquareActivity.class);

        this.mInfoIntent = new Intent(this, MessageGroup.class);

        this.mUserInfoIntent = new Intent(this, MyInfoActivity.class);

        this.mMoreIntent = new Intent(this, MoreItemsActivity.class);

        initRadios();


        setupIntent();

    }

    /**

     * 初始化底部按钮

     */

    private void initRadios() {

         ((RadioButton) findViewById(R.id.radio_button0)).setOnCheckedChangeListener(this);

         ((RadioButton) findViewById(R.id.radio_button1)).setOnCheckedChangeListener(this);

         ((RadioButton) findViewById(R.id.radio_button2)).setOnCheckedChangeListener(this);

         ((RadioButton) findViewById(R.id.radio_button3)).setOnCheckedChangeListener(this);

         ((RadioButton) findViewById(R.id.radio_button4)).setOnCheckedChangeListener(this);

    }

    /**

     * 切换模块

     */

    @Override

    public void onCheckedChanged(CompoundButton buttonView, boolean isChecked) {

        if (isChecked) {

            switch (buttonView.getId()) {

            case R.id.radio_button0:

                this.mHost.setCurrentTabByTag("mblog_tab");

                break;

            case R.id.radio_button1:

                this.mHost.setCurrentTabByTag("message_tab");

                break;

            case R.id.radio_button2:

                this.mHost.setCurrentTabByTag("userinfo_tab");

                break;

            case R.id.radio_button3:

                this.mHost.setCurrentTabByTag("search_tab");

                break;

            case R.id.radio_button4:

                this.mHost.setCurrentTabByTag("more_tab");

                break;

            }

        }

    }

    private void setupIntent() {

        this.mHost = getTabHost();

        TabHost localTabHost = this.mHost;

        localTabHost.addTab(buildTabSpec("mblog_tab", R.string.main_home,

                R.drawable.icon_1_n, this.mMBlogIntent));

        localTabHost.addTab(buildTabSpec("message_tab", R.string.main_news,

                R.drawable.icon_2_n, this.mInfoIntent));

        localTabHost.addTab(buildTabSpec("userinfo_tab", R.string.main_my_info,

                R.drawable.icon_3_n, this.mUserInfoIntent));

        localTabHost.addTab(buildTabSpec("search_tab", R.string.menu_search,

                R.drawable.icon_4_n, this.mSearchIntent));

        localTabHost.addTab(buildTabSpec("more_tab", R.string.more,

                R.drawable.icon_5_n, this.mMoreIntent));

    }

    private TabHost.TabSpec buildTabSpec(String tag, int resLabel, int resIcon,

            final Intent content) {

        return this.mHost

                .newTabSpec(tag)

                .setIndicator(getString(resLabel),

                        getResources().getDrawable(resIcon))

                .setContent(content);

    }
代码说明
1. 由于TabWidget被隐藏,所以相关的事件也会无效,这里取巧用RadioGroup与RadioButton的特性来处理切换,然后监听事件调用setCurrentTabByTag来切换Activity。
2. 注意即使TabWidget被隐藏,也要为其设置indicator,否则会保持。
三、总结
在这之前如果要做这种效果我恐怕第一时间就会想到用ActivityGroup来做,主要是因为TabHost的TabWidget非常难看,用起来也不方便。其实从源码可以看出,TabActivity也是继承自ActivityGroup,这里结合了单选按钮和TabHost,各取其长,有时间可以专门写一个这样的自定义控件:)
四、相关文章
[Android]使用ActivityGroup来切换Activity和Layout
结束
本文中使用的资源均反编译自apk文件,这里主要是讲思路,欢迎大家交流。
新浪微博布局学习——妙用TabHost的更多相关文章
- Android零基础入门第63节:过时但仍值得学习的选项卡TabHost
原文:Android零基础入门第63节:过时但仍值得学习的选项卡TabHost 由于前几天参加一个学习培训活动,几乎每天都要从早晨7点到晚上一两点,没有什么时间来分享,实在抱歉中间断更了几天.从今天开 ...
- CSS3与页面布局学习总结(八)——浏览器兼容与前端性能优化
一.浏览器兼容 1.1.概要 世界上没有任何一个浏览器是一样的,同样的代码在不一样的浏览器上运行就存在兼容性问题.不同浏览器其内核亦不尽相同,相同内核的版本不同,相同版本的内核浏览器品牌不一样,各种运 ...
- CSS3与页面布局学习总结(四)——页面布局大全
一.负边距与浮动布局 1.1.负边距 所谓的负边距就是margin取负值的情况,如margin:-100px,margin:-100%.当一个元素与另一个元素margin取负值时将拉近距离.常见的功能 ...
- CSS3与页面布局学习笔记(四)——页面布局大全(负边距、双飞翼、多栏、弹性、流式、瀑布流、响应式布局)
一.负边距与浮动布局 1.1.负边距 所谓的负边距就是margin取负值的情况,如margin:-100px,margin:-100%.当一个元素与另一个元素margin取负值时将拉近距离.常见的功能 ...
- CSS3与页面布局学习笔记(八)——浏览器兼容性问题与前端性能优化方案
一.浏览器兼容 1.1.概要 世界上没有任何一个浏览器是一样的,同样的代码在不一样的浏览器上运行就存在兼容性问题.不同浏览器其内核亦不尽相同,相同内核的版本不同,相同版本的内核浏览器品牌不一样,各种运 ...
- 原生 CSS 网格布局学习笔记
下是来自Oliver Williams的帖子. Oliver已经学习了相当长时间的原生CSS网格,可以说是在CSS网格方面有一定的发言权.在这篇文章中,他将以非同寻常的思路分析自己的CSS网格布局学习 ...
- CSS3与页面布局学习总结(四)——页面布局大全BFC、定位、浮动、7种垂直居中方法
目录 一.BFC与IFC 1.1.BFC与IFC概要 1.2.如何产生BFC 1.3.BFC的作用与特点 二.定位 2.2.relative 2.3.absolute 2.4.fixed 2.5.z- ...
- 弹性布局学习-详解align-content(六)
弹性布局学习-详解align-content(六)
- 弹性布局学习-详解 justify-content(三)
弹性布局学习-详解 justify-content(三)
随机推荐
- IC卡
本词条由“科普中国”百科科学词条编写与应用工作项目 审核 . IC卡 (Integrated Circuit Card,集成电路卡),也称智能卡(Smart card).智慧卡(Intelligent ...
- jQuery 中的 Ajax $.ajax() load() $.get() $.post() $.getJSON() $.getScript()
1. $.ajax()方法 参数对象属性如下: 参数名 类型 描述 url String (默认: 当前页地址) 发送请求的地址. type String (默认: "GET") ...
- 关于“找不到附属汇编 Microsoft.VC90.CRT,上一个错误是 参照的汇编没有安装在系统上。”的解决
关于“找不到附属汇编 Microsoft.VC90.CRT,上一个错误是 参照的汇编没有安装在系统上.”的解决 一个项目需要在Win系统用计划任务执行PHP,写了个批处理bat利用php-cgi.ex ...
- IRC配置for open source community
IRC是开源社区进行交流使用的一个很重要的工具. 但是很多公司有限制,不让在办公电脑上, 安装IRC的客户端. ZNC + weechat 是一个可以替代的 选择. irccloude 也是一个可替代 ...
- Guava缓存器源码分析——删除消息
Guava缓存器的删除消息机制 测试代码—— LoadingCache<String, Integer> cache = CacheBuilder.newBuild ...
- WISE安装程序增加注册控制
我做安装程序,一直用的WISE 9.最近为一个用户提供安装程序时,公司要求对安装程序增加控制,避免用户到处安装,增加公司服务的压力.因此,我在WISE制作的安装程序中增加了注册码校验控制,不能给出正确 ...
- Hibernate、批量操作数据
Hibernate 批量操作数据可以使用两种方法实现 1.分批更新,每一小批同步一次数据: public void saveEmployee2(){ Session s=HibernateSessio ...
- 基于Schema的AOP 配置使用详解
原文地址:http://jinnianshilongnian.iteye.com/blog/1418598 基于Schema的AOP从Spring2.0之后通过"aop"命名空间来 ...
- 在magento中发邮件
1. 在system->Configuration->Store Email Addresses中设置General Contact的Sender Name.Sender Email. S ...
- 改动分区后,导致linux上不了
/*************************** *Author : 林旭东 *problem:基于分区改动出现的问题(1) *calender: 15/07/10 ******** ...