【饿了么】—— Vue2.0高仿饿了么核心模块&移动端Web App项目爬坑(三)
前言:接着上一篇项目总结,这一篇是学习过程记录的最后一篇,这里会梳理:评论组件、商家组件、优化、打包、相关资料链接。项目github地址:https://github.com/66Web/ljq_eleme,欢迎Star。
 |
 |
| ratings | seller |
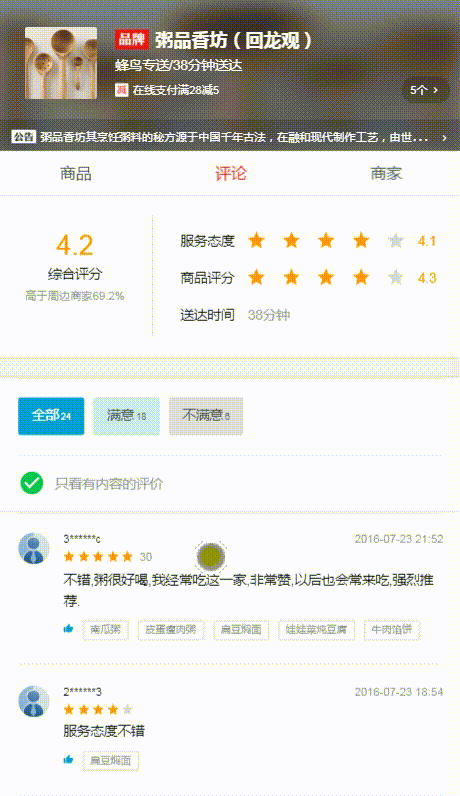
| 一、评论组件-ratings |
评论组件主要分为三块
- 评分信息-overview
- 评论选择-ratingselect
- 评论详细信息
评分信息部分
- 左侧评分
- 布局Dom
<div class="ratings-content">

     <div class="overview">

       <div class="overview-left">

          <h1 class="score">{{seller.score}}</h1>

          <div class="title">综合评分</div>

          <div class="rank">高于周边商家{{seller.rankRate}}%</div>

       </div>

       <div class="overview-right">

        .....

       </div>

     </div>

     <split></split>
CSS样式
.overview

        display flex

        padding 18px 0 18px 18px

        .overview-left

          padding-bottom 6px 0

          flex 0 0 137px

          width 137px // 防止出现兼容性问题

          border-right 1px solid rgba(7,17,27,0.1)

          text-align center

          @media only screen and (max-width 320px)

            flex 0 0 110px

            width 110px

          .score

            margin-bottom 6px

            line-height 28px

            font-size 24px

            color rgb(255, 153, 0)

          .title

            margin-bottom 8px

            line-height 12px

            font-size 12px

            color rgb(7, 17, 27)

          .rank

            line-height 10px

            font-size 10px

            color rgb(147, 153, 159)

        .overview-right

          flex 1

padding 6px 0 6px 24px- seller数据:App.vue中的routerview进行传递,在rating组件中使用props进行接收,这样才可以在模板中直接使用seller.XXX数据
 props: {

    seller: {

      type: Object

    }

  }
- 右侧star组件+商品评分+送达时间
- 布局Dom
<div class="overview">

        <div class="overview-left">

          ...

        </div>

        <div class="overview-right">

          <div class="score-wrapper">

            <span class="title">服务态度</span>

            <star :size="36" :score="seller.serviceScore"></star>

            <span class="score">{{seller.serviceScore}}</span>

          </div>

          <div class="score-wrapper">

            <span class="title">商品评分</span>

            <star :size="36" :score="seller.foodScore"></star>

            <span class="score">{{seller.foodScore}}</span>

          </div>

          <div class="delivery-wrapper">

            <span class="title">送达时间</span>

            <span class="delivery">{{seller.deliveryTime}}分钟</span>

          </div>

        </div>

      </div>
CSS样式:
        .overview-right

          flex 1

          padding 6px 0 6px 24px

          @media only screen and (max-width 320px)

            padding-left 6px

          .score-wrapper

            line-height 18px

            margin-top 8px

            font-size 0

            .title

              display inline-block

              vertical-align top

              line-height 18px

              font-size 12px

              color rgb(7, 17, 27)

            .star

              display inline-block

              vertical-align top

              margin 0 12px

            .score

              display inline-block

              vertical-align top

              line-height 18px

              font-size 12px

              color rgb(255, 153, 0)

          .delivery-wrapper

            font-size 0

            .title  //span文字和文字之间默认是垂直居中的,可以不用加display vertical-align

              display inline-block

              vertical-align top

              line-height 18px

              font-size 12px

              color rgb(7, 17, 27)

            .delivery

              display inline-block

              margin-left 12px

              vertical-align top

              line-height 18px

              font-size 12px

              color rgb(147, 153, 159)
坑:视口宽度不够宽时,右侧部分过长会出现折行。解决:添加一个mediea Query媒体查询
.overview-left

     padding-bottom: 6px 0

     flex: 0 0 137px

     width: 137px // 防止出现兼容性问题

     border-right: 1px solid rgba(7,17,27,0.1)

     text-align: center

     @media only screen and (max-width 320px)

         flex: 0 0 110px

         width: 110px

.overview-right

     flex 1

     padding: 6px 0 6px 24px

     @media only screen and (max-width 320px)

         padding-left: 6px
- 页面很长,需要引用better-scroll
- 同时,已经做好的分割区split组件、星星star组件、评论选择ratingselect组件、时间戳转换等也都需要引用
import star from '@/components/star/star'

import BScroll from 'better-scroll';

import split from '@/components/split/split'

import ratingselect from '@/components/ratingselect/ratingselect'

import {formatDate} from '@/common/js/date'
<template>
<div class="ratings" ref="ratings"> <!-- ratings-content大于ratings的时候出现滚动 -->
<div class="ratings-content"> 要实现滚动,像good组件一样,需要固定视口的高度,将其定位绝对定位,top为header组件的高度
.ratings

      position: absolute

      top: 174px

      bottom: 0

      left: 0

      width: 100%

      overflow: hidden
评论选择部分
- 使用引用并注册好的split组件和ratingselect组件
<split></split>

<ratingselect @increment="incrementTotal"

              :select-type="selectType"

              :only-content="onlyContent"

              :ratings="ratings">

</ratingselect>
- data中添加ratingselect组件中需要维护的值
data () {

    return {

      ratings: [],

      showFlag: false,

      selectType: ALL,

      onlyContent: true

    };

}
注意:此时模板中的ratings是所有商品的ratings(针对一个商家),不是food.vue中对某一种食品的评价——food.ratings
- 点击切换评价列表,和商品详情页类似,可参考【饿了么】—— Vue2.0高仿饿了么核心模块&移动端Web App项目爬坑(二)
评论详细信息
- 同商品组件,在created()函数中拿到ratings的API数据,将得到的ratings传到ratings的组件中
const ERR_OK = 0;

created () {

    this.$http.get('/api/ratings')

          .then((res) => {

             res = res.body;

             if (res.errno === ERR_OK) {

                  this.ratings = res.data;

                  // console.log(this.ratings)

                  this.$nextTick(() => {

                     this.scroll = new BScroll(this.$refs.ratings, {

                         click: true

                     })

                  });

             }

          }

    )
拿到数据之后在raring组件中填充html中的DOM数据
<div class="rating-wrapper">

        <ul>

          <li v-for="rating in ratings" :key="rating.id" class="rating-item" v-show="needShow(rating.rateType, rating.text)">

            <div class="avatar">

              <img :src="rating.avatar" width="28px" height="28px">

            </div>

            <div class="content">

              <h1 class="name">{{rating.username}}</h1>

              <div class="star-wrapper">

                <star :size="24" :score="rating.score"></star>

                <span class="delivery" v-show="rating.deliveryTime">

                  {{rating.deliveryTime}}

                </span>

              </div>

              <p class="text">{{rating.text}}</p>

              <div class="recommend" v-show="rating.recommend && rating.recommend.length"> <!-- 赞或踩和相关推荐 -->

                <i class="icon-thumb_up"></i>

                <span class="item" v-for="item in rating.recommend" :key="item.id">{{item}}</span>

              </div>

              <div class="time">

                 {{rating.rateTime | formatDate}}

              </div>

            </div>

          </li>

        </ul>

      </div>
CSS样式
      .rating-wrapper

        padding 0 18px

        .rating-item

          display flex

          padding 18px 0

          border-1px(rgba(1, 17, 27, 0.1))

          .avatar

            flex 0 0 28px

            width 28px

            margin-right 12px

            img

              border-radius 50%

          .content

            position relative

            flex 1

            .name

              margin-bottom 4px

              line-height 12px

              font-weight 700

              font-size 10px

              color rgb(7, 17, 27)

            .star-wrapper

              margin-bottom 6px

              font-size 0

              .star

                display inline-block

                margin-right 16px

                vertical-align top

              .delivery

                display inline-block

                vertical-align top

                font-size 10px

                line-height 12px

                color rgb(147, 153, 159)

            .text

              line-height 18px

              color rgb(7, 17, 27)

              font-size 12px

              margin-bottom 8px

            .recommend

              line-height 16px

              font-size 0

              .icon-thumb_up, .item

                display inline-block

                margin 0 8px 4px 0

                font-size 9px

              .icon-thumb_up

                color rgb(0, 160, 220)

              .item

                padding 0 6px

                border 1px solid rgba(7, 17, 27, 0.1)

                border-radius 1px

                color rgb(147, 153, 159)

                background #fffff

            .time

              position absolute

              top 0

              right 0

              line-height 12px

              font-size 10px

              color rgb(147, 153, 159)
绑定better-scroll,使评论列表部分可以滚动
- 拿到DOM数据,ref="ratings",将better-scroll初始化时机写在created函数拿到api数据之后
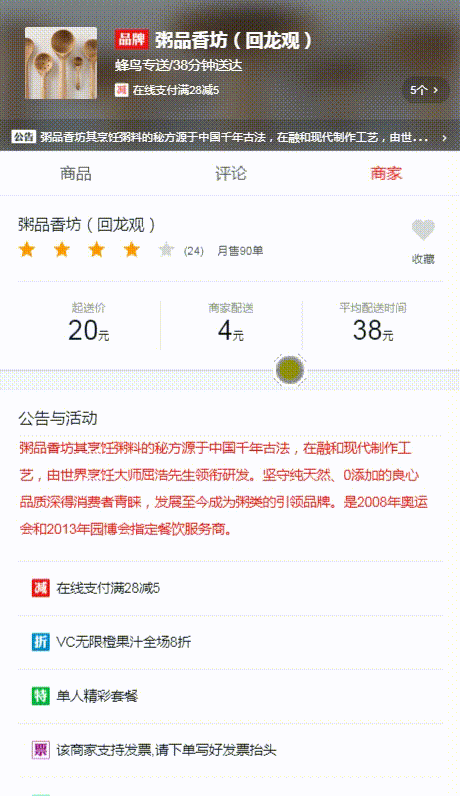
| 二、商家组件-seller |
基础操作
- 接收传递进来的seller数据
 props: {

    //APP.vue的routerview中已经将seller传进来了,这里只需要接收就好

    seller: {

      type: Object

    }

  }
布局DOM
<div class="overview">

        <h1 class="title">{{seller.name}}</h1>

        <div class="desc border-1px">

          <star :size="36" :score="seller.score"></star>

          <span class="text">({{seller.ratingCount}})</span>

          <span class="text">月售{{seller.sellCount}}单</span>

        </div>

        <ul class="remark">

          <li class="block">

            <h2>起送价</h2>

            <div class="content">

              <span class="stress">{{seller.minPrice}}</span>元

            </div>

          </li>

          <li class="block">

            <h2>商家配送</h2>

            <div class="content">

              <span class="stress">{{seller.deliveryPrice}}</span>元

            </div>

          </li>

          <li class="block">

            <h2>平均配送时间</h2>

            <div class="content">

              <span class="stress">{{seller.deliveryTime}}</span>元

            </div>

          </li>

        </ul>

        <div class="favorite"  @click="toggleFavorite($event)">

          <i class="icon-favorite"

             :class="{'active':favorite}"></i> <!-- 对应是否收藏两种样式-->

          <span>{{favoriteText}}</span> <!-- 有没有选中对应不同的文本,所以这里要绑定一个变量,放到data中 -->

        </div>

      </div>
CSS样式
.seller

        position: absolute

        top: 174px

        bottom: 0

        left: 0

        width: 100%

        overflow: hidden

        .overview

          padding: 18px

          position: relative

          .title

            margin-bottom: 8px

            line-height: 14px

            color: rgb(7, 17, 27)

            font-size: 14px

          .desc

            padding-bottom: 18px

            font-size: 0

            border-1px(rgba(7, 17, 27, 0.1))

            &:before

               display: none

            .star

              display: inline-block

              vertical-align: top

              margin-right: 8px

            .text

              display: inline-block

              vertical-align: top

              margin-right: 12px

              line-height: 18px // 不能为父元素设置line-heigth,否则组件会被撑高

              font-size: 10px

              color: rgb(77, 85, 93)

          .remark

            display: flex

            padding-top: 18px

            .block

              flex: 1

              text-align: center

              border-right: 1px solid rgba(7, 17, 27, 0.1)

              &:last-child

                border: none

              h2

                margin-bottom: 4px

                line-height: 10px

                font-size: 10px

                color: rgb(147, 153, 149)

              .content

                line-height: 24px

                font-size: 10px

                color: rgb(7, 17, 27)

                .stress

                  font-size: 24px
公告与活动部分
- 先添加一个split组件,再添加内容,同时不要忘记把图片拷贝过来
- 布局DOM
<div class="bulletin">

        <h1 class="title">公告与活动</h1>

        <div class="content-wrapper border-1px">

          <p class="content">{{seller.bulletin}}</p>

        </div>

        <ul v-if="seller.supports" class="supports">

            <li class="support-item border-1px"
                v-for="(item,index) in seller.supports"
                :key="(item.id,index.id)">

              <span class="icon" :class="classMap[seller.supports[index].type]"></span>

              <span class="text">{{seller.supports[index].description}}</span>

            </li>

       </ul>

</div>

<split></split>
其中:图标icon 动态绑定class时,使用classMap,在created()中定义,通过获取索引值一一对应,同header.vue组件中一样
 created() {

    this.classMap = ['decrease', 'discount', 'special', 'invoice', 'guarantee'];

} - CSS样式
.bulletin

            padding: 18px 18px 0 18px

            .title

              margin-bottom: 8px

              line-height: 14px

              color: rgb(7, 17, 27)

              font-size: 14px

            .content-wrapper

              padding: 0 12px 16px 1px

              border-1px(rgba(7, 17, 27, 0.1))

              .content

                line-height: 24px

                font-size: 12px

                color: rgb(240, 20, 20)

            .supports

              .support-item

                padding: 16px 12px

                border-1px(rgba(7, 17, 27, 0.1))

                font-size 0

                &:last-child

                  border-none()

                .icon

                  display inline-block

                  width 16px

                  height 16px

                  vertical-align top

                  margin-right 6px

                  background-size 16px 16px

                  background-repeat no-repeat

                  &.decrease

                    bg-image('decrease_4')

                  &.discount

                    bg-image('discount_4')

                  &.guarantee

                    bg-image('guarantee_4')

                  &.invoice

                    bg-image('invoice_4')

                  &.special

                    bg-image('special_4')

                .text

                  display inline-block

                  font-size 12px

                  line-height 16px

                  color rgb(7, 17, 27)
使用BScroll
- 页面很长,需要引用BScroll
- 坑:初始化BScroll语句放在created()中,但是不起作用。
- 原因:seller是异步获取的,但是我们的内容都是靠seller里的数据撑开的,所以一开始内容肯定是小于我我们定义的wrapper的,所以没有被撑开
- 解决:将其放入watch:{} 中可以监测到seller的变化,将初始化语句写成一个方法,在watch中进行调用
 methods: {

     _initScroll() {

      this.$nextTick(() => {

          if (!this.scroll) {

            this.scroll = new BScroll(this.$refs.seller, {click: true});

          }else{

            this.scroll.refresh();

          }

      })

    }
watch: {
'seller'() { //观测seller数据的更新,并且执行更新后的操作
this._initScroll();
this._initPics();
}
},
created() {
this.classMap = ['decrease', 'discount', 'special', 'invoice', 'guarantee']; this._initScroll();
this._initPics();
} - 坑:之前的情况是切换之后不能滚动,现在的新问题是一开始(没切换界面之前)就不能滚动了,切换之后就可以滚动了;
原因:created()的执行时机要先于watch中的seller,然后我们在执行seller中的initScroll的时候就会发现BScroll已经被初始化了,所以initScroll失效,即使在watch中观察到变化也只能什么都不做
解决:一定要为初始化函数_initScroll()和this._initPics()中的nextTick()下的添加if-else语句,对BScroll进行刷新,完成
- 商家实景区块 -- 横向滚动
- 添加图片,设置样式,横向排列
<div class="pics">

       <h1 class="title">商家实景</h1>

        <div class="pic-wrapper" ref="picWrapper">

          <ul class="pic-list" ref="picList">

            <li class="pic-item" v-for="pic in seller.pics" :key="pic.id">

              <img :src="pic" width="120" height="90">

            </li>

          </ul>

        </div>

</div>

<split></split>
CSS样式:
 .pics

       padding: 18px

       .title

            margin-bottom: 12px

            line-height: 14px

            color: rgb(7, 17, 27)

            font-size: 14px

            .pic-wrapper

              width: 100%

              overflow: hidden

              white-space: nowrap /*不产生折行*/

              .pic-list

                font-size: 0

                .pic-item

                  display: inline-block

                  margin-right: 6px

                  width: 120px

                  height: 90px

                  &:last-child

margin: 0 - 原理: pic-wrapper是固定宽度的视口的大小,当里面的ul超过视口宽度的时候就会出现滚动
- 注意:ul是外层的宽度,并不是真实的li撑开的宽度
- 实现:使用BScroll实现滚动,添加_initPic()方法,并把它添加到watch和create()中
_initPics() {

      if(this.seller.pics) {

         let picWidth = 120;

         let margin = 6;

         let width = (picWidth + margin)*this.seller.pics.length - margin;//计算ul的宽度

         this.$nextTick(() => {

              this.$refs.picList.style.width = width + 'px';//设置ul宽度,不要忘记单位

              if (!this.picScroll) {

                 this.picScroll = new BScroll(this.$refs.picWrapper, {

                      scrollX: true,//表示横向滚动

                      eventPassthrough:'vertical'//横向滚动图片的时候忽略纵向的滚动

                 });

              }else{

                this.scroll.refresh();

              }

          })

      }

    }
收藏商家
- 收藏按钮:设置:active样式(红,白)和字体的变化(收藏和未收藏)
<div class="favorite"  @click="toggleFavorite($event)">

     <i class="icon-favorite" :class="{'active':favorite}"></i> <!-- 对应是否收藏两种样式-->

     <span>{{favoriteText}}</span> <!-- 有没有选中对应不同的文本,所以这里要绑定一个变量,放到data中 -->

</div> - favorite是一个变量,在data里观测,使用computed定义favoriteText()改变并返回变量
data() {

    return {

     // favorite: false, //默认没有被收藏,从localStorge中取读取,不是一个默认值了

      favorite: (() => {

       return loadFromlLocal(this.seller.id, 'favorite', false);

     })()

    };

},

computed: {

    favoriteText() {

       return this.favorite ? '已收藏' : '收藏';

    }

}
CSS样式
.favorite

     position: absolute

     right: 11px

     top: 18px

     width: 50px

     text-align: center

     .icon-favorite

         display: block

         margin-bottom: 4px

         line-height: 24px

         font-size: 24px

         width: 50px

         color: #d4d6d9

         &.active

               color: rgb(240,20,20)

         .text

                line-height: 10px

                font-size: 10px

                color: rgb(77,85,93)
添加点击事件,methods中定义toggleFavorite()方法
 toggleFavorite(event) {

        if (!event._constructed) {

          return;

        }

        this.favorite = !this.favorite;

        //这样写取法区分商家id,不同商家的状态一样

        //localStorage.favorite = this.favorite;

        saveToLocal(this.seller.id, 'favorite', this.favorite);

 },
保存收藏状态
- 解析url中商家id数据为Object对象:每一个商家都有一个唯一的id,这个id存在url中,所以创建util.js,封装一个函数,将url解析成对象的模式
/**

 * 解析url参数

 * Created by yi on 2016-12-28.

 * @return Object {id:12334}

 */

export function urlParse() {

  let url = window.location.search;

  let obj = {};

  let reg = /[?&][^?&]+=[^?&]]+/g;

  let arr = url.match(reg);

  // ['?id=123454','&a=b']

  if (arr) {

    arr.forEach((item) => {

      let tempArr = item.substring(1).split('=');// 先分割取到id=123454,之后用=号分开

      let key = tempArr[0];

      let val = tempArr[1];

      obj[key] = val;

    });

  }

  // return obj;

  return {id: 123123};

}; - 在App.vue组件中引入urlParse,并在data中获取data,通过扩展对象在data.json文件中存入data
import {urlParse} from './common/js/util.js'

data() {

     return {

       seller:{

         id: (() => {

           let queryParam = urlParse();

          //  console.log(queryParam)

           return queryParam.id;

         })()

       }

     }

   },

   created: function() {

      this.$http.get('/api/seller?id=' + this.seller.id)

          .then((res) => {

             res = res.body;

             if (res.errno === ERR_OK) {

                  this.seller = res.data;

                  // console.log(this.seller)

                  this.seller = Object.assign({}, this.seller, res.data);//扩展对象 添加其它属性--id

             }

          }, (err) => {

          })

   }
刷新之后,收藏样式就会消失:创建store.js实现数据的存取,专门存取不同商家的id,通过唯一id,将收藏的信息添加到localStorge中
//savaToLocal(this.seller.id, 'favorite', this.favorite);存取

export function saveToLocal(id, key, value) { //存储到localStorge

  let seller = window.localStorage.__seller__;

  if (!seller) { //没有seller的时候,初始化,定义一个seller对象,并给他设定一个id

    seller = {};

    seller[id] = {}; // 每个id下都是一个单独的obj

  } else {

    seller = JSON.parse(seller); // JSON 字符串转换为对象

    if (!seller[id]) { //判断是否有当前这个商家

      seller[id] = {};

    }

  }

  seller[id][key] = value; // 将key和value存到id这个对象的下边

  //将一个JavaScript值(对象或者数组)转换为一个 JSON字符串

  window.localStorage.__seller__ = JSON.stringify(seller);

}

//loadFromlLocal(this.seller.id, 'favorite', false);读取

export function loadFromlLocal(id, key, def) { //读取,读不到的时候传入一个default变量

  let seller = window.localStorage.__seller__;

  if (!seller) {

    return def;

  }

  seller = JSON.parse(seller)[id]; // 取到这个商家下所有的对象

  if (!seller) {

    return def;

  }

  let ret = seller[key];

  return ret || def;

}
seller.vue中引入,并在data和toggleFavorite()中使用这两个方法:
import {saveToLocal, loadFromlLocal} from 'common/js/store.js';data() {
return {
// favorite: false, //默认没有被收藏,从localStorge中取读取,不是一个默认值了
favorite: (() => {
return loadFromlLocal(this.seller.id, 'favorite', false);
})()
};
}toggleFavorite(event) {
if (!event._constructed) {
return;
}
this.favorite = !this.favorite;
//这样写取法区分商家id,不同商家的状态一样
//localStorage.favorite = this.favorite;
saveToLocal(this.seller.id, 'favorite', this.favorite);
},
| 三、优化&打包 |
优化
- 问题:切换界面时会闪现
- 原因:界面被重新渲染了,生命周期函数被重新执行了一遍
- 优化:切换组件的时候,组件之前的状态也能被保留
- 解决:vue中提供 vue-router切换组件保留的功能内置组件<keepalive>,在App.vue中更改为
<keep-alive>

      <router-view :seller="seller"></router-view>

</keep-alive>
打包
- vue-cli 项目打包构建的结果就是根目录下会多出一个dist文件夹:存储编译后的文件
npm run build
| 四、相关资料链接 |
Vue.js官网:https://vuejs.org.cn/
Vue-cli:https://github.com/vuejs/vue-cli
Vue-resource: https://github.com/vuejs/vue-resource
Vue-router: https://github.com/vuejs/vue-router
better-scroll: http://npm.taobao.org/package/better-scroll
webpack官网:https://www.webpackjs.com/
Stylus中文文档:https://www.zhangxinxu.com/jq/stylus/
es6入门学习:http://es6.ruanyifeng.com/
eslint规则:http://eslint.org/docs/rules/
设备像素比:https://www.zhangxinxu.com/wordpress/2012/08/window-devicepixelratio/
Flex布局:http://www.ruanyifeng.com/blog/2015/07/flex-grammar.html
贝塞尔曲线测试:http://cubic-bezier.com/#.17,.67,.83,.67
注:项目来自慕课网
【饿了么】—— Vue2.0高仿饿了么核心模块&移动端Web App项目爬坑(三)的更多相关文章
- vue2.0高仿饿了么better-scroll
首先安装better-scroll npm i better-scroll -S goods页面模板 <template> <div class="goods"& ...
- 用vue2 +vue-router2 + es6 +webpack 高仿饿了么app(干货满满)
#高仿饿了么app商家详情 (vue2 +vue-router2 + es6 +webpack ) ##demo [demo 地址](http://liangxiaojuan.github.io/ ...
- 基于vue2+nuxt构建的高仿饿了么(2018版)
前言 高仿饿了么,以nuxt作为vue的服务端渲染,适合刚接触或者准备上vue ssr的同学参考和学习 项目地址如遇网络不佳,请移步国内镜像加速节点 效果演示 查看demo请戳这里(请用chrome手 ...
- Vue.js高仿饿了么WebApp
介绍 学习Vue.js也有一阵子了,为了加深对Vue的理解及运用,做了一个小项目.这是一个高仿饿了么外卖WebApp,现已完成商品预览.商品详情.商家预览.添加购物.查看评论等功能. 部分截图 项目预 ...
- Vuejs 高仿饿了么外卖APP 百度云视频教程下载
Vuejs 高仿饿了么外卖APP 百度云视频教程下载 链接:https://pan.baidu.com/s/1KPbKog0qJqXI-2ztQ19o7w 提取码: 关注公众号[GitHubCN]回复 ...
- 使用 swift3.0高仿新浪微博
项目地址:https://github.com/SummerHH/swift3.0WeBo 使用 swift3.0 高仿微博,目前以实现的功能有,添加访客视图,用户信息授权,首页数据展示(支持正文中连 ...
- Vue2.0 全家桶开发的网页应用(参照吾记APP)
github链接 借鉴吾记APP,使用 vue2.0+vue-router+vuex 为主要技术栈,elementui做为ui框架,多模块 spa 模式,webpack2.0 负责模块打包,gulp ...
- 【数据售卖平台】—— Vue2.0入门学习项目爬坑
前言:这个项目是我从零学习Vue2.0时用于练习基础知识的入门项目,包含了Vue2.0几乎所有项目都会用到的基础功能,是新手用来练手的好项目,这里温故知新对功能点做一个总结.github地址:http ...
- vue2高仿饿了么app
Github地址: https://github.com/ccyinghua/appEleme-project 一.构建项目所用: vue init webpack appEleme-project ...
随机推荐
- 转:xxe attack学习
小结 1.http包发送类型:content-type:text/xml2.xxe漏洞非常危险, 因为此漏洞会造成服务器上敏感数据的泄露,和潜在的服务器拒绝服务攻击.要去校验DTD(document ...
- 洛谷——P4017 最大食物链计数
P4017 最大食物链计数 题目背景 你知道食物链吗?Delia生物考试的时候,数食物链条数的题目全都错了,因为她总是重复数了几条或漏掉了几条.于是她来就来求助你,然而你也不会啊!写一个程序来帮帮她吧 ...
- 图形管线之旅 Part4
原文:<A trip through the Graphics Pipeline 2011> 翻译:往昔之剑 转载请注明出处 欢迎回来.上个部分是关于vertex shader的, ...
- openstack多region配置
实验 A机器 10.64.8.171 RegionOne B机器 10.64.8.142 RegionTwo Keytson(这个组件随便放在哪台都可以) openst ...
- centos7 更改时区
Linux 系统(我特指发行版, 没说内核) 下大部分软件的风格就是不会仔细去考虑向后 的兼容性, 比如你上个版本能用这种程序配置, 没准到了下一个版本, 该程序已经不见了. 比如 sysvinit ...
- Knockout.js(四):自定义绑定
除了内嵌的绑定,还可以创建一些自定义绑定,封装复杂的逻辑或行为. 注册绑定 添加子属性到ko.bindingHandlers来注册绑定: ko.bindingHandlers.yourBindingN ...
- codevs 5294 挖地雷
5294 挖地雷 时间限制: 1 s 空间限制: 1000 KB 题目等级 : 黄金 Gold 题目描述 Description 在一个地图上有N个地窖(N<=20),每个地窖中埋有一 ...
- 欧拉路小结 JZYZOJ1210 骑马修栅栏
现在写到欧拉路,理解起来并不算特别困难...吧... 但是非常恶心的是每次都要调试半天,做不到一遍两遍就能ac 每次写程序都对于程序的整体构架没有清晰的思路,想到哪里写到哪里真的是个非常差的习惯[尽管 ...
- HDU 6141 I am your Father!(最小树形图)
[题目链接] http://acm.hdu.edu.cn/showproblem.php?pid=6141 [题目大意] 给出一个有向图,求1点为根的最小树形图使得第n个点的直接父亲编号最小 [题解] ...
- Java性能优化的9大工具
在这篇文章中,我会带着大家一起看一下9个可以帮助我们优化Java性能的工具.有一些我们已经在IDR Solutions中使用了,而另外一些有可能在个人项目中使用. NetBeans Profiler ...