
Angular20 nginx安装,angular项目部署
1 nginx安装(Windows版本)
1.1 下载安装包
到官网下载Windows版本的nginx安装包
技巧01:下载好的压缩包解压即可,无需安装

1.2 启动nginx
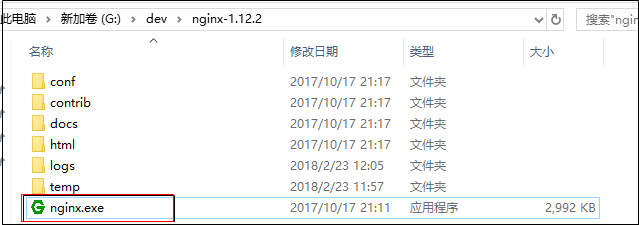
进入到解压目录,点击 nginx.exe 就可以启动nginx啦
1.3 验证
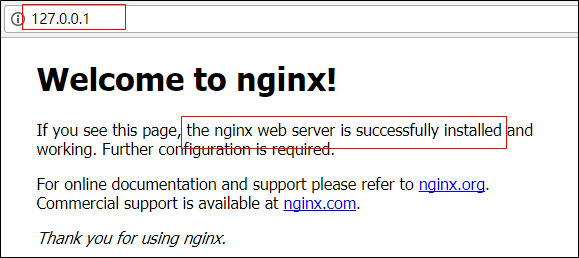
打开浏览器,跳转到 http://127.0.0.1/ 后如果出现下面的页面就说明nginx安装成功啦
1.4 参考文档
2 angular项目部署
2.1 项目打包
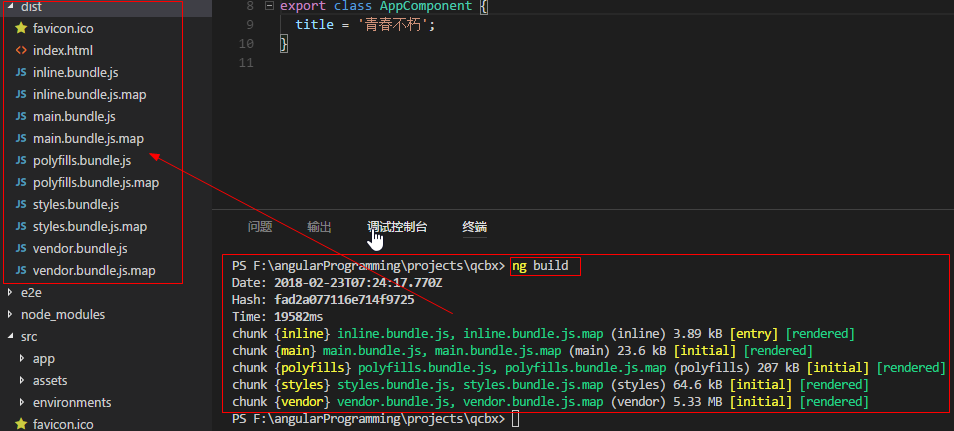
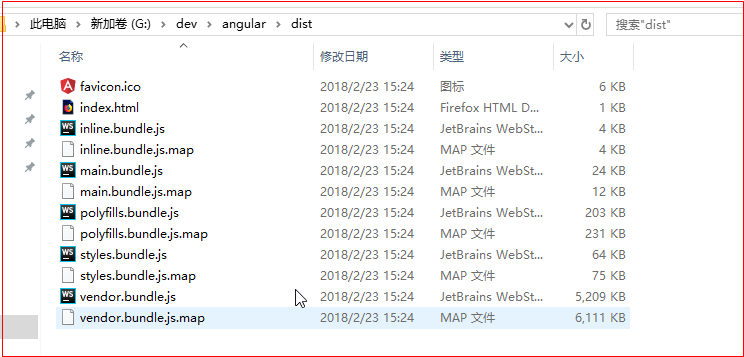
对angular项目进行打包处理,打包好后在angular项目的根目录会出现一个dist文件夹,该文件夹存放的就是打包好的项目文件
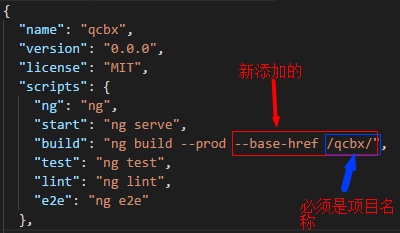
技巧01:需要到 package.json 中去修改 ng build 指令
{

  "name": "qcbx",

  "version": "0.0.0",

  "license": "MIT",

  "scripts": {

    "ng": "ng",

    "start": "ng serve",

    "build": "ng build --prod --base-href /qcbx/",

    "test": "ng test",

    "lint": "ng lint",

    "e2e": "ng e2e"

  },

  "private": true,

  "dependencies": {

    "@angular/animations": "^5.2.5",

    "@angular/cdk": "^5.2.2",

    "@angular/common": "^5.2.0",

    "@angular/compiler": "^5.2.0",

    "@angular/core": "^5.2.0",

    "@angular/forms": "^5.2.0",

    "@angular/http": "^5.2.0",

    "@angular/material": "^5.2.2",

    "@angular/platform-browser": "^5.2.0",

    "@angular/platform-browser-dynamic": "^5.2.0",

    "@angular/router": "^5.2.0",

    "core-js": "^2.4.1",

    "hammerjs": "^2.0.8",

    "rxjs": "^5.5.6",

    "zone.js": "^0.8.19"

  },

  "devDependencies": {

    "@angular/cli": "~1.7.0",

    "@angular/compiler-cli": "^5.2.0",

    "@angular/language-service": "^5.2.0",

    "@types/jasmine": "~2.8.3",

    "@types/jasminewd2": "~2.0.2",

    "@types/node": "~6.0.60",

    "codelyzer": "^4.0.1",

    "jasmine-core": "~2.8.0",

    "jasmine-spec-reporter": "~4.2.1",

    "karma": "~2.0.0",

    "karma-chrome-launcher": "~2.2.0",

    "karma-coverage-istanbul-reporter": "^1.2.1",

    "karma-jasmine": "~1.1.0",

    "karma-jasmine-html-reporter": "^0.2.2",

    "protractor": "~5.1.2",

    "ts-node": "~4.1.0",

    "tslint": "~5.9.1",

    "typescript": "~2.5.3"

  }

}
2.2 打包项目移动
将打包好的项目移动到任意位置,例如:
2.3 nginx配置
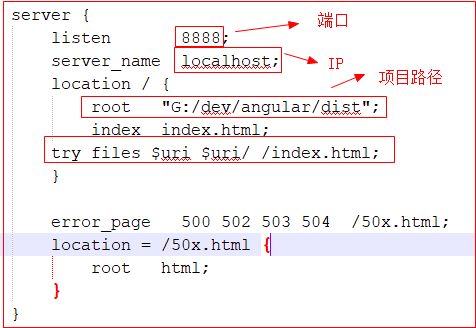
nginx需要配置的东西也就是在conf文件中,打开安装目录下的 conf/nginx.conf 在http节点下添加server节点

技巧01:天假server节点时一定要加上 try_files $uri $uri/ /index.html; 否则项目配置的子路由无法生效
#user  nobody;

worker_processes  1;

#error_log  logs/error.log;

#error_log  logs/error.log  notice;

#error_log  logs/error.log  info;

#pid        logs/nginx.pid;

events {

    worker_connections  1024;

}

http {

    include       mime.types;

    default_type  application/octet-stream;

    #log_format  main  '$remote_addr - $remote_user [$time_local] "$request" '

    #                  '$status $body_bytes_sent "$http_referer" '

    #                  '"$http_user_agent" "$http_x_forwarded_for"';

    #access_log  logs/access.log  main;

    sendfile        on;

    #tcp_nopush     on;

    #keepalive_timeout  0;

    keepalive_timeout  65;

    #gzip  on;

    server {

        listen       80;

        server_name  localhost;

        #charset koi8-r;

        #access_log  logs/host.access.log  main;

        location / {

            root   html;

            index  index.html index.htm;

        }

        #error_page  404              /404.html;

        # redirect server error pages to the static page /50x.html

        #

        error_page   500 502 503 504  /50x.html;

        location = /50x.html {

            root   html;

        }

        # proxy the PHP scripts to Apache listening on 127.0.0.1:80

        #

        #location ~ \.php$ {

        #    proxy_pass   http://127.0.0.1;

        #}

        # pass the PHP scripts to FastCGI server listening on 127.0.0.1:9000

        #

        #location ~ \.php$ {

        #    root           html;

        #    fastcgi_pass   127.0.0.1:9000;

        #    fastcgi_index  index.php;

        #    fastcgi_param  SCRIPT_FILENAME  /scripts$fastcgi_script_name;

        #    include        fastcgi_params;

        #}

        # deny access to .htaccess files, if Apache's document root

        # concurs with nginx's one

        #

        #location ~ /\.ht {

        #    deny  all;

        #}

    }

    server {

        listen       8888;

        server_name  localhost;

        location / {

            root   "G:/dev/angular/dist";

            index  index.html;

        try_files $uri $uri/ /index.html;

        }

        error_page   500 502 503 504  /50x.html;

        location = /50x.html {

            root   html;

        }

    }

    # another virtual host using mix of IP-, name-, and port-based configuration

    #

    #server {

    #    listen       8000;

    #    listen       somename:8080;

    #    server_name  somename  alias  another.alias;

    #    location / {

    #        root   html;

    #        index  index.html index.htm;

    #    }

    #}

    # HTTPS server

    #

    #server {

    #    listen       443 ssl;

    #    server_name  localhost;

    #    ssl_certificate      cert.pem;

    #    ssl_certificate_key  cert.key;

    #    ssl_session_cache    shared:SSL:1m;

    #    ssl_session_timeout  5m;

    #    ssl_ciphers  HIGH:!aNULL:!MD5;

    #    ssl_prefer_server_ciphers  on;

    #    location / {

    #        root   html;

    #        index  index.html index.htm;

    #    }

    #}

}
2.4 重启nginx
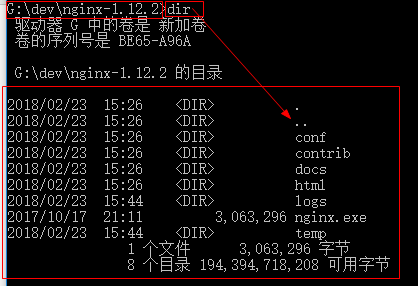
技巧01:利用命令启动或者关闭nginx时必须进入到安装nginx的根目录,例如
Windows下nginx命令操作:点击前往
nginx.exe

nginx.exe -s stop

nginx.exe -s quit

nginx.exe -s reload
坑01:重启nginx后还必须清楚浏览器数据,再访问时才可以看到最新的效果,否则会是重启nginx之前的效果
2.5 效果展示
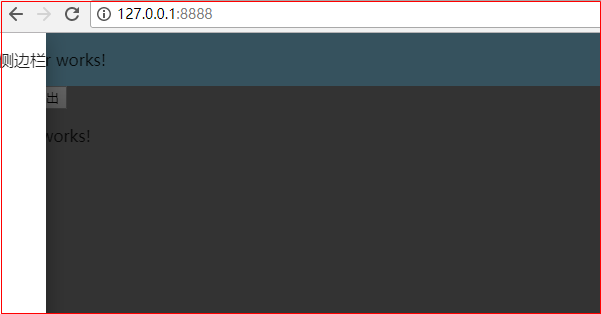
利用浏览器访问 http://127.0.0.1:8888/ 就会弹出angular项目的页面
2.6 参考文档
Angular20 nginx安装,angular项目部署的更多相关文章
- Angular4---部署---将Angular项目部署到IIS上
---恢复内容开始--- Angular项目部署到一个IIS服务器上 1.安装URL rewrite组件: 网址:https://www.microsoft.com/en-us/download/de ...
- [转]Angular4---部署---将Angular项目部署到IIS上
本文转自:https://www.cnblogs.com/kingkangstudy/p/7699710.html Angular项目部署到一个IIS服务器上 1.安装URL rewrite组件: 网 ...
- .NET Core +Angular 项目 部署到CentOS
前言: 最近公司需要开发项目能在Linux系统上运行,示例开发项目采用.Net Core + Angular开发:理论上完全支持跨平台. 但是实践才是检验真理的唯一标准:那么还是动手来验证实现下:过程 ...
- 基于腾讯云CentOS7.4+MySQL5.7+Python3+uwsgi+nginx的Django项目部署
准备知识 1.django一个基于python的开源web框架,请确保自己熟悉它的框架目录结构. 2.uWSGI一个基于自有的uwsgi协议.wsgi协议和http服务协议的web网关 3.nginx ...
- Linux下tomcat的安装与项目部署
最近在linux下安装了jdk,为了圆我以前的心愿,把tomcat也安装了,顺便部署个项目,也算是小又成就感 废话不说了,直接上过程 一.下载安装对应的jdk,并配置Java环境. 有关jdk的安装请 ...
- centos 5.8 x64Jetty的安装以及项目部署配置
链接地址:http://blog.csdn.net/shuixin536/article/details/9049821 安装环境 centos 5.8 x64 安装前须知 首先在安装Jetty之前要 ...
- 微服务架构 ------ DockerCompose从安装到项目部署
DockerCompose的目的:简化Docker的启动和停止流程,以及编排Docker启动服务与服务之间的关系 DockerCompose的安装:curl -L https://get.daoclo ...
- Nginx+Uwsgi+Django 项目部署到服务器。
首先先说一下思路: 1.本地django项目打包 主要用到的是 python自带的distutils.core 下的 setup,具体代码在下面,主要讲的两个问题是package主要打包为和目录同级的 ...
- tomcat安装与项目部署
1.tomcat依赖:jdk jre,环境变量配置 java_home jre_home 2.tomcat安装: 下载:http://tomcat.apache.org/ download ...
随机推荐
- Mybatis框架 基础
思维导图 @有对应的例子 @1接入数据库 配置文件 <?xml version="1.0" encoding="UTF-8" ?> <!DOC ...
- API接口签名验证2
http://www.jianshu.com/p/d47da77b6419 系统从外部获取数据时,通常采用API接口调用的方式来实现.请求方和�接口提供方之间的通信过程,有这几个问题需要考虑: 1.请 ...
- 邓_html_选项卡
================================================= ================[ 选项卡 ]================= ======= ...
- IOS UI 滚动视图 UIScrollView
UIScrollView 常用属性 scrollView.maximumZoomScale= 2.0; // 缩放最大比例 scrollView.minimumZoomScale = 0.2;// ...
- Java中的SerialVersionUID
Java中的SerialVersionUID 序列化及SergalVersionUID困扰着许多Java开发人员.我经常会看到这样的问题,什么是SerialVersionUID,如果实现了Serial ...
- Socket与ServerSocket
ServerSocket: 用于打开服务端口,等待客户端连接,运行在服务端. Socket: 用于连接指定服务器的指定端口,运行在客户端. flush是输出到缓冲区,缓冲区没满的话不发送,close的 ...
- Spring的RestTemplata使用
spring-web的RestTemplata是对java底层http的封装,使用RestTemplata用户可以不再关注底层的连接建立,并且RestTemplata不仅支持Rest规范,还可以定义返 ...
- vuejs axios安装配置与使用
1.安装服务 npm install --save axios vue-axios 2.在main.js import axios from 'axios' import VueAxios from ...
- docker 安装NexusRepository Manager
今天学习了一下docker 感觉这东西要学习好多的命令,但是自己又是喜欢这种命令,感觉linux总是高一个等级的东西,这几天学习使用docker安装各种东西,下面记录一些我安装nexus的步骤,还是不 ...
- hexo部署github和gitment操作简单介绍
优点: 快速高效 支持markdown 布局自定义简单,无广告 部署简单 因为想开始写博客,但又找不到好的博客平台,平时都看博客园和开源中国看博客文章,但博客园的那个皮肤是真有点难受,所以就想自己打个 ...