
MVC学习系列6--使用Ajax加载分部视图和Json格式的数据
Ajax的应用在平时的工作中,很是常见,这篇文章,完全是为了,巩固复习。
我们先看看不使用json格式返回分部视图:
先说需求吧:
我有两个实体,一个是出版商【Publisher】,一个是书【Book】(很显然这是一对多的关系,一个出版商可以出版很多书籍,一本书只有一个出版商。),这里,我要实现的是,在出版商页面,使用DropDownList加载出来有哪些出版商,然后选择出版商的时候,异步加载分部视图,加载这个出版商出版的书籍的数据。
打算使用EF来做,也当是一个复习吧:
1.首先新建一个空白的MVC web项目:,在Model文件夹下面新建两个实体:

BOOK实体:
using System;

using System.Collections.Generic;

using System.Linq;

using System.Web;

namespace AjaxDataInMVC.Models

{

    public class Book

    {

        public int BookID { get; set; }

        public string Title { get; set; }

        public string Auther { get; set; }

        public string Price { get; set; }

        public string Year { get; set; }

        public int PublisherID { get; set; }

        public virtual Publisher Publisher { get; set; }

    }

}
Book
Punlisher实体:
using System;

using System.Collections.Generic;

using System.Linq;

using System.Web;

namespace AjaxDataInMVC.Models

{

    public class Publisher

    {

        /// <summary>

        /// 出版编号

        /// </summary>

        public int PublisherID { get; set; }

        /// <summary>

        /// 出版商名称

        /// </summary>

        public string PublisherName { get; set; }

        /// <summary>

        /// 出版日期

        /// </summary>

        public string PublisherYear { get; set; }

        public virtual ICollection<Book> Books { get; set; }

    }

}
Publisher
2.接着,添加EF引用,然后在根目录下,新建一个Map文件夹,在里面新建两个实体:
using AjaxDataInMVC.Models;

using System;

using System.Collections.Generic;

using System.ComponentModel.DataAnnotations.Schema;

using System.Data.Entity.ModelConfiguration;

using System.Linq;

using System.Web;

namespace AjaxDataInMVC.Map

{

    public class BookMap:EntityTypeConfiguration<Book>

    {

        public BookMap()

        {

            //设置主键

            this.HasKey(x => x.BookID);

            this.Property(x => x.BookID).HasDatabaseGeneratedOption(DatabaseGeneratedOption.Identity);

            this.Property(x => x.Price).IsRequired();

            this.Property(x => x.Auther).IsRequired().HasMaxLength();

            this.Property(x => x.Title);

            this.Property(x => x.Year);

            this.HasRequired(x => x.Publisher).WithMany(x => x.Books).HasForeignKey(x => x.PublisherID).WillCascadeOnDelete(true);

            this.ToTable("Books");

        }

    }

}
BookMap
using AjaxDataInMVC.Models;

using System;

using System.Collections.Generic;

using System.ComponentModel.DataAnnotations.Schema;

using System.Data.Entity.ModelConfiguration;

using System.Linq;

using System.Web;

namespace AjaxDataInMVC.Map

{

    public class PublisherMap:EntityTypeConfiguration<Publisher>

    {

        public PublisherMap()

        {

            //主键

            this.HasKey(x => x.PublisherID);

            this.Property(x => x.PublisherID).HasDatabaseGeneratedOption(DatabaseGeneratedOption.Identity);

            this.Property(x => x.PublisherName).HasMaxLength().IsRequired();

            this.Property(x => x.PublisherYear).IsRequired();

            this.ToTable("Publishers");

        }

    }

}
PublisherMap
3.现在就是新建数据上下文类了,在Map文件夹下:
using System;

using System.Collections.Generic;

using System.Data.Entity;

using System.Data.Entity.ModelConfiguration;

using System.Linq;

using System.Reflection;

using System.Web;

namespace AjaxDataInMVC.Map

{

    public class MyDbContext:DbContext

    {

        public MyDbContext() :

            base("name=DbConnectionString") { }

        protected override void OnModelCreating(DbModelBuilder modelBuilder)

        {

            var typesToRegister = Assembly.GetExecutingAssembly().GetTypes()

         .Where(type => !String.IsNullOrEmpty(type.Namespace))

         .Where(type => type.BaseType != null && type.BaseType.IsGenericType

              && type.BaseType.GetGenericTypeDefinition() == typeof(EntityTypeConfiguration<>));

            foreach (var type in typesToRegister)

            {

                dynamic configurationInstance = Activator.CreateInstance(type);

                modelBuilder.Configurations.Add(configurationInstance);

            }

           // base.OnModelCreating(modelBuilder);

        }

    }

}
MyDbContext
别忘了,配置文件中加上:
<connectionStrings>

    <add name="DbConnectionString" connectionString="server=.;database=MyBookDB;uid=sa;pwd=Password_1" providerName="System.Data.SqlClient"/>

  </connectionStrings>
5.这里特别提到,创建下拉框,我们可以新建一个ViewModel性质的实体
using System;

using System.Collections.Generic;

using System.ComponentModel.DataAnnotations;

using System.Linq;

using System.Web;

using System.Web.Mvc;

namespace AjaxDataInMVC.ViewModel

{

    public class PublisherViewModel

    {

        public PublisherViewModel()

        {

            PublisherList = new List<SelectListItem>();

        }

        [Display(Name="PublishName")]

        public int PublisherID { get; set; }

        public IEnumerable<SelectListItem> PublisherList { get; set; }

    }

}
4.创建对应的控制器:
using AjaxDataInMVC.Map;

using AjaxDataInMVC.Models;

using AjaxDataInMVC.ViewModel;

using System;

using System.Collections.Generic;

using System.Linq;

using System.Web;

using System.Web.Mvc;

namespace AjaxDataInMVC.Controllers

{

    public class PublisherController : Controller

    {

        private MyDbContext context;

        public PublisherController()

        {

            context = new MyDbContext();
        //检测到循环引用可以加上这句

            context.Configuration.ProxyCreationEnabled = false;

        }

        // GET: Publisher

        public ActionResult Index()

        {

            List<Publisher> lstPublisher = context.Set<Publisher>().ToList();

            PublisherViewModel model = new PublisherViewModel();

            model.PublisherList = lstPublisher.Select(x => new SelectListItem()

            {

                Text = x.PublisherName,

                Value = x.PublisherID.ToString()

            });

            return View(model);

        }

    }

}
using AjaxDataInMVC.Map;

using AjaxDataInMVC.Models;

using System;

using System.Collections.Generic;

using System.Linq;

using System.Web;

using System.Web.Mvc;

namespace AjaxDataInMVC.Controllers

{

    public class BookController : Controller

    {

        private MyDbContext context;

        public BookController()

        {

            context = new MyDbContext();

            context.Configuration.ProxyCreationEnabled = false;

        }

        // GET: Book

        public ActionResult Index()

        {

            return View();

        }

        //直接返回布局页的方式:HTML

        public PartialViewResult GetBookDetailsByID(int id)

        {

            List<Book> lstBook = context.Set<Book>().Where(x => x.PublisherID.Equals(id)).ToList();

            return PartialView(lstBook);

        }

        //Json方式

        //public JsonResult GetBookDetailsByID(int id)

        //{

        //    List<Book> lstBook = context.Set<Book>().Where(x => x.PublisherID.Equals(id)).ToList();

        //    return Json(lstBook,JsonRequestBehavior.AllowGet);

        //}

    }

}
Publisher控制器的Index视图:
@model AjaxDataInMVC.ViewModel.PublisherViewModel

@{

    Layout = null;

}

<!DOCTYPE html>

<html>

<head>

    <meta name="viewport" content="width=device-width" />

    <script src="~/Scripts/jquery-1.10.2.js"></script>

    <title>Index</title>

</head>

<body>

    @*思路是:在当前页面,点击下拉框,加载分部视图*@

    <div>

        @Html.LabelFor(s=>s.PublisherID)

        @Html.DropDownListFor(s=>s.PublisherID,Model.PublisherList)

    </div>

    <div id="myDIV">

    </div>

    <script type="text/javascript">

        $(document).ready(function () {

            $("#PublisherID").change(function () {

                var id=$("#PublisherID").val();

                $.ajax({

                    url: "/Book/GetBookDetailsByID/" + id,

                    type: "get",

                    dataType: "html",

                    success: function (result) {

                        //html文本方式

                        $("#myDIV").html("");

                        $("#myDIV").html(result);

                        //二。Json方式

                        //$("#myDIV").html("");

                        //var myHTML = "<ul>";

                        //$.each(result, function (key, item) {

                        //    myHTML += "<li>编号:" + item.BookID + "</li>";

                        //    myHTML += "<li>标题:" + item.Title + "</li>";

                        //    myHTML += "<li>作者:" + item.Auther + "</li>";

                        //    myHTML += "<li>价格:" + item.Price + "</li>";

                        //    myHTML += "<li>时间:" + item.Year + "</li>";

                        //})

                        //myHTML +="</ul>"

                        //$("#myDIV").html(myHTML);

                    },

                    error:function(result){

                        alert(result.responseText);

                    }

                });

            });

        });

    </script>

</body>

</html>
Book控制器的分部视图GetBookDetailsByID:
@model IEnumerable<AjaxDataInMVC.Models.Book>

<table style="border:1px solid thin">

    <thead>

        <tr>

            <th>BookID</th>

            <th>Title</th>

            <th>Auther</th>

            <th>Price</th>

            <th>Year</th>

        </tr>

    </thead>

    <tbody>

        @foreach (var item in Model)

        {

            <tr>

                <td>@item.BookID</td>

                <td>@item.Title</td>

                <td>@item.Auther</td>

                <td>@item.Price</td>

                <td>@item.Year</td>

            </tr>

        }

    </tbody>

</table>
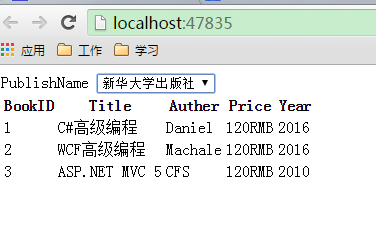
在数据库中写上测试数据,然后先运行一下:
选择:新华大学出版社,的时候,随即加载出了对应的数据。
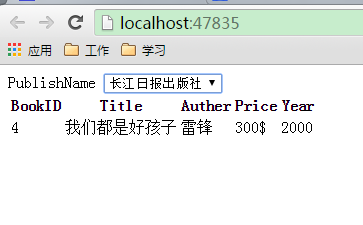
选择:长江日报出版社的时候,加载:
现在看看:使用Json方式加载吧:
修改一下Book控制器,和其相关的Publisher控制器的Index视图就可以:
using AjaxDataInMVC.Map;

using AjaxDataInMVC.Models;

using System;

using System.Collections.Generic;

using System.Linq;

using System.Web;

using System.Web.Mvc;

namespace AjaxDataInMVC.Controllers

{

    public class BookController : Controller

    {

        private MyDbContext context;

        public BookController()

        {

            context = new MyDbContext();

            context.Configuration.ProxyCreationEnabled = false;

        }

        // GET: Book

        public ActionResult Index()

        {

            return View();

        }

        ////直接返回布局页的方式:HTML

        //public PartialViewResult GetBookDetailsByID(int id)

        //{

        //    List<Book> lstBook = context.Set<Book>().Where(x => x.PublisherID.Equals(id)).ToList();

        //    return PartialView(lstBook);

        //}

        //Json方式

        public JsonResult GetBookDetailsByID(int id)

        {

            List<Book> lstBook = context.Set<Book>().Where(x => x.PublisherID.Equals(id)).ToList();

            return Json(lstBook,JsonRequestBehavior.AllowGet);

        }

    }

}
@model AjaxDataInMVC.ViewModel.PublisherViewModel

@{

    Layout = null;

}

<!DOCTYPE html>

<html>

<head>

    <meta name="viewport" content="width=device-width" />

    <script src="~/Scripts/jquery-1.10.2.js"></script>

    <title>Index</title>

</head>

<body>

    @*思路是:在当前页面,点击下拉框,加载分部视图*@

    <div>

        @Html.LabelFor(s=>s.PublisherID)

        @Html.DropDownListFor(s=>s.PublisherID,Model.PublisherList)

    </div>

    <div id="myDIV">

    </div>

    <script type="text/javascript">

        $(document).ready(function () {

            $("#PublisherID").change(function () {

                var id=$("#PublisherID").val();

                $.ajax({

                    url: "/Book/GetBookDetailsByID/" + id,

                    type: "get",

                    dataType: "json",

                    success: function (result) {

                        //1.html文本方式

                        //$("#myDIV").html("");

                        //$("#myDIV").html(result);

                        //二。Json方式

                        $("#myDIV").html("");

                        var myHTML = "<ul>";

                        $.each(result, function (key, item) {

                            myHTML += "<li>编号:" + item.BookID + "</li>";

                            myHTML += "<li>标题:" + item.Title + "</li>";

                            myHTML += "<li>作者:" + item.Auther + "</li>";

                            myHTML += "<li>价格:" + item.Price + "</li>";

                            myHTML += "<li>时间:" + item.Year + "</li>";

                        })

                        myHTML +="</ul>"

                        $("#myDIV").html(myHTML);

                    },

                    error:function(result){

                        alert(result.responseText);

                    }

                });

            });

        });

    </script>

</body>

</html>
接着运行:

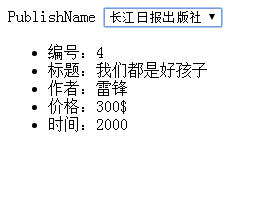
总结:这篇文章,完全为了复习巩固,另外在序列化Book实体,json 数据的时候,你可能会遇到这个错误:检测到循环依赖,因为我没有给Book实体新建一个ViewModel,这里可以这样解决:
 context.Configuration.ProxyCreationEnabled = false;
禁用代理。
另外,使用Json格式返回数据,很快,比直接用HTML文本加载视图快很多。
| Content Type | Header | Body | Total (Byte) |
| text/html | 434 | 375 | 809 |
| application/ json | 398 | 197 | 595 |

MVC学习系列6--使用Ajax加载分部视图和Json格式的数据的更多相关文章
- MVC学习七:Razor布局之加载分部视图【PartialView】
Partial View 顾名思义就是Html代码片段,应用于此HTML代码多次被页面加载时使用.(类似于WebForm程序中的用户控件) 注:PartialView和正常的View页面在访问时没有任 ...
- MVC5中,加载分部视图,常见的方式
首先,新建一个MVC类型的Web项目: 然后在Model文件夹下定义一个Student实体: public class Student { public int ID { get; set; } pu ...
- 【Spring源码深度解析学习系列】Bean的加载(六)
Bean的加载所涉及到的大致步骤: 1)转换对应beanName 为什么需要转换beanName呢?因为传入的参数可能是别名,也可能是FactoryBean,所以需要一系列的解析,这些解析内容包括如下 ...
- 基于layer封装的异步加载分部视图弹出层
背景:之前一直用的artdialog,但是样式不是很好看,后来偶然看到layer,觉得不错,但是对于.net mvc来说,不能像artdialog一样弹出分部视图是很难受的.所以下面的方法就解决了. ...
- MVC学习系列4--@helper辅助方法和用户自定义HTML方法
在HTML Helper,帮助类的帮助下,我们可以动态的创建HTML控件.HTML帮助类是在视图中,用来呈现HTML内容的.HTML帮助类是一个方法,它返回的是string类型的值. HTML帮助类, ...
- 使用jquery加载部分视图02-使用$.ajax()
本篇体验使用$.ajax()加载部分视图.与加载部分视图相关的包括: RenderPartial和RenderAction区别 使用jquery加载部分视图01-使用$.get() □ ...
- MVC Ajax Helper或jQuery异步方式加载部分视图
Model: namespace MvcApplication1.Models { public class Team { public string Preletter { get; set; } ...
- ASP.NET MVC学习系列(二)-WebAPI请求(转)
转自:http://www.cnblogs.com/babycool/p/3922738.html 继续接着上文 ASP.NET MVC学习系列(一)-WebAPI初探 来看看对于一般前台页面发起的g ...
- MVC学习系列——ModelBinder扩展
在MVC系统中,我们接受数据,运用的是ModelBinder 的技术. MVC学习系列——ActionResult扩展在这个系列中,我们自定义了XmlResult的返回结果. 那么是不是意味着能POS ...
随机推荐
- Repository 仓储,你的归宿究竟在哪?(一)-仓储的概念
写在前面 写这篇博文的灵感来自<如何开始DDD(完)>,很感谢young.han兄这几天的坚持,陆陆续续写了几篇有关于领域驱动设计的博文,让园中再次刮了一阵"DDD探讨风&quo ...
- 如何访问facebook (转)
对于普通大众,访问facebook需要两个条件:1)使用代理 2)翻译网页内容.本文将介绍怎样安全高速地访问诸如facebook之类的国外网站,并提供相关软件下载. 工具/原料 chromeGAE软件 ...
- android防止内存溢出浅析
Android的虚拟机是基于寄存器的Dalvik,它的最大堆大小一般是16M.但是Android采用的是Java语言编写,所以在很大程度上,Android的内存机制等同于Java的内存机制,在刚开始开 ...
- js构建ui的统一异常处理方案(三)
笔者之前分析了如何实现js的责任链异常处理的方法,通过promise这个异步模型,我们能够对同步方法和异步方法的两种情况,均可以实现责任链模式.有了这些武器,我们就可以开始设计ui的统一异常处理方案了 ...
- Spring-AOP实践 - 统计访问时间
公司的项目有的页面超级慢,20s以上,不知道用户会不会疯掉,于是老大说这个页面要性能优化.于是,首先就要搞清楚究竟是哪一步耗时太多. 我采用spring aop来统计各个阶段的用时,其中计时器工具为S ...
- Linux中读写权限
learn the auth of Linux. Generally, r-x w: write , modify and delete -2 r: read -4 x: execute ...
- Linux日志定时清理
linux是一个很能自动产生文件的系统,日志.邮件.备份等.虽然现在硬盘廉价,我们可以有很多硬盘空间供这些文件浪费,让系统定时清理一些不需要的文件很有一种爽快的事情.不用你去每天惦记着是否需要清理日志 ...
- HTML label标签的一点理解
label标签为input元素定义标注. label元素不呈现任何特殊效果.不过他为鼠标用户改进了可用性.如果你在label元素内点击文本就会触发此控件.就是说当用户选择该标签是,浏览器就会自动的将焦 ...
- CSS清除浮动
今天看到一篇文章关于清除浮动的,突然间脑袋短路了,咦?为什么要清除浮动?原谅我的无知,搜了下原来是这样,又倒腾出原来的笔记,唉,本来就有记录啊,而且也会经常用到,用的久了连原理都忘了.恩,防止自己再犯 ...
- Win 10 UWP开发系列:设置AppBarButton的图标
在WP8以前,页面最下面的四个小圆按钮是不支持绑定的,WP8.1 RT之后,系统按钮升级成了AppBarButton,并且支持绑定了.在Win10 UWP开发中,按钮的样式发生了变化,外面的圆圈没有了 ...