2.2_springboot2.x消息RabbitMQ整合&amqpAdmin管理组件的使用
5.1.1、基本测试
1.引 spring-boot-starter-amqp**
 <dependencies>

        <dependency>

            <groupId>org.springframework.boot</groupId>

            <artifactId>spring-boot-starter-amqp</artifactId>

        </dependency>

        <dependency>

            <groupId>org.springframework.boot</groupId>

            <artifactId>spring-boot-starter-web</artifactId>

        </dependency>

        <dependency>

            <groupId>org.springframework.boot</groupId>

            <artifactId>spring-boot-starter-test</artifactId>

            <scope>test</scope>

        </dependency>

        <dependency>

            <groupId>org.springframework.amqp</groupId>

            <artifactId>spring-rabbit-test</artifactId>

            <scope>test</scope>

        </dependency>

    </dependencies>
自动配置原理说明 RabbitAutoConfiguration
1、有自动配置了连接工厂CachingConnectionFactory;获取与rabbitmq连接信息
@Configuration

@ConditionalOnClass({ RabbitTemplate.class, Channel.class })

@EnableConfigurationProperties(RabbitProperties.class)

@Import(RabbitAnnotationDrivenConfiguration.class)

public class RabbitAutoConfiguration {

	@Configuration

	@ConditionalOnMissingBean(ConnectionFactory.class)

	protected static class RabbitConnectionFactoryCreator {

		@Bean

		public CachingConnectionFactory rabbitConnectionFactory(RabbitProperties properties,

				ObjectProvider<ConnectionNameStrategy> connectionNameStrategy) throws Exception {

           ...

        }

        ...
2、RabbitProperties封装了 RabbitMQ的配置
@ConfigurationProperties(prefix = "spring.rabbitmq")

public class RabbitProperties {

	/**

	 * RabbitMQ host.

	 */

	private String host = "localhost";

	/**

	 * RabbitMQ port.

	 */

	private int port = 5672;

    ....
application.yml配置
spring:

  rabbitmq:

    host: xxx.xxx.xxx.xxx

    username: guest

    password: guest

    port: 5672
3、RabbitTemplate:给RabbitMQ发送和接收消息
@Configuration

@ConditionalOnClass({ RabbitTemplate.class, Channel.class })

@EnableConfigurationProperties(RabbitProperties.class)

@Import(RabbitAnnotationDrivenConfiguration.class)

public class RabbitAutoConfiguration {

    ....

	@Configuration

	@Import(RabbitConnectionFactoryCreator.class)

	protected static class RabbitTemplateConfiguration {

		private final RabbitProperties properties;

		private final ObjectProvider<MessageConverter> messageConverter;

		private final ObjectProvider<RabbitRetryTemplateCustomizer> retryTemplateCustomizers;

		public RabbitTemplateConfiguration(RabbitProperties properties,

				ObjectProvider<MessageConverter> messageConverter,

				ObjectProvider<RabbitRetryTemplateCustomizer> retryTemplateCustomizers) {

			this.properties = properties;

			this.messageConverter = messageConverter;

			this.retryTemplateCustomizers = retryTemplateCustomizers;

		}

		@Bean

		@ConditionalOnSingleCandidate(ConnectionFactory.class)

		@ConditionalOnMissingBean(RabbitOperations.class)

		public RabbitTemplate rabbitTemplate(ConnectionFactory connectionFactory) {

			PropertyMapper map = PropertyMapper.get();

			RabbitTemplate template = new RabbitTemplate(connectionFactory);

			MessageConverter messageConverter = this.messageConverter.getIfUnique();

			if (messageConverter != null) {

				template.setMessageConverter(messageConverter);

			}

			template.setMandatory(determineMandatoryFlag());

			RabbitProperties.Template properties = this.properties.getTemplate();

			if (properties.getRetry().isEnabled()) {

				template.setRetryTemplate(new RetryTemplateFactory(

						this.retryTemplateCustomizers.orderedStream().collect(Collectors.toList())).createRetryTemplate(

								properties.getRetry(), RabbitRetryTemplateCustomizer.Target.SENDER));

			}

			map.from(properties::getReceiveTimeout).whenNonNull().as(Duration::toMillis)

					.to(template::setReceiveTimeout);

			map.from(properties::getReplyTimeout).whenNonNull().as(Duration::toMillis).to(template::setReplyTimeout);

			map.from(properties::getExchange).to(template::setExchange);

			map.from(properties::getRoutingKey).to(template::setRoutingKey);

			map.from(properties::getDefaultReceiveQueue).whenNonNull().to(template::setDefaultReceiveQueue);

			return template;

		}

}
4、AmqpAdmin:RabbitMQ系统管理组件,用来声明队列,交换器等 , 当没有在网页端自己创建queue、exchange、Binding时可采用 AmqpAdmin:创建和删除queue、exchange、Binding
@Configuration

@ConditionalOnClass({ RabbitTemplate.class, Channel.class })

@EnableConfigurationProperties(RabbitProperties.class)

@Import(RabbitAnnotationDrivenConfiguration.class)

public class RabbitAutoConfiguration {

    ...

        @Bean

		@ConditionalOnSingleCandidate(ConnectionFactory.class)

		@ConditionalOnProperty(prefix = "spring.rabbitmq", name = "dynamic", matchIfMissing = true)

		@ConditionalOnMissingBean

		public AmqpAdmin amqpAdmin(ConnectionFactory connectionFactory) {

			return new RabbitAdmin(connectionFactory);

		}

}
2.测试RabbitMQ
1)单波-点对点
@RunWith(SpringRunner.class)

@SpringBootTest

public class Springboot02AmqpApplicationTests {

    @Autowired

    RabbitTemplate rabbitTemplate;

      @Test

    public void contextLoads() {

        //message需要自己定义,定义一个消息体内容

        //rabbitTemplate.send(exchage,routeKey,message);

        //常用的convertAndSend,消息体会自动转换,object:默认当成消息体,只要传入要发送的对象,自动序列化Babbitmq

        //rabbitTemplate.convertAndSend(exchange,routeKey,object);

        Map<String,Object> maps = new HashMap<String,Object>();

        maps.put("msg","这是一个消息");

        maps.put("data", Arrays.asList("helloworld",123,true));

        //对象被默认序列化以后发送出去(jdk)

        rabbitTemplate.convertAndSend("exchange.direct","jatpeo.news",new Book("西游记","吴承恩"));

    }

    //接收数据,如何将数据自动转为json发送出去?

    @Test

    public void receive(){

        Object o = rabbitTemplate.receiveAndConvert("jatpeo.news");

        System.out.println(o.getClass());

        System.out.println(o);

    }
常用的convertAndSend,消息体会自动转换,object:默认当成消息体,只要传入要发送的对象,自动序列化Babbitmq,对象被默认序列化以后发送出去(jdk)
源码分析:
public class RabbitTemplate extends RabbitAccessor // NOSONAR type line count

		implements BeanFactoryAware, RabbitOperations, MessageListener,

			ListenerContainerAware, PublisherCallbackChannel.Listener, Lifecycle, BeanNameAware {

                	private MessageConverter messageConverter = new SimpleMessageConverter();
调用SimpleMessageConverter
public class SimpleMessageConverter extends WhiteListDeserializingMessageConverter implements BeanClassLoaderAware {

      content = new String(message.getBody(), encoding);

                } catch (UnsupportedEncodingException var8) {

                    throw new MessageConversionException("failed to convert text-based Message content", var8);

                }

            } else if (contentType != null && contentType.equals("application/x-java-serialized-object")) {

                try {

                    content = SerializationUtils.deserialize(this.createObjectInputStream(new ByteArrayInputStream(message.getBody()), this.codebaseUrl));

                } catch (IllegalArgumentException | IllegalStateException | IOException var7) {

                    throw new MessageConversionException("failed to convert serialized Message content", var7);

                }

            }

}
自定义MessageConvert
新建MyAMQPConfig
@EnableRabbit//开启基于注解的RabbitMQ

@Configuration

public class MyAMQPConfig {

    @Bean

    public MessageConverter messageConverter(){

        return new Jackson2JsonMessageConverter();

    }

}
2)广播
@RunWith(SpringRunner.class)

@SpringBootTest

public class Springboot02AmqpApplicationTests {

    @Autowired

    RabbitTemplate rabbitTemplate;

     /**

     * 2、广播

     *

     * 广播路由键无所谓

     * */

    @Test

    public void Test(){

        rabbitTemplate.convertAndSend("exchange.fanout","",new Book("红楼梦","曹雪芹"));

    }
[外链图片转存失败,源站可能有防盗链机制,建议将图片保存下来直接上传(img-TNAhBooF-1571057027287)(C:\Users\Administrator\AppData\Roaming\Typora\typora-user-images\1571056120180.png)]
5.1.2、@RabbitListener和@EnableRabbit
@EnableRabbit + @RabbitListener 监听消息队列的内容
@RabbitListener:监听队列
@EnableRabbit:开启基于注解的RabbitMq
@Service

public class BookService {

    //只要这个消息队列收到消息就打印消息,要让此注解生效要在配置类中开启注解@EnableRabbit

    @RabbitListener(queues = "jatpeo.news")

    public void receive(Book book){

        System.out.println("收到消息。。。打印");

    }

    @RabbitListener(queues = "jatpeo")

    public void receive02(Message message){

        System.out.println(message.getBody());

        System.out.println(message.getMessageProperties());

    }

}
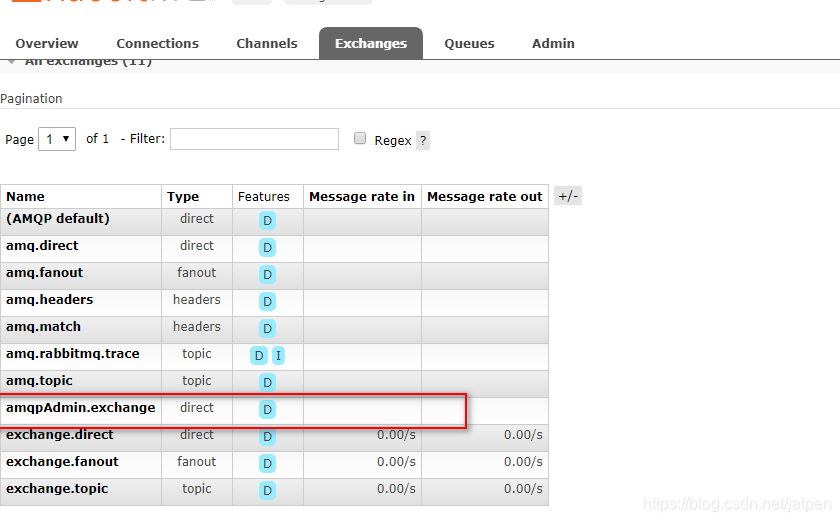
5.1.3、AmqpAdmin:RabbitMQ
AmqpAdmin:RabbitMQ系统管理组件,用来声明队列,交换器等
当没有在网页端自己创建queue、exchange、Binding时可采用* AmqpAdmin:创建和删除queue、exchange、Binding
注入AmqpAdmin
@RunWith(SpringRunner.class)

@SpringBootTest

public class Springboot02AmqpApplicationTests {

    @Autowired

    RabbitTemplate rabbitTemplate;

    @Autowired

    AmqpAdmin amqpAdmin;

    @Test

    public void createExchange(){

        //创建DirectExchange

       /* amqpAdmin.declareExchange(new DirectExchange("amqpAdmin.exchange"));

        System.out.println("创建完成");*/

        //创建队列

       //amqpAdmin.declareQueue(new Queue("amqpAdmin.queue",true));

        //创建绑定规则

        amqpAdmin.declareBinding(new Binding("amqpAdmin.queue", Binding.DestinationType.QUEUE,

                "amqpAdmin.exchange","amqpAdmin.haha",null));

    }
网页端查看:
等。
2.2_springboot2.x消息RabbitMQ整合&amqpAdmin管理组件的使用的更多相关文章
- SpringBoot消息篇Ⅲ --- 整合RabbitMQ
知识储备: 关于消息队列的基本概念我已经在上一篇文章介绍过了(传送门),本篇文章主要讲述的是SpringBoot与RabbitMQ的整合以及简单的使用. 一.安装RabbitMQ 1.在linux上 ...
- java框架之SpringBoot(12)-消息及整合RabbitMQ
前言 概述 大多数应用中,可通过消息服务中间件来提升系统异步通信.扩展解耦的能力. 消息服务中两个重要概念:消息代理(message broker)和目的地(destination).当消息发送者发送 ...
- springboot核心技术(五)-----消息(rabbitmq)
消息 1. 大多应用中,可通过消息服务中间件来提升系统异步通信.扩展解耦能力 2. 消息服务中两个重要概念: 消息代理(message broker)和目的地(destination) 当消息发送者发 ...
- SpringBoot日记——MQ消息队列整合(一)
除了之前讲到的缓存,我们还会用到消息队列来存储一些消息,为了提升系统的异步性能等等: 消息服务有两个概念需要知道:消息代理-message broker,目的地-destination.消息发送由代理 ...
- SpringBoot与消息(RabbitMQ)
1. JMS和AMQP JMS(Java Message Service): ActiveMQ是JMS实现; AMQP(Advanced Message Queuing Protocol) 兼容JMS ...
- rabbitmq之后台管理和用户设置(三)
前言 前面介绍了erlang环境的安装和rabbitmq环境安装,接下来介绍rabbitmq的web管理和用户设置. 启用后台管理插件 通过后台管理插件我们可以动态监控mq的流量,创建用户,队列等. ...
- RabbitMQ交换机、RabbitMQ整合springCloud
目标 1.交换机 2.RabbitMQ整合springCloud 交换机 蓝色区域===生产者 红色区域===Server:又称Broker,接受客户端的连接,实现AMQP实体服务 绿色区域===消费 ...
- 消息中间件——RabbitMQ(十)RabbitMQ整合SpringBoot实战!(全)
前言 1. SpringBoot整合配置详解 publisher-confirms,实现一个监听器用于监听Broker端给我们返回的确认请求:RabbitTemplate.ConfirmCallbac ...
- Rabbitmq与spring整合之重要组件介绍——AMQP声明式配置&RabbitTemplate组件
上一节是使用rabbitAdmin的管理组件进行声明队列,交换器,绑定等操作,本节则是采用AMQP声明式配置来声明这些东西.AMQP声明主要是通过@Bean注解进行的. 配置: package com ...
随机推荐
- bzoj1211树的计数 x bzoj1005明明的烦恼 题解(Prufer序列)
1211: [HNOI2004]树的计数 Time Limit: 10 Sec Memory Limit: 162 MBSubmit: 3432 Solved: 1295[Submit][Stat ...
- Spring Boot下启用https
1.需要一个证书,可以自己生成或者购买.下面是我们通过keytool自己生成. 打开运行,输入cmd,进入命令行 输入生成命令: keytool -genkey -alias tomcat -stor ...
- 【二叉树】二叉树常用算法的C++实现
常见算法有: 1.求二叉树的最大深度 2.求二叉树的最小深度 3.二叉树的层次遍历 4.二叉树的前序遍历 5.二叉树的中序遍历 6.二叉树的后序遍历 7.求二叉树的节点个数 8.求二叉树的叶节点个数 ...
- linux学习的任督二脉-进程调度和内存管理
转自 宋宝华老师的博客原文:https://blog.csdn.net/21cnbao/article/details/77505330 内功心法 学习或遇到问题时,反过来主动思考如果我是设计者,我会 ...
- Hadoop 基础知识
Hadoop 数据是存储在HDFS, Mapreduce 是一种计算框架,负责计算处理. HDFS上的数据存储默认是本地节点数据一份,同一机架不同节点一份,不同机架不同节点一份.默认是存储3份 HDF ...
- JDK8新特性之Optional
Optional是什么 java.util.Optional Jdk8提供Optional,一个可以包含null值的容器对象,可以用来代替xx != null的判断. Optional常用方法 of ...
- C# WinForm 访问webService天气预报
1.直接添加服务引用 右键引用 -->添加服务引用 这样的好处是可以直接当成类用 简单 麻烦的地方就是地址是死的 代码如下: private void button1_Click(object ...
- Win10下安装erl和RabbitMQ踩坑【版本不兼容】
版本不兼容 erl:otp_win64_21.0.1.exe rabbitmq:rabbitmq-server-3.8.1.exe(2019.12.06时最新版) 根据官方文档的匹配表:https:/ ...
- 使用cpanel后台的“时钟守护作业”功能完成空间的定时全备份
现在不少虚拟主机都是使用的cpanel控制面板,由于空间商选用的cpanel版本不同,有的带有定时备份功能,而有的就没有这项功能,需要手动备份.不过,还在绝大部分的cpanel后台都有“时钟守护作业” ...
- JavaScript深浅拷贝区别
分享一篇自己关注的微信订阅号(前端大全)文章:JavaScript浅拷贝与深拷贝 作者:浪里行舟 https://github.com/ljianshu/Blog/issues/5 这里很详细的讲解了 ...