【Redis】Redis的基本安装及使用、Jedis的基本使用、spring-data-redis的集成、主从模式、哨兵模式
在Linux上安装Redis
Redis的安装很简单。基本上是下载、解压、运行安装脚本。我用的Redis版本是3.2.1。
[nicchagil@localhost app]$ wget -q http://download.redis.io/releases/redis-3.2.1.tar.gz

[nicchagil@localhost app]$

[nicchagil@localhost app]$ ll redis-3.2.1.tar.gz

-rw-r--r--. 1 nicchagil nicchagilg 1534696 Jun 20 08:13 redis-3.2.1.tar.gz

[nicchagil@localhost app]$

[nicchagil@localhost app]$ tar -xzf redis-3.2.1.tar.gz

[nicchagil@localhost app]$

[nicchagil@localhost app]$ cd ./redis-3.2.1

[nicchagil@localhost redis-3.2.1]$

[nicchagil@localhost redis-3.2.1]$ make
启动服务器
运行src目录下的redis-server即可启动Redis。
[nicchagil@localhost redis-3.2.1]$ src/redis-server

11713:C 06 Aug 03:13:09.795 # Warning: no config file specified, using the default config. In order to specify a config file use src/redis-server /path/to/redis.conf

11713:M 06 Aug 03:13:09.803 * Increased maximum number of open files to 10032 (it was originally set to 1024).

                _._

           _.-``__ ''-._

      _.-``    `.  `_.  ''-._           Redis 3.2.1 (00000000/0) 64 bit

  .-`` .-```.  ```\/    _.,_ ''-._

 (    '      ,       .-`  | `,    )     Running in standalone mode

 |`-._`-...-` __...-.``-._|'` _.-'|     Port: 6379

 |    `-._   `._    /     _.-'    |     PID: 11713

  `-._    `-._  `-./  _.-'    _.-'

 |`-._`-._    `-.__.-'    _.-'_.-'|

 |    `-._`-._        _.-'_.-'    |           http://redis.io

  `-._    `-._`-.__.-'_.-'    _.-'

 |`-._`-._    `-.__.-'    _.-'_.-'|

 |    `-._`-._        _.-'_.-'    |

  `-._    `-._`-.__.-'_.-'    _.-'

      `-._    `-.__.-'    _.-'

          `-._        _.-'

              `-.__.-'

11713:M 06 Aug 03:13:09.842 # WARNING: The TCP backlog setting of 511 cannot be enforced because /proc/sys/net/core/somaxconn is set to the lower value of 128.

11713:M 06 Aug 03:13:09.842 # Server started, Redis version 3.2.1

11713:M 06 Aug 03:13:09.845 # WARNING overcommit_memory is set to 0! Background save may fail under low memory condition. To fix this issue add 'vm.overcommit_memory = 1' to /etc/sysctl.conf and then reboot or run the command 'sysctl vm.overcommit_memory=1' for this to take effect.

11713:M 06 Aug 03:13:09.851 # WARNING you have Transparent Huge Pages (THP) support enabled in your kernel. This will create latency and memory usage issues with Redis. To fix this issue run the command 'echo never > /sys/kernel/mm/transparent_hugepage/enabled' as root, and add it to your /etc/rc.local in order to retain the setting after a reboot. Redis must be restarted after THP is disabled.

11713:M 06 Aug 03:13:09.852 * The server is now ready to accept connections on port 6379
从日志上大概上看出Redis已启动,并监听6379端口。
指定配置文件启动
我们也可以指定配置文件启动,比如使用安装后自带的配置:
[nicchagil@localhost redis-3.2.1]$ src/redis-server redis.conf
其配置默认如下,并在后面简述其作用:
[root@blog ~]# grep -v "^#" /third_package/redis-3.2.1/redis.conf | grep -v "^$"

bind 127.0.0.1 # 允许客户端连接的IP,任何IP都能连接配置0.0.0.0

protected-mode yes # 保护模式

port 6379 # 监听端口

tcp-backlog 511 # TCP监听的最大容纳数量,高并发下,Linux有可能调整此值为/proc/sys/net/core/somaxconn一致,请调整此二者的值

timeout 0 # 客户端空闲多久才关闭连接,设置0则不断开

tcp-keepalive 300 # TCP心跳,默认建议设为300

daemonize no # 是否以守护进程运行

supervised no

pidfile /var/run/redis_6379.pid # 以守护进程运行时,此文件记录进程ID

loglevel notice # 日志级别,debug/verbose/notice/warning,生产环境推荐用notice

logfile "" # 日志文件,空字符串表示标准输出,请注意,当以守护进程模式运行标准输出至/dev/null

databases 16 # 数据库数量

save 900 1 # 如果900秒内有1个key变化,则保存快照

save 300 10 # 如果300秒内有10个key变化,则保存快照

save 60 10000 # 如果60秒内有10000个key变化,则保存快照

stop-writes-on-bgsave-error yes # 如果后台保存快照出现错误,是否停止接收写操作

rdbcompression yes # 保存快照是否压缩,压缩则写入操作效率低点但数据文件小点嘛,反之写入操作块但文件大嘛

rdbchecksum yes # 是否校验快照

dbfilename dump.rdb # 快照文件

dir ./ # 快照文件和追加文件所在

slave-serve-stale-data yes # 当slave和master失联或正在复制时,slave的数据可能过时,是否返回数据

slave-read-only yes # slave是否只读

repl-diskless-sync no #

repl-diskless-sync-delay 5

repl-disable-tcp-nodelay no

slave-priority 100 # 当master不能正常工作时,哨兵从slave中选出新的master,优先级越小越优先

appendonly no # 是否开启追加持久化

appendfilename "appendonly.aof" # 追加文件

appendfsync everysec # 追加同步频率

no-appendfsync-on-rewrite no # 追加同步时是否压缩

auto-aof-rewrite-percentage 100 # 多久进行一次压缩

auto-aof-rewrite-min-size 64mb #

aof-load-truncated yes

lua-time-limit 5000

slowlog-log-slower-than 10000

slowlog-max-len 128

latency-monitor-threshold 0

notify-keyspace-events ""

hash-max-ziplist-entries 512

hash-max-ziplist-value 64

list-max-ziplist-size -2

list-compress-depth 0

set-max-intset-entries 512

zset-max-ziplist-entries 128

zset-max-ziplist-value 64

hll-sparse-max-bytes 3000

activerehashing yes

client-output-buffer-limit normal 0 0 0

client-output-buffer-limit slave 256mb 64mb 60

client-output-buffer-limit pubsub 32mb 8mb 60

hz 10

aof-rewrite-incremental-fsync yes
默认的redis.conf有几个默认的配置设置只允许本地客户端访问(如果你从其他机器访问,记得修改下哦):
- 只允许本机客户端连接
- 使用保护模式
bind 127.0.0.1

......

protected-mode yes
如果你想从其他机器访问,可改成具体IPbind xx.xx.xx.xx,如任何IP都可访问,则bind 0.0.0.0。
使用本地客户端连接Redis
切换另外一个会话,运行src目录下的redis-cli即可使用本地客户端连接Redis,并测试一下基本的get命令。
[nicchagil@localhost redis-3.2.1]$ src/redis-cli

127.0.0.1:6379> get some-key

(nil)

127.0.0.1:6379>
使用非本地客户端连接Redis
在此使用Java的Jeids。
为什么?只是因为公司用这个,我需要熟悉,哈哈。
引入相关包:
<dependency>

    <groupId>redis.clients</groupId>

	<artifactId>jedis</artifactId>

	<version>2.8.2</version>

</dependency>
最简单的连接程序:
package com.nicchagil.study.jedis;

import redis.clients.jedis.Jedis;

public class HowToTest {

	public static void main(String[] args) {

		Jedis jedis = null;

		try {

			jedis = new Jedis("192.168.1.9", 6379);

			jedis.set("myname", "Nick Huang");

			String rs = jedis.get("myname");

			System.out.println(rs);

		} finally {

			if (jedis != null) {

				jedis.close();

			}

		}

	}

}
关于“非本地客户端连接Redis”常见问题
Redis运行在保护模式,这是默认的启动方式,提示里已经教我们如何处理了。
DENIED Redis is running in protected mode because protected mode is enabled, no bind address was specified, no authentication password is requested to clients. In this mode connections are only accepted from the loopback interface. If you want to connect from external computers to Redis you may adopt one of the following solutions: 1) Just disable protected mode sending the command 'CONFIG SET protected-mode no' from the loopback interface by connecting to Redis from the same host the server is running, however MAKE SURE Redis is not publicly accessible from internet if you do so. Use CONFIG REWRITE to make this change permanent. 2) Alternatively you can just disable the protected mode by editing the Redis configuration file, and setting the protected mode option to 'no', and then restarting the server. 3) If you started the server manually just for testing, restart it with the '--protected-mode no' option. 4) Setup a bind address or an authentication password. NOTE: You only need to do one of the above things in order for the server to start accepting connections from the outside.
我们可以把保护模式关掉:
[root@localhost ~]# /usr/local/redis-3.2.8/src/redis-cli

127.0.0.1:6379>

127.0.0.1:6379>

127.0.0.1:6379> config set protected-mode "no"
如果不能连接,记得检查下是否Linux的防火墙拦截了。测试阶段,最简单的方式就是把防火墙关闭。
[root@localhost ~]# service iptables stop

iptables: Setting chains to policy ACCEPT: filter          [  OK  ]

iptables: Flushing firewall rules:                         [  OK  ]

iptables: Unloading modules:                               [  OK  ]
Jedis连接池的简单配置
Jedis自带有连接池,是在GenericObjectPoolConfig的基础上实现的。
具体的配置可以参考这篇博文:Jedis2.4.2链接池配置注释
简单的使用JedisPool:
package com.nicchagil.study.jedis;

import redis.clients.jedis.Jedis;

import redis.clients.jedis.JedisPool;

import redis.clients.jedis.JedisPoolConfig;

public class JedisPoolUtils {

	public static JedisPoolConfig c = new JedisPoolConfig(); // 连接池配置

	public static JedisPool jedisPool = null; // 连接池

	static {

		c.setBlockWhenExhausted(true); // 连接耗尽则阻塞

		c.setLifo(true); // 后进先出

		c.setMaxIdle(10); // 最大空闲连接数为10

		c.setMinIdle(0); // 最小空闲连接数为0

		c.setMaxTotal(20); // 最大连接数为20

		c.setMaxWaitMillis(-1); // 设置最大等待毫秒数:无限制

		c.setMinEvictableIdleTimeMillis(1800000); // 逐出连接的最小空闲时间:30分钟

		c.setTestOnBorrow(true); // 获取连接时是否检查连接的有效性:是

		c.setTestWhileIdle(true); // 空闲时是否检查连接的有效性:是

		jedisPool = new JedisPool(c, "192.168.1.9", 6379); // 初始化连接池

	}

	/**

	 * 获取Jedis连接

	 * @return Jedis连接

	 */

	public static Jedis getJedis() {

		return jedisPool.getResource();

	}

	public static void main(String[] args) {

		/* 操作Redis */

		Jedis jedis = null;

		try {

			jedis = JedisPoolUtils.getJedis();

			jedis.set("myname", "Nick Huang");

			String rs = jedis.get("myname");

			System.out.println(rs);

		} finally {

			if (jedis != null) {

				jedis.close();

			}

		}

	}

}
用spring-data-redis集成jedis连接redis
引入相关包:
<dependency>

    <groupId>org.springframework.data</groupId>

	<artifactId>spring-data-redis</artifactId>

	<version>1.7.10.RELEASE</version>

</dependency>

<dependency>

	<groupId>redis.clients</groupId>

	<artifactId>jedis</artifactId>

	<version>2.8.2</version>

</dependency>

<dependency>

	<groupId>org.slf4j</groupId>

	<artifactId>slf4j-log4j12</artifactId>

	<version>1.7.25</version>

</dependency>

<dependency>

	<groupId>junit</groupId>

	<artifactId>junit</artifactId>

	<version>4.11</version>

</dependency>
配置连接池、连接工厂、操作模板:
<?xml version="1.0" encoding="UTF-8"?>

<beans xmlns="http://www.springframework.org/schema/beans"

    xmlns:xsi="http://www.w3.org/2001/XMLSchema-instance" xmlns:context="http://www.springframework.org/schema/context"

	xmlns:jms="http://www.springframework.org/schema/jms" xmlns:p="http://www.springframework.org/schema/p"

	xsi:schemaLocation="http://www.springframework.org/schema/beans http://www.springframework.org/schema/beans/spring-beans.xsd

    http://www.springframework.org/schema/context http://www.springframework.org/schema/context/spring-context.xsd

    http://www.springframework.org/schema/beans http://www.springframework.org/schema/beans/spring-beans.xsd

    http://www.springframework.org/schema/jms http://www.springframework.org/schema/jms/spring-jms.xsd">

	<!-- Spring扫描组件的路径 -->

	<context:component-scan base-package="com.nicchagil" />

	<!-- 连接池 -->

	<bean id="poolConfig" class="redis.clients.jedis.JedisPoolConfig">

		<property name="maxTotal" value="20"></property>

		<property name="maxIdle" value="10"></property>

		<property name="minIdle" value="0"></property>

		<property name="maxWaitMillis" value="-1"></property>

		<property name="minEvictableIdleTimeMillis" value="1800000"></property>

		<property name="numTestsPerEvictionRun" value="3"></property>

		<property name="timeBetweenEvictionRunsMillis" value="60000"></property>

		<property name="testOnBorrow" value="true"></property>

		<property name="testOnReturn" value="true"></property>

		<property name="testWhileIdle" value="true"></property>

	</bean>

	<!-- 连接工厂 -->

	<bean id="connectionFactory"

		class="org.springframework.data.redis.connection.jedis.JedisConnectionFactory"

		p:host-name="192.168.1.101" p:port="6379" p:password=""

		p:pool-config-ref="poolConfig" />

	<!-- String模板 -->

	<bean id="stringRedisTemplate" class="org.springframework.data.redis.core.StringRedisTemplate">

		<property name="connectionFactory" ref="connectionFactory" />

		<!-- 默认序列器是如下配置,看StringRedisTemplate源码可知 -->

		<!--

		<property name="KeySerializer" ref="stringRedisSerializer" />

		<property name="ValueSerializer" ref="stringRedisSerializer" />

		 -->

	</bean>

	<!-- 通用模板 -->

	<bean id="redisTemplate" class="org.springframework.data.redis.core.RedisTemplate">

		<property name="connectionFactory" ref="connectionFactory" />

		<!-- 默认序列器是如下配置,看RedisTemplate源码可知 -->

		<!--

		<property name="KeySerializer" ref="jdkSerializationRedisSerializer" />

		<property name="ValueSerializer" ref="jdkSerializationRedisSerializer" />

		 -->

	</bean>

	<!-- 各种序列器 -->

	<bean id="stringRedisSerializer" class="org.springframework.data.redis.serializer.StringRedisSerializer" />

	<bean id="jdkSerializationRedisSerializer" class="org.springframework.data.redis.serializer.JdkSerializationRedisSerializer" />

</beans>
实体类:
package com.nicchagil.entity;

import java.io.Serializable;

public class User implements Serializable {

	private static final long serialVersionUID = -5490973977018492996L;

	private Integer id;

	private String name;

	public Integer getId() {

		return id;

	}

	public void setId(Integer id) {

		this.id = id;

	}

	public String getName() {

		return name;

	}

	public void setName(String name) {

		this.name = name;

	}

	@Override

	public String toString() {

		return "User [id=" + id + ", name=" + name + "]";

	}

	public User() {

		super();

	}

}
操作String的Dao:
package com.nicchagil.redis.dao;

import org.springframework.beans.factory.annotation.Autowired;

import org.springframework.data.redis.core.StringRedisTemplate;

import org.springframework.stereotype.Repository;

@Repository

public class StringDao {

	@Autowired

	private StringRedisTemplate stringRedisTemplate;

	public void put(final String key, final String value) {

		this.stringRedisTemplate.opsForValue().set(key, value);

	}

	public String get(final String key) {

		return this.stringRedisTemplate.opsForValue().get(key);

	}

	public Long increment(final String key, final Long l) {

		return this.stringRedisTemplate.opsForValue().increment(key, l);

	}

}
操作String的测试类:
package com.nicchagil;

import java.io.IOException;

import org.springframework.context.support.ClassPathXmlApplicationContext;

import com.nicchagil.redis.dao.StringDao;

public class HowToUseStringDao {

    public static void main(String[] args) throws IOException {

		try (ClassPathXmlApplicationContext context = new ClassPathXmlApplicationContext(new String[] {"spring-redis.xml"})) {

			StringDao stringDao = context.getBean("stringRedisService", StringDao.class);

			stringDao.put("chinese", "中文");

		}

	}

}
操作User的Dao:
package com.nicchagil.redis.dao;

import org.springframework.beans.factory.annotation.Autowired;

import org.springframework.data.redis.core.RedisTemplate;

import org.springframework.stereotype.Repository;

import com.nicchagil.entity.User;

@Repository

public class UserRedisDao {

	@Autowired

	private RedisTemplate<Object, User> redisTemplate;

	public void put(final Object key, final User value) {

		this.redisTemplate.opsForValue().set(key, value);

	}

	public User get(final Object key) {

		return this.redisTemplate.opsForValue().get(key);

	}

}
操作User的测试类:
package com.nicchagil;

import java.io.IOException;

import org.junit.Test;

import org.springframework.context.support.ClassPathXmlApplicationContext;

import com.nicchagil.entity.User;

import com.nicchagil.redis.dao.UserRedisDao;

public class HowToUseUserDao {

    public static void main(String[] args) throws IOException {

	}

	@Test

	public void put() {

		try (ClassPathXmlApplicationContext context = new ClassPathXmlApplicationContext(new String[] {"spring-redis.xml"})) {

			UserRedisDao userRedisDao = context.getBean("userRedisDao", UserRedisDao.class);

			User user = new User();

			user.setId(5);

			user.setName("Nick Huang");

			userRedisDao.put("user_" + user.getId(), user);

		}

	}

	@Test

	public void get() {

		try (ClassPathXmlApplicationContext context = new ClassPathXmlApplicationContext(new String[] {"spring-redis.xml"})) {

			UserRedisDao userRedisDao = context.getBean("userRedisDao", UserRedisDao.class);

			User user = userRedisDao.get("user_5");

			System.out.println(user);

		}

	}

}
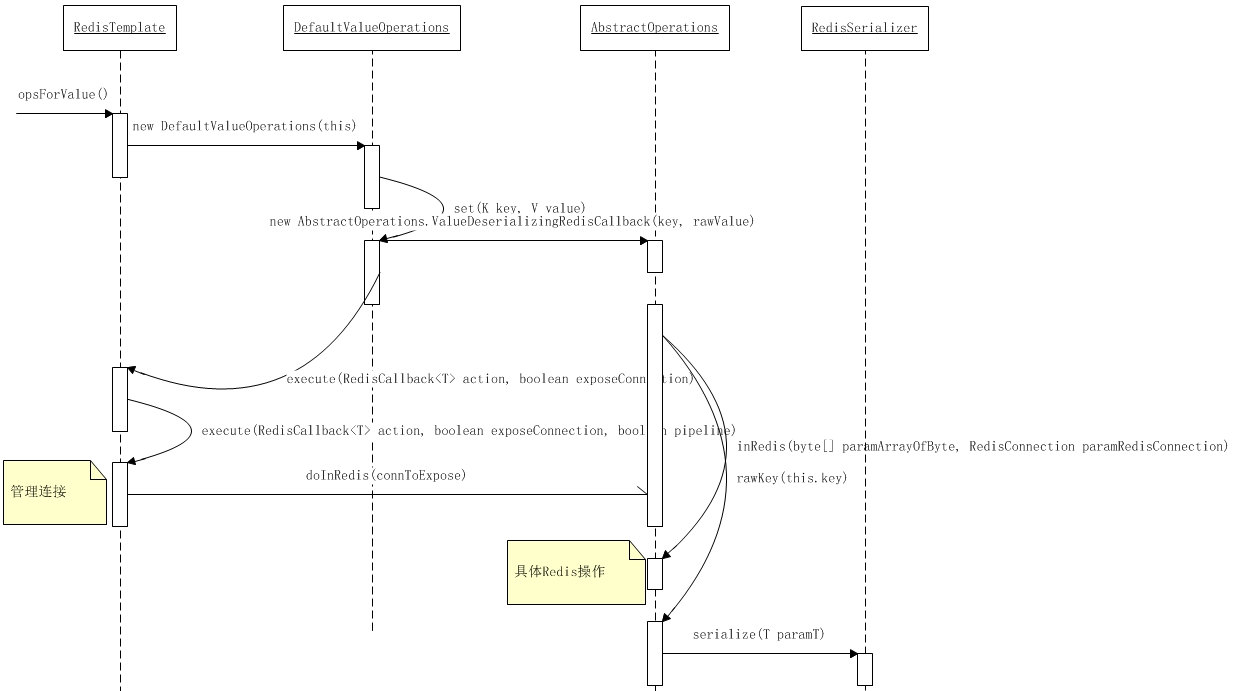
RedisTemplate的调用逻辑
下图为RedisTemplate中opsForValue().set(key, value)的调用逻辑:

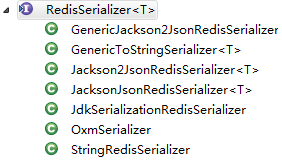
序列器的接口与实现:

配置简单的主从模式
准备好3个redis,现在我需要配置/opt/redis/redis-3.2.1-A为master,/opt/redis/redis-3.2.1-B、/opt/redis/redis-3.2.1-C为slave。
修改如下配置文件分别监听6379、16379、26379,然后两个slave都配置slaveof xx.xx.xx.xx 6379,其中 xx.xx.xx.xx为master的IP(声明:我测试的环境为3个redis均在本机,即伪集群,真集群我还没有测试)
vi /opt/redis/redis-3.2.1-A/redis.conf

vi /opt/redis/redis-3.2.1-B/redis.conf

vi /opt/redis/redis-3.2.1-C/redis.conf
然后启动:
/opt/redis/redis-3.2.1-A/src/redis-server /opt/redis/redis-3.2.1-A/redis.conf &

/opt/redis/redis-3.2.1-B/src/redis-server /opt/redis/redis-3.2.1-B/redis.conf &

/opt/redis/redis-3.2.1-C/src/redis-server /opt/redis/redis-3.2.1-C/redis.conf &
然后客户连接测试,可以尝试用info查看各redis的信息,以及在master操作/读取数据、在slave读取数据。:
/opt/redis/redis-3.2.1-A/src/redis-cli -p 6379

/opt/redis/redis-3.2.1-B/src/redis-cli -p 16379

/opt/redis/redis-3.2.1-C/src/redis-cli -p 26379
配置简单的哨兵模式
默认的sentinel.conf是这样的,另外自己加了简述:
[root@blog redis-3.2.1-A]# grep -v "^#" /opt/redis/redis-3.2.1-A/sentinel.conf | grep -v "^$"

port 26379 # 监听端口

dir /tmp

sentinel monitor mymaster 127.0.0.1 6379 2 # 监视127.0.0.1:6379,判断此服务器为失效至少需要2个哨兵同意

sentinel down-after-milliseconds mymaster 30000 # 哨兵认为此服务器断线的时间

sentinel parallel-syncs mymaster 1 # 故障转移时,最多可以有多少slave从新master同步

sentinel failover-timeout mymaster 180000 # 故障转移超时时间
我配置了3个哨兵,只修改哨兵的端口和监视的master的IP、端口。(本人在阿里云上测试,启动时报端口已被使用,我加配了bind xx.xx.xx.xx,具体资料见[环境配置]阿里云ecs不支持redis-sentinel么?、[基础常识]在CentOS 6 运行 redis-sentinel 程序)
然后就启动了:
vi /opt/redis/redis-3.2.1-A/sentinel.conf

vi /opt/redis/redis-3.2.1-B/sentinel.conf

vi /opt/redis/redis-3.2.1-C/sentinel.conf

/opt/redis/redis-3.2.1-A/src/redis-sentinel /opt/redis/redis-3.2.1-A/sentinel.conf &

/opt/redis/redis-3.2.1-B/src/redis-sentinel /opt/redis/redis-3.2.1-B/sentinel.conf &

/opt/redis/redis-3.2.1-C/src/redis-sentinel /opt/redis/redis-3.2.1-C/sentinel.conf &
进程如下:
[root@blog ~]# ps -ef | grep redis

root     14788 13445  0 10:40 pts/1    00:00:00 /opt/redis/redis-3.2.1-A/src/redis-server xx.xx.xx.xx:6379

root     14793 13445  0 10:40 pts/1    00:00:00 /opt/redis/redis-3.2.1-B/src/redis-server xx.xx.xx.xx:16379

root     14799 13445  0 10:40 pts/1    00:00:00 /opt/redis/redis-3.2.1-C/src/redis-server xx.xx.xx.xx:26379

root     14916 14219  0 10:49 pts/4    00:00:00 /opt/redis/redis-3.2.1-A/src/redis-sentinel xx.xx.xx.xx:6380 [sentinel]

root     14966 14943  0 10:50 pts/3    00:00:00 /opt/redis/redis-3.2.1-C/src/redis-sentinel xx.xx.xx.xx:26380 [sentinel]

root     14971 14921  0 10:50 pts/2    00:00:00 /opt/redis/redis-3.2.1-B/src/redis-sentinel xx.xx.xx.xx:16380 [sentinel]
然后关闭master,会自动选其中一个slave为master,原master再次启动则为slave。
请注意,上述的redis.conf和sentinel.conf,Redis在运行中会生成、变更部分配置,比如,故障切换master后,/redis-3.2.1-A/redis.conf的最后有如下记录:
# Generated by CONFIG REWRITE

slaveof xx.xx.xx.xx 16379
以下命令仅为本人备份使用,无参考意义:
vi /third_package/redis-3.2.1/redis_A.conf

vi /third_package/redis-3.2.1/redis_B.conf

vi /third_package/redis-3.2.1/redis_C.conf

cp redis_A.conf /opt/redis/redis-3.2.1-A/redis.conf

cp redis_B.conf /opt/redis/redis-3.2.1-B/redis.conf

cp redis_C.conf /opt/redis/redis-3.2.1-C/redis.conf

/opt/redis/redis-3.2.1-A/src/redis-server /opt/redis/redis-3.2.1-A/redis.conf &

/opt/redis/redis-3.2.1-B/src/redis-server /opt/redis/redis-3.2.1-B/redis.conf &

/opt/redis/redis-3.2.1-C/src/redis-server /opt/redis/redis-3.2.1-C/redis.conf &

/opt/redis/redis-3.2.1-A/src/redis-cli -p 6379

/opt/redis/redis-3.2.1-B/src/redis-cli -p 16379

/opt/redis/redis-3.2.1-C/src/redis-cli -p 26379

vi /third_package/redis-3.2.1/sentinel_A.conf

vi /third_package/redis-3.2.1/sentinel_B.conf

vi /third_package/redis-3.2.1/sentinel_C.conf

cp sentinel_A.conf /opt/redis/redis-3.2.1-A/sentinel.conf

cp sentinel_B.conf /opt/redis/redis-3.2.1-B/sentinel.conf

cp sentinel_C.conf /opt/redis/redis-3.2.1-C/sentinel.conf

/opt/redis/redis-3.2.1-A/src/redis-sentinel /opt/redis/redis-3.2.1-A/sentinel.conf &

/opt/redis/redis-3.2.1-B/src/redis-sentinel /opt/redis/redis-3.2.1-B/sentinel.conf &

/opt/redis/redis-3.2.1-C/src/redis-sentinel /opt/redis/redis-3.2.1-C/sentinel.conf &

ps -ef | grep redis
【Redis】Redis的基本安装及使用、Jedis的基本使用、spring-data-redis的集成、主从模式、哨兵模式的更多相关文章
- 关于在项目中使用spring data redis与jedis的选择
项目中需要用到redis,主要用来作为缓存,redis的客户端有两种实现方式,一是可以直接调用jedis来实现,二是可以使用spring data redis,通过spring的封装来调用. 应该使用 ...
- Spring Data Redis与Jedis的选择(转)
说明:内容可能有点旧,需要在业务上做权衡. Redis的客户端有两种实现方式,一是可以直接调用Jedis来实现,二是可以使用Spring Data Redis,通过Spring的封装来调用.应该使用哪 ...
- Spring Data Redis入门示例:基于Jedis及底层API (二)
使用底层API:RedisConnectionFactory和RedisConnection可以直接操作Redis,下面是一个简单的例子: ### Maven依赖 <properties> ...
- 关于Spring Data redis几种对象序列化的比较
redis虽然提供了对list set hash等数据类型的支持,但是没有提供对POJO对象的支持,底层都是把对象序列化后再以字符串的方式存储的.因此,Spring data提供了若干个Seriali ...
- Spring data redis的使用
Spring data redis的使用 一.Redis的安装和使用 Redis是用C语言开发的一个高性能键值对数据库,可用于数据缓存,主要用于处理大量数据的高访问负载. 下载地址:https://g ...
- Redis与Spring Data Redis
1.Redis概述 1.1介绍 官网:https://redis.io/ Redis是一个开源的使用ANSIC语言编写.支持网络.可基于内存 亦可持久化的日志型.Key-Value型的高性能数据库. ...
- spring data redis RedisTemplate操作redis相关用法
http://blog.mkfree.com/posts/515835d1975a30cc561dc35d spring-data-redis API:http://docs.spring.io/sp ...
- spring mvc Spring Data Redis RedisTemplate [转]
http://maven.springframework.org/release/org/springframework/data/spring-data-redis/(spring-data包下载) ...
- Spring Data Redis简介以及项目Demo,RedisTemplate和 Serializer详解
一.概念简介: Redis: Redis是一款开源的Key-Value数据库,运行在内存中,由ANSI C编写,详细的信息在Redis官网上面有,因为我自己通过google等各种渠道去学习Redis, ...
- Spring data redis的一个bug
起因 前两天上线了一个新功能,导致线上业务的缓存总是无法更新,报错也是非常奇怪,redis.clients.jedis.exceptions.JedisConnectionException: Unk ...
随机推荐
- 通过Parcelable协议传递数据出现系列错误
07-14 00:42:37.414: E/AndroidRuntime(17687): FATAL EXCEPTION: main 07-14 00:42:37.414: E/AndroidRunt ...
- 远程阿里云window服务器报错身份验证错误
整理文章,很久之前遇到的一个问题,一直呆在草稿箱,特发布出来,帮助可能遇到该问题的人 mstsc连接时报错如下 解决方法: 修改本地安全组策略[安全组 gpedit.msc]
- WinForm中 事件 委托 多线程的应用【以一个下载进度条为例】
第一步:首先我们创建一个winfor的项目 第二步:我们建一个窗体 在一个窗体里面 打开一个另外的窗体 另外的窗体有一个按钮 点击后就开始下载 下载完成后 在注册窗体上面 显示下载完成(达到在一个窗体 ...
- [SQL Server]从 varchar 数据类型到 datetime 数据类型的转换产生一个超出范围的值。
见下图sql, 使用dateadd()转换时报如题错误, 原因是数据库表中存入的数据格式不正确, 数据格式不正确, 数据格式不正确, 重要的事情讲3遍!! ca.batch_no的前8位必须是日 ...
- java struts2入门学习--OGNL语言基本用法
一.知识点学习 1.struts2中包含以下6种对象,requestMap,sessionMap,applicationMap,paramtersMap,attr,valueStack; 1)requ ...
- libev loop_init分析
尼玛 C语言学不好真是桑心呐! 看了libev的代码有一种想死的感觉,但是还是要硬着头皮看下去,一定看完! /* initialise a loop structure, must be zero-i ...
- 在 Linux 平台中调试 C/C++ 内存泄漏方法(转)
由于 C 和 C++ 程序中完全由程序员自主申请和释放内存,稍不注意,就会在系统中导入内存错误.同时,内存错误往往非常严重,一般会带来诸如系统崩溃,内存耗尽这样严重的后果.本文将从静态分析和动态检测两 ...
- 如何用STAF进行自动化测试分布式运行
本文的目的在于引导读者去了解STAF及如何调用其接口去实现自动化测试的分布式动行. 提到分布式运行,很多人想到了Jenkins,Jenkins里面有个node插件,可以去分派任务给slave,Jenk ...
- ubuntu远程桌面连接windows系统
现在用ubuntu系统,公司买了个windows的服务器,需要给配置一套环境,来回跑很麻烦,就想windows下可以的远程桌面,Linux应该也有. 现在自己的ubuntu13.10,无法进入桌面的“ ...
- visual studio 设置代码注释模板
1.C#模板文件: 路径:C:\Program Files (x86)\Microsoft Visual Studio 14.0\Common7\IDE\ItemTemplates\CSharp\Co ...
