【转】Keepalived+Tengine实现高可用集群
原文出处:http://502245466.blog.51cto.com/7559397/1301772
概述
近年来随着Nginx在国内的发展潮流,越来越多的互联网公司使用Nginx;凭Nginx的高性能、稳定性等成为了众多IT者青睐的WEB反向代理服务器;但是Nginx虽然有很强大的代理功能,只有一台Nginx服务器难免不会出现问题,这就形成了单点故障的问题,而恰好可以使用Keepalived来解决单点的故障问题,Keepalived故障转移时间比较短,而且配置简单易用,这也是选择Keepalived做高可用的一个主要原因所在,如果日PV值不是很大的中小型企业可以考虑使用这种方案
Tengine
Tengine是由淘宝网发起的Web服务器项目。它在Nginx的基础上,针对大访问量网站的需求,添加了很多高级功能和特性。Tengine的性能和稳定性已经在大型的网站如淘宝、天猫商城等得到了很好的检验。它的最终目标是打造一个高效、稳定、安全、易用的Web平台
Tengine特性:
1、继承Nginx-1.2.9的所有特性,100%兼容Nginx的配置
2、动态模块加载(DSO)支持。加入一个模块不再需要重新编译整个Tengine
3、更加强大的负载均衡能力,包括一致性hash模块、会话保持模块,还可以对后端的服务器进行主动健康4、检查,根据服务器状态自动上线下线
5、输入过滤器机制支持。通过使用这种机制Web应用防火墙的编写更为方便
6、组合多个CSS、JavaScript文件的访问请求变成一个请求
7、自动根据CPU数目设置进程个数和绑定CPU亲缘性
8、监控系统的负载和资源占用从而对系统进行保护
9、更强大的防攻击(访问速度限制)模块
10、动态脚本语言Lua支持。扩展功能非常高效简单
......
一、Nginx+Keepalived有两种配置高可用方法
1、Nginx+Keepalived主备模式
使用一个虚拟IP地址即可,前端有两台Nginx服务器做调度,其中一台为主节点而另一台有备用节点,两台服务器只有一台提供服务,而另一台处于闲置的状态,只有主节点服务器出现故障时备用节点服务器才会接管主节点服务器上的所有服务及虚拟IP并继续提供服务,而这一切对客户端来说是透明的
2、Nginx+Keepalived主主模式
这种模式需要使用两个虚拟IP地址,前端有两台Nginx服务器做调度,两台服务器互为主备并同时工作,如果其中一台服务器出现故障时,将会把所有请求都转发到另一台服务器上面,这种做是不是很经济实惠,两台服务器同时提供服务,相比主备模式不仅分担了一台服务器的压力还提高了并发量
二、下面以一个案例来配置说明Keepalived+Nginx是如何实现高可用
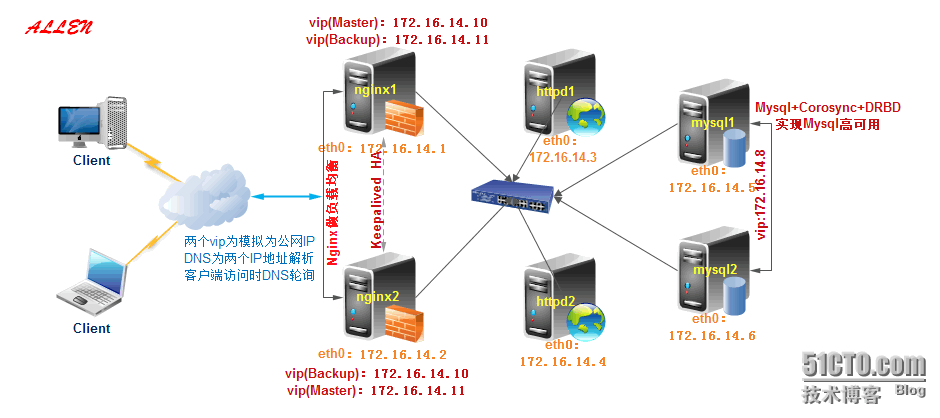
环境介绍:
系统版本:CentOS 6_x86_64
Tengine版本: Tengine-1.5.1
Keepalived版本:keepalived-1.2.7-3.el6
1、在Nginx1与Nginx2服务器上安装Tengine
|
1
2
3
4
5
6
7
8
9
10
11
12
13
14
15
16
17
18
19
20
21
22
23
24
25
26
27
28
29
30
31
32
33
|
######在Nginx1安装[root@nginx1 ~]# useradd -r nginx[root@nginx1 ~]# tar xf tengine-1.5.1.tar.gz[root@nginx1 ~]# cd tengine-1.5.1######安装Tengine的依赖环境包[root@nginx1 ~]# yum -y install pcre-devel openssl-devel libxml2-devel libxslt-devel gd-devel lua-devel GeoIP-devel gcc gcc-c++[root@nginx1 ~]# ./configure \--prefix=/usr/local/nginx \--sbin-path=/usr/local/nginx/sbin/nginx \--conf-path=/etc/nginx/nginx.conf \--error-log-path=/var/log/nginx/error.log \--http-log-path=/var/log/nginx/access.log \--pid-path=/var/run/nginx/nginx.pid \--lock-path=/var/lock/nginx.lock \--user=nginx \--group=nginx \--enable-mods-shared=all[root@nginx1 tengine-1.5.1]# make && make install######在Nginx2安装[root@nginx2 ~]# scp 172.16.14.1:/root/tengine-1.5.1.tar.gz ./[root@nginx2 tengine-1.5.1]# yum -y install pcre-devel openssl-devel libxml2-devel libxslt-devel gd-devel lua-devel GeoIP-devel gcc gcc-c++[root@nginx2 tengine-1.5.1]# ./configure \--prefix=/usr/local/nginx \--sbin-path=/usr/local/nginx/sbin/nginx \--conf-path=/etc/nginx/nginx.conf \--error-log-path=/var/log/nginx/error.log \--http-log-path=/var/log/nginx/access.log \--pid-path=/var/run/nginx/nginx.pid \--lock-path=/var/lock/nginx.lock \--user=nginx \--group=nginx \--enable-mods-shared=all[root@nginx2 tengine-1.5.1]# make && make install |
2、在Nginx1与Nginx2服务器上为Tengine准备Sysv服务脚本
|
1
2
3
4
5
6
7
8
9
10
11
12
13
14
15
16
17
18
19
20
21
22
23
24
25
26
27
28
29
30
31
32
33
34
35
36
37
38
39
40
41
42
43
44
45
46
47
48
49
50
51
52
53
54
55
56
57
58
59
60
61
62
63
64
65
66
67
68
69
70
71
72
73
74
75
76
77
78
79
80
81
82
83
84
85
86
87
88
89
90
91
92
93
94
95
96
97
98
99
100
101
102
103
104
105
106
107
108
109
110
111
112
113
114
115
116
117
118
119
|
######Nginx1提供脚本[root@nginx1 ~]# vim /etc/init.d/nginx#!/bin/sh# nginx - this script starts and stops the nginx daemon# chkconfig: - 85 15# description: Nginx is an HTTP(S) server, HTTP(S) reverse \# processname: nginx# config: /etc/nginx/nginx.conf# config: /etc/sysconfig/nginx# pidfile: /var/run/nginx.pid# Source function library.. /etc/rc.d/init.d/functions# Source networking configuration.. /etc/sysconfig/network# Check that networking is up.[ "$NETWORKING" = "no" ] && exit 0 nginx="/usr/local/nginx/sbin/nginx"prog=$(basename $nginx)NGINX_CONF_FILE="/etc/nginx/nginx.conf"[ -f /etc/sysconfig/nginx ] && . /etc/sysconfig/nginxlockfile=/var/lock/subsys/nginxmake_dirs() { # make required directories user=`nginx -V 2>&1 | grep "configure arguments:" | sed 's/[^*]*--user=\([^ ]*\).*/\1/g' -` options=`$nginx -V 2>&1 | grep 'configure arguments:'` for opt in $options; do if [ `echo $opt | grep '.*-temp-path'` ]; then value=`echo $opt | cut -d "=" -f 2` if [ ! -d "$value" ]; then # echo "creating" $value mkdir -p $value && chown -R $user $value fi fi done}start() { [ -x $nginx ] || exit 5 [ -f $NGINX_CONF_FILE ] || exit 6 make_dirs echo -n $"Starting $prog: " daemon $nginx -c $NGINX_CONF_FILE retval=$? echo [ $retval -eq 0 ] && touch $lockfile return $retval}stop() { echo -n $"Stopping $prog: " killproc $prog -QUIT retval=$? echo [ $retval -eq 0 ] && rm -f $lockfile return $retval}restart() { configtest || return $? stop sleep 1 start}reload() { configtest || return $? echo -n $"Reloading $prog: " killproc $nginx -HUP RETVAL=$? echo}force_reload() { restart}configtest() { $nginx -t -c $NGINX_CONF_FILE}rh_status() { status $prog}rh_status_q() { rh_status >/dev/null 2>&1}case "$1" in start) rh_status_q && exit 0 $1 ;; stop) rh_status_q || exit 0 $1 ;; restart|configtest) $1 ;; reload) rh_status_q || exit 7 $1 ;; force-reload) force_reload ;; status) rh_status ;; condrestart|try-restart) rh_status_q || exit 0 ;; *) echo $"Usage: $0 {start|stop|status|restart|condrestart|try-restart|reload|force-reload|configtest}" exit 2esac######将Nginx加入到系统服务并启动[root@nginx1 ~]# chmod +x /etc/init.d/nginx[root@nginx1 ~]# chkconfig --add nginx[root@nginx1 ~]# service nginx start######将Nginx1脚本拷贝到Nignx2服务器上并加入系统服务[root@nginx2 ~]# scp 172.16.14.1:/etc/init.d/nginx /etc/init.d/[root@nginx2 ~]# chmod +x /etc/init.d/nginx[root@nginx2 ~]# chkconfig --add nginx[root@nginx2 ~]# service nginx start |
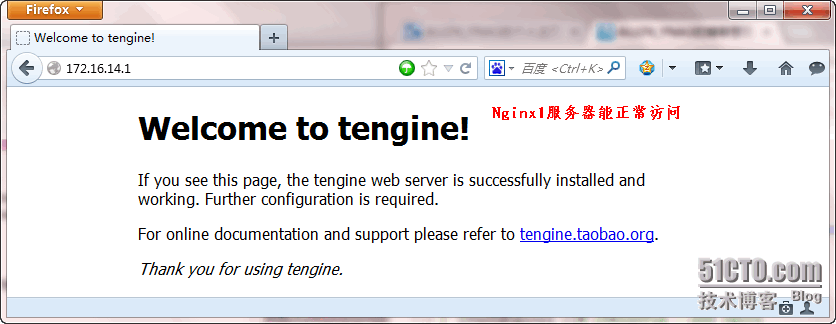
3、访问测试Nginx服务是否正常
3.1、在Nginx1服务器上测试
|
1
2
|
[root@nginx1 ~]# netstat -anpt|grep nginxtcp 0 0 0.0.0.0:80 0.0.0.0:* LISTEN 15088/nginx |
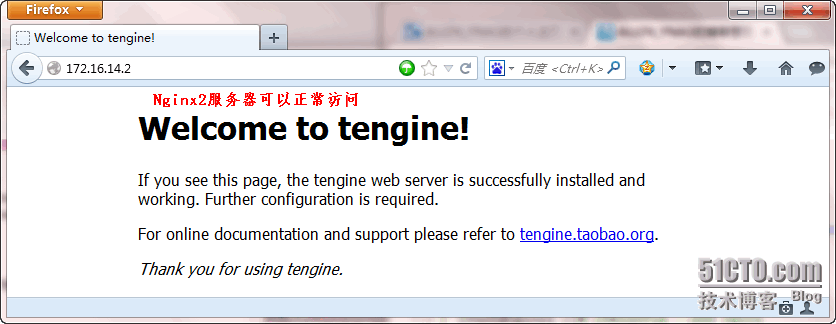
3.2、在Nginx2服务器上测试
|
1
2
|
[root@nginx2 ~]# netstat -anpt|grep nginxtcp 0 0 0.0.0.0:80 0.0.0.0:* LISTEN 7281/nginx |
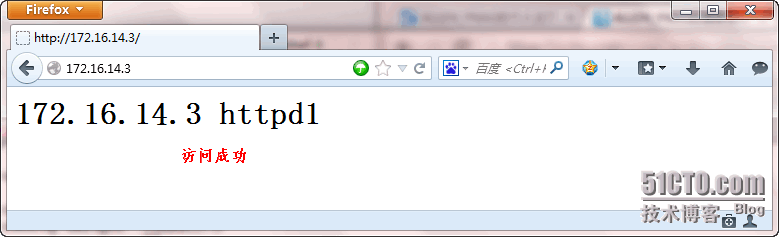
三、在Httpd1与Httpd2服务器上安装Apache
1、在Httpd1服务器配置好YUM源,使用YUM安装HTTPD服务
|
1
2
3
4
5
|
[root@httpd1 ~]# yum -y install httpd[root@httpd1 ~]# chkconfig httpd on[root@httpd1 ~]# service httpd start######为Httpd1提供测试页[root@httpd1 ~]# echo '<h1>172.16.14.3 httpd1</h1>' > /var/www/html/index.html |
2、在Httpd2服务器配置好YUM源,使用YUM安装HTTPD服务
|
1
2
3
4
|
[root@httpd2 ~]# yum -y install httpd[root@httpd2 ~]# chkconfig httpd on[root@httpd2 ~]# service httpd start[root@httpd2 ~]# echo '<h1>172.16.14.4 httpd2</h1>' > /var/www/html/index.html |

四、配置Tengine
1、将主配置文件备份一份然后修改主配置文件
|
1
2
3
4
5
6
7
8
9
10
11
12
13
14
15
16
17
18
19
20
21
22
23
24
25
26
27
28
29
30
31
32
33
34
35
36
37
38
39
40
41
42
43
44
45
46
47
48
49
50
51
52
53
54
55
56
57
58
59
60
61
62
63
64
65
66
67
68
69
70
71
72
73
74
75
76
77
78
79
80
81
82
83
84
85
86
87
88
89
90
91
92
93
94
95
96
97
98
99
100
101
102
103
104
105
106
107
108
109
|
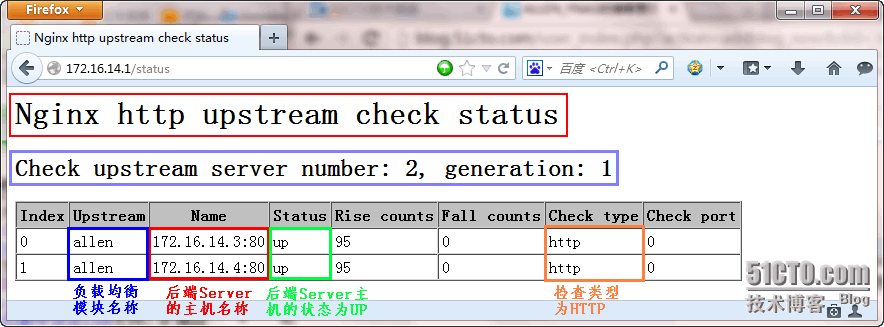
[root@nginx1 ~]# cd /etc/nginx/[root@nginx1 nginx]# cp nginx.conf nginx.conf.bak[root@nginx1 nginx]# vim nginx.confuser nginx nginx;worker_processes 2;worker_rlimit_nofile 51200;#error_log logs/error.log;#pid logs/nginx.pid;events { use epoll; worker_connections 51200;}# load modules compiled as Dynamic Shared Object (DSO)dso { #实现动态加载模块 load ngx_http_upstream_session_sticky_module.so; #加载session模块}http { include mime.types; default_type application/octet-stream; log_format main '$remote_addr - $remote_user [$time_local] "$request" ' '$status $body_bytes_sent "$http_referer" ' '"$http_user_agent" "$http_x_forwarded_for"'; access_log logs/access.log main; client_max_body_size 20m; client_header_buffer_size 16k; large_client_header_buffers 4 16k; sendfile on; tcp_nopush on; keepalive_timeout 65; gzip on; #开启压缩 gzip_min_length 1k; gzip_buffers 4 16k; gzip_proxied any; gzip_http_version 1.1; gzip_comp_level 3; gzip_types text/plain application/x-javascript text/css application/xml; gzip_vary on; proxy_temp_path /tmp/proxy_temp; proxy_cache_path /tmp/proxy_cache levels=1:2 keys_zone=cache_one:500m inactive=1d max_size=3g; proxy_connect_timeout 50; proxy_read_timeout 600; proxy_send_timeout 600; proxy_buffer_size 128k; proxy_buffers 16 256k; proxy_busy_buffers_size 512k; proxy_temp_file_write_size 1024m; proxy_next_upstream error timeout invalid_header http_500 http_503 http_404 http_502 http_504; upstream allen { server 172.16.14.3; server 172.16.14.4; check interval=3000 rise=2 fall=5 timeout=1000 type=http; #后端Server健康状态检查 check_http_send "GET / HTTP/1.0\r\n\r\n"; check_http_expect_alive http_2xx http_3xx; session_sticky; #保持会话连接 } server { listen 80; server_name localhost; #charset koi8-r; #access_log logs/host.access.log main; location / { proxy_pass http://allen; } location /status { #实现状态监控 check_status; } #error_page 404 /404.html; # redirect server error pages to the static page /50x.html # error_page 500 502 503 504 /50x.html; location = /50x.html { root html; } # proxy the PHP scripts to Apache listening on 127.0.0.1:80 # pass the PHP scripts to FastCGI server listening on 127.0.0.1:9000 # #location ~ \.php$ { # root html; # fastcgi_pass 127.0.0.1:9000; # fastcgi_index index.php; # fastcgi_param SCRIPT_FILENAME /scripts$fastcgi_script_name; # include fastcgi_params; #} # deny access to .htaccess files, if Apache's document root # concurs with nginx's one # #location ~ /\.ht { # deny all; #} } # HTTPS server # #server { # listen 443; # server_name localhost; # ssl on; # ssl_certificate cert.pem; # ssl_certificate_key cert.key; # ssl_session_timeout 5m; # ssl_protocols SSLv2 SSLv3 TLSv1; # ssl_ciphers HIGH:!aNULL:!MD5; # ssl_prefer_server_ciphers on; # location / { # root html; # index index.html index.htm; # } #}}注释:Nginx的更多参数介绍请查看前面的博客 |
2、重启Tengine服务访问测试负载均衡
|
1
|
[root@nginx1 ~]# service nginx restart |
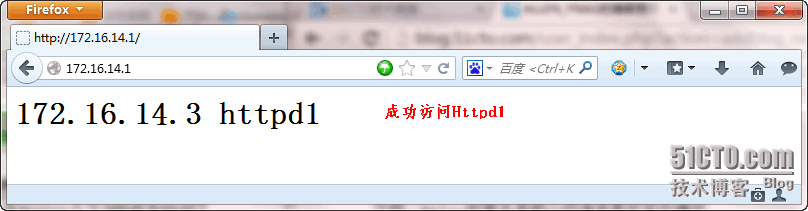
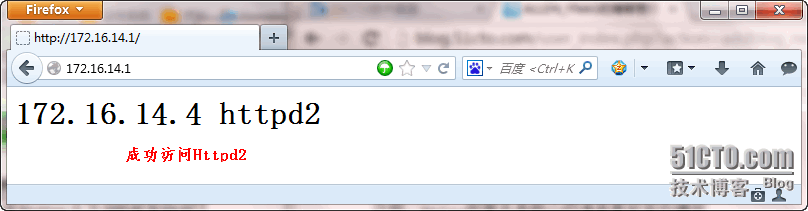
由上图可见可以成功访问到后端的Httpd服务,接下来访问测试状态监控模块
3、在Nginx2服务器配置Tengine主配置文件
|
1
2
3
4
|
######复制Nginx1服务器上的配置文件到Nginx2服务器[root@nginx2 ~]# scp 172.16.14.1:/etc/nginx/nginx.conf /etc/nginx/[root@nginx2 ~]# service nginx restart注释:重启Tengine服务并测试;测试方法同Nginx1服务器,这里就不再做测试了 |
五、安装Keepalived并配置
1、在Nginx1与Nginx2服务器上安装Keepalived
|
1
2
3
4
|
######在Nginx1服务器安装[root@nginx1 ~]# yum -y install keepalived######在Nginx2服务器安装[root@nginx2 ~]# yum -y install keepalived |
2、配置Keepalived双主模式
2.1、修改Nginx1服务器上的Keepalived主配置文件定义
|
1
2
3
4
5
6
7
8
9
10
11
12
13
14
15
16
17
18
19
20
21
22
23
24
25
26
27
28
29
30
31
32
33
34
35
36
37
38
39
40
41
42
43
44
45
46
47
48
49
50
51
52
53
54
55
56
57
58
59
60
|
[root@nginx1 ~]# vim /etc/keepalived/keepalived.conf! Configuration File for keepalivedglobal_defs { notification_email { root@localhost #通知收件人地址,可以写换行写多个 } notification_email_from admin@allen.com #发件人地址 smtp_server 127.0.0.1 #邮件smtp服务器地址 smtp_connect_timeout 30 #邮件smtp连接超时时间 router_id LVS_DEVEL #运行Keepalived服务器的标识,自定义;发邮件时显示在邮件标题中的信息}vrrp_script chk_nginx { #定义一个外部脚本 script "/etc/keepalived/chk_nginx.sh"#脚本的路径 interval 1 #通知间隔 weight 2 }vrrp_script chk_proess { script "/etc/keepalived/chk_proess.sh" interval 1 weight 2}vrrp_instance nginx_1 { state MASTER #角色{MASTER|BACKUP} interface eth0 #HA监测的网卡 virtual_router_id 56 #虚拟路由ID;一组集群ID号必须一样 priority 100 #权重,BACKUP不能高于MASTER advert_int 1 #检测时间间隔 garp_master_delay 1 authentication { auth_type PASS #认证类型 auth_pass 1234 #认证密码,同一集群密码要一样 } virtual_ipaddress { #定义虚拟IP地址,可以有多个 172.16.14.10 } track_script { #定义状态跟踪 chk_nginx #名称为vrrp_script中定义的 chk_proess } notify_master "/etc/keepalived/chk_nginx.sh master" #指定切换到Master状态时执行的脚本 notify_backup "/etc/keepalived/chk_nginx.sh backup" #指定切换到Backup状态时执行的脚本 notify_fault "/etc/keepalived/chk_nginx.sh fault" #指定切换到Fault状态时执行的脚本}vrrp_instance nginx_2 { state BACKUP interface eth0 virtual_router_id 58 priority 90 advert_int 1 authentication { auth_type PASS auth_pass 4321 } virtual_ipaddress { 172.16.14.11 } track_script { chk_nginx }} |
2.2、修改Nginx2服务器上的Keepalived主配置文件定义
|
1
2
3
4
5
6
7
8
9
10
11
12
13
14
15
16
17
18
19
20
21
22
23
24
25
26
27
28
29
30
31
32
33
34
35
36
37
38
39
40
41
42
43
44
45
46
47
48
49
50
51
52
53
54
55
56
57
58
59
|
[root@nginx2 ~]# vim /etc/keepalived/keepalived.conf! Configuration File for keepalivedglobal_defs { notification_email { root@localhost } notification_email_from admin@allen.com smtp_server 127.0.0.1 smtp_connect_timeout 30 router_id LVS_DEVEL}vrrp_script chk_nginx { script "/etc/keepalived/chk_nginx.sh" interval 1 weight 2}vrrp_script chk_nginx { script "/etc/keepalived/chk_proess.sh" interval 1 weight 2}vrrp_instance nginx_1 { state BACKUP interface eth0 virtual_router_id 56 priority 98 advert_int 1 authentication { auth_type PASS auth_pass 1234 } virtual_ipaddress { 172.16.14.10 } track_script { chk_nginx }}vrrp_instance nginx_2 { state MASTER interface eth0 virtual_router_id 58 priority 92 advert_int 1 authentication { auth_type PASS auth_pass 4321 } virtual_ipaddress { 172.16.14.11 } track_script { chk_nginx chk_proess } notify_master "/etc/keepalived/chk_nginx.sh master" notify_backup "/etc/keepalived/chk_nginx.sh backup" notify_fault "/etc/keepalived/chk_nginx.sh fault"} |
3、在Nginx1与Nginx2服务器分别为Keepalived提供状态检测脚本及通知脚本
|
1
2
3
4
5
6
7
8
9
10
11
12
13
14
15
16
17
18
19
20
21
22
23
24
25
26
27
28
29
30
31
32
33
34
35
36
37
38
39
40
41
42
|
######通知脚本vim /etc/keepalived/chk_nginx.sh#!/bin/bash# Author: ALLEN# description: An example of notify script#vip=172.16.14.10contact='root@localhost'notify() { mailsubject="`hostname` to be $1: $vip floating" mailbody="`date '+%F %H:%M:%S'`: vrrp transition, `hostname` changed to be $1" echo $mailbody | mail -s "$mailsubject" $contact}case "$1" in master) notify master /etc/init.d/keepalived start exit 0 ;; backup) notify backup /etc/init.d/keepalived stop exit 0 ;; fault) notify fault exit 0 ;; *) echo 'Usage: `basename $0` {master|backup|fault}' exit 1 ;;esac######状态检测脚本vim /etc/keepalived/chk_proess.sh#!/bin/bashkillall -0 nginxif [[ $? -ne 0 ]];then /etc/init.d/keepalived stopfi######添加执行权限chkmod +x /etc/keepalived/chk_* |
六、测试Keepalived+Tengine高可用
1、分别重新启动Nginx1与Nginx2服务器上面的Keepalived与Tengine服务
|
1
2
|
[root@nginx1 ~]# service keepalived restart;service nginx restart[root@nginx2 ~]# service keepalived restart;service nginx restart |
2、分别查看Nginx1与Nginx2服务器上的IP地址
|
1
2
3
4
5
6
7
8
9
10
11
12
13
14
15
16
17
|
######查看Nginx1服务器[root@nginx1 ~]# ip addr show eth02: eth0: <BROADCAST,MULTICAST,UP,LOWER_UP> mtu 1500 qdisc pfifo_fast state UP qlen 1000 link/ether 00:0c:29:2c:1a:24 brd ff:ff:ff:ff:ff:ff inet 172.16.14.1/16 brd 172.16.255.255 scope global eth0 inet 172.16.14.10/32 scope global eth0 inet6 fe80::20c:29ff:fe2c:1a24/64 scope link valid_lft forever preferred_lft forever######查看Nginx2服务器[root@nginx2 ~]# ip addr show eth02: eth0: <BROADCAST,MULTICAST,UP,LOWER_UP> mtu 1500 qdisc pfifo_fast state UP qlen 1000 link/ether 00:0c:29:ec:f6:3f brd ff:ff:ff:ff:ff:ff inet 172.16.14.2/16 brd 172.16.255.255 scope global eth0 inet 172.16.14.11/32 scope global eth0 inet6 fe80::20c:29ff:feec:f63f/64 scope link valid_lft forever preferred_lft forever注释:由上可见,两台服务器都有虚拟IP地址 |
3、访问测试172.16.14.10
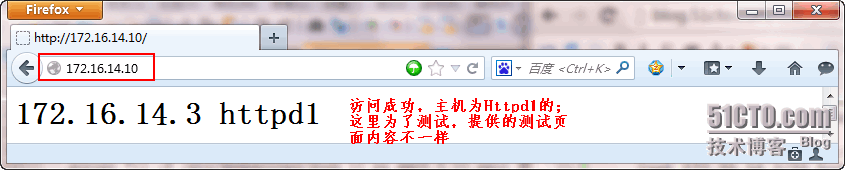
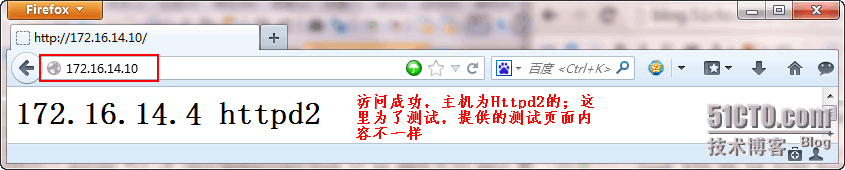
4、模拟其中一台前端Nginx服务器出现故障不能正常提供服务
|
1
2
3
4
5
6
7
8
9
10
11
12
13
14
15
16
17
18
19
|
[root@nginx1 ~]# killall nginx[root@nginx1 ~]# ip addr show eth02: eth0: <BROADCAST,MULTICAST,UP,LOWER_UP> mtu 1500 qdisc pfifo_fast state UP qlen 1000 link/ether 00:0c:29:2c:1a:24 brd ff:ff:ff:ff:ff:ff inet 172.16.14.1/16 brd 172.16.255.255 scope global eth0 inet6 fe80::20c:29ff:fe2c:1a24/64 scope link valid_lft forever preferred_lft forever######由上可见,虚拟IP地址已删除========================================================================######在Nginx2服务器上查看IP地址[root@nginx2 ~]# ip addr show eth02: eth0: <BROADCAST,MULTICAST,UP,LOWER_UP> mtu 1500 qdisc pfifo_fast state UP qlen 1000 link/ether 00:0c:29:ec:f6:3f brd ff:ff:ff:ff:ff:ff inet 172.16.14.2/16 brd 172.16.255.255 scope global eth0 inet 172.16.14.11/32 scope global eth0 inet 172.16.14.10/32 scope global eth0 inet6 fe80::20c:29ff:feec:f63f/64 scope link valid_lft forever preferred_lft forever注释:由上可见,虚拟IP地址已成功切换 |
5、在Nginx2服务器查看邮件通知
|
1
2
3
4
5
6
7
8
9
10
11
12
13
14
15
16
17
18
19
20
21
22
|
[root@nginx2 ~]# mailHeirloom Mail version 12.4 7/29/08. Type ? for help."/var/spool/mail/root": 3 messages 2 unread>U 1 root Wed Sep 25 16:54 19/712 "nginx2.allen.com to be master: 172.16.14.10 floating" U 2 root Wed Sep 25 17:23 19/712 "nginx2.allen.com to be master: 172.16.14.10 floating" 3 root Wed Sep 25 18:06 19/713 "nginx2.allen.com to be master: 172.16.14.10 floating"& 3Message 3:From root@nginx2.allen.com Wed Sep 25 18:06:27 2013Return-Path: <root@nginx2.allen.com>X-Original-To: root@localhostDelivered-To: root@localhost.allen.comDate: Wed, 25 Sep 2013 18:06:27 +0800To: root@localhost.allen.comSubject: nginx2.allen.com to be master: 172.16.14.10 floatingUser-Agent: Heirloom mailx 12.4 7/29/08Content-Type: text/plain; charset=us-asciiFrom: root@nginx2.allen.com (root)Status: RO2013-09-25 18:06:27: vrrp transition, nginx2.allen.com changed to be master& quit #退出注释:可以看出此时Nginx2服务器已经成功Master,当然Nginx1服务器成功了Backup;这里就不在查看Nginx1的邮件了,各位博友可以查看一下 |
6、再次访问172.16.14.10测试


由上图可见,依然可以正常访问;Keepalived+Tengine高可用已实现
7、这里就不在对另一个虚拟IP(172.16.14.11)做测试了,测试方法与(172.16.14.10)相同;在实际环境中在DNS服务器为两个虚拟IP地址做A记录,能实现两个前端Nginx调度的负载均衡;这里配置个两个实例均使用的是eth0网卡,但在实际环境中最好使用不同的网卡;由于内容较多,下面就不写Corosync+DRBD+Mysql的实现了,如果各位博友有兴趣可以看前面写的博客:
http://502245466.blog.51cto.com/7559397/1299082
【转】Keepalived+Tengine实现高可用集群的更多相关文章
- 使用Keepalived构建LVS高可用集群
LVS的DR模型配置+Keepalive部署 介绍 下图为DR模型的通信过程,图中的IP不要被扑结构中的IP迷惑,图里只是为了说明DR的通信原理,应用到本例中的拓扑上其工作原理不变. 拓扑结构 服务器 ...
- nginx+keepalived+consul 实现高可用集群
继 负载均衡 之 nginx+consul+consul template,我这次将使用2台虚拟机,来做一个简单的双机负载均衡试验. 试验目标: 1. 当参加负载均衡的子节点服务,有任何其中一个或多个 ...
- 基于keepalived搭建MySQL高可用集群
MySQL的高可用方案一般有如下几种: keepalived+双主,MHA,MMM,Heartbeat+DRBD,PXC,Galera Cluster 比较常用的是keepalived+双主,MHA和 ...
- 003.Keepalived搭建LVS高可用集群
一 基础环境 1.1 IP规划 OS:CentOS 6.8 64位 节点类型 IP规划 主机名 类型 主 Director Server eth0:172.24.8.10 DR1 公共IP eth1: ...
- 使用Keepalived实现linux高可用集群
安装 apt install libipset-dev keepalived -y 创建账户 useradd -s/usr/sbin/nologin -M -g root keepalived_scr ...
- keepalived + lvs 网站高可用集群
一 ,四台服务器 master 端 : 192.168.1.3 backup 端: 192.168.1.4 REserver1 端 : 192.168.1.5 REserver2 端: 192.168 ...
- Keepalived高可用集群搭建(转载linuxIDC)
1.Keepalived简介 Keepalived是一个基于VRRP协议来实现的WEB服务高可用方案,可以利用其来避免单点故障.使用多台节点安装keepalived.其 他的节点用来提供真实的服务,同 ...
- 集群介绍 keepalived介绍 用keepalived配置高可用集群
集群介绍 • 根据功能划分为两大类:高可用和负载均衡 • 高可用集群通常为两台服务器,一台工作,另外一台作为冗余,当提供服务的机器宕机,冗余将接替继续提供服务 • 实现高可用的开源软件有:heartb ...
- Keepalived+Nginx高可用集群
Keepalived简介 Keepalived的作用是检测服务器的状态,如果有一台web服务器宕机,或工作出现故障,Keepalived将检测到,并将有故障的服务器从系统中剔除,同时使用其他服务器代替 ...
随机推荐
- MySQL学习【SQL语句上】
1.连接服务端命令 1.mysql -uroot -p123 -h127.0.0.1 2.mysql -uroot -p123 -S /tmp/mysql.sock 3.mysql -uroot -p ...
- shutil.rmtree()
shutil.rmtree(path, ignore_errors=False, onerror=None) #递归地删除文件 def rmtree(path, ignore_errors=Fal ...
- Resharp常用设置收集整理
F12跳转的问题:
- js数组去重(多种写法)
最基本的写法 使用indexOf() var arr = [1,1,5,77,32,54,2,4,5,2,2,4,52,2,2,2,2,2] //比较常规的语法使用indexOf来判断是否已经存在 g ...
- Mysql是否开启binlog日志&开启方法
运行sql show variables like 'log_bin'; 如果Value 为 OFF 则为开启日志文件 如何开启mysql日志? 找到my,cnf 中 [mysqld] 添加如下 ...
- Python学习 :json、pickle&shelve 模块
数据交换格式 json 模块 json (JavaScript Object Notation)是一种轻量级的数据交换语言,以文字为基础,且易于让人阅读.尽管 json 是JavaScript的一个子 ...
- python代理爬取存入csv文件
爬取高匿代理 from urllib import request import re import time f = open('西1.csv','w',encoding='GBK') header ...
- 用elk+filebeat监控容器日志
elk 为 elasticsearch(查询搜索引擎),logstash(对日志进行分析和过滤,然后转发给elasticsearch),kibana(一个web图形界面用于可视化elasticsea ...
- 《PHP框架Laravel学习》系列分享专栏
<PHP框架Laravel学习>已整理成PDF文档,点击可直接下载至本地查阅https://www.webfalse.com/read/201735.html 文章 Laravel教程:l ...
- vuecli结合eslint静态检查
vuecli结合eslint静态检查 搭建vue项目开发可能选择vue-cli项目脚手架快速创建vue项目.(https://github.com/vuejs/vue-cli) 安装vue-cli n ...