Oracle递归查询与常用分析函数
最近学习oracle的一些知识,发现自己sql还是很薄弱,需要继续学习,现在总结一下哈。
(1)oracle递归查询 start with ... connect by prior ,至于是否向上查询(根节点)还是向下查询(叶节点),主要看prior后面跟的字段是否是父ID。
向上查询:select * from test_tree_demo start with id=1 connect by prior pid=id
查询结果:

向下查询:select * from test_tree_demo start with id=3 connect by prior id=pid

如果要进行过滤,where条件不能放在connect by 后面,如下:select * from test_tree_demo where id !=4 start with id=1 connect by prior pid=id

(2)分析函数- over( partition by )
数据库中的数据如下:select * from testemp1

select deptno,ename,sal,sum(sal)over() deptsum from testemp1 如果over中不加任何条件,就相当于sum(sal),显示结果如下:

一般over都是配合partition by order by 一起使用,partition by 就是分组的意思。下面看个例子:按部门分组,同个部门根据姓名进行工资累计求和。
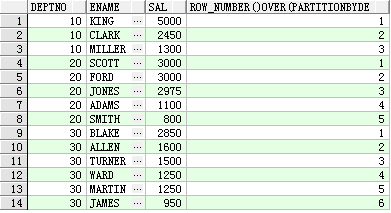
select deptno,ename,sal,sum(sal)over(partition by deptno order by ename) deptsum from testemp1,显示如下:

其实统计各个部门的薪水总和,可以使用group by实现,select deptno,sum(sal) deptsum from testemp1 group by deptno,结果如下:

但是,使用group by 的时候查询出来的字段必须是分组的字段或者聚合函数。例如查询结果多加个ename字段。使用partition by 就简单了。
select deptno,ename,sum(sal) over (partition by deptno) from testemp1,显示如下:

(3)分析函数-rank(),dense_rank(),row_number()
select deptno,ename,sal,rank() over(partition by deptno order by sal) from testemp1,结果如下:

select deptno,ename,sal,dense_rank() over(partition by deptno order by sal) from testemp1,结果如下:

可以看出使用rank()和dense_rank()的区别了吧。接下来在看看row_number()
select deptno,ename,sal,row_number() over(partition by deptno order by sal desc) from testemp1,显示结果如下:
(4)分析函数-group by rollup
根据部门分组,统计各个部门各个职位的薪水总和。
select group_id,job,sum(salary) as salary from group_test group by rollup (group_id,job),显示结果如下:

group by rollup (a,b,c)相当于group by (a,b,c) union group by(a,b) union group by (a) union 全表。
上述结果可以用group by 与 union实现,如下:order by 1 ,2 就是根据第一二列进行排序
select group_id, job, sum(salary) from group_test group by group_id, job
union all
select group_id, null, sum(salary) from group_test group by group_id
union all
select null, null, sum(salary) from group_test
order by 1, 2;
可以结合grouping()函数一起使用,如下:
select group_id,case when grouping(group_id) = 0 and grouping(job) = 1 then '小计'
when grouping(group_id) = 1 and grouping(job) = 1 then '总计'
else job end as job,
sum(salary) as salary
from group_test
group by rollup(group_id, job);
显示如下:当grouping()为空的时候返回1,非空返回0.

(5)分析函数-group by cube
group by cube(a,b)=group by(a,b) union group by (a) union group by (b) union (全表)
select group_id,job,sum(salary) as salary from group_test group by cube (group_id,job),显示如下:

上述结果可以用group by 与 union实现,如下:
select group_id, job, sum(salary) from group_test group by group_id, job
union all
select group_id, null, sum(salary) from group_test group by group_id
union all
select null, job, sum(salary) from group_test group by job
union all
select null, null, sum(salary) from group_test
order by 1, 2;
(5)merge into
最近接触到oracle这个函数,感觉挺好的。假如我们现在有两个表A,B,其中有部分数据是A ,B表一样的,有一部分数据是B有的,而A表没有的,现在有一个需求,将两个表整合在一个表中。那么按照之前,我们一般都是根据A表某个唯一的字段查询B表,如果存在,则跳过,不存在则插入到A表。要实现这个需求,我们需要两步才能实现,如果使用merge into 则方便很多了。
merge into的结构如下:
MERGE INTO table_name alias1
USING (table|view|sub_query) alias2
ON (join condition)
WHEN MATCHED THEN
UPDATE table_name
SET col1 = col_val1,
col2 = col_val2
WHEN NOT MATCHED THEN
INSERT (column_list) VALUES (column_values);
下面我们看一个简单的例子: A表:group_test B表:testemp1
A表的数据如下: B表的数据如下:
现在将B中deptno为50的数据插入到A表,如下:
merge into group_test t1
using (select * from testemp1 where deptno = 50) t2
on (t1.group_id = t2.deptno)
when matched then
update set t1.salary = 1000
when not matched then
insert (group_id, job,name,salary) values (t2.deptno,t2.ename,'gdpuzxs',5000)
显示如下: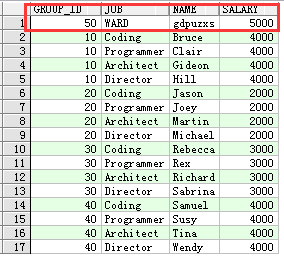 因为A表中没有group_id=50,所以执行插入。
接着,我们在执行一下上面那个语句,
显示如下: 因为A表中存在group_id=50,所以执行更新操作。
Oracle递归查询与常用分析函数的更多相关文章
- 【转载】Oracle递归查询:使用prior实现树操作【本文出自叶德华博客】
本文标题:Oracle递归查询:使用prior实现树操作 本文链接:http://yedward.net/?id=41 本文版权归作者所有,欢迎转载,转载请以文字链接的形式注明文章出处. Oracle ...
- Oracle SQL高级编程——分析函数(窗口函数)全面讲解
Oracle SQL高级编程--分析函数(窗口函数)全面讲解 注:本文来源于:<Oracle SQL高级编程--分析函数(窗口函数)全面讲解> 概述 分析函数是以一定的方法在一个与当前行相 ...
- 【2016-11-7】【坚持学习】【Day22】【Oracle 递归查询】
直接在oracle 递归查询语句 select * from groups start with id=:DeptId connect by prior superiorid =id 往下找 sele ...
- Oracle DBA 的常用Unix参考手册(一)
作为一名Oracle DBA,在所难免要接触Unix,但是Unix本身又是极其复杂的,想要深刻掌握同样很不容易.那么到底我们该怎么入手呢?Donald K Burleson 的<Unix for ...
- oracle rac 数据库常用命令
oracle rac 数据库常用命令:1.所有实例和服务的状态srvclt status database -d orcl单个实例的状态:srvctl status instance -d orcl ...
- Oracle表的常用查询实验(一)
Oracle表的常用查询实验(一) 练习1.请查询表DEPT中所有部门的情况. select * from dept; 练习2.查询表DEPT中的部门号.部门名称两个字段的所有信息. select d ...
- Oracle EBS DBA常用SQL - 安装/补丁【Z】
Oracle EBS DBA常用SQL - 安装/补丁 检查应用补丁有没有安装:select bug_number,last_update_date from ad_bugs where bug_nu ...
- Oracle递归查询start with connect by prior
一.基本语法 connect by递归查询基本语法是: select 1 from 表格 start with ... connect by prior id = pId start with:表示以 ...
- Oracle递归查询,Oracle START WITH……CONNECT BY查询
Oracle递归查询,Oracle START WITH……CONNECT BY查询,Oracle树查询 ================================ ©Copyright 蕃薯耀 ...
随机推荐
- xmpp muc 群聊协议 1
翻译来自 :http://wiki.jabbercn.org/index.php?title=XEP-0045&variant=zh-cn#.E6.9C.AF.E8.AF.AD 通用术语 Af ...
- fastJson API
FastJSON是一个很好的java开源json工具类库,相比其他同类的json类库,它的速度的确是fast,最快!但是文档做得不好,在应用前不得不亲测一些功能. 实际上其他的json处理工具都和 ...
- 微信商城 Common Log Format Apache CustomLog
w 0- /Apr/::: +] "-" "Mozilla/5.0 (Windows NT 6.1; WOW64) AppleWebKit/537.36 (KHTML, ...
- iOS 数组containsObject:方法
今年上半年打算巩固一下基础知识,将工作和学习中遇到的疑惑尽量搞清楚原理.作为一个菜鸟级别的程序员,我深深的体会到算法和基础的重要性,如果说算法是内功,那么基础就是下盘,只有下盘稳住了,上面才不会轻易倒 ...
- SpringMVC 之数据转换和国际化
1. 数据绑定流程 SpringMVC 主框架将 ServletRequest 对象及目标方法的入参实例传递给 WebDataBinderFactory 实例,以创建 DataBinder 实例对象; ...
- SSH 框架整合总结
1. 搭建Struts2 环境 创建 struts2 的配置文件: struts.xml; 在 web.xml 中配置 struts2 的核心过滤器; // struts.xml <?xml v ...
- 2015-03-22——js常用的Array方法
Array array.concat(item...); //产生一个新数组如果item,是一个数组,那么它的每个元素会被分别添加(浅复制,只解析一层).示例:var a = [1, 3, 4];v ...
- pycharm调试
pycharm调试 flask app调试: 1.打开edit configurations面板 run===>edit configurations(图一或图二处都可以) 2.配置项目信息 点 ...
- Vue(4)- 获取原生的DOM的方式、DIY脚手架、vue-cli的使用
一.获取原生的DOM的方式 在js中,我们可以通过id.class或者标签获取DOM元素,vue中也为我们提供了获取原生DOM的方法,就是给标签或者组件添加ref属性,通过this.$refs获取,如 ...
- Python基础教程-List和Tuple
List Python内置的一种数据类型是列表:list.list是一种有序的集合,可以随时添加和删除其中的元素. 比如: >>> classmates = ['Michael',' ...