flink on yarn部分源码解析 (FLIP-6 new mode)
我们在https://www.cnblogs.com/dongxiao-yang/p/9403427.html文章里分析了flink提交single job到yarn集群上的代码,flink在1.5版本后对整个框架的deploy方式重构了全新的流程(参考https://cwiki.apache.org/confluence/pages/viewpage.action?pageId=65147077),本文基于flink1.6.1版本源码分析一下新模式在yarn的整个流程。
一 初始化
客户端本地整个初始化流程与https://www.cnblogs.com/dongxiao-yang/p/9403427.html差不多,由于newmode的关系,几个有区别的地方为
1 final ClusterDescriptor<T> clusterDescriptor = customCommandLine.createClusterDescriptor(commandLine); ,返回的具体对象类为YarnClusterDescriptor
2 ClientFrontend.runProgram方法会进入if (isNewMode && clusterId == null && runOptions.getDetachedMode()) {..方法块,调用路径为
YarnClusterDescriptor.deployJobCluster->AbstractYarnClusterDescriptor.deployInternal->startAppMaster
这个时候我们发现AM的启动类变成了YarnJobClusterEntrypoint
二 YarnJobClusterEntrypoint
YarnJobClusterEntrypoint的main函数是整个AM进程的启动入口,在方法的最后会调用其祖父类ClusterEntrypoint的startCluster方法开启整个集群组件的启动过程。
具体调用链路为startCluster->runCluster->startClusterComponents
protected void startClusterComponents(

			Configuration configuration,

			RpcService rpcService,

			HighAvailabilityServices highAvailabilityServices,

			BlobServer blobServer,

			HeartbeatServices heartbeatServices,

			MetricRegistry metricRegistry) throws Exception {

		synchronized (lock) {

			dispatcherLeaderRetrievalService = highAvailabilityServices.getDispatcherLeaderRetriever();

			resourceManagerRetrievalService = highAvailabilityServices.getResourceManagerLeaderRetriever();

			LeaderGatewayRetriever<DispatcherGateway> dispatcherGatewayRetriever = new RpcGatewayRetriever<>(

				rpcService,

				DispatcherGateway.class,

				DispatcherId::fromUuid,

				10,

				Time.milliseconds(50L));

			LeaderGatewayRetriever<ResourceManagerGateway> resourceManagerGatewayRetriever = new RpcGatewayRetriever<>(

				rpcService,

				ResourceManagerGateway.class,

				ResourceManagerId::fromUuid,

				10,

				Time.milliseconds(50L));

			// TODO: Remove once we have ported the MetricFetcher to the RpcEndpoint

			final ActorSystem actorSystem = ((AkkaRpcService) rpcService).getActorSystem();

			final Time timeout = Time.milliseconds(configuration.getLong(WebOptions.TIMEOUT));

			webMonitorEndpoint = createRestEndpoint(

				configuration,

				dispatcherGatewayRetriever,

				resourceManagerGatewayRetriever,

				transientBlobCache,

				rpcService.getExecutor(),

				new AkkaQueryServiceRetriever(actorSystem, timeout),

				highAvailabilityServices.getWebMonitorLeaderElectionService());

			LOG.debug("Starting Dispatcher REST endpoint.");

			webMonitorEndpoint.start();

			resourceManager = createResourceManager(

				configuration,

				ResourceID.generate(),

				rpcService,

				highAvailabilityServices,

				heartbeatServices,

				metricRegistry,

				this,

				clusterInformation,

				webMonitorEndpoint.getRestBaseUrl());

			jobManagerMetricGroup = MetricUtils.instantiateJobManagerMetricGroup(metricRegistry, rpcService.getAddress());

			final HistoryServerArchivist historyServerArchivist = HistoryServerArchivist.createHistoryServerArchivist(configuration, webMonitorEndpoint);

			dispatcher = createDispatcher(

				configuration,

				rpcService,

				highAvailabilityServices,

				resourceManager.getSelfGateway(ResourceManagerGateway.class),

				blobServer,

				heartbeatServices,

				jobManagerMetricGroup,

				metricRegistry.getMetricQueryServicePath(),

				archivedExecutionGraphStore,

				this,

				webMonitorEndpoint.getRestBaseUrl(),

				historyServerArchivist);

			LOG.debug("Starting ResourceManager.");

			resourceManager.start();

			resourceManagerRetrievalService.start(resourceManagerGatewayRetriever);

			LOG.debug("Starting Dispatcher.");

			dispatcher.start();

			dispatcherLeaderRetrievalService.start(dispatcherGatewayRetriever);

		}

	}
从上述代码里可以发现,AM里面包含两个重要的全新组件:ResourceManager和Dispatcher
在FLIP6的改进下,Resource这个全新的角色定义如下:
The main tasks of the ResourceManager are
Acquire new TaskManager (or slots) by starting containers, or allocating them to a job
Giving failure notifications to JobManagers and TaskManagers
Caching TaskManagers (containers) to be reused, releasing TaskManagers (containers) that are unused for a certain period.
大体来说就是由ResourceManager负责和YARN集群进行资源申请上的沟通,并给指定JobManager分配特定
aa
在yarn模式下,ResourceManager对应的实现类为YarnResourceManager,在这个类的initialize方法中,我们可以发现它实例化了两个client,resourceManagerClient和nodeManagerClient,这两个客户端分别包含了Yarn框架的AMRMClientAsync和NMClient,分别用来负责和Yarn的ResourceManager和NodeManager通信。
    @Override

    protected void initialize() throws ResourceManagerException {

        try {

            resourceManagerClient = createAndStartResourceManagerClient(

                yarnConfig,

                yarnHeartbeatIntervalMillis,

                webInterfaceUrl);

        } catch (Exception e) {

            throw new ResourceManagerException("Could not start resource manager client.", e);

        }

        nodeManagerClient = createAndStartNodeManagerClient(yarnConfig);

    }
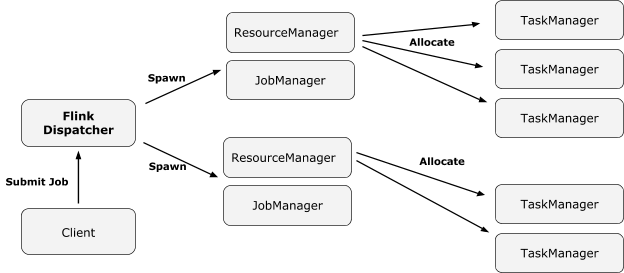
关于Dispatcher的定义如下,它取代了以前由jobManager负责的提交job给集群的工作,并且预期将来可以由一个dispatcher提交任务给多个集群。
The new design includes the concept of a Dispatcher. The dispatcher accepts job submissions from clients and starts the jobs on their behalf on a cluster manager.
The dispatcher is introduced because:
Some cluster managers need a central job spawning and monitoring instance
It subsumes the role of the standalone JobManager, waiting for jobs to be submitted
在本文的条件下,Dispatcher具体的实现类为MiniDispatcher,在dispatcher.start();调用后,整个调用链经过了
leaderElectionService.start(this)->
ZooKeeperLeaderElectionService.start->
ZooKeeperLeaderElectionService.isLeader->
Dispatcher.grantLeadership->
tryAcceptLeadershipAndRunJobs->
runJob->
createJobManagerRunner
调到了DisPatcher的createJobManagerRunner方法。
	private CompletableFuture<JobManagerRunner> createJobManagerRunner(JobGraph jobGraph) {

		final RpcService rpcService = getRpcService();

		final CompletableFuture<JobManagerRunner> jobManagerRunnerFuture = CompletableFuture.supplyAsync(

			CheckedSupplier.unchecked(() ->

				jobManagerRunnerFactory.createJobManagerRunner(

					ResourceID.generate(),

					jobGraph,

					configuration,

					rpcService,

					highAvailabilityServices,

					heartbeatServices,

					blobServer,

					jobManagerSharedServices,

					new DefaultJobManagerJobMetricGroupFactory(jobManagerMetricGroup),

					fatalErrorHandler)),

			rpcService.getExecutor());

		return jobManagerRunnerFuture.thenApply(FunctionUtils.uncheckedFunction(this::startJobManagerRunner));

	}
上述代码可以分为两个部分,第一部分经过DefaultJobManagerRunnerFactory.createJobManagerRunner->new JobManagerRunner->new JobMaster初始化了JobMaster对象。
第二部分经过
startJobManagerRunner->
JobManagerRunner.start->
ZooKeeperLeaderElectionService.start->
ZooKeeperLeaderElectionService.isLeader->

JobManagerRunner.grantLeadership->
verifyJobSchedulingStatusAndStartJobManager->

jobMaster.start->
startJobExecution->
	private Acknowledge startJobExecution(JobMasterId newJobMasterId) throws Exception {

		validateRunsInMainThread();

		checkNotNull(newJobMasterId, "The new JobMasterId must not be null.");

		if (Objects.equals(getFencingToken(), newJobMasterId)) {

			log.info("Already started the job execution with JobMasterId {}.", newJobMasterId);

			return Acknowledge.get();

		}

		setNewFencingToken(newJobMasterId);

		startJobMasterServices();

		log.info("Starting execution of job {} ({})", jobGraph.getName(), jobGraph.getJobID());

		resetAndScheduleExecutionGraph();

		return Acknowledge.get();

	}

	private void startJobMasterServices() throws Exception {

		// start the slot pool make sure the slot pool now accepts messages for this leader

		slotPool.start(getFencingToken(), getAddress());

		//TODO: Remove once the ZooKeeperLeaderRetrieval returns the stored address upon start

		// try to reconnect to previously known leader

		reconnectToResourceManager(new FlinkException("Starting JobMaster component."));

		// job is ready to go, try to establish connection with resource manager

		//   - activate leader retrieval for the resource manager

		//   - on notification of the leader, the connection will be established and

		//     the slot pool will start requesting slots

		resourceManagerLeaderRetriever.start(new ResourceManagerLeaderListener());

	}
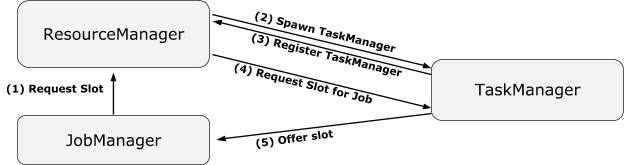
JobMaster首先调用startJobMasterServices进行连接flink resource manager ,启动jobmanager服务并注册等操作。然后通过resetAndScheduleExecutionGraph执行任务资源的初始化申请。resetAndScheduleExecutionGraph方法首先调用createAndRestoreExecutionGraph生成了整个任务的executiongraph,然后通过
scheduleExecutionGraph->
ExecutionGraph.scheduleForExecution->
scheduleEager->
ExecutionJobVertex.allocateResourcesForAll->
Execution.allocateAndAssignSlotForExecution->
ProviderAndOwner.allocateSlot->
SlotPool.allocateSlot->
allocateMultiTaskSlot
提出对任务slot资源的申请
SlotPool.requestSlotFromResourceManager->
ResourceManager.requestSlot->
SlotManager.registerSlotRequest->
internalRequestSlot->
ResourceActionsImpl.allocateResource->
YarnResourceManager.startNewWorker->
申请启动新的TaskManager
    @Override

    public void startNewWorker(ResourceProfile resourceProfile) {

        log.info("startNewWorker");

        // Priority for worker containers - priorities are intra-application

        //TODO: set priority according to the resource allocated

        Priority priority = Priority.newInstance(generatePriority(resourceProfile));

        int mem = resourceProfile.getMemoryInMB() < 0 ? defaultTaskManagerMemoryMB : resourceProfile.getMemoryInMB();

        int vcore = resourceProfile.getCpuCores() < 1 ? defaultCpus : (int) resourceProfile.getCpuCores();

        Resource capability = Resource.newInstance(mem, vcore);

        requestYarnContainer(capability, priority);

    }

    private void requestYarnContainer(Resource resource, Priority priority) {

        resourceManagerClient.addContainerRequest(new AMRMClient.ContainerRequest(resource, null, null, priority));

        // make sure we transmit the request fast and receive fast news of granted allocations

        resourceManagerClient.setHeartbeatInterval(FAST_YARN_HEARTBEAT_INTERVAL_MS);

        numPendingContainerRequests++;

        log.info("Requesting new TaskExecutor container with resources {}. Number pending requests {}.",

            resource,

            numPendingContainerRequests);

    }
上述代码就是flink resourcemanager 通过yarn客户端与yarn通信申请taskmanager部分代码
	@Override

	public void onContainersAllocated(List<Container> containers) {

		log.info("onContainersAllocated");

		runAsync(() -> {

			for (Container container : containers) {

				log.info(

					"Received new container: {} - Remaining pending container requests: {}",

					container.getId(),

					numPendingContainerRequests);

				if (numPendingContainerRequests > 0) {

					numPendingContainerRequests--;

					final String containerIdStr = container.getId().toString();

					final ResourceID resourceId = new ResourceID(containerIdStr);

					workerNodeMap.put(resourceId, new YarnWorkerNode(container));

					try {

						// Context information used to start a TaskExecutor Java process

						ContainerLaunchContext taskExecutorLaunchContext = createTaskExecutorLaunchContext(

							container.getResource(),

							containerIdStr,

							container.getNodeId().getHost());

						nodeManagerClient.startContainer(container, taskExecutorLaunchContext);

					} catch (Throwable t) {

						log.error("Could not start TaskManager in container {}.", container.getId(), t);

						// release the failed container

						workerNodeMap.remove(resourceId);

						resourceManagerClient.releaseAssignedContainer(container.getId());

						// and ask for a new one

						requestYarnContainer(container.getResource(), container.getPriority());

					}

				} else {

					// return the excessive containers

					log.info("Returning excess container {}.", container.getId());

					resourceManagerClient.releaseAssignedContainer(container.getId());

				}

			}

			// if we are waiting for no further containers, we can go to the

			// regular heartbeat interval

			if (numPendingContainerRequests <= 0) {

				resourceManagerClient.setHeartbeatInterval(yarnHeartbeatIntervalMillis);

			}

		});

	}
am客户端在taskmanager的客户端里会设置启动的主类org.apache.flink.yarn.YarnTaskExecutorRunner
flink on yarn部分源码解析 (FLIP-6 new mode)的更多相关文章
- flink on yarn部分源码解析
转发请注明原创地址:https://www.cnblogs.com/dongxiao-yang/p/9403427.html flink任务的deploy形式有很多种选择,常见的有standalone ...
- [源码解析] 从TimeoutException看Flink的心跳机制
[源码解析] 从TimeoutException看Flink的心跳机制 目录 [源码解析] 从TimeoutException看Flink的心跳机制 0x00 摘要 0x01 缘由 0x02 背景概念 ...
- [源码解析] 当 Java Stream 遇见 Flink
[源码解析] 当 Java Stream 遇见 Flink 目录 [源码解析] 当 Java Stream 遇见 Flink 0x00 摘要 0x01 领域 1.1 Flink 1.2 Java St ...
- [源码解析] Flink的Slot究竟是什么?(1)
[源码解析] Flink的Slot究竟是什么?(1) 目录 [源码解析] Flink的Slot究竟是什么?(1) 0x00 摘要 0x01 概述 & 问题 1.1 Fllink工作原理 1.2 ...
- [源码解析] Flink的Slot究竟是什么?(2)
[源码解析] Flink 的slot究竟是什么?(2) 目录 [源码解析] Flink 的slot究竟是什么?(2) 0x00 摘要 0x01 前文回顾 0x02 注册/更新Slot 2.1 Task ...
- 《Flink 源码解析》—— 源码编译运行
更新一篇知识星球里面的源码分析文章,去年写的,周末自己录了个视频,大家看下效果好吗?如果好的话,后面补录发在知识星球里面的其他源码解析文章. 前言 之前自己本地 clone 了 Flink 的源码,编 ...
- Flink 源码解析 —— 源码编译运行
更新一篇知识星球里面的源码分析文章,去年写的,周末自己录了个视频,大家看下效果好吗?如果好的话,后面补录发在知识星球里面的其他源码解析文章. 前言 之前自己本地 clone 了 Flink 的源码,编 ...
- Flink 源码解析 —— 如何获取 ExecutionGraph ?
https://t.zsxq.com/UnA2jIi 博客 1.Flink 从0到1学习 -- Apache Flink 介绍 2.Flink 从0到1学习 -- Mac 上搭建 Flink 1.6. ...
- Flink 源码解析 —— 深度解析 Flink 是如何管理好内存的?
前言 如今,许多用于分析大型数据集的开源系统都是用 Java 或者是基于 JVM 的编程语言实现的.最着名的例子是 Apache Hadoop,还有较新的框架,如 Apache Spark.Apach ...
随机推荐
- 四种有能力取代Cookies的客户端Web存储方案
目前在用户的网络浏览器中保存大量数据需要遵循几大现有标准,每一种标准都拥有自己的优势.短板.独特的W3C标准化状态以及浏览器支持级别.但无论如何,这些标准的实际表现都优于广泛存在的cookies机制. ...
- PASCAL 的开源工具
PASCAL 的开源工具: 1)free pascal 代码编译器 http://www.freepascal.org/ 2)lazarus 图形界面开发工具 http://www.la ...
- [Android Memory] Android系统中查看某个应用当前流量的方法
转载自: http://blog.sina.com.cn/s/blog_628cc2b70101dbyy.html 一.查看原理:某个应用的网络流量数据保存在系统的/proc/uid_stat/$UI ...
- Mybatis数据库操作的返回值
mybatis配置 <!-- 配置mybatis --> <bean id="sqlSessionFactory" class="org.mybatis ...
- [转] SSIS可靠性和扩展性—事务
本文转自:http://www.cnblogs.com/tylerdonet/archive/2011/09/23/2186579.html 在这一个随笔中将介绍在package中如何使用事务来保证数 ...
- matplotlib绘制常用统计图
常见统计图:单条折线图.多条折线图.直方图.柱状图.饼状图 #!/usr/bin/python # -*- coding: utf-8 -*- import numpy as np import ma ...
- 可以ping通虚拟机但不能telnet 9000端口
突然发现eclipse不能连上虚拟机了,报错是本机连接不上9000的端口. 觉得有点奇怪,就在命令行里试图ping通虚拟机,成功:但尝试这telnet 9000端口的时候,却报错连接不上. 上网查了这 ...
- automake--关于两个文件configure.in和Makefile.am的编写
http://blog.csdn.net/shanzhizi/article/details/30251763 automake主要通过编辑Makefile.am来控制它的行为,下面就常用的三个Mak ...
- 云计算之路-试用Azure:拐弯抹角的负载均衡
负载均衡是云服务商标配的免费服务.阿里云的对应产品叫SLB,UCloud的对应产品叫ULB,操作都很简单直观,进入负载均衡管理控制台,添加负载均衡,选择相应的虚拟机即可. 而Azure则完全不一样,在 ...
- ThinkPHP 3.2 中获取所有函数方法名,以及注释,完整可运行
<?php namespace Home\Controller; use Common\Controller\BaseController; class AuthController exten ...