yii2 RESTful API Develop
参考文档:http://www.yiiframework.com/doc-2.0/guide-rest.html
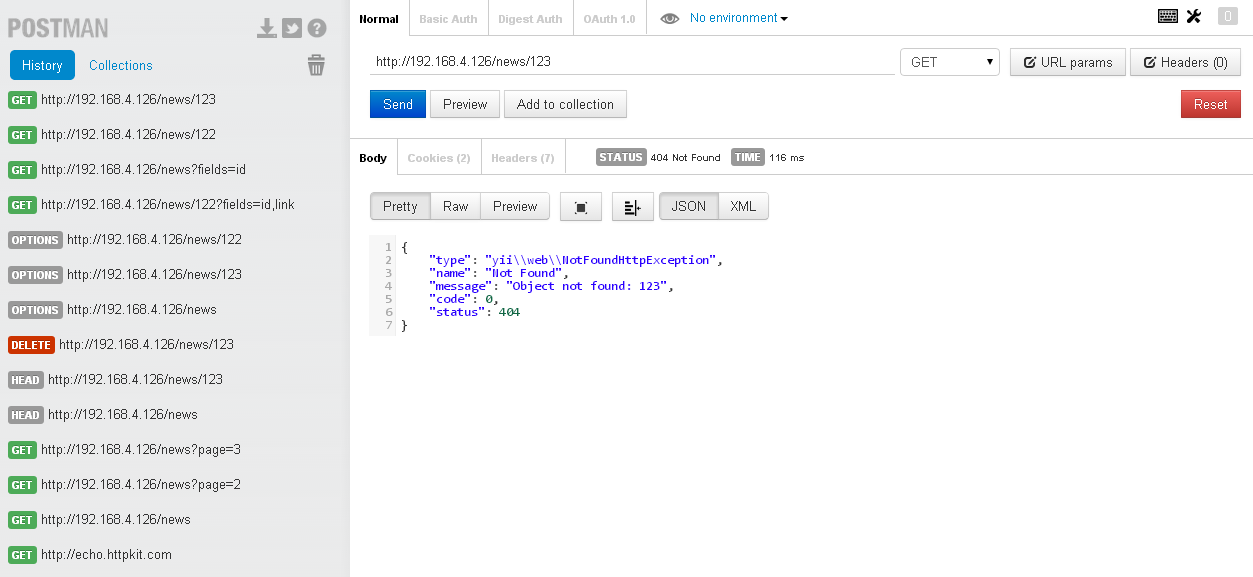
以 DB 中的 news 表为例创建该资源的 RESTful API,最终的测试通过工具 POSTMAN 测试如下图;
通过 yii2 ,非常方便的创建 RESTful API
步骤:
- 准备工作,配置友好的 URLManager
- 创建News Model (via gii)
- 创建News Controller
- 测试用 POSTMAN 工具或者 CURL
- Restful Api 验证和授权
- 配置 friendly Url
参看另一篇文章 http://www.cnblogs.com/ganiks/p/yii2-config.html
		'urlManager' => [

			'enablePrettyUrl' => true,

			'showScriptName' => false,

			'enableStrictParsing' => true,

			'rules' => [

				'<controller:\w+>/<id:\d+>' => '<controller>/view',

				'<controller:\w+>/<action:\w+>/<id:\d+>' => '<controller>/<action>',

				'<controller:\w+>/<action:\w+>' => '<controller>/<action>',

				['class' => 'yii\rest\UrlRule', 'controller' => ['user', 'news']],

			],

		]
原创文章,转载请注明 http://www.cnblogs.com/ganiks/
.htaccess 不要遗漏
更新20140731:特别说明, 上面的
rules配置有误, 用于yii1.x版本中的rules(前三行)在这个地方时多余的,而且引起了一个很严重的 bug
参看另一篇随笔 http://www.cnblogs.com/ganiks/p/yii2-RESTful-API-405-Method-Not-Allowed.html
- 创建 News Model
- 创建 News Controller
<?php

namespace app\controllers;

use yii\rest\ActiveController;

class NewsController extends ActiveController

{

    public $modelClass = 'app\models\News';

}
- 测试
用Chrome工具 POSTMAN 测试
GET /news: list all news page by page;

HEAD /news: show the overview information of new listing;

POST /news: create a new new;

GET /news/123: return the details of the new 123;

HEAD /news/123: show the overview information of new 123;

PATCH /news/123 and PUT /news/123: update the new 123;

DELETE /news/123: delete the new 123;

OPTIONS /news: show the supported verbs regarding endpoint /news;

OPTIONS /news/123: show the supported verbs regarding endpoint /news/123.
遗留问题: 如何用 POSTMAN 工具测试 PUT 方法?
用 CURL 命令行测试
GET 方法
E:\>curl http://192.168.4.126/news/126

{

    "array": {

        "type": "yii\\web\\UnauthorizedHttpException",

        "name": "Unauthorized",

        "message": "You are requesting with an invalid access token.",

        "code": 0,

        "status": 401

    }

}
授权访问
E:\>curl http://192.168.4.126/news/126?access-token=100-token

{

    "array": {

        "id": "126",

        "image": "201_img.jpg",

        "link": "http:\\/\\/www.surveymonkey.com\\/s\\/HZYZ3ZZ",

        "show_date": "2012-05-15",

        "state": 1,

        "show_order": 18

    }

}
PUT 方法
E:\>curl -X PUT -d image="test_method_put" http://192.168.4.126/news/126

{

    "array": {

        "type": "yii\\web\\UnauthorizedHttpException",

        "name": "Unauthorized",

        "message": "You are requesting with an invalid access token.",

        "code": 0,

        "status": 401

    }

}

E:\>curl -X PUT -d image="test_method_put" http://192.168.4.126/news/126?access-token=100-token

{

    "array": {

        "id": "126",

        "image": "test_method_put",

        "link": "http:\\/\\/www.surveymonkey.com\\/s\\/HZYZ3ZZ",

        "show_date": "2012-05-15",

        "state": 1,

        "show_order": 18

    }

}

E:\>curl http://192.168.4.126/news/126?access-token=100-token

{

    "array": {

        "id": "126",

        "image": "test_method_put",

        "link": "http:\\/\\/www.surveymonkey.com\\/s\\/HZYZ3ZZ",

        "show_date": "2012-05-15",

        "state": 1,

        "show_order": 18

    }

}
DELETE 方法
E:\>curl -X DELETE http://192.168.4.126/news/126?access-token=100-token

E:\>curl http://192.168.4.126/news/126?access-token=100-token

{

    "array": {

        "type": "yii\\web\\NotFoundHttpException",

        "name": "Not Found",

        "message": "Object not found: 126",

        "code": 0,

        "status": 404

    }

}
POST 方法
E:\>curl -X POST -d image="test_method_post" http://192.168.4.126/news?access-token=100-token

{

    "array": {

        "image": "test_method_post",

        "id": "165"

    }

}

E:\>curl http://192.168.4.126/news/165?access-token=100-token

{

    "array": {

        "id": "165",

        "image": "test_method_post",

        "link": "",

        "show_date": "0000-00-00",

        "state": 1,

        "show_order": 0

    }

}
其他方法
E:\>curl -X OPTIONS http://192.168.4.126/news/165?access-token=100-token

E:\>curl -X OPTIONS http://192.168.4.126/news?access-token=100-token

E:\>curl -X HEAD http://192.168.4.126/news?access-token=100-token

E:\>curl -i http://192.168.4.126/news/165?access-token=100-token

HTTP/1.1 200 OK

Date: Thu, 31 Jul 2014 06:37:40 GMT

Server: Apache/2.2.9 (Win32) PHP/5.4.30 mod_fcgid/2.3.6

X-Powered-By: PHP/5.4.30

Content-Length: 99

Content-Type: application/json; charset=UTF-8

{"id":"165","image":"test_method_post","link":"","show_date":"0000-00-00","state":1,"show_order":0}

E:\>
- Restful Api 验证和授权
首先参看我的另一篇译文 http://www.cnblogs.com/ganiks/p/Yii2-RESTful-Authentication-and-Authorization.html
官方文档中介绍了3种发送 access-token 的方法, 方便测试的有 http basic Auth 以及 Query parameter 两种
这里简单介绍下配置的流程:
- config/web.php 设置
enableSession
        'user' => [

            'identityClass' => 'app\models\User',

            'enableAutoLogin' => true,

            'enableSession' => false,

        ]
- controllers/news.php
use yii\filters\auth\HttpBasicAuth;

use yii\helpers\ArrayHelper;

use yii\filters\auth\CompositeAuth;

use yii\filters\auth\HttpBearerAuth;

use yii\filters\auth\QueryParamAuth;

	public function behaviors()

	{

		return ArrayHelper::merge(parent::behaviors(), [

			'authenticator' => [

				#这个地方使用`ComopositeAuth` 混合认证

				'class' => CompositeAuth::className(),

				#`authMethods` 中的每一个元素都应该是 一种 认证方式的类或者一个 配置数组

				'authMethods' => [

					HttpBasicAuth::className(),

					HttpBearerAuth::className(),

					QueryParamAuth::className(),

				]

			]

		]);

	}
- models/User.php
    private static $users = [

        '100' => [

            'id' => '100',

            'username' => 'admin',

            'password' => 'admin',

            'authKey' => 'test100key',

            'accessToken' => '100-token',

        ],

        '101' => [

            'id' => '101',

            'username' => 'demo',

            'password' => 'demo',

            'authKey' => 'test101key',

            'accessToken' => '101-token',

        ],

    ];

    public static function findIdentityByAccessToken($token, $type = null)

    {

        foreach (self::$users as $user) {

            if ($user['accessToken'] === $token) {

                return new static($user);

            }

        }

        return null;

    }
两种方式测试一下:
- 访问 http://192.168.4.126/news/122 ,在弹出的登录对话框中输入用户名
100-token 或者 101-token, 密码任意,登录 - 直接访问 http://192.168.4.126/news/122?access-token=101-token
yii2 RESTful API Develop的更多相关文章
- RESTful API Develop
yii2 RESTful API Develop 参考文档:http://www.yiiframework.com/doc-2.0/guide-rest.html 以 DB 中的 news 表为例 ...
- Yii2 Restful Api 401
采用Yii2 Restful Api方式为APP提供数据,默认你已经做好了所有的编码和配置工作.采用Postman测试接口: 出现这个画面的一个可能原因是:access_token的写法有误,如果你使 ...
- Yii2 restful api创建,认证授权以及速率控制
Yii2 restful api创建,认证授权以及速率控制 下面是对restful从创建到速率控制的一个详细流程介绍,里面的步骤以及截图尽可能详细,熟悉restful的盆友可能觉得过于繁琐,新手不妨耐 ...
- yii2 RESTful API 405 Method Not Allowed
关于 Yii2 中 RESTful API 的开发,可以参考另一篇随笔 http://www.cnblogs.com/ganiks/p/yii2-restful-api-dev.html 测试的过程中 ...
- Yii2 Restful api设计--App接口编程
Yii2框架写一套RESTful风格的API,对照魏曦教你学 一,入门 一.目录结构 实现一个简单地RESTful API只需用到三个文件.目录如下: frontend ├─ config │ └ m ...
- yii2 restful api——app接口编程实例
<?php namespace common\components; use common\models\Cart; use common\models\User; use Yii; use y ...
- Yii2 Restful API 原理分析
Yii2 有个很重要的特性是对 Restful API的默认支持, 通过短短的几个配置就可以实现简单的对现有Model的RESTful API 参考另一篇文章: http://www.cnblogs. ...
- yii2 RESTful api的详细使用
作者:白狼 出处:http://www.manks.top/yii2-restful-api.html 本文版权归作者,欢迎转载,但未经作者同意必须保留此段声明,且在文章页面明显位置给出原文连接,否则 ...
- yii2 restful api --app接口编程
转 http://www.yiichina.com/tutorial/1143yii2中restful url访问配置, 登陆接口access-token验证类 [ 2.0 版本 ] 登陆接口acce ...
随机推荐
- 如何在 CentOS 7 上安装 Percona Server
在这篇文章中我们将了解关于 Percona 服务器,一个开源的MySQL,MariaDB的替代品.InnoDB的数据库引擎使得Percona 服务器非常有吸引力,如果你需要的高性能,高可靠性和高性价比 ...
- 纯 PHP 代码最好在文件末尾删除 PHP 结束标记
如果文件内容是纯 PHP 代码,最好在文件末尾删除 PHP 结束标记.这可以避免在 PHP 结束标记之后万一意外加入了空格或者换行符,会导致 PHP 开始输出这些空白,而脚本中此时并无输出的意图. & ...
- MySQL建表设置外键提示错误
错误内容: ERROR 1064 (42000): You have an error in your SQL syntax; check the manual that corresponds to ...
- [CSS3] Make a One-time CSS Animation that Does Not Revert to its Original Style
We'll add animation to patio11bot using CSS keyframes. When defining a CSS animation, you can add it ...
- Asp.Net生成无限级菜单
首先创建SQL脚本 ) DROP TABLE [Menu] CREATE TABLE [Menu] ( , ) NOT NULL, ) NULL, ), ) NULL, ), [AddTime] [d ...
- 使用JTextArea示例
相对于JLabel显示提示文字,JTextArea有一个先天优势:文字可以拷贝出来.经过下面设置它也能在外观上和JLabel一致. 代码如下: JTextArea txtArea=new JTextA ...
- C#秘密武器之特性
一.概述 Attribute说白了就是一个类而已,里边一般含有一些附加信息,或者一些特殊的处理逻辑,以便告诉编译器应用该特性的东东是个奇葩,需要特殊对待! 二.使用时的注意事项 2.1. Attrib ...
- iOS key value coding kvc在接收json数据与 model封装中的使用
iOS key value coding kvc在接收json数据与 model封装中的使用 使用 kvc 能够极大的简化代码工作,及以后的接口维护工作: 1:先创建MovieModel类.h和 . ...
- 如何为iTunes Connect准备应用
原地址:http://blog.sina.com.cn/s/blog_947c4a9f0101dded.html 如果你已经成功注册了iOS开发者,那么现在就可以登陆iTunes Connect来管理 ...
- 设计模式 - 迭代器模式(iterator pattern) 具体解释
迭代器模式(iterator pattern) 详细解释 本文地址: http://blog.csdn.net/caroline_wendy 迭代器模式(iterator pattern) : 提供一 ...