
android Application Component研究之Activity(二)
http://blog.csdn.net/windskier/article/details/7172710
本文为原创文章,欢迎转载!转载时请注明出处:http://blog.csdn.net/windskier
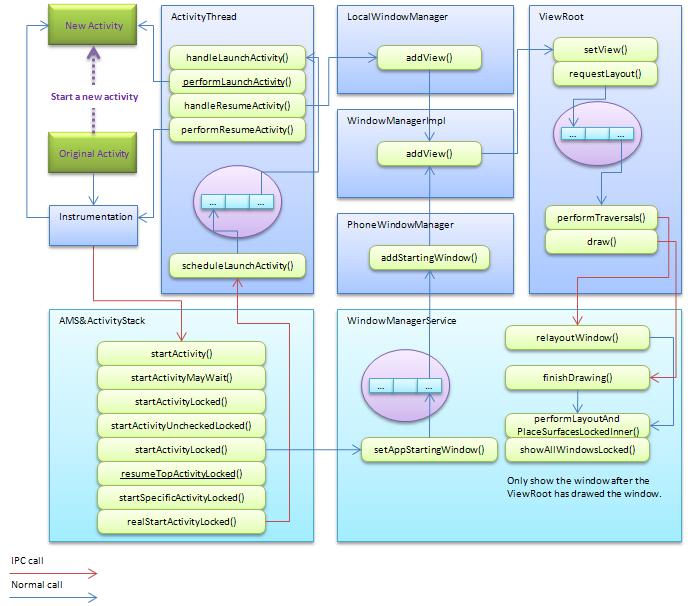
上篇文章分析完了task的创建或者复用,接下来接着分析activity在启动过程中还有哪些工作需要去完成?首先给出整个activity的过程图。
1. Starting Window
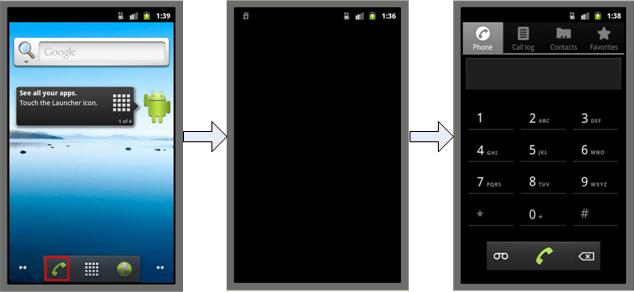
当该activity运行在新的task中或者进程中时,需要在activity显示之前显示一个Starting Window。如上图所示的setAppStartingWindow()方法,这个Starting Window上并没有绘制任何的view,它就是一个空白的Window,但是WMS赋予了它一个animation。这个Starting Window的处理过程需要注意几点:
·1. 在AMS请求WMS启动Starting Window时,这个过程是被置在WMS的消息队列中,也就是说这个过程是一个异步的过程,并且需要将其置在WMS消息队列的队首。
一般情况下,Starting Window是在activity Window之前显示的,但是由于是异步过程,因此从理论上来说activity Window较早显示是有可能的,如果这样的话,Starting Window将会被清除而不再显示。例如在addStartingWindow()@PhoneWindowManager.java方法调用addView之前做一个sleep操作,结果就可能不显示Starting Window。
setAppStartingWindow()@WindowManagerService.java
- // The previous app was getting ready to show a
- // starting window, but hasn't yet done so. Steal it!
- if (DEBUG_STARTING_WINDOW) Slog.v(TAG,
- "Moving pending starting from " + ttoken
- + " to " + wtoken);
- wtoken.startingData = ttoken.startingData;
- ttoken.startingData = null;
- ttoken.startingMoved = true;
- Message m = mH.obtainMessage(H.ADD_STARTING, wtoken);
- // Note: we really want to do sendMessageAtFrontOfQueue() because we
- // want to process the message ASAP, before any other queued
- // messages.
- mH.sendMessageAtFrontOfQueue(m);
- return;
2. Starting Window是设置了Animation的
addStartingWindow()@PhoneWindowManager.java
- final WindowManager.LayoutParams params = win.getAttributes();
- params.token = appToken;
- params.packageName = packageName;
- params.windowAnimations = win.getWindowStyle().getResourceId(
- com.android.internal.R.styleable.Window_windowAnimationStyle, 0);
- params.setTitle("Starting " + packageName);
3. Starting Window同普通的activity Window一样,均为一个PhoneWindow,其中包看着DecorView和ViewRoot。
addStartingWindow()@PhoneWindowManager.java
- try {
- Context context = mContext;
- boolean setTheme = false;
- //Log.i(TAG, "addStartingWindow " + packageName + ": nonLocalizedLabel="
- // + nonLocalizedLabel + " theme=" + Integer.toHexString(theme));
- if (theme != 0 || labelRes != 0) {
- try {
- context = context.createPackageContext(packageName, 0);
- if (theme != 0) {
- context.setTheme(theme);
- setTheme = true;
- }
- } catch (PackageManager.NameNotFoundException e) {
- // Ignore
- }
- }
- if (!setTheme) {
- context.setTheme(com.android.internal.R.style.Theme);
- }
- //创建PhoneWindow
- Window win = PolicyManager.makeNewWindow(context);
- if (win.getWindowStyle().getBoolean(
- com.android.internal.R.styleable.Window_windowDisablePreview, false)) {
- return null;
- }
- Resources r = context.getResources();
- win.setTitle(r.getText(labelRes, nonLocalizedLabel));
- win.setType(
- WindowManager.LayoutParams.TYPE_APPLICATION_STARTING);
- // Force the window flags: this is a fake window, so it is not really
- // touchable or focusable by the user. We also add in the ALT_FOCUSABLE_IM
- // flag because we do know that the next window will take input
- // focus, so we want to get the IME window up on top of us right away.
- win.setFlags(
- WindowManager.LayoutParams.FLAG_NOT_TOUCHABLE|
- WindowManager.LayoutParams.FLAG_NOT_FOCUSABLE|
- WindowManager.LayoutParams.FLAG_ALT_FOCUSABLE_IM,
- WindowManager.LayoutParams.FLAG_NOT_TOUCHABLE|
- WindowManager.LayoutParams.FLAG_NOT_FOCUSABLE|
- WindowManager.LayoutParams.FLAG_ALT_FOCUSABLE_IM);
- win.setLayout(WindowManager.LayoutParams.MATCH_PARENT,
- WindowManager.LayoutParams.MATCH_PARENT);
- final WindowManager.LayoutParams params = win.getAttributes();
- params.token = appToken;
- params.packageName = packageName;
- params.windowAnimations = win.getWindowStyle().getResourceId(
- com.android.internal.R.styleable.Window_windowAnimationStyle, 0);
- params.setTitle("Starting " + packageName);
- WindowManagerImpl wm = (WindowManagerImpl)
- context.getSystemService(Context.WINDOW_SERVICE);
- View view = win.getDecorView();
- if (win.isFloating()) {
- // Whoops, there is no way to display an animation/preview
- // of such a thing! After all that work... let's skip it.
- // (Note that we must do this here because it is in
- // getDecorView() where the theme is evaluated... maybe
- // we should peek the floating attribute from the theme
- // earlier.)
- return null;
- }
- if (localLOGV) Log.v(
- TAG, "Adding starting window for " + packageName
- + " / " + appToken + ": "
- + (view.getParent() != null ? view : null));
- <span style="white-space: pre;"> </span> //向WindowManager addView
- wm.addView(view, params);
- // Only return the view if it was successfully added to the
- // window manager... which we can tell by it having a parent.
- return view.getParent() != null ? view : null;
- }
2. 启动新进程
如果新启动的activity需要运行在新的进程中,那么这个流程就涉及到了一个新进程的启动,由于画图的局限性,这个过程在上图中没有体现出来。
所有的ProcessRecord被存储在mProcessNames变量中,以当前的进程的名字为索引。
@ActivityManagerService.java
- final ProcessMap<ProcessRecord> mProcessNames
- = new ProcessMap<ProcessRecord>();
进程名字的确定有如下规则:
①如果Activity设置了Android:process属性,则processName为属性设置的值;
@ComponentInfo.java
- public String processName;
②如果Activity没有设置android:process属性,那么Activity的processName为Application的processName。如果Application设置了process属性,那么processName为该值;如果没有设置,processName为Package的名字,即
@PackageItemInfo.java
- public String packageName;
整个进程启动的过程前面有一篇文章介绍过,就不在介绍。
3. Application Transition
Application Transition是android在实现窗口切换过程中,为了提供更好的用户体验和特定的指示,来呈现出的过渡效果。一般情况下,Application Transition是一个动画效果。
Application Transition有两种,一种是启动activity时的Transition动画,一种是启动一些widget时的Transition动画。
Transition类型的设置通过函数prepareAppTransition()@WindowManagerService.java来进行.
设置完Transition类型之后,通过executeAppTransition()@WindowManagerService.java函数来执行这个Transition。
prepareAppTransition()-->executeAppTransition()-->performLayoutAndPlaceSurfacesLocked();
具体的Transition的animation绘制过程在分析WMS再做分析。

3.1 activity Transition
当启动一个activity时,系统会给它的window呈现提供一个animation,这个animation可以在frameworks/base/core/res/res/values/styles.xml中进行设置
- <!-- Standard animations for a full-screen window or activity. -->
- <style name="Animation.Activity">
- <item name="activityOpenEnterAnimation">@anim/activity_open_enter</item>
- <item name="activityOpenExitAnimation">@anim/activity_open_exit</item>
- <item name="activityCloseEnterAnimation">@anim/activity_close_enter</item>
- <item name="activityCloseExitAnimation">@anim/activity_close_exit</item>
- <item name="taskOpenEnterAnimation">@anim/task_open_enter</item>
- <item name="taskOpenExitAnimation">@anim/task_open_exit</item>
- <item name="taskCloseEnterAnimation">@anim/task_close_enter</item>
- <item name="taskCloseExitAnimation">@anim/task_close_exit</item>
- <item name="taskToFrontEnterAnimation">@anim/task_open_enter</item>
- <item name="taskToFrontExitAnimation">@anim/task_open_exit</item>
- <item name="taskToBackEnterAnimation">@anim/task_close_enter</item>
- <item name="taskToBackExitAnimation">@anim/task_close_exit</item>
- <item name="wallpaperOpenEnterAnimation">@anim/wallpaper_open_enter</item>
- <item name="wallpaperOpenExitAnimation">@anim/wallpaper_open_exit</item>
- <item name="wallpaperCloseEnterAnimation">@anim/wallpaper_close_enter</item>
- <item name="wallpaperCloseExitAnimation">@anim/wallpaper_close_exit</item>
- <item name="wallpaperIntraOpenEnterAnimation">@anim/wallpaper_intra_open_enter</item>
- <item name="wallpaperIntraOpenExitAnimation">@anim/wallpaper_intra_open_exit</item>
- <item name="wallpaperIntraCloseEnterAnimation">@anim/wallpaper_intra_close_enter</item>
- <item name="wallpaperIntraCloseExitAnimation">@anim/wallpaper_intra_close_exit</item>
- </style>
activity启动的animation根据当前的activity所在的task状态有所不同,从上面的xml中的animation定义中就可以看出,它的分类:
★ 如果启动的activity运行在原来的task中,那么使用animation activityOpenEnterAnimation/activityOpenExitAnimation;
★ 如果启动的activity运行在新的task中,那么使用animation taskOpenEnterAnimation/taskOpenExitAnimation;
★ 如果结束的activity结束之后原来的task还存在,那么使用activityCloseEnterAnimation/activityCloseExitAnimation;
★ 如果结束的activity结束之后原来的task将不存在,也即次activity为task最后的activity,那么使用taskCloseEnterAnimation/taskCloseExitAnimation;
★ 一些特定的情况下,AMS需要将某个task move到最前面,例如上一篇文章中的task reparenting过程,此时使用taskToFrontEnterAnimation/taskToFrontExitAnimation;
★ 一些特定的情况下,AMS需要将某个task move到最底端,此时使用taskToBackEnterAnimation/taskToBackExitAnimation;
★ 如果当前的activity使用的theme中的参数android:windowShowWallpaper为true,此时的activity应该以当前的壁纸为背景,并且前一个显示的activity的背景不是当前的壁纸,此时使用wallpaperOpenEnterAnimation/wallpaperOpenExitAnimation/wallpaperCloseEnterAnimation/wallpaperCloseExitAnimation,
如下面activity所示:

★ 如果当前的activity使用的theme中的参数android:windowShowWallpaper为true,此时的activity应该以当前的壁纸为背景,并且前一个显示的activity的背景是当前的壁纸,此时使用wallpaperIntraOpenEnterAnimation/wallpaperIntraOpenExitAnimation/wallpaperIntraCloseEnterAnimation/wallpaperIntraCloseExitAnimation.
下面代码即是判断当前应该选择那些带有wallpaper的Transition类型。
performLayoutAndPlaceSurfacesLockedInner()@WindowManagerService.java
- final int NC = mClosingApps.size();
- NN = NC + mOpeningApps.size();
- for (i=0; i<NN; i++) {
- AppWindowToken wtoken;
- int mode;
- if (i < NC) {
- wtoken = mClosingApps.get(i);
- mode = 1;
- } else {
- wtoken = mOpeningApps.get(i-NC);
- mode = 2;
- }
- if (mLowerWallpaperTarget != null) {
- if (mLowerWallpaperTarget.mAppToken == wtoken
- || mUpperWallpaperTarget.mAppToken == wtoken) {
- foundWallpapers |= mode;
- }
- }
- if (wtoken.appFullscreen) {
- WindowState ws = wtoken.findMainWindow();
- if (ws != null) {
- // If this is a compatibility mode
- // window, we will always use its anim.
- if ((ws.mAttrs.flags&FLAG_COMPATIBLE_WINDOW) != 0) {
- animLp = ws.mAttrs;
- animToken = ws.mAppToken;
- bestAnimLayer = Integer.MAX_VALUE;
- } else if (ws.mLayer > bestAnimLayer) {
- animLp = ws.mAttrs;
- animToken = ws.mAppToken;
- bestAnimLayer = ws.mLayer;
- }
- }
- }
- }
- if (foundWallpapers == 3) {
- if (DEBUG_APP_TRANSITIONS) Slog.v(TAG,
- "Wallpaper animation!");
- switch (transit) {
- case WindowManagerPolicy.TRANSIT_ACTIVITY_OPEN:
- case WindowManagerPolicy.TRANSIT_TASK_OPEN:
- case WindowManagerPolicy.TRANSIT_TASK_TO_FRONT:
- transit = WindowManagerPolicy.TRANSIT_WALLPAPER_INTRA_OPEN;
- break;
- case WindowManagerPolicy.TRANSIT_ACTIVITY_CLOSE:
- case WindowManagerPolicy.TRANSIT_TASK_CLOSE:
- case WindowManagerPolicy.TRANSIT_TASK_TO_BACK:
- transit = WindowManagerPolicy.TRANSIT_WALLPAPER_INTRA_CLOSE;
- break;
- }
- if (DEBUG_APP_TRANSITIONS) Slog.v(TAG,
- "New transit: " + transit);
- } else if (oldWallpaper != null) {
- // We are transitioning from an activity with
- // a wallpaper to one without.
- transit = WindowManagerPolicy.TRANSIT_WALLPAPER_CLOSE;
- if (DEBUG_APP_TRANSITIONS) Slog.v(TAG,
- "New transit away from wallpaper: " + transit);
- } else if (mWallpaperTarget != null) {
- // We are transitioning from an activity without
- // a wallpaper to now showing the wallpaper
- transit = WindowManagerPolicy.TRANSIT_WALLPAPER_OPEN;
- if (DEBUG_APP_TRANSITIONS) Slog.v(TAG,
- "New transit into wallpaper: " + transit);
- }
3.2 widget Transition
每个widget在启动时的animation和activity不一样,并且在frameworks/base/core/res/res/values/styles.xml中可以设置不同widget。
- private boolean applyAnimationLocked(WindowState win,
- int transit, boolean isEntrance) {
- if (win.mLocalAnimating && win.mAnimationIsEntrance == isEntrance) {
- // If we are trying to apply an animation, but already running
- // an animation of the same type, then just leave that one alone.
- return true;
- }
- // Only apply an animation if the display isn't frozen. If it is
- // frozen, there is no reason to animate and it can cause strange
- // artifacts when we unfreeze the display if some different animation
- // is running.
- if (!mDisplayFrozen && mPolicy.isScreenOn()) {
- int anim = mPolicy.selectAnimationLw(win, transit);
- int attr = -1;
- Animation a = null;
- if (anim != 0) {
- a = AnimationUtils.loadAnimation(mContext, anim);
- } else {
- switch (transit) {
- case WindowManagerPolicy.TRANSIT_ENTER:
- attr = com.android.internal.R.styleable.WindowAnimation_windowEnterAnimation;
- break;
- case WindowManagerPolicy.TRANSIT_EXIT:
- attr = com.android.internal.R.styleable.WindowAnimation_windowExitAnimation;
- break;
- case WindowManagerPolicy.TRANSIT_SHOW:
- attr = com.android.internal.R.styleable.WindowAnimation_windowShowAnimation;
- break;
- case WindowManagerPolicy.TRANSIT_HIDE:
- attr = com.android.internal.R.styleable.WindowAnimation_windowHideAnimation;
- break;
- }
- if (attr >= 0) {
- a = loadAnimation(win.mAttrs, attr);
- }
- }
- if (DEBUG_ANIM) Slog.v(TAG, "applyAnimation: win=" + win
- + " anim=" + anim + " attr=0x" + Integer.toHexString(attr)
- + " mAnimation=" + win.mAnimation
- + " isEntrance=" + isEntrance);
- if (a != null) {
- if (DEBUG_ANIM) {
- RuntimeException e = null;
- if (!HIDE_STACK_CRAWLS) {
- e = new RuntimeException();
- e.fillInStackTrace();
- }
- Slog.v(TAG, "Loaded animation " + a + " for " + win, e);
- }
- win.setAnimation(a);
- win.mAnimationIsEntrance = isEntrance;
- }
- } else {
- win.clearAnimation();
- }
- return win.mAnimation != null;
- }
4. Activity启动

5. Activity pausing过程
Activity pausing过程有3种情况:
1. 第一种情况是从一个activity启动另一个activity的同时,也伴随着前一个activity的pause过程。
resumeTopActivityLocked()@ActivityStack.java
- // We need to start pausing the current activity so the top one
- // can be resumed...
- if (mResumedActivity != null) {
- if (DEBUG_SWITCH) Slog.v(TAG, "Skip resume: need to start pausing");
- startPausingLocked(userLeaving, false);
- return true;
- }
2. 第二种情况是当PowerManagerService要求AMS休眠或者设备shutDown时;
@ActivityStack.java
- void pauseIfSleepingLocked() {
- if (mService.mSleeping || mService.mShuttingDown) {
- if (!mGoingToSleep.isHeld()) {
- mGoingToSleep.acquire();
- if (mLaunchingActivity.isHeld()) {
- mLaunchingActivity.release();
- mService.mHandler.removeMessages(LAUNCH_TIMEOUT_MSG);
- }
- }
- // If we are not currently pausing an activity, get the current
- // one to pause. If we are pausing one, we will just let that stuff
- // run and release the wake lock when all done.
- if (mPausingActivity == null) {
- if (DEBUG_PAUSE) Slog.v(TAG, "Sleep needs to pause...");
- if (DEBUG_USER_LEAVING) Slog.v(TAG, "Sleep => pause with userLeaving=false");
- startPausingLocked(false, true);
- }
- }
- }
3.第三种情况是一个activity finish过程中。这个下面再介绍。
下图为第一种情况的时序图,整个pausing过程的是相同的,因此以一种情况的时序图来体现activity的pausing过程。

6. Activity Stoping 过程
我们知道,当Activity不可见时会执行stoping的过程,下面我们就来分析以下一个activity是怎么来进行stop的。下面给出整个stop过程的时序图:

在stop中有一个很重要的概念就是activity idle状态,不论是activity被新启动的activity完全覆盖,还是activity被finish,也就是activity的stop过程以及finsh过程,均是在最新被resume的activity已经resume完成之后才去处理。
我们可以想象一下,每个应用程序的主线程ActivityThread中,当没有任何的消息待处理时,此时我们可以认为此时的已被resumed的activity状态时空闲的,没有任何的人机交互。因此android设计者将前一个被完全覆盖不可见的或者finish的activity的stop或finish操作放在此时来处理。这样做是合情合理,毕竟stop或者finish一个activity以及显示新的activity之间的关系是同步,是必须有先后顺序的,为了达到更好的用户体验,理所当然应该是先显示新的activity,然后采取stop或者finish旧的activity。为了实现这个目的,android设计者使用了MessageQueue的这个IdleHandler机制。
首先,我们看一下MessageQueue的IdleHandler机制。
next ()@MessageQueue.java
- // Run the idle handlers.
- // We only ever reach this code block during the first iteration.
- for (int i = 0; i < pendingIdleHandlerCount; i++) {
- final IdleHandler idler = mPendingIdleHandlers[i];
- mPendingIdleHandlers[i] = null; // release the reference to the handler
- boolean keep = false;
- try {
- keep = idler.queueIdle();
- } catch (Throwable t) {
- Log.wtf("MessageQueue", "IdleHandler threw exception", t);
- }
- if (!keep) {
- synchronized (this) {
- mIdleHandlers.remove(idler);
- }
- }
- }
在ActivityThread线程的Looper中,Looper会不停的去查找消息队列中是否有消息需要处理,如果没有任何的消息待处理,那么将查看当前的消息队列是否有IdleHandler注册,如果有逐个执行这些IdleHandler。
明白了IdleHandler的机制,回过头来了看ActivityThread的IdleHandler的注册过程,代码如下。
handleResumeActivity()@ActivityThread.java
- r.nextIdle = mNewActivities;
- mNewActivities = r;
- if (localLOGV) Slog.v(
- TAG, "Scheduling idle handler for " + r);
- Looper.myQueue().addIdleHandler(new Idler());
7. Activity finishing过程

如同activity不可见时的处理一样,activity的finishing过程同样是在新的activity被resume之后才去执行,但是存在一种情况,当mHistory栈中存在多个(多于4个)activity时,假如此时user以很快的速度去按back键,并且在第一个需resume的activity尚未被resume完成时,已经被user触发了多次back键,此时应该怎么处理finish过程呢?
按照上面的逻辑来看,user不停的以很快的速度去触发back键,直到回到home activity,这种情况下ActivityThread的Looper一直会有消息需要处理,根本不可能去处理它的IdleHandler,也就不可能去处理各个activity的finish过程,直到回到home activity之后才能有空闲去处理。我们可以想象一下如果按照这个逻辑去操作的话,会有什么问题?
设想一下,我们累计了多个activity在ActivityThread的Looper在idle状态下处理,那么这个过程将是比较长的,假如此时又有user触发了启动actibity的操作,那么ActivityThread将会同时处理累计的activity的finish过程,同时又需要处理activity的启动过程,那么这么做的结果只能是给用户带来系统很慢的用户体验。因此上面的finish逻辑需要进行一定的矫正与修改。
AMS在累计的activity超过3个时,就会强制调用Idle处理操作。这么做就有效的消耗了累计的activity的finish过程,就很大程度上减轻了上述所说的问题。
finishCurrentActivityLocked()@ActivityStack.java
- // First things first: if this activity is currently visible,
- // and the resumed activity is not yet visible, then hold off on
- // finishing until the resumed one becomes visible.
- if (mode == FINISH_AFTER_VISIBLE && r.nowVisible) {
- if (!mStoppingActivities.contains(r)) {
- mStoppingActivities.add(r);
- Slog.d(TAG, "finishCurrentActivityLocked mStoppingActivities size:" + mStoppingActivities.size());
- if (mStoppingActivities.size() > 3) {
- // If we already have a few activities waiting to stop,
- // then give up on things going idle and start clearing
- // them out.
- Message msg = Message.obtain();
- msg.what = IDLE_NOW_MSG;
- mHandler.sendMessage(msg);
- }
- }
- r.state = ActivityState.STOPPING;
- mService.updateOomAdjLocked();
- return r;
- }
同样的问题也存在与activity启动过程中,假如user以很快的速度去不停的启动activity,那么被覆盖的activity的stop过程很上述的finish过程一样,也会不停的累计,出现相同的问题。解决的思路也是一致的。
completePauseLocked()@ActivityStack.java
- mStoppingActivities.add(prev);
- if (mStoppingActivities.size() > 3) {
- // If we already have a few activities waiting to stop,
- // then give up on things going idle and start clearing
- // them out.
- if (DEBUG_PAUSE) Slog.v(TAG, "To many pending stops, forcing idle");
- Message msg = Message.obtain();
- msg.what = IDLE_NOW_MSG;
- mHandler.sendMessage(msg);
- }
android Application Component研究之Activity(二)的更多相关文章
- android Application Component研究之Activity(一)
http://blog.csdn.net/windskier/article/details/7096521 终于下定决心写写ActivityManagerService的源码分析的文章了,Activ ...
- 二、Android学习第二天——初识Activity(转)
(转自:http://wenku.baidu.com/view/af39b3164431b90d6c85c72f.html) 一. Android学习第二天——初识Activity 昨天程序搭建成功以 ...
- Android application 和 activity 标签详解
extends:http://blog.csdn.net/self_study/article/details/54020909 Application 标签 android:allowTaskRep ...
- 【转】Android平台下利用zxing实现二维码开发
http://www.cnblogs.com/dolphin0520/p/3355728.html 现在走在大街小巷都能看到二维码,而且最近由于项目需要,所以研究了下二维码开发的东西,开源的二维码扫描 ...
- Android平台下利用zxing实现二维码开发
Android平台下利用zxing实现二维码开发 现在走在大街小巷都能看到二维码,而且最近由于项目需要,所以研究了下二维码开发的东西,开源的二维码扫描库主要有zxing和zbar,zbar在iPos平 ...
- 关于android编程中service和activity的区别
一. 绝大部分情况下,Service的作用是用来“执行”后台的.耗时的.重要的任务,三者缺一不可,而最重要的原因是第三点:要执行重要的任务. 因为当一个进程启动了Service后,进程的优先级变高了, ...
- (转载)Android平台下利用zxing实现二维码开发
Android平台下利用zxing实现二维码开发 现在走在大街小巷都能看到二维码,而且最近由于项目需要,所以研究了下二维码开发的东西,开源的二维码扫描库主要有zxing和zbar,zbar在iPos平 ...
- Android应用程序窗口(Activity)与WindowManagerService服务的连接过程分析
在前两文中,我们分析了Activity组件的窗口对象和视图对象的创建过程.Activity组件在其窗口对象和视图对象创建完成之后,就会请求与WindowManagerService建立一个连接,即请求 ...
- android数据存储之Sqlite(二)
SQLite学习笔记 前言:上一章我们介绍了sqlite的一些基本知识以及在dos命令下对sqlite进行的增删改查的操作,这一章我们将在android项目中实际来操作sqlite. 1. SQLit ...
随机推荐
- PM2来部署nodejs服务器永久开启
pm2 日常使用 1. pm2 是什么? 日常开发中需要启动一个node项目,需要用npm run …,,如果终端被关掉,程序也就自动停止,有时候几个项目一起跑起来,好几个终端开着,个人不太喜欢, ...
- SpringBoot(3) 文件上传和访问
springboot文件上传 MultipartFile file,源自SpringMVC MultipartFile 对象的transferTo方法,用于文件保存(效率和操作比原先用FileOutS ...
- Java设计模式学习记录-命令模式
前言 这次要介绍的是命令模式,这也是一种行为型模式.最近反正没有面试机会我就写博客呗,该投的简历都投了.然后就继续看书,其实看书也会给自己带来成就感,原来以前不明白的东西,书上已经给彻底的介绍清楚了, ...
- Task.Run Vs Task.Factory.StartNew 【收藏】
在.Net 4中,Task.Factory.StartNew是启动一个新Task的首选方法.它有很多重载方法,使它在具体使用当中可以非常灵活,通过设置可选参数,可以传递任意状态,取消任务继续执行,甚至 ...
- 使用Maven搭建JFinal环境
使用Maven搭建JFinal环境 工具:IDEA 2017 JFinal版本:3.4 一.Maven项目创建 选择maven模板进行创建 填写GroupId和ArtifactId 一路Next即可 ...
- sql语句中left join和inner join中的on与where的区别分析
关于SQL SERVER的表联接查询INNER JOIN .LEFT JOIN和RIGHT JOIN,经常会用到ON和WHERE的条件查询,以前用的时候有时是凭感觉的,总是没有搞清楚,今日亲自测试了下 ...
- 解说css中的margin属性缩写方式
<html> <body> <div style="border: 1px solid red;"> <div style="b ...
- canvas-star6-drawMoon.html
<!DOCTYPE html> <html lang="en"> <head> <meta charset="UTF-8&quo ...
- 【CSS学习】--- 盒子模型
一.前言:这篇只作为本人的笔记,以后慢慢再补充. 页面中的所有元素都可以被看作一个一个的“盒子”.这些盒子都包含了:内容(content).内边距(padding).边框(border)以及外边距(m ...
- Jmeter进阶篇之保存测试结果
Jmeter现在真的是一款越来越流行的接口测试工具. 但是通过和老大哥LR相比较,可能有部分同学觉得,LR的图表功能,报告功能不要太强大. 但是小弟jmeter在这方面其实并不差... 今天我们就来学 ...