IdentityServer4授权和认证
IdentityServer4 简称ids4
oidc了解:http://www.jessetalk.cn/2018/04/04/oidc-asp-net-core/
是一个去中心化的网上身份认证系统,集成了认证和授权
博客园已经有很多大佬写过了。我也是跟着学,记录下学习成果
授权服务器代码:
var oidc = new Client

            {

                ClientId = "oidc",

                ClientName = "name",

                ClientSecrets = { new Secret("secret".Sha256()) },

                ClientUri = "http://www.cnblogs.com", //客户端

                LogoUri = "https://www.cnblogs.com/images/logo_small.gif",

                //AllowedGrantTypes={GrantType.AuthorizationCode }

                /*

                 如果客户端使用的认证是

                 */

                AllowedGrantTypes = GrantTypes.Hybrid,

                AllowedScopes ={

                        IdentityServerConstants.StandardScopes.OpenId,

                        IdentityServerConstants.StandardScopes.Profile,

                        IdentityServerConstants.StandardScopes.Email,

                    },

                RedirectUris = { "http://localhost:5001/signin-oidc" },

                PostLogoutRedirectUris = { "http://localhost:5001/signout-callback-oidc" }

            };
AllowedScopes 中的
IdentityServerConstants.StandardScopes.OpenId,
IdentityServerConstants.StandardScopes.Profile必须的
也可以不用枚举类型。直接写:“openid”,"profile"
为什么说是必须定义的呢。因为ids4代码的封装。默认就添加了“openid”,"profile"两个scope
因为只有openid才能确定唯一性
而profile是用户资料信息
github地址:
https://github.com/aspnet/AspNetCore/blob/master/src/Security/Authentication/OpenIdConnect/src/OpenIdConnectOptions.cs

可以看到其他的默认配置,比如回调地址,登出地址
如果之前了解过授权和认证,对这个不陌生
//使用ids中间件
app.UseIdentityServer();
认证代码,我自己写了挺多注释,可以忽略
  services.AddAuthentication(options =>

            {

                /*

                 要想使用认证系统,必要先注册Scheme

                 而每一个Scheme必须指定一个Handler

                 AuthenticationHandler 负责对用户凭证的验证

                 这里指定的默认认证是cookie认证

                 Scheme可以翻译为方案,即默认的认证方案

                因为这里用到了多个中间件,(AddAuthentication,AddCookie,AddOpenIdConnect)

                OpenIdConnectDefaults.DisplayName 的默认值是oidc

                指定AddOpenIdConnect是默认中间件,在AddOpenIdConnect配置了很多选项

                如果只用了一个中间件,则可以不写,是否还记得cookie认证

                //     services.AddAuthentication(CookieAuthenticationDefaults.AuthenticationScheme)

                //     .AddCookie(option =>

                //     {

                //         ///Account/Login?ReturnUrl=%2Fadmin

                //         option.LoginPath = "/login/index";

                //         //option.ReturnUrlParameter = "params"; //指定参数名称

                //         //option.Cookie.Domain

                //         option.AccessDeniedPath = "/login/noAccess";

                //         option.Cookie.Expiration = TimeSpan.FromSeconds(4);

                //         option.Events = new CookieAuthenticationEvents

                //         {

                //             OnValidatePrincipal = LastChangedValidator.ValidateAsync

                //         };

                //     });

                 */

                //options.DefaultScheme = "Cookies";

                //默认的认证方案:cookie认证,信息是保存在cookie中的

                options.DefaultAuthenticateScheme = "Cookies";

                //oidc 就是openidConnect

                //名字随便取,只要AddOpenIdConnect中的的oidc名字一样即可,

                //这样才能找到

                options.DefaultChallengeScheme = "oidc";

                //默认使用oidc中间件

                //options.DefaultChallengeScheme = OpenIdConnectDefaults.DisplayName;

            }).AddCookie("Cookies")

            .AddOpenIdConnect("oidc", options =>

            {

                options.SignInScheme = "Cookies";

                options.Authority = "http://localhost:5003";

                options.RequireHttpsMetadata = false;

                options.ClientId = "oidc";

                options.ClientSecret = "secret";

                options.SaveTokens = true;

                //options.Scope.Add("openid");

                /*

                 默认值是:id_token

                 */

                //options.ResponseType = OpenIdConnectResponseType.CodeIdToken;

                options.Events = new OpenIdConnectEvents

                {

                    /*

                     远程异常触发

                     在授权服务器取消登陆或者取消授权

                     */

                    OnRemoteFailure = OAuthFailureHandler =>

                    {

                        //跳转首页

                        OAuthFailureHandler.Response.Redirect("/");

                        OAuthFailureHandler.HandleResponse();

                        return Task.FromResult();

                    }

                };

            });
配置其实跟OAuth2认证差不多,运行是没有问题的
我这里主要讲解ids4的授权和认证类型ResponseType
默认是 id_token ,源码是个好东西,我们看看
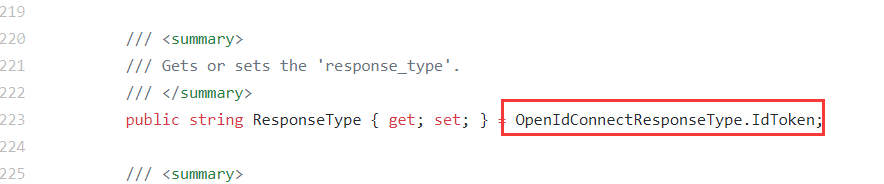
客户端端id_token对应服务端,会返回id_token
AllowedGrantTypes = GrantTypes.Implicit, 隐式模式
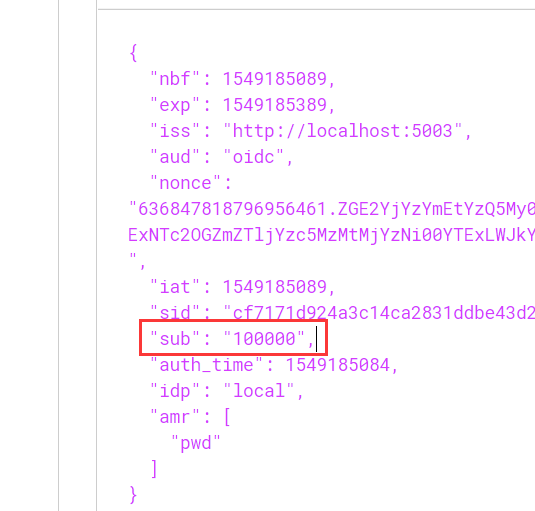
它返回id_token信息,包含了用户信息的SubjectId,是TestUser配置的
参考:https://www.cnblogs.com/jesse2013/p/oidc-in-aspnetcore-with-identity-server.html
客户端端code id_token对应服务端,会返回id_token和access_token
AllowedGrantTypes = GrantTypes.Hybrid, 混合模式
可以用access_token 去userinfo endpoint获取用户信息
access toke管的是权限,里面保存的是一些认证信息
,id token是身份信息


http://localhost:5003/.well-known/openid-configuration
可以查看userinfo endpoint配置

有人可能会注意到,在这里我们拿到的idtoken没有派上用场,我们的用户资料还是通过access_token从userinfo endpoint里拿的。这里有两个区别:
- userinfo endpoint是属于认证服务器实现的,并非资源服务器,有归属的区别
- id_token 是一个jwt,里面带有用户的唯一标识,我们在判断该用户已经存在的时候不需要再请求userinfo endpoint
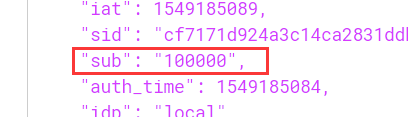
下图是对id_token进行解析得到的信息:sub即subject_id(用户唯一标识 )
看网上很多例子都在Controller上打个Authorize标签
当未授权就跳转到授权服务器,这样,这个网站那就必须使用授权服务器才能登陆
比如:我这个网站可以有自己的密码登陆,也可以用第三方登陆。所以在没有授权的时候是跳转到登陆页面,
让用户自己选择是密码登陆还是第三方授权登陆
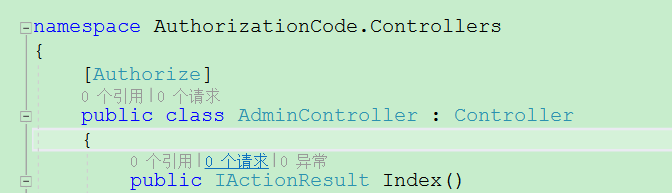
如果是这样,我没有授权登陆。只有访问这个Admin页面就会跳转到授权服务器,
那如果我们添加多个第三方认证,比如QQ,微博,微信等等,那起步乱套了
显然这不是我想要的,应该像简书这样,集成第三方登陆

所以我们可以设置使用那个中间件options.DefaultChallengeScheme=“myCookies”
当没有登陆的是,会走AddCookie,跳转到到登陆页面
比如我们这里注入了oidc授权,google授权
 services.AddAuthentication(options =>

            {

                //默认的认证方案:cookie认证,信息是保存在cookie中的

                options.DefaultAuthenticateScheme = "Cookies";

                options.DefaultChallengeScheme = "myCookies";

            }).AddCookie("myCookies",options=> {

                options.LoginPath = "/Account/Login";

            })

            .AddGoogle("googole", options => {

            })

            .AddOpenIdConnect("oidc", options =>

            {

            }
当用户单击,使用微博登陆则:通过Challenge方法指定使用那个schemes
这样就会跳转到登陆页面,用户自己选择了
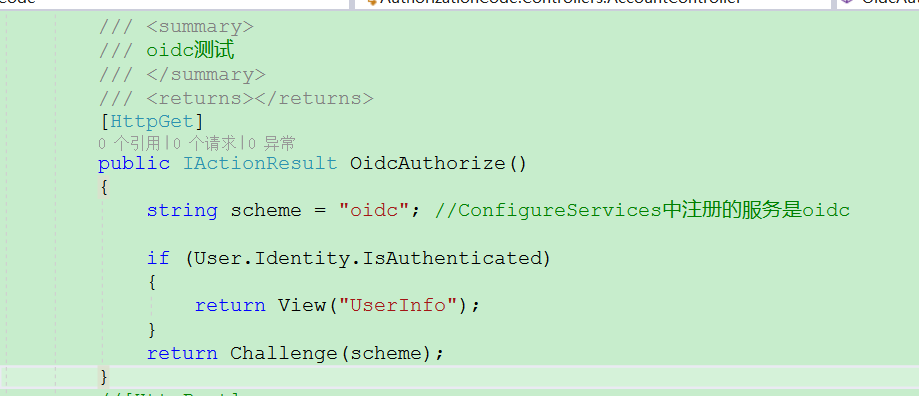
可以用User.Identity.IsAuthenticated判断是否验证授权
没有则手动触发: Challenge("oidc")
oidc 为你想使用的第三方
比如:我设置了,cookie,微博,QQ,google,oidc等等
.AddCookie("cookie")
.AddGoogole("google")
.AddQQ("qq")
当你想用google授权,则Challenge(”google")
这样做的好处是:我网站只是接入别第三方登陆。至于使用第三方登陆还是使用我网站注册用户登陆
都是由用户选择
网络收集,没有一一验证:
/***********************************相关事件***********************************/

    // 未授权时,重定向到OIDC服务器时触发

    //o.Events.OnRedirectToIdentityProvider = context => Task.CompletedTask;

    // 获取到授权码时触发

    //o.Events.OnAuthorizationCodeReceived = context => Task.CompletedTask;

    // 接收到OIDC服务器返回的认证信息(包含Code, ID Token等)时触发

    //o.Events.OnMessageReceived = context => Task.CompletedTask;

    // 接收到TokenEndpoint返回的信息时触发

    //o.Events.OnTokenResponseReceived = context => Task.CompletedTask;

    // 验证Token时触发

    //o.Events.OnTokenValidated = context => Task.CompletedTask;

    // 接收到UserInfoEndpoint返回的信息时触发

    //o.Events.OnUserInformationReceived = context => Task.CompletedTask;

    // 出现异常时触发

    //o.Events.OnAuthenticationFailed = context => Task.CompletedTask;

    // 退出时,重定向到OIDC服务器时触发

    //o.Events.OnRedirectToIdentityProviderForSignOut = context => Task.CompletedTask;

    // OIDC服务器退出后,服务端回调时触发

    //o.Events.OnRemoteSignOut = context => Task.CompletedTask;

    // OIDC服务器退出后,客户端重定向时触发

    //o.Events.OnSignedOutCallbackRedirect = context => Task.CompletedTask;
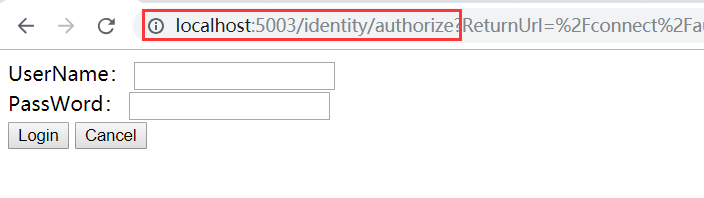
当用户没有授权,跳转到授权服务器的登陆地址,同意授权地址,都是默认值
https://github.com/IdentityServer/IdentityServer4/blob/63a50d7838af25896fbf836ea4e4f37b5e179cd8/src/Constants.cs

我们可以修改自己想要的地址

然后添加Route

这样就成功了
大佬文章:
https://www.cnblogs.com/jesse2013/p/oidc-in-aspnetcore-with-identity-server.html
https://www.cnblogs.com/RainingNight/p/7635534.html
https://www.cnblogs.com/xishuai/p/6274036.html
https://www.cnblogs.com/cgzl/p/9253667.html
https://cloud.tencent.com/developer/article/1048128
https://www.cnblogs.com/stulzq/p/7879101.html
IdentityServer4授权和认证的更多相关文章
- IdentityServer4授权和认证集成Identity和profile
identiyt的使用可以看之前的文章:https://www.cnblogs.com/nsky/p/10323415.html 之前的ids4授权服务器都是用的in-men方式把数据添加到内存, 现 ...
- IdentityServer4授权和认证对接数据库
接着上一篇讲:https://www.cnblogs.com/nsky/p/10352678.html 我们之前都是用in-men的方式把数据添加到内存了,目的是为了测试方便, 现在我们把所有配置都添 ...
- Angular SPA基于Ocelot API网关与IdentityServer4的身份认证与授权(四)
在上一讲中,我们已经完成了一个完整的案例,在这个案例中,我们可以通过Angular单页面应用(SPA)进行登录,然后通过后端的Ocelot API网关整合IdentityServer4完成身份认证.在 ...
- Angular SPA基于Ocelot API网关与IdentityServer4的身份认证与授权(一)
好吧,这个题目我也想了很久,不知道如何用最简单的几个字来概括这篇文章,原本打算取名<Angular单页面应用基于Ocelot API网关与IdentityServer4+ASP.NET Iden ...
- Angular SPA基于Ocelot API网关与IdentityServer4的身份认证与授权(二)
上文已经介绍了Identity Service的实现过程.今天我们继续,实现一个简单的Weather API和一个基于Ocelot的API网关. 回顾 <Angular SPA基于Ocelot ...
- Angular SPA基于Ocelot API网关与IdentityServer4的身份认证与授权(三)
在前面两篇文章中,我介绍了基于IdentityServer4的一个Identity Service的实现,并且实现了一个Weather API和基于Ocelot的API网关,然后实现了通过Ocelot ...
- Asp.Net Core 中IdentityServer4 授权中心之应用实战
一.前言 查阅了大多数相关资料,查阅到的IdentityServer4 的相关文章大多是比较简单并且多是翻译官网的文档编写的,我这里在 Asp.Net Core 中IdentityServer4 的应 ...
- Asp.Net Core 中IdentityServer4 授权中心之自定义授权模式
一.前言 上一篇我分享了一篇关于 Asp.Net Core 中IdentityServer4 授权中心之应用实战 的文章,其中有不少博友给我提了问题,其中有一个博友问我的一个场景,我给他解答的还不够完 ...
- Asp.Net Core 中IdentityServer4 授权原理及刷新Token的应用
一.前言 上面分享了IdentityServer4 两篇系列文章,核心主题主要是密码授权模式及自定义授权模式,但是仅仅是分享了这两种模式的使用,这篇文章进一步来分享IdentityServer4的授权 ...
随机推荐
- hdoj:2052
#include <iostream> #include <string> using namespace std; int main() { int n, m; while ...
- 通过动态SQL语句创建游标
DECLARE @sql varchar(100); DECLARE @TableName varchar(32); DECLARE @FieldName varchar(32); DECLARE @ ...
- c++线程池小例子
ThreadPool.h #ifndef __THREADPOOL_H #define __THREADPOOL_H #define HAVE_STRUCT_TIMESPEC //#include & ...
- elephant-bird学习笔记
elephant-bird是Twitter的开源项目,项目的地址为 https://github.com/twitter/elephant-bird 该项目是Twitter为LZO,thrift,pr ...
- OpenGL着色器入门简介
说明:本文翻译自LearnOpengl经典教程,OpenGL着色器基础介绍的比较通俗易懂,特总结分享一下! 为什么要使用着色器?我们知道,OpenGL一般使用经典的固定渲染管线来渲染对象,但是随着Op ...
- Git命令行大全
git branch 查看本地所有分支 git status 查看当前状态 git commit 提交 git branch -a 查看所有的分支 git branch -r 查看远程所有分支 git ...
- python把文件从一个目录复制到另外一个目录,并且备份
#!/usr/bin/python # -*- coding: utf-8 -*- import os,sys,md5,datetime,shutil,time,zipfile,chardet # c ...
- [LeetCode] Wiggle Sort II 摆动排序之二
Given an unsorted array nums, reorder it such that nums[0] < nums[1] > nums[2] < nums[3]... ...
- Realm 简介
是一个跨平台的本地数据库,比sqlite 数据库更轻量级,执行效率更高. 官网地址:https://realm.io/docs/java/latest/
- 遍历文件,读取.wxss文件,在头部添加一条注释
change.pl #!/usr/bin/perl use autodie; use utf8; use Encode qw(decode encode); use v5.26; my $path = ...