Android学习之基础知识六—Android四种布局详解
一、Android基本布局
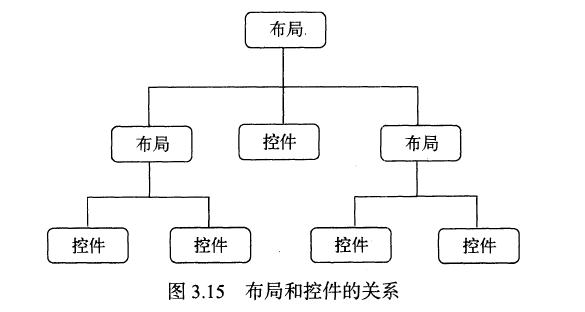
布局是一种可以放置多个控件的容器,它可以按照一定规律调整内部控件的位置,而且布局内部除了可以放置控件外,还可以放置布局,实现多层布局嵌套。布局和控件、布局和布局之间的关系如下图所示:
二、线性布局(LinearLayout)
1、LinearLayout布局是一种非常常用的布局文件,它内部所包含的控件在线性方向上依次排列。线性方向有水平和垂直两种,通过android:orientation属性来指定线性排列方向,可选值有两种:horizontal(控件在水平方向排列)、vertical(控件在垂直方向排列),默认排列方式是水平排列
接下来通过代码来直观感受一下:
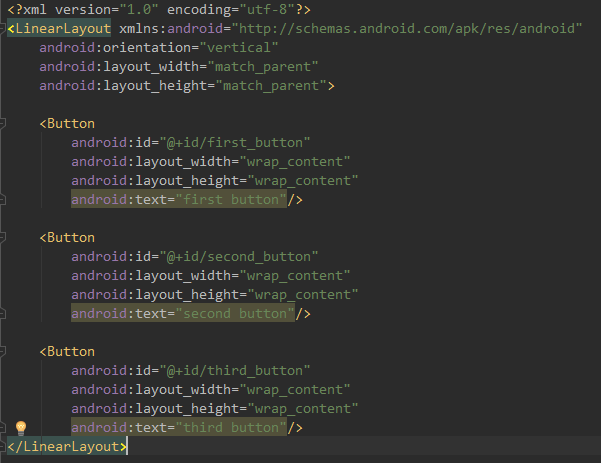
第一步:创建三个按钮:
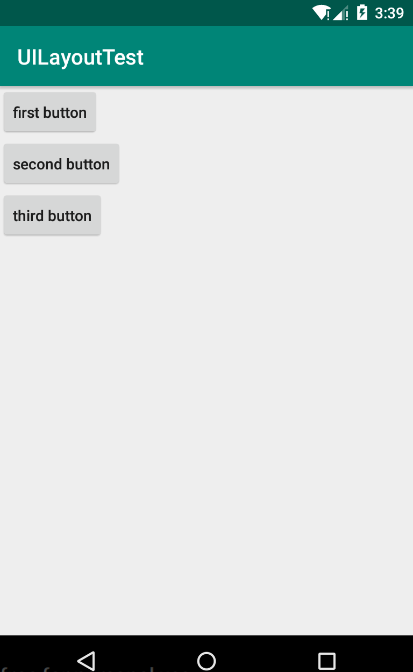
第二步:运行程序,效果如下(左),如果将android:orientation的值选为horizontal(水平),效果如下(右)
注意:
如果LinearLayout的排列方向是:horizontal(水平),那么其内部的控件就绝对不能将宽度指定为:match_parent(与父布局一样宽),因为这样的话,单独一个控件就会将整个水平方向占满,其他的控件就没有可以放置的位置了。同理,如果LinearLayout的排列方向是:vertical(垂直),那么内部控件的高度就绝对不能指定为:match_parent
2、android:layout_gravity属性与android:gravity属性:
android:layout_gravity属性:用于指定控件在布局中的对齐方式
android:gravity属性:用于指定文字在控件中的对齐方式
注意:
使用android:layout_gravity属性时,如果LinearLayout的排列方向是:horizontal(水平方向)时,只有垂直方向上的对齐方式才会生效,因为水平方向上的长度是不固定的,每添加一个控件,水平方向上的长度都会变,无法指定该方向上的对齐方式。同理,如果LinearLayout的排列方向是:vertical(垂直方向),那么只有水平方向的对齐方式有效。
下面通过代码来感受一下:
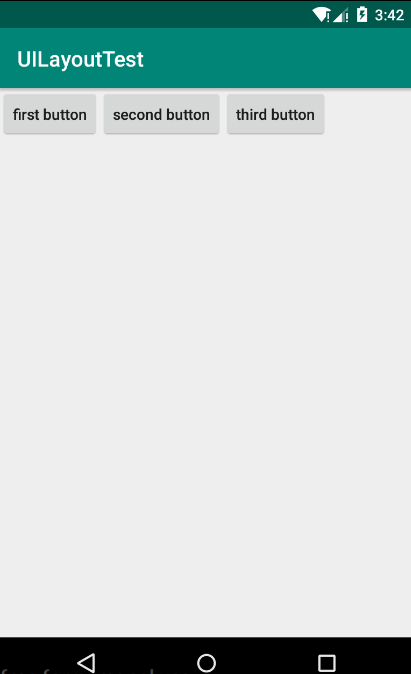
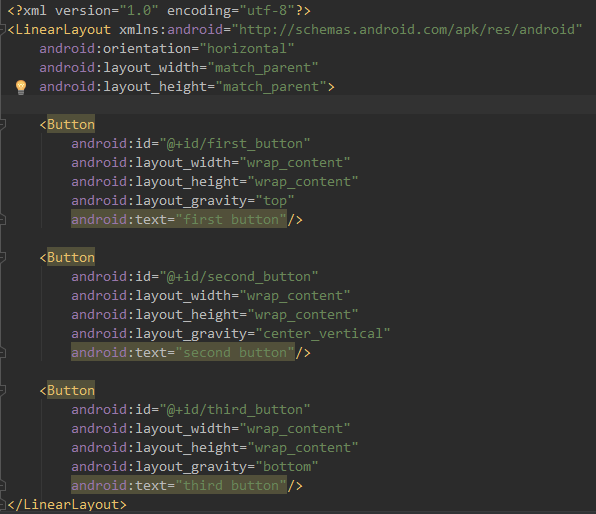
第一步:在activity_main.xml中指定:LinearLayout布局的排列方向为:horizontal(水平方向),first button对齐方式为:top,second button对齐方式为:center_vertical,third button对齐方式为:bottom
第二步:运行程序,效果如下:

3、android:layout_weight属性:这是一个很重要的属性,它允许我们使用比例的方式来指定控件的大小,在手机屏幕的适配性方面起到非常重要的作用。
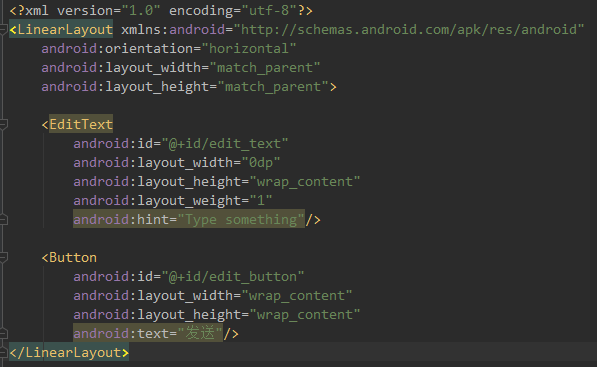
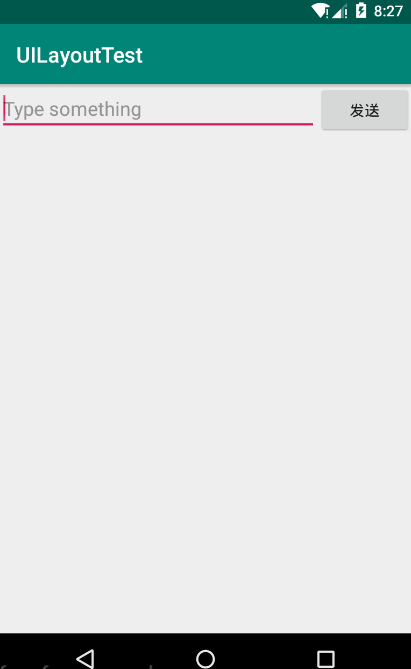
我们先来看一下代码和效果:编写一个消息发送界面(一个文本编辑框,一个发送按钮)
第一步:在布局中添加一个文本编辑框和发送按钮

第二步:效果展示:

代码分析:
1、代码中将EditText控件和Button控件的宽度都指定为0dp,然后使用了android:layout_weight属性,此时,控件的宽度就由android:layout_weight属性来控制了
2、系统是通过控件中android:layout_weight的值来分配屏幕宽度的,计算方法是:先把每个控件中layout_weight的值相加,得到一个总值,然后根据每个控件的值除以总值得到所占的比例。比如上面EditText控件所占的屏幕宽度为:4/(1+4)=4/5,同样,Button所占屏幕宽度即为:1/5.
拓展:
其实对于上面的代码我们还可以进行优化:将Button控件的宽度改回:wrap_content,这是,Button的宽度依然按:wrap_content来计算,而EditText控件就会占据屏幕剩下的所有空间,使用这种方式编辑界面,不仅在各种屏幕的适配方面会非常好,而且看起来也更加舒服。
三、相对布局(RelativeLayout)
RelativeLayout布局也是一种非常常用的布局。和LinearLayout的排列方式不同,RelativeLayout显得更加随意,它可以通过相对定位的方式让控件出现在布局的任何位置,也正因为如此,RelativeLayout中的属性非常的多,不过这些属性都是有规律可循的。
先看代码和效果:
第一步:在RelativeLayout布局中加入五个Button,分别位于左上角、右上角、布局中间、左下角、右下角
 <?xml version="1.0" encoding="utf-8"?>

 <RelativeLayout xmlns:android="http://schemas.android.com/apk/res/android"

     android:layout_width="match_parent"

     android:layout_height="match_parent">

     <Button

         android:id="@+id/first_button"

         android:layout_width="wrap_content"

         android:layout_height="wrap_content"

         android:layout_alignParentLeft="true"

         android:layout_alignParentTop="true"

         android:text="first button"/>

     <Button

         android:id="@+id/second_button"

         android:layout_width="wrap_content"

         android:layout_height="wrap_content"

         android:layout_alignParentRight="true"

         android:layout_alignParentTop="true"

         android:text="second button"/>

     <Button

         android:id="@+id/third_button"

         android:layout_width="wrap_content"

         android:layout_height="wrap_content"

         android:layout_centerInParent="true"

         android:text="third button"/>

     <Button

         android:id="@+id/four_button"

         android:layout_width="wrap_content"

         android:layout_height="wrap_content"

         android:layout_alignParentLeft="true"

         android:layout_alignParentBottom="true"

         android:text="four button" />

     <Button

         android:id="@+id/five_button"

         android:layout_width="wrap_content"

         android:layout_height="wrap_content"

         android:layout_alignParentRight="true"

         android:layout_alignParentBottom="true"

         android:text="five button"/>

 </RelativeLayout>
第二步:效果展示:
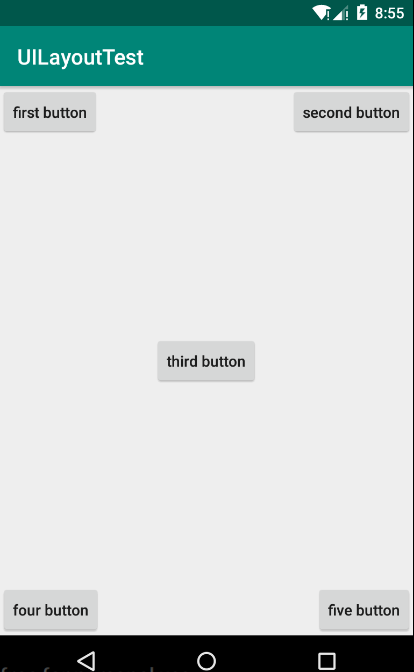
代码分析:
layout_alignParentLeft、Layout_aligntParentTop:控件位于父布局的左上角
layout_alignParentRight、Layout_aligntParentTop:控件位于父布局的右上角
layout_alignParentLeft、Layout_aligntParentBottom:控件位于父布局的左下角
layout_alignParentRight、Layout_aligntParentBottom:控件位于父布局的右下角
Layout_centerInParent:控件位于父布局的中心
拓展:
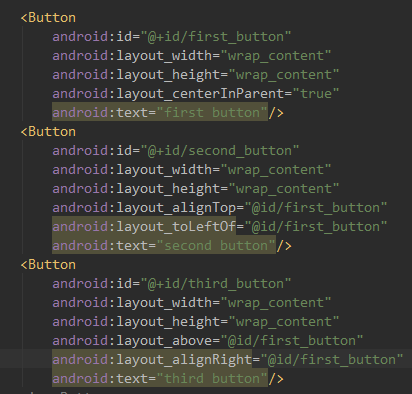
上面的控件都是相对于布局进行定位的,其实在RelativeLayout布局中,控件也可以相对于控件进行定位,下面是代码和效果:
 <?xml version="1.0" encoding="utf-8"?>

 <RelativeLayout xmlns:android="http://schemas.android.com/apk/res/android"

     android:layout_width="match_parent"

     android:layout_height="match_parent">

     <Button

         android:id="@+id/first_button"

         android:layout_width="wrap_content"

         android:layout_height="wrap_content"

         android:layout_centerInParent="true"

         android:text="first button"/>

     <Button

         android:id="@+id/second_button"

         android:layout_width="wrap_content"

         android:layout_height="wrap_content"

         android:layout_above="@id/first_button"

17         android:layout_toLeftOf="@id/first_button"

         android:text="second button"/>

     <Button

         android:id="@+id/third_button"

         android:layout_width="wrap_content"

         android:layout_height="wrap_content"

         android:layout_above="@id/first_button"

24         android:layout_toRightOf="@id/first_button"

         android:text="third button"/>

     <Button

         android:id="@+id/four_button"

         android:layout_width="wrap_content"

         android:layout_height="wrap_content"

         android:layout_below="@id/first_button"

31         android:layout_toLeftOf="@id/first_button"

         android:text="four button" />

     <Button

         android:id="@+id/five_button"

         android:layout_width="wrap_content"

         android:layout_height="wrap_content"

         android:layout_below="@id/first_button"

38         android:layout_toRightOf="@id/first_button"

         android:text="five button"/>

 </RelativeLayout>
效果展示:
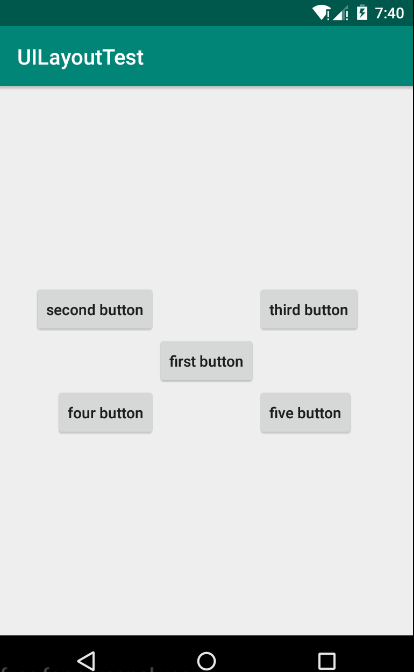
代码分析:
android:layout_above属性:一个控件位于另一个控件的上方
android:layout_below属性:一个控件位于另一个控件的下方
android:layout_toLfetOf属性:一个控件位于另一个控件的左边
android:layout_toRightOf属性:一个控件位于另一个控件的右边
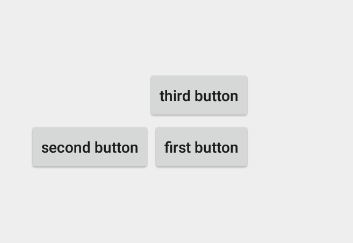
除此之外,还有另外一组相对于控件定位的属性:
android:layout_aligntLeft属性:一个控件的左边缘与另外一个控件的左边缘对齐
android:layout_aligntRight属性:一个控件的右边缘与另外一个控件的右边缘对齐
android:layout_aligntTop属性:一个控件的上边缘与另外一个控件的上边缘对齐
android:layout_aligntBottom属性:一个控件的下边缘与另外一个控件的下边缘对齐
下面举一个简单的例子:
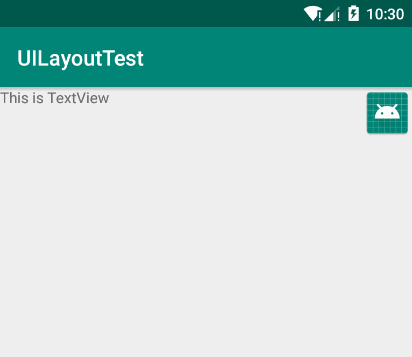
四、帧布局(FrameLayout)
FrameLayout布局因为其定位方式的欠缺,所以它的应用场景很少,下面我们就来简单的了解一下:
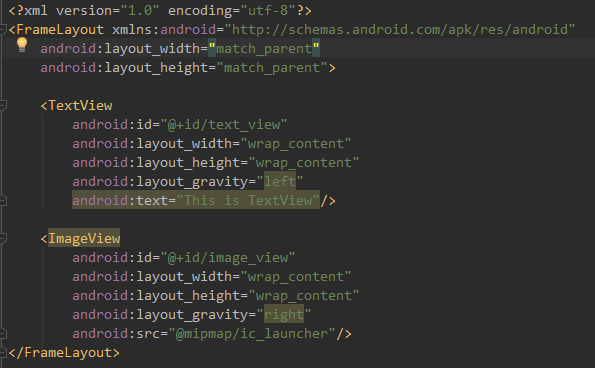
关于FrameLayout布局,在碎片中可以有所应用,后面我们会学到的。
五、百分比布局(PercentFrameLayout、PercentRelativeLayout)
1、 只有LinearLayout布局支持使用:layout_weight 来实现按比例指定控件大小的功能。
2、百分比布局允许直接指定控件在布局中所占的百分比,这样可以轻松实现平分布局或者按任意比例分割布局的效果了。
3、因为LinearLayout布局本身已经支持按比例来指定控件大小了,所以百分比布局只为FrameLayout布局和RelativeLayout布局进行了扩展,提供了PercentFrameLayout和PercentRelativeLayout两种全新的布局。
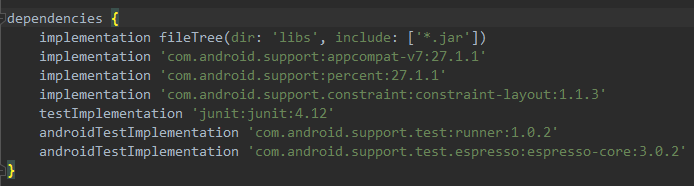
4、百分比布局是一种全新的布局,为了使其能在所有Android版本上使用,我们需要在app/build.gradle文件中添加百分比布局库的依赖:
implementation 'com.android.support:percent:27.1.1'
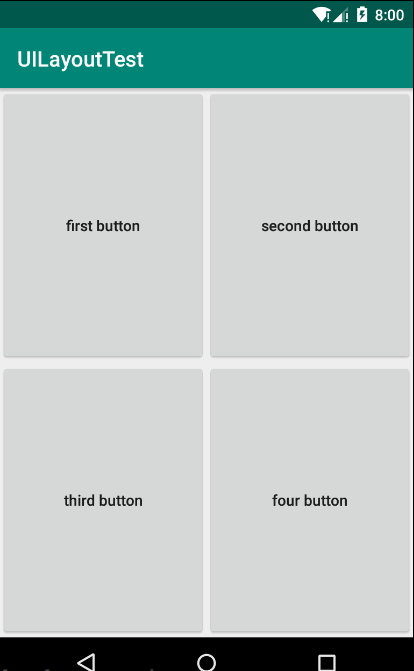
5、下面看代码和效果:
 <?xml version="1.0" encoding="utf-8"?>

 <android.support.percent.PercentFrameLayout

     xmlns:android="http://schemas.android.com/apk/res/android"

     xmlns:app="http://schemas.android.com/apk/res-auto"

     android:layout_width="match_parent"

     android:layout_height="match_parent">

     <Button

         android:id="@+id/first_button"

         android:text="first button"

         android:layout_gravity="left|top"

         app:layout_widthPercent="50%"

12         app:layout_heightPercent="50%"

        />

     <Button

         android:id="@+id/second_button"

         android:text="second button"

         android:layout_gravity="right|top"

         app:layout_widthPercent="50%"

         app:layout_heightPercent="50%"/>

     <Button

         android:id="@+id/third_button"

         android:text="third button"

         android:layout_gravity="left|bottom"

         app:layout_widthPercent="50%"

         app:layout_heightPercent="50%"/>

     <Button

         android:id="@+id/four_button"

         android:text="four button"

         android:layout_gravity="right|bottom"

         app:layout_widthPercent="50%"

         app:layout_heightPercent="50%"/>

 </android.support.percent.PercentFrameLayout>
代码分析:
1、在XML文件中需要定义一个app的命名空间,这样才能使用百分比布局的自定义属性(app属性)
app:layout_widthPercent属性:指定宽度百分比
app:layout_heightPercent属性:指定高度的百分比。
2、PercentFrameLayout还继承了FrameLayout的特性,及所有的控件默认都是摆放在布局的左上角。
使用layout_gravity来分别指定左上、右上、左下、右下
3、PercentRelativeLayout用法与PercentFrameLayout用法相似,它也继承了RelativeLayout布局的所有属性,并且可以使用app:layout_widthPercent和app:layout_heightPercent属性来指定控件所占的百分比。
Android学习之基础知识六—Android四种布局详解的更多相关文章
- Android学习之基础知识十三 — 四大组件之服务详解第一讲
一.服务是什么 服务(Service)是Android中实现程序后台运行的解决方案,它非常适合去执行那些不需要和用户交互而且还要求长期运行的任务.服务的运行不依赖于任何用户界面,即使程序被切换到后台, ...
- Android学习之基础知识二(build.gradle文件详解)
一.详解build.gradle文件 1.Android Studio是采用Gradle来创建项目的,Gradle是非常先进的构建的项目的工具,基于Groovy领域特定的语言(DSL)来声明项目配置, ...
- Android学习之基础知识十三 — 四大组件之服务详解第二讲(完整版的下载示例)
上一讲学习了很多关于服务的使用技巧,但是当在真正的项目里需要用到服务的时候,可能还会有一些棘手的问题让你不知所措.接下来就来综合运用一下,尝试实现一下在服务中经常会使用到的功能——下载. 在这一讲我们 ...
- Android学习之基础知识五—Android常用的七大控件
一.TextView控件:在界面上显示一段文本信息 先看XML代码和执行效果: 代码分析: 1.android:id属性,给当前控件定义了一个唯一的标识符 2.android:layo ...
- Android学习之基础知识八—Android广播机制
一.广播机制简介 Android提供了一套完整的API,允许应用程序自由的发送和接受广播,发送广播借助于我们之前学过的:Intent,而接收广播需要借助于广播接收器(Broadcast Receive ...
- Android学习之基础知识八—Android广播机制实践(实现强制下线功能)
强制下线功能算是比较常见的了,很多的应用程序都具备这个功能,比如你的QQ号在别处登录了,就会将你强制挤下线.实现强制下线功能的思路比较简单,只需要在界面上弹出一个对话框,让用户无法进行任何操作,必须要 ...
- Android学习之基础知识十四 — Android特色开发之基于位置的服务
一.基于位置的服务简介 LBS:基于位置的服务.随着移动互联网的兴起,这个技术在最近的几年里十分火爆.其实它本身并不是什么时髦的技术,主要的工作原理就是利用无线电通讯网络或GPS等定位方式来确定出移动 ...
- Android学习之基础知识四-Activity活动6讲(体验Activity的生命周期)
一.体验活动的生命周期的执行 代码组成: 1.三个Java类:MainActivity.java.NormalActivity.java.DialogActivity.java 2.三个布局文件:ac ...
- Android学习之基础知识四-Activity活动1讲
一.活动(Activity)的基本用法: 1.手动创建活动FirstActivity(java源码): A.Android Studio在一个工作区间只允许打开一个项目,点击:File--->C ...
随机推荐
- SVN多项目并行版本管理解决方案
1.背景 随着公司业务拓展,各业务部门频繁的需求变更,导致系统集成冲突的问题日益突出. 2.现状 基于SVN版本管理模式,多分支版本并行,分支合并主干交付.多分支开发存在依赖关系且有交付的先后顺序, ...
- HashMap底层实现原理(JDK1.8)源码分析
ref:https://blog.csdn.net/tuke_tuke/article/details/51588156 http://www.cnblogs.com/xiaolovewei/p/79 ...
- HDU6213
Chinese Zodiac Time Limit: 1000/1000 MS (Java/Others) Memory Limit: 65535/32768 K (Java/Others)To ...
- blfs(systemd版本)学习笔记-配置远程访问和管理lfs系统
我的邮箱地址:zytrenren@163.com欢迎大家交流学习纠错! 要实现远程管理和配置lfs系统需要配置以下软件包: 前几页章节脚本的配置:https://www.cnblogs.com/ren ...
- ajax请求完之前的loading加载
很多时候我们需要引入框架来开发项目,这时我们可能会遇到页面还没加载完源码出来了的问题,给用户一种不好的视觉体验,这是便需要loading加载了,来完善用户体验! /*loading.js*/ // 加 ...
- Maven 环境搭建及使用(win10)
最近由于公司项目需要,学习了一下Maven 环境的配置.这里把配置步骤和简单的操作做一个汇总. 一.Maven环境的搭建 1.配置java环境(这里不详述过程,可参考:http://www.cnblo ...
- retrofit框架接口调用时候报Throwing new exception
最近在开发的时候遇到了一个很坑的问题,在三星6.0手机上请求接口时候报了一个异常:Throwing new exception 'length=1658; index=3248' with unexp ...
- [201804012]关于hugepages 3.txt
[201804012]关于hugepages 3.txt --//有一段时间我一直强调安装oracle一定要配置hugepage,因为现在的服务器内存越来越大,如果还使用4K的页面表,如果内存表占用内 ...
- lua保留n位小数方法
time:2015/04/21 1. string.format() function GetPreciseDecimal(nNum, n) if type(nNum) ~= "number ...
- [SequenceFile_2] SequenceFile 的基本操作
0. 说明 测试序列文件的读写操作 && 测试序列文件的排序操作 && 测试序列文件的合并操作 && 测试序列文件的压缩方式 && 测试 ...