
Zabbix实战-简易教程(3)--DB安装和表分区
一、DB安装环境
| 主机角色 | 主机IP | VIP | 操作系统版本 | 软件版本 |
| DB Master A | 192.168.1.97 |
(主从) |
CentOS 6.5 64bit | mysql-5.6.21 |
| DB Slave B | 192.168.1.98 | CentOS 6.5 64bit | mysql-5.6.21 |
二、架构图
架构详见图中的数据存储层部分:http://www.cnblogs.com/skyflask/p/7499789.html
三、Mysql安装(源码)
1. 创建目录和安装依赖包
提前规划好数据库安装目录,具体如下:
安装目录:prefix dir
/usr/local/mysql/
sock目录:
/var/lib/mysql/mysql.sock
数据目录datadir
/data/ismdata/
Innodb数据目录
/data/idbdata
相关Logs目录:
/data/myqllog/slowlog/slow.log

/data/mysqllog/errorlog/log-error.log

/data/mysqllog/binlog/master-bin.log
创建相应目录并安装基础包:
mkdir -p /data/{ismdata,idbdata,mysqllog}

yuminstall sudo gdb ethtool ntp sysstat htop ntpdate irqbalance ncftp straceltrace hal gcc g++ cmake make bison libncurses5-dev gcc-c++ ncurses-devel

groupadd-g  mysql

useraddmysql -u  -g mysql -s /sbin/nologin

chownmysql.mysql -R /data/ismdata

chownmysql.mysql -R /data/idbdata

chownmysql.mysql -R /data/mysqllog
2. 解压编译安装mysql
tar zxvf mysql-5.6.21.tar.gz

cd mysql-5.6.21

cmake -DCMAKE_INSTALL_PREFIX=/usr/local/mysql/

-DMYSQL_DATADIR=/data/ismdata/-DENABLED_LOCAL_INFILE=1

-DMYSQL_UNIX_ADDR=/var/lib/mysql/mysql.sock-DWITH_DEBUG=0

-DMYSQL_USER=mysql

-DMYSQL_TCP_PORT=3306

-DWITH_READLINE=1

-DWITHOUT_EXAMPLE_STORAGE_ENGINE=1

-DWITH_INNOBASE_STORAGE-ENGINE=1

-DWITH_MYISAM_STORAGE_ENGINE=1

-DWITH_MEMORY_STORAGE_ENGINE=1

-DWITH_PARTITION_STORAGE_ENGINE=1

-DDEFAULT_CHARSET=utf8

-DDEFAULT_COLLATION=utf8_general_ci

-DWITH_EXTRA_CHARSETS:STRING=utf8,gbk

-DENABLE_DOWNLOADS=1

make -j 4

make install
这里编辑my.cnf文件
chmod 755scripts/mysql_install_db

./scripts/mysql_install_db --user=mysql--basedir=/usr/local/mysql --datadir=/data/ismdata

cp support-files/mysql.server /etc/init.d/mysqld && chmod u+x /etc/init.d/mysqld &&chkconfig --add mysqld

ln -s /usr/local/mysql/bin/mysql /usr/bin/
3.设密码
use mysql

grant all privileges on *.* to root@"%" identified by "EhqW{OZzdsfwe222";

update user set password= password('EhqW{OZzdsfwe222') where user='root';

flush privileges;
4.安全相关设置
#/usr/local/mysql/bin/mysql_secure_installation
 NOTE: RUNNING ALL PARTS OF THIS SCRIPT IS RECOMMENDED FOR ALL MySQL SERVERS IN PRODUCTION USE!  PLEASE READ EACH STEP CAREFULLY!

 In order to log into MySQL to secure it, we'll need the current password for the root user.  If you've just installed MySQL, and you haven't set the root password yet, the password will be blank,so you should just press enter here.

 Enter current password for root (enter for none):

 OK, successfully used password, moving on...

 Setting the root password ensures that nobody can log into the MySQL

 root user without the proper authorisation.

 You already have a root password set, so you can safely answer 'n'.

 Change the root password? [Y/n] n   #是否修改密码?

  ... skipping.

 By default, a MySQL installation has an anonymous user, allowing anyone

 to log into MySQL without having to have a user account created for

 them.  This is intended only for testing, and to make the installation

 go a bit smoother.  You should remove them before moving into a

 production environment.

 Remove anonymous users? [Y/n] y  #是否删除匿名用户?

  ... Success!

 Normally, root should only be allowed to connect from 'localhost'.  This

 ensures that someone cannot guess at the root password from the network.

 Disallow root login remotely? [Y/n] n  #禁止root远程登录?

  ... skipping.

 By default, MySQL comes with a database named 'test' that anyone can

 access.  This is also intended only for testing, and should be removed

 before moving into a production environment.

 Remove test database and access to it? [Y/n] y    #删除test数据库

  - Dropping test database...

  ... Success!

  - Removing privileges on test database...

  ... Success!

 Reloading the privilege tables will ensure that all changes made so far

 will take effect immediately.

 Reload privilege tables now? [Y/n] y   #重载授权表?

  ... Success!

 All done!  If you've completed all of the above steps, your MySQL

 installation should now be secure.

 Thanks for using MySQL!

 Cleaning up...
5.mysql主从配置
Mysql从5.6版本开始,可以直接进行配置,而无需锁表复制文件了。
Master上配置:
grant replication slave on *.* torepuser@'192.168.1.%' identified by "XXXXXXX";

stop slave;

reset master;
Slave上配置:
stop slave;

reset slave;

Change master tomaster_host='192.168.1.97',master_user='repuser',master_password='XXXXX',master_auto_position=;

start slave;
最后附上my.cnf文件
[client]

port            =

socket            = /var/lib/mysql/mysql.sock

[mysqld]

socket            = /var/lib/mysql/mysql.sock

port            =

tmpdir                      = /tmp/tmpmysql

#character set,.6version set utf8

character_set_server=utf8

init_connect='set names utf8'

skip-character-set-client-handshake=

#deafault engine

default_storage_engine  = InnoDB

#log info

slow_query_log        =

slow_query_log_file     = /data/mysqllog/slowlog/slowquery.log

long_query_time       =

log-error          = /data/mysqllog/errorlog/log-error.log

skip-external-locking

log_warnings

back_log =

# fine tuning

skip-name-resolve

max_connections       =

max_allowed_packet       = 32M

max_heap_table_size     = 128M

key_buffer_size       = 128M

sort_buffer_size       = 16M

join_buffer_size       = 16M

net_buffer_length      = 8K

read_buffer_size       = 128M

read_rnd_buffer_size     = 128M

myisam_sort_buffer_size     = 8M

thread_cache_size      =

#thread_concurrency     =

table_open_cache       =

#mysql 5.6 new feature

explicit_defaults_for_timestamp=true

# * Query Cache Configuration

query_cache_limit       = 4M

query_cache_size       = 4096M

query_cache_type       =

tmp_table_size        = 128M

#innodb settings

innodb_data_home_dir         = /data/idbdata

innodb_log_group_home_dir    = /data/idbdata/

innodb_data_file_path        = ibdata1:100M:autoextend

innodb_fast_shutdown         =

innodb_file_per_table      =

innodb_file_io_threads      =

innodb_open_files       =

innodb_buffer_pool_size      = 10G

#innodb_additional_mem_pool_size = 16M

innodb_thread_concurrency    =

innodb_max_dirty_pages_pct   =

innodb_log_buffer_size       = 8M

innodb_flush_log_at_trx_commit =

innodb_flush_method       = 0_DIRECT

innodb_lock_wait_timeout     =

innodb_log_files_in_group   =

innodb_log_file_size     = 64M

innodb_flush_log_at_trx_commit=

innodb_autoextend_increment  =

innodb_buffer_pool_instances =

innodb_concurrency_tickets  =

innodb_old_blocks_time    =

innodb_lock_wait_timeout   =

#log-bin settings

log-bin            = /data/mysqllog/binlog/master-bin.log

expire_logs_days       =

binlog_cache_size       = 1M

max_binlog_size        = 10M

[mysqldump]

# Do not buffer the whole result set in memory before writing it to

# file. Required for dumping very large tables

quick

#quote-names

max_allowed_packet      = 64M

max_connect_errors      =

[mysql]

no-auto-rehash # faster start of mysql but no tab completition

[isamchk]

key_buffer = 512M

sort_buffer_size = 512M

read_buffer = 8M

write_buffer = 8M

[myisamchk]

key_buffer = 512M

sort_buffer_size = 512M

read_buffer = 8M

write_buffer = 8M

[mysqlhotcopy]

interactive-timeout
6、DB注意事项和要点
a、使用tmpfs存储临时文件
mkdir /tmp/tmpmysql

修改/etc/fstab:

tmfs /tmp/tmpmysql tmpfs rw,uid=mysql,gid=mysql,size=1G,nr_inodes=10k,mode=

修改my.cnf

tmpdir=/tmp/tmpmysql
b、设置正确的buffer pool
设置Innodb可用多少内存,建议设置成物理内存的70%~%

innodb_buffer_pool_size=10G
c、设置innodb使用O_DIRECT
这样buffer_pool中的数据就不会与系统缓存中的重复。

innodb_flush_method=O_DIRECT
d、设置合适的log大小
zabbix数据库属于写入较多的数据库,因此设置大一点可以避免MySQL持续将log文件flush到表中。

不过有一个副作用,就是启动和关闭数据库会变慢一点。

innodb_log_file_size=64M
e、打开慢查询日志
log_slow_queries=/data/mysqllog/slowquery.log
f、设置innodb_file_per_table
innodb_file_per_table =
四、mysqlDB分表,去housekeeping
zabbix默认会一小时执行一次housekeeping,如果数据库的量很大的时候,会让数据库变得非常慢,所以此时我们需要进行分表操作。
Alter table history_text drop primary key, add index (id), drop index history_text_2, add index history_text_2 (itemid, id);

Alter table history_log drop primary key, add index (id), drop index history_log_2, add index history_log_2 (itemid, id);
/usr/local/mysql/bin/mysql  -uroot -p'zabbix' zabbix < partition_call.sql

/usr/local/mysql/bin/mysql  -uroot -p'zabbix' zabbix < partition_all.sql
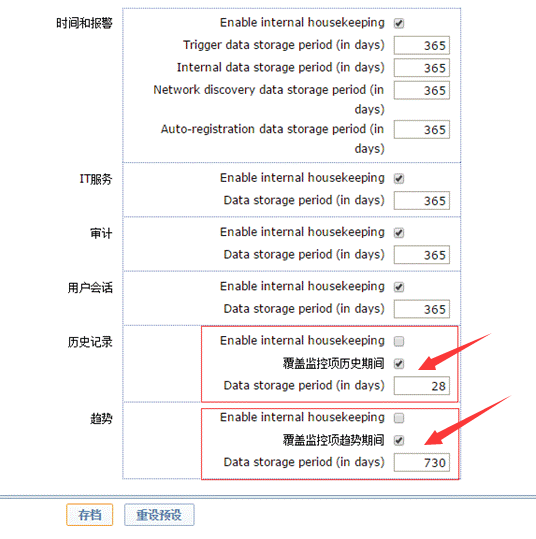
五、参考文献和文件索引
a、分表文件:partition_call.sql和partition_all.sql位于github:
https://github.com/loveqx/zabbix-doc/tree/master/zabbix-scripts/zabbix-install
b、参考文章
Zabbix实战-简易教程(3)--DB安装和表分区的更多相关文章
- Zabbix实战-简易教程系列
一.基础篇(安装和接入) Zabbix实战-简易教程--总流程 Zabbix实战-简易教程--整体架构图 Zabbix实战-简易教程--DB安装和表分区 Zabbix实战-简易教程--Server端 ...
- Zabbix实战-简易教程(6)--Server端高可用
3.4 server前端高可用 至此,单台Zabbix server环境已经搭建完成,为了达到高可用效果,我们需要通过2台服务器之间通过HA软件进行探测,一旦检测到主的server挂掉后,从的s ...
- Zabbix实战-简易教程(4)--Server端安装
在数据库安装完成后,接着开始安装server端了.我们这里采用yum安装. 3.2.0 安装需求 ● PHP 5.6.18 ● curl 7.47.1 ● zabbix_server (Zabbix) ...
- Zabbix实战-简易教程--DB类--ClickHouse
一.ClickHouse介绍 Clickhouse是一个用于联机分析处理(OLAP)的列式数据库管理系统(columnar DBMS). 传统数据库在数据大小比较小,索引大小适合内存,数据缓存命中率足 ...
- Zabbix实战-简易教程--大型分布式监控系统实现Agent批量快速接入
一.分布式架构 相信使用zabbix的大神都熟悉他的分布式架构,分布式的优势相当明显,分而治之.比如目前我的架构图如下: 那么,对将要接入监控系统的任何一个agent如何快速定位,并进行接入呢? 问 ...
- Zabbix实战-简易教程(1)--总流程
序 玩zabbix已经几年了,一直想分享一些相关的使用经验和心得,但是总以各种借口而拖延,最近准备重新整理,记录一些实际工作环境中的示例,一方面希望能够帮助正在学习或者正在寻找这方面资料的朋友,另一方 ...
- Zabbix实战-简易教程(5)--Proxy和Agent端(源码和yum方式)
3.3.1 zabbix proxy安装(源码方式) 1.创建目录 mkdir -p /usr/local/zabbix 2.安装必要软件 yum install -y fping(若安装不成功) 或 ...
- Zabbix实战-简易教程--技巧(本地化)
1.zabbix的logo图标替换(不建议修改) 3.0版本以下: 1.修改/usr/share/zabbix/include/page_header.php 2.修改/usr/share/zabbi ...
- Zabbix实战-简易教程--排错(持续收集中)
一.安装错误 1.zabbix 安装故障之无法跳到下一步或点击下一步没反应 执行命令:chownnginx:nginx /var/lib/php/session/ -R 2.proxy上无法采集交 ...
随机推荐
- 自学Zabbix3.8.1.2-可视化Visualisation-Graphs自定义图表
自学Zabbix3.8.1.2-可视化Visualisation-Graphs自定义图表 自定义图表,如名称所示,提供定制功能.虽然简单的图形可以很好地查看单个项目的数据,但是它们不提供配置功能.因此 ...
- 翻译:SET NAMES
*/ .hljs { display: block; overflow-x: auto; padding: 0.5em; color: #333; background: #f8f8f8; } .hl ...
- 【java提高】---数组增删 list删除 map删除
数组增删 集合删除 1.数组增删 package com.test; import java.util.List; import java.util.ArrayList; import java.ut ...
- ESL翻译:Linear Methods for Regression
chapter 3: Linear Methods for Regression 第3章:回归的线性方法 3.1 Introduction A linear regression model assu ...
- 开始连载啦~每周2更共11堂iKcamp课|基于Koa2搭建Node.js实战项目教学(含视频)| 课程大纲介绍
- 【JMeter】获取json响应报文中数组长度
import com.jayway.jsonpath.JsonPath; import com.jayway.jsonpath.Predicate; import net.minidev.json.J ...
- BCryptPasswordEncoder加密及判断密码是否相同
项目中用到了BCryptPasswordEncoder对密码进行二次加密,需要注意的是,加密后的字符串比较长,数据库的长度至少为60位. 通过BCryptPasswordEncoder的加密的相同字符 ...
- bzoj 3712: [PA2014]Fiolki
Description 化学家吉丽想要配置一种神奇的药水来拯救世界.吉丽有n种不同的液体物质,和n个药瓶(均从1到n编号).初始时,第i个瓶内装着g[i]克的第i种物质.吉丽需要执行一定的步骤来配置药 ...
- 从源码(编译)安装golang 二
h1 { margin-top: 0.6cm; margin-bottom: 0.58cm; direction: ltr; color: #000000; line-height: 200%; te ...
- NIO中的易筋经
匠心零度 转载请注明原创出处,谢谢! 前言 <易筋经>.天下武功出少林,而易筋经是少林寺的镇寺之宝.学好了易筋经就可以轻易地学好其它武功,只不过很少人学到了它的全部精髓.游坦之只是碰巧学了 ...