超详细教程:SpringBoot整合MybatisPlus
摘要:本文为大家带来SpringBoot整合MybatisPlus的教程,实现SpringBoot项目中依赖数据模块进行数据操作,并进行简单测试。
本文分享自华为云社区《SpringBoot整合MybatisPlus【超详细】》,原文作者:牛哄哄的柯南。
创建个SpringBoot项目
选生所需的依赖:==
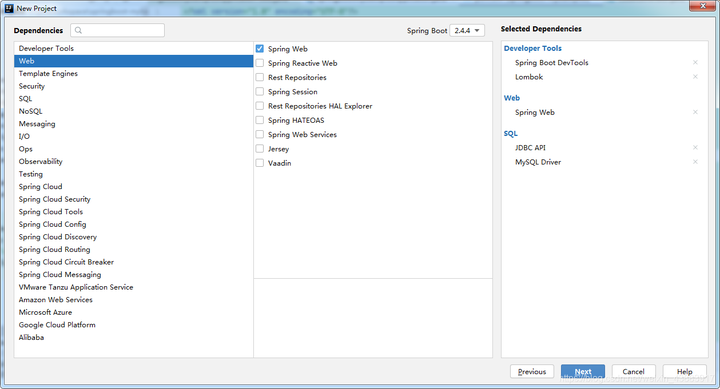
我把application的后缀改为.yml了,方便些。
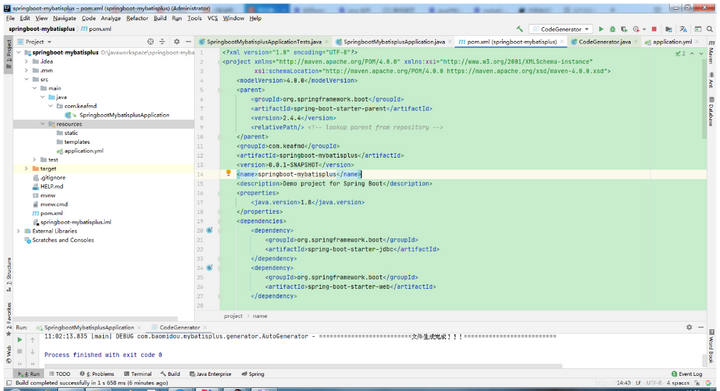
==pom.xml:==
<?xml version="1.0" encoding="UTF-8"?>

<project xmlns="http://maven.apache.org/POM/4.0.0" xmlns:xsi="http://www.w3.org/2001/XMLSchema-instance"

         xsi:schemaLocation="http://maven.apache.org/POM/4.0.0 https://maven.apache.org/xsd/maven-4.0.0.xsd">

    <modelVersion>4.0.0</modelVersion>

    <parent>

        <groupId>org.springframework.boot</groupId>

        <artifactId>spring-boot-starter-parent</artifactId>

        <version>2.4.4</version>

        <relativePath/> <!-- lookup parent from repository -->

    </parent>

    <groupId>com.keafmd</groupId>

    <artifactId>springboot-mybatisplus</artifactId>

    <version>0.0.1-SNAPSHOT</version>

    <name>springboot-mybatisplus</name>

    <description>Demo project for Spring Boot</description>

    <properties>

        <java.version>1.8</java.version>

    </properties>

    <dependencies>

        <dependency>

            <groupId>org.springframework.boot</groupId>

            <artifactId>spring-boot-starter-jdbc</artifactId>

        </dependency>

        <dependency>

            <groupId>org.springframework.boot</groupId>

            <artifactId>spring-boot-starter-web</artifactId>

        </dependency>

        <dependency>

            <groupId>org.springframework.boot</groupId>

            <artifactId>spring-boot-devtools</artifactId>

            <scope>runtime</scope>

            <optional>true</optional>

        </dependency>

        <dependency>

            <groupId>mysql</groupId>

            <artifactId>mysql-connector-java</artifactId>

            <scope>runtime</scope>

        </dependency>

        <dependency>

            <groupId>org.projectlombok</groupId>

            <artifactId>lombok</artifactId>

            <optional>true</optional>

        </dependency>

        <dependency>

            <groupId>org.springframework.boot</groupId>

            <artifactId>spring-boot-starter-test</artifactId>

            <scope>test</scope>

        </dependency>

    </dependencies>

    <build>

        <plugins>

            <plugin>

                <groupId>org.springframework.boot</groupId>

                <artifactId>spring-boot-maven-plugin</artifactId>

                <configuration>

                    <excludes>

                        <exclude>

                            <groupId>org.projectlombok</groupId>

                            <artifactId>lombok</artifactId>

                        </exclude>

                    </excludes>

                </configuration>

            </plugin>

        </plugins>

    </build>

</project>
因为我们配置了数据源,所以需要在application.yml中配置下数据源,不然会起不来,我顺便也改了下端口。
==application.yml:==
server:

  port: 80

spring:

  datasource:

    url: jdbc:mysql://127.0.0.1:3306/ssm-java1?useSSL=false&&characterEncoding=UTF-8

    driver-class-name: com.mysql.cj.jdbc.Driver

    username: root

    password: 18044229
写个HelloController测试下
==HelloController:==
package com.keafmd.controller;

import org.springframework.web.bind.annotation.RequestMapping;

import org.springframework.web.bind.annotation.RestController;

/**

 * Keafmd

 *

 * @ClassName: HelloController

 * @Description:

 * @author: 牛哄哄的柯南

 * @Date: 2021-04-09 11:11

 * @Blog: https://keafmd.blog.csdn.net/

 */

@RestController

public class HelloController {

    @RequestMapping("/hello")

    public String hello(){

        return "keafmd";

    }

}
运行启动类,访问:http://127.0.0.1/hello
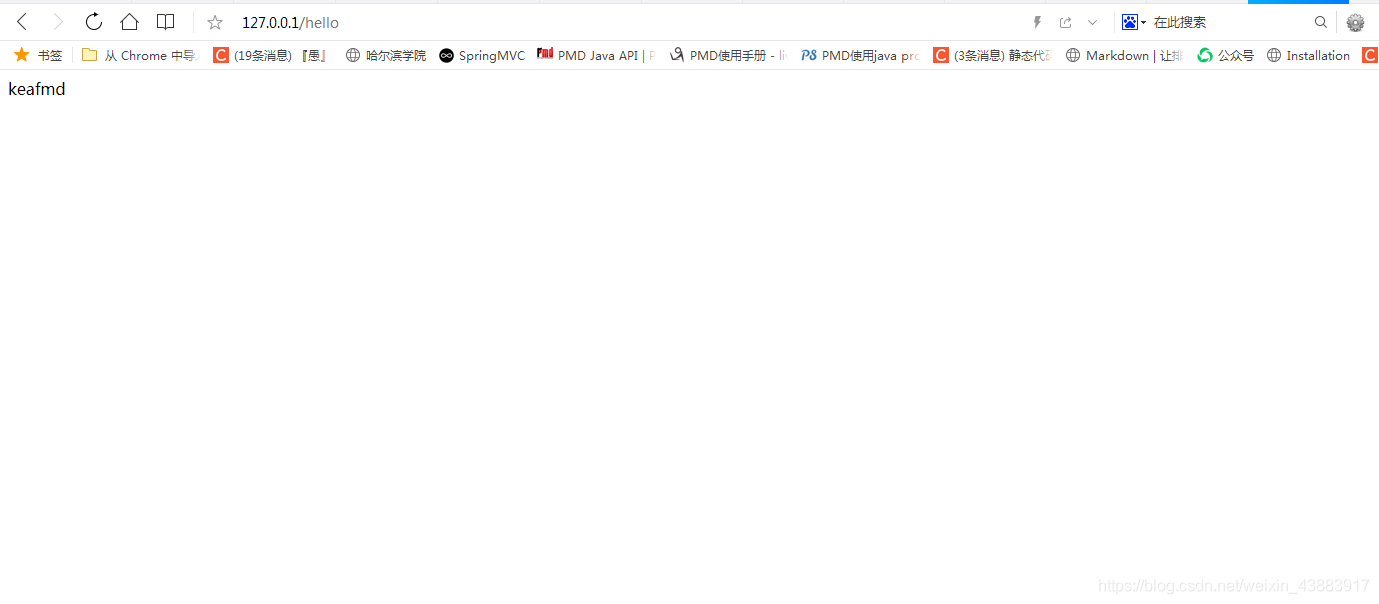
到此证明SpringBoot没有问题。
使用代码生成器生成代码
添加所需的依赖
pom.xml中添加以下依赖:
<dependency>

   <groupId>com.baomidou</groupId>

    <artifactId>mybatis-plus-generator</artifactId>

    <scope>test</scope>

    <version>3.4.0</version>

</dependency>

<dependency>

    <groupId>org.freemarker</groupId>

    <artifactId>freemarker</artifactId>

    <scope>test</scope>

    <version>2.3.31</version>

</dependency>
由于代码生成器并不会在生产环境使用,只是在开发环境中使用了下。所以我们把代码生成器写在test包中即可,依赖的使用场景也定义成test即可。
CodeGenerator
==CodeGenerator:==
package com.keafmd.mp;

import com.baomidou.mybatisplus.core.exceptions.MybatisPlusException;

import com.baomidou.mybatisplus.core.toolkit.StringPool;

import com.baomidou.mybatisplus.core.toolkit.StringUtils;

import com.baomidou.mybatisplus.generator.AutoGenerator;

import com.baomidou.mybatisplus.generator.InjectionConfig;

import com.baomidou.mybatisplus.generator.config.*;

import com.baomidou.mybatisplus.generator.config.po.TableInfo;

import com.baomidou.mybatisplus.generator.config.rules.NamingStrategy;

import com.baomidou.mybatisplus.generator.engine.FreemarkerTemplateEngine;

import java.util.ArrayList;

import java.util.List;

import java.util.Scanner;

/**

 * Keafmd

 *

 * @ClassName: CodeGenerator

 * @Description:

 * @author: 牛哄哄的柯南

 * @date: 2021-03-23 21:47

 */

// 演示例子,执行 main 方法控制台输入模块表名回车自动生成对应项目目录中

public class CodeGenerator {

    /**

     * <p>

     * 读取控制台内容

     * </p>

     */

    public static String scanner(String tip) {

        Scanner scanner = new Scanner(System.in);

        StringBuilder help = new StringBuilder();

        help.append("请输入" + tip + ":");

        System.out.println(help.toString());

        if (scanner.hasNext()) {

            String ipt = scanner.next();

            if (StringUtils.isNotBlank(ipt)) {

                return ipt;

            }

        }

        throw new MybatisPlusException("请输入正确的" + tip + "!");

    }

    public static void main(String[] args) {

        // 代码生成器

        AutoGenerator mpg = new AutoGenerator();

        // 全局配置

        GlobalConfig gc = new GlobalConfig();

        String projectPath = System.getProperty("user.dir");

//        System.out.println("projectPath = " + projectPath);

        gc.setOutputDir(projectPath + "/src/main/java");

//        gc.setOutputDir("D:\\test");

        gc.setAuthor("关注公众号:牛哄哄的柯南");

        gc.setOpen(false);

        // gc.setSwagger2(true); 实体属性 Swagger2 注解

        gc.setServiceName("%sService");

        mpg.setGlobalConfig(gc);

        // 数据源配置

        DataSourceConfig dsc = new DataSourceConfig();

        dsc.setUrl("jdbc:mysql://localhost:3306/ssm-java1?useUnicode=true&useSSL=false&characterEncoding=utf8&serverTimezone=UTC");

        // dsc.setSchemaName("public");

        dsc.setDriverName("com.mysql.cj.jdbc.Driver");

        dsc.setUsername("root");

        dsc.setPassword("18044229");

        mpg.setDataSource(dsc);

        // 包配置

        PackageConfig pc = new PackageConfig();

        pc.setModuleName(null);

        pc.setParent("com.keafmd");

        mpg.setPackageInfo(pc);

        // 自定义配置

        InjectionConfig cfg = new InjectionConfig() {

            @Override

            public void initMap() {

                // to do nothing

            }

        };

        // 如果模板引擎是 freemarker

        String templatePath = "/templates/mapper.xml.ftl";

        // 如果模板引擎是 velocity

        // String templatePath = "/templates/mapper.xml.vm";

        // 自定义输出配置

        List<FileOutConfig> focList = new ArrayList<>();

        // 自定义配置会被优先输出

        focList.add(new FileOutConfig(templatePath) {

            @Override

            public String outputFile(TableInfo tableInfo) {

                // 自定义输出文件名 , 如果你 Entity 设置了前后缀、此处注意 xml 的名称会跟着发生变化!!

                return projectPath + "/src/main/resources/mapper/"

                        + "/" + tableInfo.getEntityName() + "Mapper" + StringPool.DOT_XML;

            }

        });

        cfg.setFileOutConfigList(focList);

        mpg.setCfg(cfg);

        // 配置模板

        TemplateConfig templateConfig = new TemplateConfig();

        templateConfig.setXml(null);

        mpg.setTemplate(templateConfig);

        // 策略配置

        StrategyConfig strategy = new StrategyConfig();

        strategy.setNaming(NamingStrategy.underline_to_camel);

        strategy.setColumnNaming(NamingStrategy.underline_to_camel);

        strategy.setEntityLombokModel(true);

        strategy.setRestControllerStyle(true);

        strategy.setInclude(scanner("表名,多个英文逗号分割").split(","));

        strategy.setControllerMappingHyphenStyle(true);

        strategy.setTablePrefix("m_");

        mpg.setStrategy(strategy);

        mpg.setTemplateEngine(new FreemarkerTemplateEngine());

        mpg.execute();

    }

}
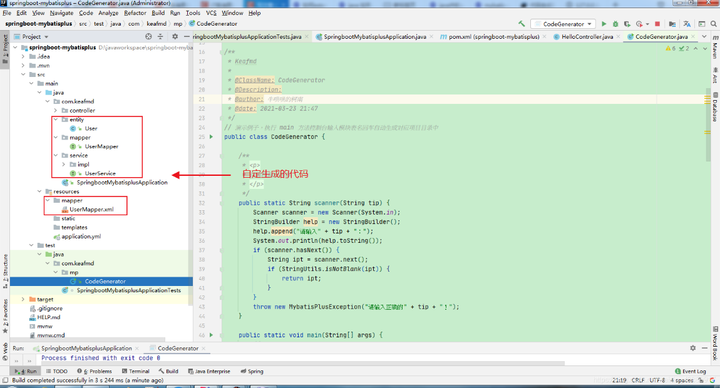
运行代码生成器,在控制台输入想要生成的表
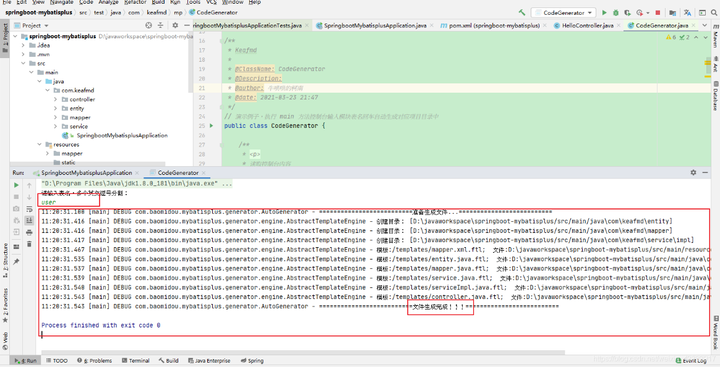
这样就会生成一些包及相应的代码,注意CodeGenerator中的相关代码(如数据库的,包名的)需要该成你们需要的。
以上就是SpringBoot整合MybatisPlus【超详细】的全部内容。
超详细教程:SpringBoot整合MybatisPlus的更多相关文章
- Struts2+Spring4+Hibernate4整合超详细教程
Struts2.Spring4.Hibernate4整合 超详细教程 Struts2.Spring4.Hibernate4整合实例-下载 项目目的: 整合使用最新版本的三大框架(即Struts2.Sp ...
- 很详细的SpringBoot整合UEditor教程
很详细的SpringBoot整合UEditor教程 2017年04月10日 20:27:21 小宝2333 阅读数:21529 版权声明:本文为博主原创文章,未经博主允许不得转载. https: ...
- Springboot 整合 MyBatisPlus[详细过程]
Springboot 整合 MyBatisPlus[详细过程] 提要 这里已经将Springboot环境创建好 这里只是整合MyBatis过程 引入Maven依赖 添加MyBatisPlus启动依赖, ...
- SpringBoot整合MyBatisPlus配置动态数据源
目录 SpringBoot整合MyBatisPlus配置动态数据源 SpringBoot整合MyBatisPlus配置动态数据源 推文:2018开源中国最受欢迎的中国软件MyBatis-Plus My ...
- Github上传代码菜鸟超详细教程【转】
最近需要将课设代码上传到Github上,之前只是用来fork别人的代码. 这篇文章写得是windows下的使用方法. 第一步:创建Github新账户 第二步:新建仓库 第三部:填写名称,简介(可选), ...
- WebRTC VideoEngine超详细教程(三)——集成X264编码和ffmpeg解码
转自:http://blog.csdn.net/nonmarking/article/details/47958395 本系列目前共三篇文章,后续还会更新 WebRTC VideoEngine超详细教 ...
- 安装64位Oracle 10g超详细教程
安装64位Oracle 10g超详细教程 1. 安装准备阶段 1.1 安装Oracle环境 经过上一篇博文的过程,已经完成了对Linux系统的安装,本例使用X-Manager来实现与Linux系统的连 ...
- NumPy 超详细教程(3):ndarray 的内部机理及高级迭代
系列文章地址 NumPy 最详细教程(1):NumPy 数组 NumPy 超详细教程(2):数据类型 NumPy 超详细教程(3):ndarray 的内部机理及高级迭代 ndarray 对象的内部机理 ...
- NumPy 超详细教程(2):数据类型
系列文章地址 NumPy 最详细教程(1):NumPy 数组 NumPy 超详细教程(2):数据类型 NumPy 超详细教程(3):ndarray 的内部机理及高级迭代 文章目录 NumPy 数据类型 ...
- NumPy 超详细教程(1):NumPy 数组
系列文章地址 NumPy 最详细教程(1):NumPy 数组 NumPy 超详细教程(2):数据类型 NumPy 超详细教程(3):ndarray 的内部机理及高级迭代 文章目录 Numpy 数组:n ...
随机推荐
- 使用gitbook快速搭建文档中心
背景 在研发一个系统,主要给公司内部同事用,按理说,简单点的话,搞个使用文档就行了,但产品经理希望是做成一个文档中心,比如,你学习个新技术的时候,比如vue,一般有个在线的帮助文档,他的想法就是这种. ...
- KubeEdge v1.15.0发布!新增5大特性
本文分享自华为云社区<KubeEdge v1.15.0发布!新增Windows 边缘节点支持,基于物模型的设备管理,DMI 数据面支持等功能>,作者:云容器大未来 . 北京时间2023年1 ...
- 9.24 多校联测 Day4 总结
没有罚坐,但好像什么也没做. 反向挂分,RP++. 开考推 T1 的 k=2.推推推,写写写,假了.又假了.还是假的. 此时已过去 1h,开 T2,没有看懂题,又看了一会依旧没有看懂. 开 T3.尝试 ...
- P9580 「Cfz Round 1」Wqs Game 题解
题目链接 挺好的博弈论题,这是一个跟官方题解不太一样的做法. 遇到这种组合游戏可以先考虑逆推胜负,把握一下规律,我们先从一个区间的胜负判断开始入手. 考察区间中最后一个数字的从属关系,如果它属于弈,因 ...
- 【pwn】[SWPUCTF 2021 新生赛]nc签到 --shell过滤字符
附件下载打开: import os art = ''' (( "####@@!!$$ )) `#####@@!$$` )) (( '####@!!$: ...
- 《流畅的Python》 读书笔记 第8章_对象引用、可变性和垃圾回收
第8章_对象引用.可变性和垃圾回收 本章的主题是对象与对象名称之间的区别.名称不是对象,而是单独的东西 name = 'wuxianfeng' # name是对象名称 'wuxianfeng'是个st ...
- HarmonyOS 实战项目
引言 本章将介绍如何在 HarmonyOS 上进行实际项目开发.我们将从项目需求分析开始,逐步完成项目的设计.开发.测试和上线过程. 目录 项目需求分析 项目设计 项目开发 项目测试 项目上线 总结 ...
- phpmyadmin修改上传限制,phpmyadmin修改上传文件大小限制,docker版本phpmyadmin
我用的是DOCKER 版本的phpmyadmin 修改/usr/local/etc/php/conf.d/phpmyadmin-misc.ini 内的限制变量文件为 100M,重启docker 容器后 ...
- 你知道Spring中BeanFactoryPostProcessors是如何执行的吗?
Spring中的BeanFactoryPostProcessor是在Spring容器实例化Bean之后,初始化之前执行的一个扩展机制.它允许开发者在Bean的实例化和初始化之前对BeanDefinit ...
- HTML中的常用的特殊字符以及所有特殊字符
## HTML常用特殊字符以下是HTML中常用的特殊符号及其编码: | 特殊符号 | 编码 | 描述 || --- | --- | --- || `<` | `<` | 小于号 | ...