centos7.2 利用yum安装配置apache2.4多虚拟主机
分类:
Linux题目(8)
版权声明:本文为博主原创文章,未经博主允许不得转载。
一、安装apache
安装
# yum install httpd -y

# rpm -qa httpd
- 1
- 2
- 1
- 2
操作步骤:
[root@centos7-1 httpd]# cat /etc/centos-release

CentOS Linux release 7.2.1511 (Core)

[root@centos7-1 ~]# yum install httpd -y

Loaded plugins: fastestmirror

…………………………………………………………………………

Dependency Installed:

  httpd-tools.x86_64 0:2.4.6-45.el7.centos                         mailcap.noarch 0:2.1.41-2.el7

Complete!

[root@centos7-1 ~]# rpm -qa httpd

httpd-2.4.6-45.el7.centos.x86_64
- 1
- 2
- 3
- 4
- 5
- 6
- 7
- 8
- 9
- 10
- 11
- 1
- 2
- 3
- 4
- 5
- 6
- 7
- 8
- 9
- 10
- 11
二、启动测试apache
1、启动apache
[root@centos7-1 ~]# systemctl start httpd.service
- 1
- 1
2、查看是否启动成功
[root@centos7-1 ~]# ps -ef|grep httpd

root      1739     1  0 18:34 ?        00:00:00 /usr/sbin/httpd -DFOREGROUND

apache    1740  1739  0 18:34 ?        00:00:00 /usr/sbin/httpd -DFOREGROUND

apache    1741  1739  0 18:34 ?        00:00:00 /usr/sbin/httpd -DFOREGROUND

apache    1742  1739  0 18:34 ?        00:00:00 /usr/sbin/httpd -DFOREGROUND

apache    1743  1739  0 18:34 ?        00:00:00 /usr/sbin/httpd -DFOREGROUND

apache    1744  1739  0 18:34 ?        00:00:00 /usr/sbin/httpd -DFOREGROUND

root      1749  1112  0 18:37 pts/0    00:00:00 grep --color=auto httpd

[root@centos7-1 ~]# netstat -lntup|grep httpd

tcp6       0      0 :::80                   :::*                    LISTEN      1739/httpd
- 1
- 2
- 3
- 4
- 5
- 6
- 7
- 8
- 9
- 10
- 1
- 2
- 3
- 4
- 5
- 6
- 7
- 8
- 9
- 10
[root@centos7-1 ~]# echo "192.168.56.101 centos7-1.com www.centos7-1.com bbs.centos7-1.com blog.centos7-1.com">>/etc/hosts

[root@centos7-1 ~]# tail -1 /etc/hosts

192.168.56.101 centos7-1.com www.centos7-1.com bbs.centos7-1.com blog.centos7-1.com
- 1
- 2
- 3
- 1
- 2
- 3
使用curl命令测试
[root@centos7-1 ~]# echo "http://www.$HOSTNAME">/var/www/html/index.html

[root@centos7-1 ~]# cat /var/www/html/index.html

http://www.centos7-1.com

[root@centos7-1 ~]# curl www.centos7-1.com

http://www.centos7-1.com
- 1
- 2
- 3
- 4
- 5
- 1
- 2
- 3
- 4
- 5
三、配置apache
1、修改前备份文件
[root@centos7-1 ~]# cp /etc/httpd/conf/httpd.conf /etc/httpd/conf/httpd.conf.$(date +%F)

[root@centos7-1 ~]# ll /etc/httpd/conf/httpd.conf /etc/httpd/conf/httpd.conf.$(date +%F)

-rw-r--r-- 1 root root 11753 Nov 15 00:53 /etc/httpd/conf/httpd.conf

-rw-r--r-- 1 root root 11753 Jan 10 18:42 /etc/httpd/conf/httpd.conf.2017-01-10

[root@centos7-1 ~]#
- 1
- 2
- 3
- 4
- 5
- 1
- 2
- 3
- 4
- 5
2、配置httpd文件
因为在apache2.4中变化挺大,和nginx一样,可以自定义.conf文件。
在主配置文件中启用虚拟主机
[root@centos7-1 httpd]# mkdir /etc/httpd/vhost.d/

[root@centos7-1 httpd]# echo "include vhost.d/*.conf"

[root@centos7-1 httpd]# tail -1 /etc/httpd/conf/httpd.conf

include vhost.d/*.conf
- 1
- 2
- 3
- 4
- 1
- 2
- 3
- 4
虚拟主机配置文件
[root@centos7-1 httpd]# cat ./vhost.d/name.conf

<VirtualHost *:80>

    ServerAdmin admin@amsilence.com

    DocumentRoot "/var/html/www"

    ServerName www.centos7-1.com

    ErrorLog "/var/httpd/logs/www-error_log"

    CustomLog "/var/httpd/logs/www-access_log" common

</VirtualHost>

<Directory /var/html/www/>

Require all granted

</Directory>

<VirtualHost *:80>

    ServerAdmin admin@amsilence.com

    DocumentRoot "/var/html/bbs"

    ServerName bbs.centos7-1.com

    ErrorLog "/var/httpd/logs/bbs-error_log"

    CustomLog "/var/httpd/logs/bbs-access_log" common

</VirtualHost>

<Directory /var/html/bbs/>

Require all granted

</Directory>

<VirtualHost *:80>

    ServerAdmin admin@amsilence.com

    DocumentRoot "/var/html/blog"

    ServerName blog.centos7-1.com

    ErrorLog "/var/httpd/logs/blog-error_log"

    CustomLog "/var/httpd/logs/blog-access_log" common

</VirtualHost>

<Directory /var/html/blog/>

Require all granted

</Directory>
- 1
- 2
- 3
- 4
- 5
- 6
- 7
- 8
- 9
- 10
- 11
- 12
- 13
- 14
- 15
- 16
- 17
- 18
- 19
- 20
- 21
- 22
- 23
- 24
- 25
- 26
- 27
- 28
- 29
- 30
- 31
- 32
- 33
- 34
- 35
- 36
- 1
- 2
- 3
- 4
- 5
- 6
- 7
- 8
- 9
- 10
- 11
- 12
- 13
- 14
- 15
- 16
- 17
- 18
- 19
- 20
- 21
- 22
- 23
- 24
- 25
- 26
- 27
- 28
- 29
- 30
- 31
- 32
- 33
- 34
- 35
- 36
测试配置文件是否正确
[root@centos7-1 httpd]# /sbin/service httpd configtest

Syntax OK
- 1
- 2
- 1
- 2
重新启动apache服务
[root@centos7-1 httpd]# systemctl restart httpd.service

[root@centos7-1 httpd]# ps -ef|grep httpd

root      1129     1  2 20:40 ?        00:00:00 /usr/sbin/httpd -DFOREGROUND

apache    1131  1129  0 20:40 ?        00:00:00 /usr/sbin/httpd -DFOREGROUND

apache    1132  1129  0 20:40 ?        00:00:00 /usr/sbin/httpd -DFOREGROUND

apache    1133  1129  0 20:40 ?        00:00:00 /usr/sbin/httpd -DFOREGROUND

apache    1134  1129  0 20:40 ?        00:00:00 /usr/sbin/httpd -DFOREGROUND

apache    1135  1129  0 20:40 ?        00:00:00 /usr/sbin/httpd -DFOREGROUND

root      1138  1112  0 20:40 pts/0    00:00:00 grep --color=auto httpd
- 1
- 2
- 3
- 4
- 5
- 6
- 7
- 8
- 9
- 1
- 2
- 3
- 4
- 5
- 6
- 7
- 8
- 9
四、测试web服务
curl测试
[root@centos7-1 httpd]# for name in www bbs blog;do curl $name.centos7-1.com;done;

http://www.centos7-1.com

http://bbs.centos7-1.com

http://blog.centos7-1.com
- 1
- 2
- 3
- 4
- 1
- 2
- 3
- 4
ie浏览器测试
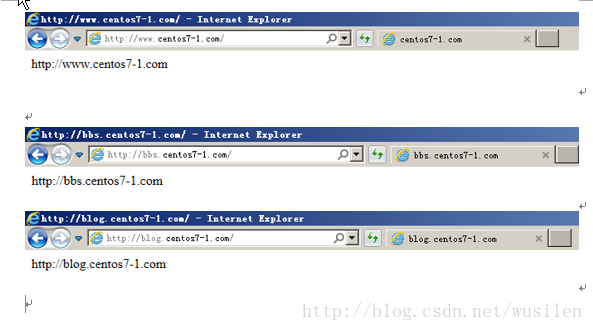
centos7.2 利用yum安装配置apache2.4多虚拟主机的更多相关文章
- ubuntu下安装配置apache2(含虚拟主机配置)
在Ubuntu14.14中安装apache 安装指令: sudo apt-get install apache2 安装结束后: 产生的启动和停止文件是: /etc/init.d/apache2 启动: ...
- 在CentOS7中利用yum命令安装mysql
在CentOS7中利用yum命令安装mysql 原创 2016年08月31日 10:42:33 标签: mysql / centos 4832 一.说明 我们是在VMware虚拟机上安装的mysql, ...
- centos7 yum安装配置redis 并设置密码
原文:https://www.cnblogs.com/fanlinglong/p/6635828.html centos7 yum安装配置redis 并设置密码 1.设置Redis的仓库地址 yum ...
- Linux 下安装Nginx两种方法- yum安装 and Centos7下yum安装配置nginx与php
转载csdn: Linux 下安装Nginx两种方法- yum安装_在电脑前深思的博客-CSDN博客 Linux安装Nginx(两种方式)_HHRunning的博客-CSDN博客_linux 是否安装 ...
- CentOS7下使用YUM安装mariadb10
1:由于centos7 默认使用yum安装MySQL的话就会安装mariadb,只是安装的版本停留在mariadb5.x,版本比较低.如果我们需要安装mariadb10这里就需要删除mariadb-l ...
- centos7中使用yum安装tomcat以及它的启动、停止、重启
centos7中使用yum安装tomcat 介绍 Apache Tomcat是用于提供Java应用程序的Web服务器和servlet容器. Tomcat是Apache Software Foundat ...
- centos7: svbversion版本的安装配置+tortoisesvn登录验证
centos7: svbversion版本的安装配置+tortoisesvn登录验证 命令工具:svnadmin create #创建版本库 hotcopy #版本库热备份 Islocks #打印所有 ...
- Centos7.6使用yum安装PHP7.2
Centos7.6使用yum安装PHP7.2 1.安装源 安装php72w,是需要配置额外的yum源地址的,否则会报错不能找到相关软件包. php高版本的yum源地址,有两部分,其中一部分是epel- ...
- centos7下使用yum安装mysql
CentOS7的yum源中默认好像是没有mysql的.为了解决这个问题,我们要先下载mysql的repo源. 1. 下载mysql的repo源 wget http://repo.mysql.com/m ...
- centOS下yum安装配置samba
centOS下yum安装配置samba 2010-03-29 15:46:00 标签:samba yum centOS 安装 休闲 注意:本文的原则是只将文件共享应用于内网服务器,并让将要被共享的目 ...
随机推荐
- 探索图片与Base64编码的优势与局限性
一.图片和Base64编码的关系: 图片是一种常见的媒体文件格式,可以通过URL进行访问和加载. Base64编码是一种将二进制数据转换为ASCII字符的编码方式,可以将图片数据转换为字符串形式. 图 ...
- 我和我的DBA之路
这几天,突然想写写这些年的工作总结,毕业至今快20年的回顾. 想到20年前,在做毕业设计的时候,当时是学的机械工程类专业,因为带毕业设计的老师兼职企业有个门户网站的需求,而我又会做点网站设计,带的老师 ...
- liquibase customChange
liquibase customChange liquibase changeset 执行Java代码. liquibase支持yml等文件,支持引入sql文件,还支持Java这种方式执行change ...
- snippet n. 小片, 片断, 摘录 单词记忆
snippet 助记:snip[剪断] + -et小词后缀. 关键是 snip 怎么记忆 snip : 拟声词,模仿剪断东西的声音. 助记单词 slip 滑 根据字母 n是done的缩写,可以 想成 ...
- Navicat 通过 Http通道 连接远程 Mysql
https://jingyan.baidu.com/article/3d69c551aa54dff0cf02d7a0.html 注意本机ip填写 localhost
- Linux安装Nginx详细教程
一.下载Nginx安装包 Nginx官网下载地址 根据需求选择自己需要的版本下载后上传至服务器(路径自行决定). 如果服务器有外网,可以直接在服务器上下载. wget -c https://nginx ...
- DiagnosticSource DiagnosticListener 无侵入式分布式跟踪
ASP.NET Core 中的框架中发出大量诊断事件,包括当前请求进入请求完成事件,HttpClient发出收到与响应,EFCore查询等等. 我们可以利用DiagnosticListener来选择性 ...
- js之实现页面内所有图片旋转
javascript:R=0; x1=.1; y1=.05; x2=.25; y2=.24; x3=1.6; y3=.24; x4=300; y4=200; x5=300; y5=200; DI=do ...
- AI 学习时代:大语言模型领域的行业黑话和专业术语解析
近年来,深度学习技术的快速发展带动了大语言模型在自然语言处理领域的广泛应用.在这个激动人心的领域里,我们常常会遇到一些行业黑话和专业术语.为了帮助大家更好地入门,让我们深入探讨一些关键概念,以及它们在 ...
- Android 开发Day2
我的是小刺猬版本,算是比较新的版本了,还有火烈鸟和蜻蜓版啥的 新建项目(project)点击加号新建就行了.这时我们会选择一个模板作为开发的辅助起点,看上哪个就选哪个就行了.推荐新手选空项目(Empt ...