Spring Boot+Eureka+Spring Cloud微服务快速上手项目实战
说明
我看了一些教程要么写的太入门、要么就是写的太抽象。真正好的文章应该是快速使人受益的而不是浪费时间。本文通过一个包括组织、部门、员工等服务交互的案例让刚接触spring cloud微服务的朋友快速上手。内容收集改造自网络,希望对大家有所帮助:)
本文涵盖以下知识点:
- 使用Spring Boot 2.6.x开发各个微服务模块。
- Spring Cloud Config提供配置中心
- Spring Cloud Eureka提供服务注册和发现服务
- Spring Cloud Gateway提供API网关
- Spring Cloud Sleuth提供服务日志(可选)
- Spring Cloud openfeign提供服务接口调用
- springdoc-openapi提供接口API文档
有关各个组件的,不在过多介绍。
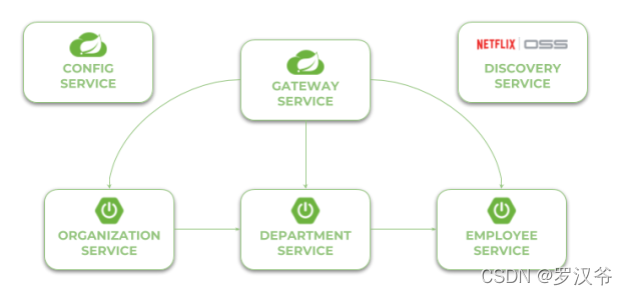
系统架构
有三个独立的Spring Boot微服务,它们在服务发现中注册自己,从配置服务中获取属性,并相互通信。整个系统隐藏在API网关后面。服务调用采用
项目源码
https://gitee.com/indexman/spring_cloud_sample
开发步骤
只展示部分关键代码,详细请看源码。
1.搭建父工程
创建一个父工程:spring_cloud_sample,添加pom.xml:
<project xmlns="http://maven.apache.org/POM/4.0.0" xmlns:xsi="http://www.w3.org/2001/XMLSchema-instance" xsi:schemaLocation="http://maven.apache.org/POM/4.0.0 http://maven.apache.org/maven-v4_0_0.xsd">

	<modelVersion>4.0.0</modelVersion>

	<groupId>com.laoxu.java</groupId>

	<artifactId>spring_cloud_sample</artifactId>

	<version>0.0.1-SNAPSHOT</version>

	<name>spring_cloud_sample</name>

	<packaging>pom</packaging>

	<parent>

		<groupId>org.springframework.boot</groupId>

		<artifactId>spring-boot-starter-parent</artifactId>

		<version>2.6.1</version>

		<relativePath />

	</parent>

	<properties>

		<java.version>1.8</java.version>

		<spring-cloud.version>2021.0.0</spring-cloud.version>

		<project.build.sourceEncoding>UTF-8</project.build.sourceEncoding>

	</properties>

	<dependencyManagement>

		<dependencies>

			<dependency>

				<groupId>org.springframework.cloud</groupId>

				<artifactId>spring-cloud-dependencies</artifactId>

				<version>${spring-cloud.version}</version>

				<type>pom</type>

				<scope>import</scope>

			</dependency>

		</dependencies>

	</dependencyManagement>

	<modules>

		<module>config-service</module>

		<module>discovery-service</module>

		<module>employee-service</module>

		<module>department-service</module>

		<module>organization-service</module>

		<module>gateway-service</module>

	</modules>

</project>
2.创建配置中心config-service
2.1 添加依赖
<dependency>

	<groupId>org.springframework.cloud</groupId>

	<artifactId>spring-cloud-config-server</artifactId>

</dependency>
2.2 添加配置
启用读取本地配置文件需要设置:spring.profiles.active=native
server:

  port: 8088

spring:

  profiles:

    active: native
2.3 添加启动类
@SpringBootApplication

@EnableConfigServer

public class ConfigApplication {

	public static void main(String[] args) {

		new SpringApplicationBuilder(ConfigApplication.class).run(args);

	}

}
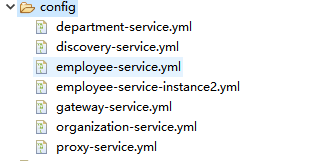
- 本地配置文件
各服务的配置都放在这个config文件夹下,启动后会自动读取。
3.创建服务发现discovery-service
3.1 添加依赖
<dependencies>

		<dependency>

			<groupId>org.springframework.cloud</groupId>

			<artifactId>spring-cloud-starter-netflix-eureka-server</artifactId>

		</dependency>

		<dependency>

			<groupId>org.springframework.cloud</groupId>

			<artifactId>spring-cloud-starter-config</artifactId>

		</dependency>

	</dependencies>
3.2 添加配置文件
注意:启动配置文件都在配置中心config-service resources目录下,此处都是去读取配置中心的各个配置,name一定不要配错!
spring:

  application:

    name: discovery-service

  config:

    import: "optional:configserver:http://localhost:8088"
3.3 添加启动类
@SpringBootApplication

@EnableEurekaServer

public class DiscoveryApplication {

	public static void main(String[] args) {

		new SpringApplicationBuilder(DiscoveryApplication.class).run(args);

	}

}
4.创建员工服务employee-service
注意每个微服务必须在启动期间执行一些操作。
- 从 config-service 获取配置,
- 在 discovery-service 中注册自己
- 暴露 HTTP API 并自动生成 API 文档。
为了实现以上操作,我们需要在 pom.xml 中包含一些依赖项。 要读取配置中心,需要依赖starter spring-cloud-starter-config。 依赖spring-cloud-starter-netflix-eureka-client并使用 @EnableDiscoveryClient 注释主类后,微服务就能注册到发现服务。 此外 Spring Boot 应用程序生成 API 文档,此处我们使用Spring REST Docs
4.1 添加依赖
<dependencies>

		<dependency>

			<groupId>org.springframework.cloud</groupId>

			<artifactId>spring-cloud-starter-netflix-eureka-client</artifactId>

		</dependency>

		<dependency>

			<groupId>org.springframework.cloud</groupId>

			<artifactId>spring-cloud-starter-config</artifactId>

		</dependency>

		<dependency>

			<groupId>org.springframework.boot</groupId>

			<artifactId>spring-boot-starter-web</artifactId>

		</dependency>

		<dependency>

			<groupId>org.springframework.boot</groupId>

			<artifactId>spring-boot-starter-actuator</artifactId>

		</dependency>

		<dependency>

		    <groupId>org.springframework.cloud</groupId>

		    <artifactId>spring-cloud-starter-sleuth</artifactId>

		</dependency>

		<dependency>

			<groupId>org.springdoc</groupId>

			<artifactId>springdoc-openapi-webmvc-core</artifactId>

			<version>1.5.13</version>

		</dependency>

		<dependency>

			<groupId>org.springframework.boot</groupId>

			<artifactId>spring-boot-starter-test</artifactId>

			<scope>test</scope>

		</dependency>

	</dependencies>
4.2 添加启动类
注意启动类主要做了2件事:
- 启用api文档配置
- 初始化employee数据
后续的部门和组织模块与此类似。
@SpringBootApplication

@OpenAPIDefinition(info =

	@Info(title = "Employee API", version = "1.0", description = "Documentation Employee API v1.0")

)

public class EmployeeApplication {

	public static void main(String[] args) {

		SpringApplication.run(EmployeeApplication.class, args);

	}

	@Bean

	EmployeeRepository repository() {

		EmployeeRepository repository = new EmployeeRepository();

		repository.add(new Employee(1L, 1L, "John Smith", 34, "Analyst"));

		repository.add(new Employee(1L, 1L, "Darren Hamilton", 37, "Manager"));

		repository.add(new Employee(1L, 1L, "Tom Scott", 26, "Developer"));

		repository.add(new Employee(1L, 2L, "Anna London", 39, "Analyst"));

		repository.add(new Employee(1L, 2L, "Patrick Dempsey", 27, "Developer"));

		repository.add(new Employee(2L, 3L, "Kevin Price", 38, "Developer"));

		repository.add(new Employee(2L, 3L, "Ian Scott", 34, "Developer"));

		repository.add(new Employee(2L, 3L, "Andrew Campton", 30, "Manager"));

		repository.add(new Employee(2L, 4L, "Steve Franklin", 25, "Developer"));

		repository.add(new Employee(2L, 4L, "Elisabeth Smith", 30, "Developer"));

		return repository;

	}

}
4.3 添加接口
@RestController

public class EmployeeController {

	private static final Logger LOGGER = LoggerFactory.getLogger(EmployeeController.class);

	@Autowired

	EmployeeRepository repository;

	@PostMapping("/")

	public Employee add(@RequestBody Employee employee) {

		LOGGER.info("Employee add: {}", employee);

		return repository.add(employee);

	}

	@GetMapping("/{id}")

	public Employee findById(@PathVariable("id") Long id) {

		LOGGER.info("Employee find: id={}", id);

		return repository.findById(id);

	}

	@GetMapping("/")

	public List<Employee> findAll() {

		LOGGER.info("Employee find");

		return repository.findAll();

	}

	@GetMapping("/department/{departmentId}")

	public List<Employee> findByDepartment(@PathVariable("departmentId") Long departmentId) {

		LOGGER.info("Employee find: departmentId={}", departmentId);

		return repository.findByDepartment(departmentId);

	}

	@GetMapping("/organization/{organizationId}")

	public List<Employee> findByOrganization(@PathVariable("organizationId") Long organizationId) {

		LOGGER.info("Employee find: organizationId={}", organizationId);

		return repository.findByOrganization(organizationId);

	}

}
5.创建部门服务department-service
5.1 添加依赖
同4.1,略
5.2 添加启动类
@SpringBootApplication

@EnableFeignClients

@OpenAPIDefinition(info =

	@Info(title = "Department API", version = "1.0", description = "Documentation Department API v1.0")

)

public class DepartmentApplication {

	public static void main(String[] args) {

		SpringApplication.run(DepartmentApplication.class, args);

	}

	@Bean

	DepartmentRepository repository() {

		DepartmentRepository repository = new DepartmentRepository();

		repository.add(new Department(1L, "Development"));

		repository.add(new Department(1L, "Operations"));

		repository.add(new Department(2L, "Development"));

		repository.add(new Department(2L, "Operations"));

		return repository;

	}

}
5.3 添加接口
@RestController

public class DepartmentController {

	private static final Logger LOGGER = LoggerFactory.getLogger(DepartmentController.class);

	DepartmentRepository repository;

	EmployeeClient employeeClient;

	public DepartmentController(DepartmentRepository repository, EmployeeClient employeeClient) {

		this.repository = repository;

		this.employeeClient = employeeClient;

	}

	@PostMapping("/")

	public Department add(@RequestBody Department department) {

		LOGGER.info("Department add: {}", department);

		return repository.add(department);

	}

	@GetMapping("/{id}")

	public Department findById(@PathVariable("id") Long id) {

		LOGGER.info("Department find: id={}", id);

		return repository.findById(id);

	}

	@GetMapping("/")

	public List<Department> findAll() {

		LOGGER.info("Department find");

		return repository.findAll();

	}

	@GetMapping("/organization/{organizationId}")

	public List<Department> findByOrganization(@PathVariable("organizationId") Long organizationId) {

		LOGGER.info("Department find: organizationId={}", organizationId);

		return repository.findByOrganization(organizationId);

	}

	@GetMapping("/organization/{organizationId}/with-employees")

	public List<Department> findByOrganizationWithEmployees(@PathVariable("organizationId") Long organizationId) {

		LOGGER.info("Department find: organizationId={}", organizationId);

		List<Department> departments = repository.findByOrganization(organizationId);

		departments.forEach(d -> d.setEmployees(employeeClient.findByDepartment(d.getId())));

		return departments;

	}

}
6.创建组织服务organization-service
6.1 添加依赖
同4.1,略
6.2 添加启动类
@SpringBootApplication

@EnableFeignClients

@OpenAPIDefinition(info =

	@Info(title = "Organization API", version = "1.0", description = "Documentation Organization API v1.0")

)

public class OrganizationApplication {

	public static void main(String[] args) {

		SpringApplication.run(OrganizationApplication.class, args);

	}

	@Bean

	OrganizationRepository repository() {

		OrganizationRepository repository = new OrganizationRepository();

		repository.add(new Organization("Microsoft", "Redmond, Washington, USA"));

		repository.add(new Organization("Oracle", "Redwood City, California, USA"));

		return repository;

	}

}
6.3 添加接口
@RestController

public class OrganizationController {

	private static final Logger LOGGER = LoggerFactory.getLogger(OrganizationController.class);

	@Autowired

	OrganizationRepository repository;

	@Autowired

	DepartmentClient departmentClient;

	@Autowired

	EmployeeClient employeeClient;

	@PostMapping

	public Organization add(@RequestBody Organization organization) {

		LOGGER.info("Organization add: {}", organization);

		return repository.add(organization);

	}

	@GetMapping

	public List<Organization> findAll() {

		LOGGER.info("Organization find");

		return repository.findAll();

	}

	@GetMapping("/{id}")

	public Organization findById(@PathVariable("id") Long id) {

		LOGGER.info("Organization find: id={}", id);

		return repository.findById(id);

	}

	@GetMapping("/{id}/with-departments")

	public Organization findByIdWithDepartments(@PathVariable("id") Long id) {

		LOGGER.info("Organization find: id={}", id);

		Organization organization = repository.findById(id);

		organization.setDepartments(departmentClient.findByOrganization(organization.getId()));

		return organization;

	}

	@GetMapping("/{id}/with-departments-and-employees")

	public Organization findByIdWithDepartmentsAndEmployees(@PathVariable("id") Long id) {

		LOGGER.info("Organization find: id={}", id);

		Organization organization = repository.findById(id);

		organization.setDepartments(departmentClient.findByOrganizationWithEmployees(organization.getId()));

		return organization;

	}

	@GetMapping("/{id}/with-employees")

	public Organization findByIdWithEmployees(@PathVariable("id") Long id) {

		LOGGER.info("Organization find: id={}", id);

		Organization organization = repository.findById(id);

		organization.setEmployees(employeeClient.findByOrganization(organization.getId()));

		return organization;

	}

}
7.创建网关服务gateway-service
- 关于网关gateway
Spring Cloud Gateway 提供了三个用于配置的基本组件:路由(routes)、谓词(predicates )和过滤器(filters)。 路由是网关的基本构建块。 它包含一个目标 URI 和定义的谓词和过滤器列表。 Predicate 负责匹配来自传入 HTTP 请求的任何内容,例如请求头或参数。 过滤器可以在发送到下游服务之前和之后修改请求和响应。 所有这些组件都可以使用配置属性进行设置。 我们为示例微服务定义的路由创建并放置在配置服务器文件 gateway-service.yml。
7.1 添加依赖
<dependencies>

		<dependency>

			<groupId>org.springframework.cloud</groupId>

			<artifactId>spring-cloud-starter-gateway</artifactId>

		</dependency>

		<dependency>

			<groupId>org.springframework.cloud</groupId>

			<artifactId>spring-cloud-starter-netflix-eureka-client</artifactId>

		</dependency>

		<dependency>

			<groupId>org.springframework.cloud</groupId>

			<artifactId>spring-cloud-starter-config</artifactId>

		</dependency>

		<dependency>

		    <groupId>org.springframework.cloud</groupId>

		    <artifactId>spring-cloud-starter-sleuth</artifactId>

		</dependency>

		<dependency>

			<groupId>org.springdoc</groupId>

			<artifactId>springdoc-openapi-webflux-core</artifactId>

			<version>1.5.13</version>

		</dependency>

		<dependency>

			<groupId>org.springdoc</groupId>

			<artifactId>springdoc-openapi-webflux-ui</artifactId>

			<version>1.5.13</version>

		</dependency>

	</dependencies>
7.2 添加启动类
@SpringBootApplication

@EnableDiscoveryClient

public class GatewayApplication {

	private static final Logger LOGGER = LoggerFactory.getLogger(GatewayApplication.class);

	public static void main(String[] args) {

		SpringApplication.run(GatewayApplication.class, args);

	}

	@Autowired

	RouteDefinitionLocator locator;

	@Bean

	public List<GroupedOpenApi> apis() {

		List<GroupedOpenApi> groups = new ArrayList<>();

		List<RouteDefinition> definitions = locator.getRouteDefinitions().collectList().block();

		assert definitions != null;

		definitions.stream().filter(routeDefinition -> routeDefinition.getId().matches(".*-service")).forEach(routeDefinition -> {

			String name = routeDefinition.getId().replaceAll("-service", "");

			groups.add(GroupedOpenApi.builder().pathsToMatch("/" + name + "/**").group(name).build());

		});

		return groups;

	}

}
7.3 添加中心化配置
server:

  port: 8060

eureka:

  client:

    serviceUrl:

      defaultZone: http://localhost:8061/eureka/

logging:

  pattern:

    console: "%d{yyyy-MM-dd HH:mm:ss} ${LOG_LEVEL_PATTERN:-%5p} %m%n"

spring:

  cloud:

    gateway:

      discovery:

        locator:

          enabled: true

      routes:

      - id: employee-service

        uri: lb://employee-service

        predicates:

        - Path=/employee/**

        filters:

        - RewritePath=/employee/(?<path>.*), /$\{path}

      - id: department-service

        uri: lb://department-service

        predicates:

        - Path=/department/**

        filters:

        - RewritePath=/department/(?<path>.*), /$\{path}

      - id: organization-service

        uri: lb://organization-service

        predicates:

        - Path=/organization/**

        filters:

        - RewritePath=/organization/(?<path>.*), /$\{path}

      - id: openapi

        uri: http://localhost:${server.port}

        predicates:

        - Path=/v3/api-docs/**

        filters:

        - RewritePath=/v3/api-docs/(?<path>.*), /$\{path}/v3/api-docs

springdoc:

  swagger-ui:

    urls:

      - name: employee

        url: /v3/api-docs/employee

      - name: department

        url: /v3/api-docs/department

      - name: organization

        url: /v3/api-docs/organization
8.运行测试
8.1 启动服务
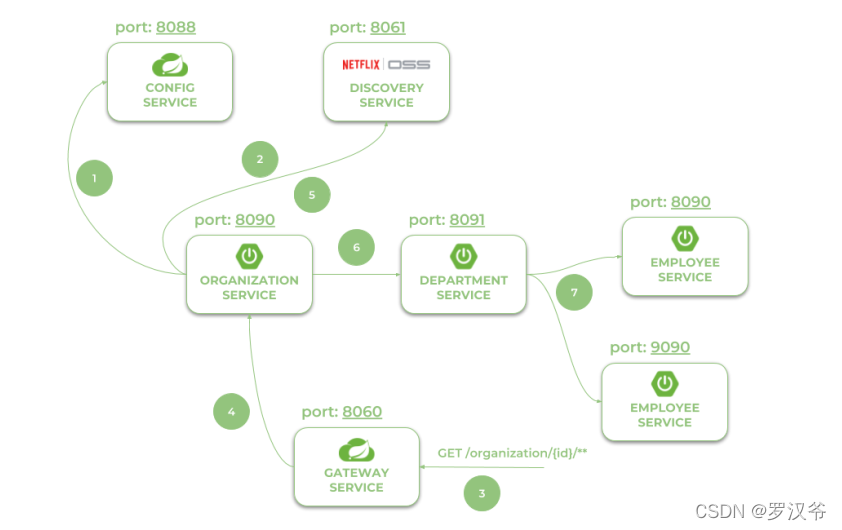
- 依次启动:
config-service、discovery-service
剩下的服务顺序无限制。 - 程序的运行逻辑参考下图:
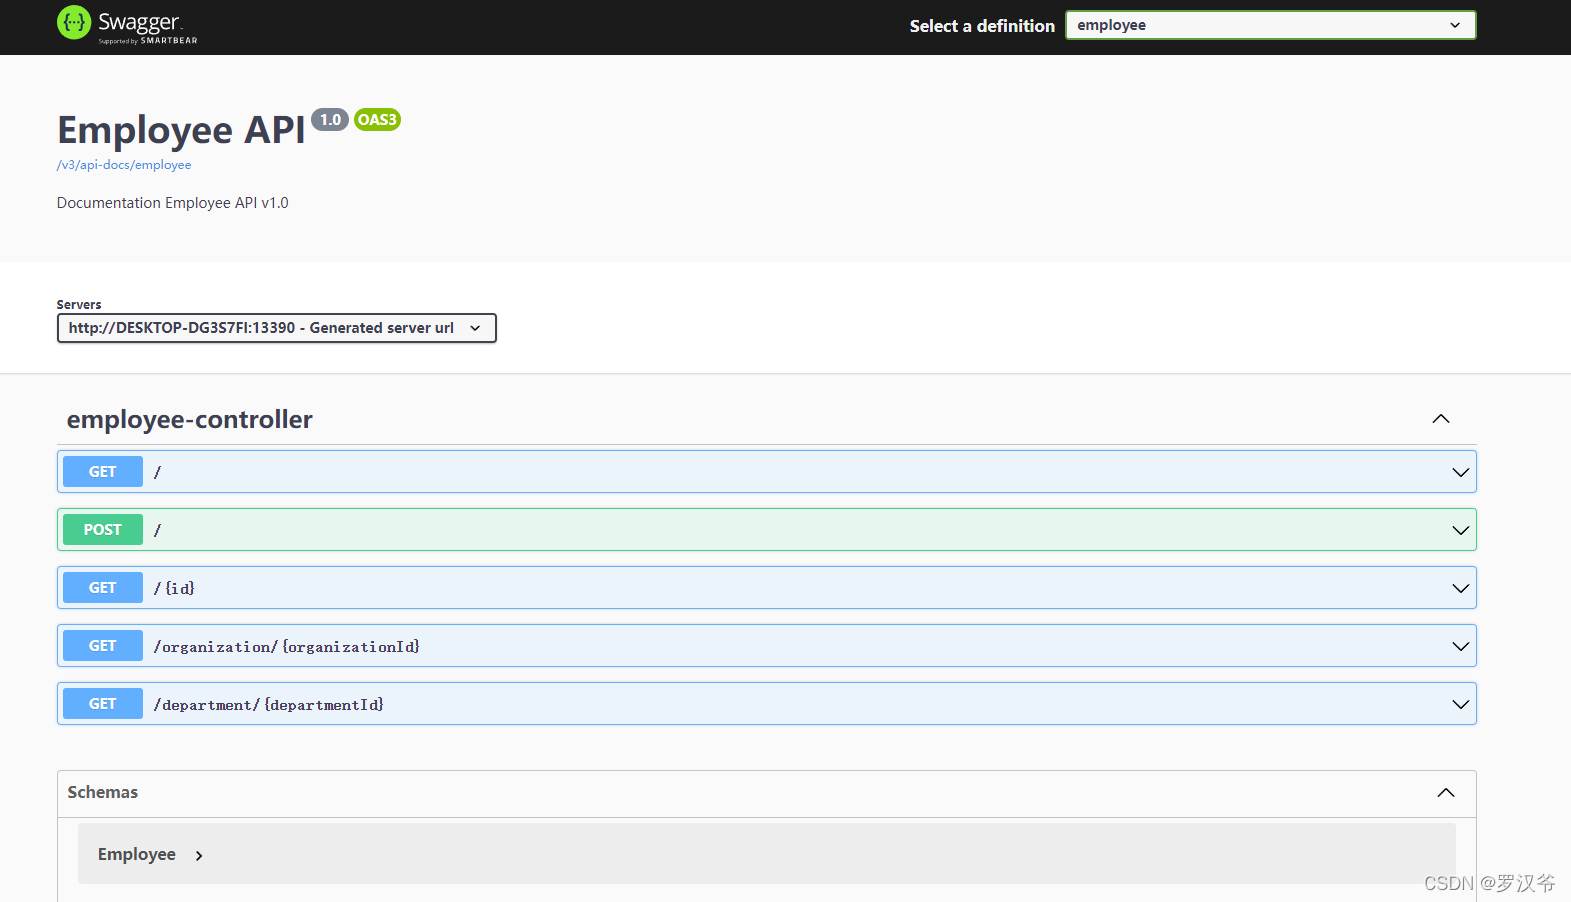
8.1 访问api doc
访问:http://localhost:8060/swagger-ui.html
8.2 访问接口
注意:由于数据在启动时初始化到内存,所以多次查询后会发生填充,重启后才会重置。当然你也可以去修改Repository中的方法去重置,此处对于整个项目无关紧要。
- 查询单个组织
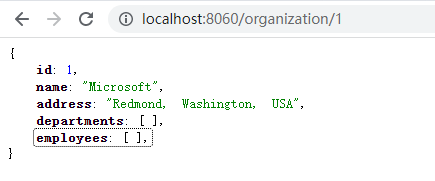
http://localhost:8060/organization/1
- 查询组织下的部门列表
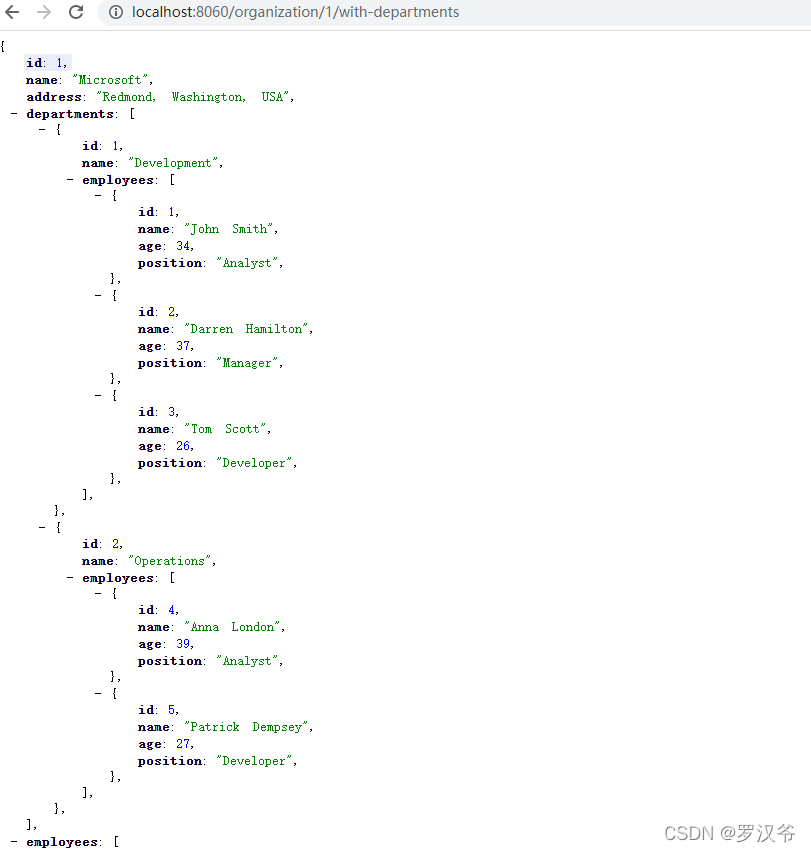
http://localhost:8060/organization/1/with-departments
Spring Boot+Eureka+Spring Cloud微服务快速上手项目实战的更多相关文章
- spring cloud微服务快速教程之(七) Spring Cloud Alibaba--nacos(一)、服务注册发现
0.前言 什么是Spring Cloud Alibaba? Spring Cloud Alibaba 是阿里开源的,致力于提供微服务开发的一站式解决方案.此项目包含开发分布式应用微服务的必需组件,方便 ...
- Spring Boot 和 Docker 实现微服务部署
Spring boot 开发轻巧的微服务提供了便利,Docker 的发展又极大的方便了微服务的部署.这篇文章介绍一下如果借助 maven 来快速的生成微服务的镜像以及快速启动服务. 其实将 Sprin ...
- Spring boot学习1 构建微服务:Spring boot 入门篇
Spring boot学习1 构建微服务:Spring boot 入门篇 Spring Boot是由Pivotal团队提供的全新框架,其设计目的是用来简化新Spring应用的初始搭建以及开发过程.该框 ...
- Java 18套JAVA企业级大型项目实战分布式架构高并发高可用微服务电商项目实战架构
Java 开发环境:idea https://www.jianshu.com/p/7a824fea1ce7 从无到有构建大型电商微服务架构三个阶段SpringBoot+SpringCloud+Solr ...
- spring cloud微服务快速教程之(六) 应用监控 spring boot admin
0-前言 当我们发布了微服务后,我们希望对各个应用的各个运行状况进行一个监控:这个时候spring boot admin,就出场了: spring boot admin:是一个监控和管理spring ...
- spring cloud微服务快速教程之(二)服务注册与发现 eureka
0.为什么需要eureka 当我们从当体系统拆分为多个独立服务项目之后,如果aaa.com/uer.aaa.com/order;:相互之间调用,如果只是一个服务一个实例,那还可以直接通过固定地址(如h ...
- spring cloud微服务快速教程之(四)熔断器(Hystrix)及其工具(Dashboard、Turbine)
0-为什么需要熔断器 在分布式系统中,各个服务相互调用相互依赖,如果某个服务挂了,很可能导致其他调用它的一连串服务也挂掉或者在不断等待中耗尽服务器资源,这种现象称之为雪崩效应: 未来防止系统雪崩,熔断 ...
- spring cloud微服务快速教程之(十一) Sleuth(zipkin) 服务链路追踪
0.前言 微服务架构上众多微服务通过REST调用,可能需要很多个服务协同才能完成一个接口功能,如果链路上任何一个服务出现问题或者网络超时,都会形成导致接口调用失败.随着业务的不断扩张,服务之间互相调用 ...
- spring cloud微服务快速教程之(五) ZUUL API网关中心
0-前言 我们一个个微服务构建好了,外部的应用如何来访问内部各种各样的微服务呢?在微服务架构中,后端服务往往不直接开放给调用端,而是通过一个API网关根据请求的url,路由到相应的服务.当添加API网 ...
- spring cloud微服务快速教程之(十) gateway 服务网关
0.前言 gateway是spring的二代网关, 作为Netflix Zuul的替代者,是异步非阻塞网关 ,ZUUL2也是异步非阻塞的,但未纳入spring cloud整合计划 基于WebFlux ...
随机推荐
- Mygin实现分组路由Group
本篇是Mygin第五篇 目的 实现路由分组 为什么要分组 分组控制(Group Control)是 Web 框架应该提供的基础功能之一,对同一模块功能的开发,应该有相同的前缀.或者对一部分第三方接口, ...
- [转帖]字符集 AL32UTF8 和 UTF8
https://blog.51cto.com/comtv/383254# 文章标签职场休闲字符集 AL32UTF8 和 UTF8文章分类数据库阅读数1992 The difference betwee ...
- [转帖]Linux命令(64)——strings命令
https://cloud.tencent.com/developer/article/1414999 1.命令简介 strings命令是二进制工具集GNU Binutils的一员,用于打印文件中可打 ...
- 汉字在unicode的编码情况-From http://yedict.com/zsts.htm
字符集内容 字数 unicode编码 字符显示说明(除非安装更大字库) 基本区 分页: 一 二 三 四 共20902字 4E00-9FA5 电脑和手机都能显示 基本区补充 共90字 9FA6-9F ...
- [转帖]TIDB TIKV 数据是怎么写入与通过Region 分割的?
https://cloud.tencent.com/developer/article/1882194 国产的分布式数据库不少,TDSQL, OB, TIDB ,等等都是比较知名的产品,使用的分布式协 ...
- [转帖]《Linux性能优化实战》笔记(22)—— 网络丢包问题分析
所谓丢包,是指在网络数据的收发过程中,由于种种原因,数据包还没传输到应用程序中,就被丢弃了.这些被丢弃包的数量,除以总的传输包数,也就是我们常说的丢包率.丢包率是网络性能中最核心的指标之一.丢包通常会 ...
- [转帖]Skywalking介绍
https://www.jianshu.com/p/ffa7ddcda4ab 微服务架构已经是一个很通用的系统架构,常见的技术栈如下图所示,这张架构图基本涵括了当前微服务体系下的各种技术栈,可能不同的 ...
- 【转帖】基于官方rpm包方式安装Oracle19c
https://blog.whsir.com/post-5489.html 本文基于Centos7.x环境,通过官方提供的rpm包来安装19c 1.下载Oracle19c安装包 https://w ...
- awk的简单样例
shell awk求和 当第一列相同时,对应的第二列相加 awk'{sum[$1]+=$2}END{for(c in sum){print c,sum[c]}}'输入文件名 在Shell中,我们可以用 ...
- 物联网浏览器(IoTBrowser)-顶尖OS2电子秤协议实现
本教程基于 物联网浏览器(IoTBrowser)-Web串口自定义开发 ,详细的过程可以翻看之前的文章. 本篇以实现顶尖OS2系列电子秤协议对接,并集成到IoTBrowser平台.由于没有找到OS2 ...