
Hadoop 3.1.0 在 Ubuntu 16.04 上的安装过程
安装过程主要参考官方文档:
http://hadoop.apache.org/docs/current/hadoop-project-dist/hadoop-common/SingleCluster.html
目标:
Set up and configure a single-node Hadoop installation so that you can quickly perform simple operations using Hadoop MapReduce and the Hadoop Distributed File System (HDFS).
部署安装一个单节点的 Hadoop ,以便使用 Hadoop MapReduce、HDFS 完成一些简单操作。
软件准备:
Ubuntu 16.04
这里使用 VMware 搭建 Ubuntu 16.04 的虚拟机系统
Hadoop 3.1.0
Hadoop 安装包下载镜像站:Apache Download Mirrors
这里下载的版本是: hadoop-3.1.0.tar.gz
解压下载的 Hadoop 压缩包:
$ tar -zxvf hadoop-3.0..tar.gz
Openjdk 8.0
Version 2.7 and later of Apache Hadoop requires Java 7. It is built and tested on both OpenJDK and Oracle (HotSpot)'s JDK/JRE.
Earlier versions (2.6 and earlier) support Java 6.
Here are the known JDKs in use or which have been tested:
Version
Status
Reported By
oracle 1.7.0_15
Good
Cloudera
oracle 1.7.0_21
Good (4)
Hortonworks
oracle 1.7.0_45
Good
Pivotal
openjdk 1.7.0_09-icedtea
Good (5)
Hortonworks
oracle 1.6.0_16
Avoid (1)
Cloudera
oracle 1.6.0_18
Avoid
Many
oracle 1.6.0_19
Avoid
Many
oracle 1.6.0_20
Good (2)
LinkedIn, Cloudera
oracle 1.6.0_21
Good (2)
Yahoo!, Cloudera
oracle 1.6.0_24
Good
Cloudera
oracle 1.6.0_26
Good(2)
Hortonworks, Cloudera
oracle 1.6.0_28
Good
LinkedIn
oracle 1.6.0_31
Good(3, 4)
Cloudera, Hortonworks
$ sudo apt upgrade
$ sudo apt install openjdk-8-jre openjdk-8-jdk
JAVA 可以使用 Oracle 的JDK 或者直接安装 OpenJDK,这里安装的是 OpenJDK 8。
可以使用 java -version 来查看 java 版本。
安装 java 之后编辑 /etc/profile ,配置 Java、Hadoop 环境变量:
$ sudo vi /etc/profile
# set oracle jdk 、hadoop environment
export JAVA_HOME=/usr/lib/jvm/java-1.8.0-openjdk-amd64

export HADOOP_HOME=/home/wu/hadoop-3.1.0
$ source /etc/profile
使用以下命令检查环境值:
$ echo $JAVA_HOME

/usr/lib/jvm/java-1.8.-openjdk-amd64

$ echo $HADOOP_HOME

/home/wu/hadoop-3.1.
ssh
$ sudo apt install ssh
安装过程:
Prepare to Start the Hadoop Cluster
在 hadoop 安装目录下,编辑 etc/hadoop/hadoop-env.sh 文件:
export JAVA_HOME=/usr/lib/jvm/java-1.8.0-openjdk-amd64
可以测试一下 hadoop:
$ bin/hadoop
或者:
$ bin/hadoop version

Hadoop 3.1.

Source code repository https://github.com/apache/hadoop -r 16b70619a24cdcf5d3b0fcf4b58ca77238ccbe6d

Compiled by centos on --30T00:00Z

Compiled with protoc 2.5.

From source with checksum 14182d20c972b3e2105580a1ad6990

This command was run using /home/wu/hadoop-3.1./share/hadoop/common/hadoop-common-3.1..jar
启动 Hadoop
启动hadoop集群有三种模式:
- 本地(独立)模式,Local (Standalone) Mode
- 伪分布式模式,Pseudo-Distributed Mode
- 完全分布式模式、Fully-Distributed Mode
1、针对本地模式 Standalone Operation :
By default, Hadoop is configured to run in a non-distributed mode, as a single Java process. This is useful for debugging.
The following example copies the unpacked conf directory to use as input and then finds and displays every match of the given regular expression. Output is written to the given output directory.
可以使用下面的一个例子简单使用 hadoop :
  $ mkdir input

  $ cp etc/hadoop/*.xml input

  $ bin/hadoop jar share/hadoop/mapreduce/hadoop-mapreduce-examples-2.9.1.jar grep input output 'dfs[a-z.]+'

  $ cat output/*
2、针对伪分布式模式 Pseudo-Distributed Mode :
Hadoop can also be run on a single-node in a pseudo-distributed mode where each Hadoop daemon runs in a separate Java process.
配置环境:
$ sudo vi etc/hadoop/core-site.xml
<configuration>

    <property>

        <name>fs.defaultFS</name>

        <value>hdfs://localhost:9000</value>

    </property>

</configuration>
$ sudo vi etc/hadoop/hdfs-site.xml
<configuration>

    <property>

        <name>dfs.replication</name>

        <value>1</value>

    </property>

</configuration>
设置 SSH 免密码登陆(Setup passphraseless ssh):
先测试是否能免密码登陆(Now check that you can ssh to the localhost without a passphrase):
$ ssh localhost
如果需要密码才能登陆,则执行下面的命令(If you cannot ssh to localhost without a passphrase, execute the following commands):
  $ ssh-keygen -t rsa -P '' -f ~/.ssh/id_rsa

  $ cat ~/.ssh/id_rsa.pub >> ~/.ssh/authorized_keys

  $ chmod  ~/.ssh/authorized_keys
执行(Execution):
The following instructions are to run a MapReduce job locally.
格式化文件系统:
$ bin/hdfs namenode -format
启动 namenode、datanode 守护进程:
$ sbin/start-dfs.sh
Starting namenodes on [localhost]
Starting datanodes
Starting secondary namenodes [ubuntu]
The hadoop daemon log output is written to the $HADOOP_LOG_DIR directory (defaults to $HADOOP_HOME/logs).
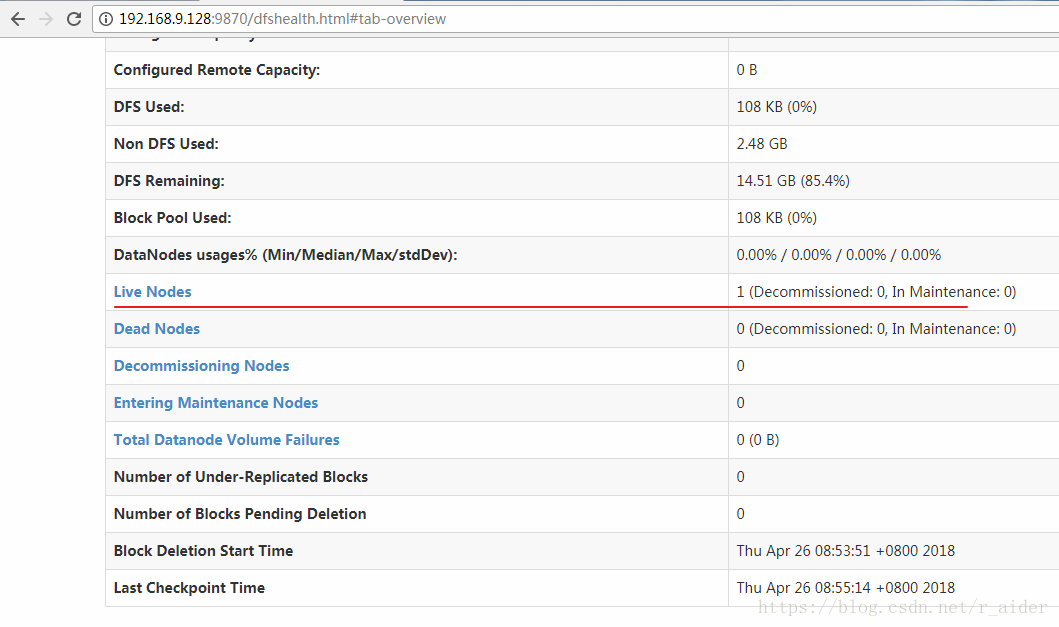
此时可以访问namenode的web服务:http://localhost:9870/,查看namenode健康状况,可以观察到有一个存活的datanode节点。
执行mapreduce任务
# 在分布式文件系统中创建用户目录

$ bin/hdfs dfs -mkdir /user

$ bin/hdfs dfs -mkdir /user/root

# 拷贝数据到分布式文件系统中

$ bin/hdfs dfs -mkdir -p input

$ bin/hdfs dfs -put etc/hadoop/*.xml input

# 运行hadoop提供的mapreduce任务

$ bin/hadoop jar share/hadoop/mapreduce/hadoop-mapreduce-examples-3.1.0.jar grep /input output 'dfs[a-z.]+'

# 拷贝任务执行结果到本地文件系统中
$ sudo bin/hdfs dfs -mkdir -p output
$ bin/hdfs dfs -get output output
$ cat output/*
# 或直接从分布式文件系统中查看计算结果

# $ bin/hdfs dfs -cat output/*
最后,结束守护进程:
$ sbin/stop-dfs.sh
Hadoop 3.1.0 在 Ubuntu 16.04 上的安装过程的更多相关文章
- Hadoop 3.1.0 在 Ubuntu 16.04 上安装时遇到的问题
1.Hadoop 安装 pdsh localhost: Connection refused Hadoop安装过程中使用 $ sbin/start-dfs.sh 启动节点时,发生错误提示: pdsh@ ...
- Ubuntu 16.04上anaconda安装和使用教程,安装jupyter扩展等 | anaconda tutorial on ubuntu 16.04
本文首发于个人博客https://kezunlin.me/post/23014ca5/,欢迎阅读最新内容! anaconda tutorial on ubuntu 16.04 Guide versio ...
- Ubuntu 16.04 Server 版安装过程图文详解
进入系统安装的第一个界面,开始系统的安装操作.每一步的操作,左下角都会提示操作方式!! 1.选择系统语言-English 2.选择操作-Install Ubuntu Server 3.选择安装过程和系 ...
- 在Ubuntu 16.04 上编译安装OpenCV3.2.0(Cmake + python3 + OpenCV3)(转)
1 安装CMAKE sudo apt-get install cmake 2 安装python及其所依赖的软件包 sudo apt-get install build-essential sudo a ...
- Ubuntu 16.04 LTS 降级安装GCC 4.8
转载自https://www.linuxidc.com/Linux/2017-03/142299.htm Ubuntu 16.04 LTS 降级安装GCC 4.8 [日期:2017-03-28] 来源 ...
- Ubuntu 16.04系统下安装Discuz出现“HTTP ERROR 500”目前无法处理此请求
问题:当我们在Ubuntu 16.04系统下安装Disucz X3时,修改好文件的权限,浏览器输入地址安装时出现如下图所示问题: 问题查询: 在终端输入: tail -f /var/log/apach ...
- Ubuntu 16.04.2 LTS 安装 jdk1.6 和 tomcat6 (一)
java和tomcat环境配置已经有很多教程和文章,最近项目需要配置Ubuntu 16.04.2下的古老的java6和tomcat 6,遇到小坑,特记录和分享. 网上的教程不是太新,就是太老,还有一些 ...
- [eShopOnContainers 学习系列] - 03 - 在远程 Ubuntu 16.04 上配置开发环境
直接把 md 粘出来了,博客园的富文本编辑器换成 markdown,没啥效果呀 ,先凑合吧.实在不行换地方 # 在远程 Ubuntu 16.04 上配置开发环境 ## 零.因 为什么要用这么麻烦的 ...
- Ubuntu 16.04下编译安装Apache2.4和PHP7结合
Ubuntu 16.04下编译安装Apache2.4和PHP7结合,并安装PDOmysql扩展. 1.编译安装apache2.4.20 1 第一步: ./configure --prefix=/usr ...
随机推荐
- 一个简单的例子教会您使用javap
javap是JDK自带的工具: 这篇文章使用下面这段简单的Java代码作为例子进行讲解. class Outer { Nested nested; Nested getNested() { retur ...
- MIPS——递归调用
嵌套过程 不调用其他过程的过程称为叶过程(leaf procedure).如果所有过程都是叶过程,那么情况就很简单.但是某个过程可以调用其他过程,甚至调用的是自身的“克隆”.在调用非叶过程时使用寄存器 ...
- C# Process.Start方法
System.Diagnostics.Process.Start(); 主要功能: 1.打开某个链接网址(弹窗). 2.定位打开某个文件目录. 3.打开系统特殊文件夹,如“控制面板”等. Proces ...
- 一、submit和button区别
一.submit和button区别 一.HTTP方法:GET.POST
- javascript单元测试框架mochajs详解(转载)
章节目录 关于单元测试的想法 mocha单元测试框架简介 安装mocha 一个简单的例子 mocha支持的断言模块 同步代码测试 异步代码测试 promise代码测试 不建议使用箭头函数 钩子函数 钩 ...
- websphere7.0异常:SRVE0255E: 尚未定义要处理 /wcm 的 Web 组/虚拟主机
websphere7.0错误:SRVE0255E: 尚未定义要处理 /wcm 的 Web 组/虚拟主机. SRVE0255E: 尚未定义要处理 /wcm 的 Web 组/虚拟主机.SRVE0255E: ...
- 许大神- xulinbo xulingbo 分享
1. 写文章投稿-- 总结的动力 可用性 单次点击 整年年度 流量激增 上下线 双网卡,交换机(网络层面) 稳定性 2. 收藏夹- canssendra 和 oceanBase 练手落地 3. 压测: ...
- 学习笔记(_huaji_)
假如我没有见过太阳,我也许会忍受黑暗. 如果我知道自己会在哪里死去,我就永远都不去那儿.失败的经历,其实也有它的价值. 人的过失会带来错误,但要制造真正的灾难还得用计算机. 嘴角微微上扬已不复当年轻狂 ...
- 《offline coolbook》笔记
https://jakearchibald.com/2014/offline-cookbook/ 在install中对依赖进行缓存 self.addEventListener('install', f ...
- 前端用户体验优化: JS & CSS 各类效果代码段
前言 不定时更新 在线预览 https://zzyper.github.io/opti... 在线预览的源码 https://github.com/zzyper/opt... 部分内容仅兼容webki ...