RabbitMQ系列(三)--Java API
基于java使用RabbitMQ
框架:SpringBoot1.5.14.RELEASE
maven依赖:
<dependency>

    <groupId>com.rabbitmq</groupId>

    <artifactId>amqp-client</artifactId>

    <version>3.6.5</version>

</dependency>

<dependency>

    <groupId>org.springframework.boot</groupId>

    <artifactId>spring-boot-starter-amqp</artifactId>

</dependency>
本文只是操作原生RabbitMQ,并没有和SpringBoot进行整合,后面介绍整合,基于注解使用
一、quick start
1.1、Consumer
public static void main(String[] args) throws Exception{

        //1 创建一个ConnectionFactory, 并进行配置

        ConnectionFactory factory = new ConnectionFactory();

        factory.setVirtualHost("/");

        factory.setHost("139.196.75.238");

        factory.setPort(5672);

        //2 通过连接工厂创建连接

        Connection connection = factory.newConnection();

        //3 通过connection创建一个Channel

        Channel channel = connection.createChannel();

        //4 声明(创建)一个队列

        channel.queueDeclare("test002", true, false, false, null);

        //5 创建消费者

        QueueingConsumer queueingConsumer = new QueueingConsumer(channel);

        //6 设置Channel

        channel.basicConsume("test002", true, queueingConsumer);

        while(true){

            //7 获取消息

            QueueingConsumer.Delivery delivery = queueingConsumer.nextDelivery();

            String msg = new String(delivery.getBody());

            log.info(msg);

        }

    }

}
Consumer
参数解释:
durable:是否持久化,Durable:是,即使服务器重启,这个队列也不会消失,Transient:否
exclusive:这个queue只能由一个exchange监听restricted to this connection,使用场景:顺序消费
autoDelete:当最后一个Binding到Exchange的Queue删除之后,自动删除该Exchange
arguments:参数
autoACK:是否自动签收,对应着手动签收
1.2、Producer
public class Producer {

    public static void main(String[] args) throws Exception{

        //1 创建一个ConnectionFactory, 并进行配置

        ConnectionFactory factory = new ConnectionFactory();

        factory.setVirtualHost("/");

        factory.setHost("139.196.75.238");

        factory.setPort(5672);

        //2 通过连接工厂创建连接

        Connection connection = factory.newConnection();

        //3 通过connection创建一个Channel

        Channel channel = connection.createChannel();

        //4 通过Channel发送数据

        for(int i=0; i < 5; i++){

            String msg = "Hello RabbitMQ!";

            //1 exchange   2 routingKey

            channel.basicPublish("", "test002", null, msg.getBytes());

        }

        //5 关闭相关的连接

        channel.close();

        factory.clone();

    }

}
Producer
参数解释:
exchange name:
routingKey:路由规则
BasicProperties:
body:message中的body
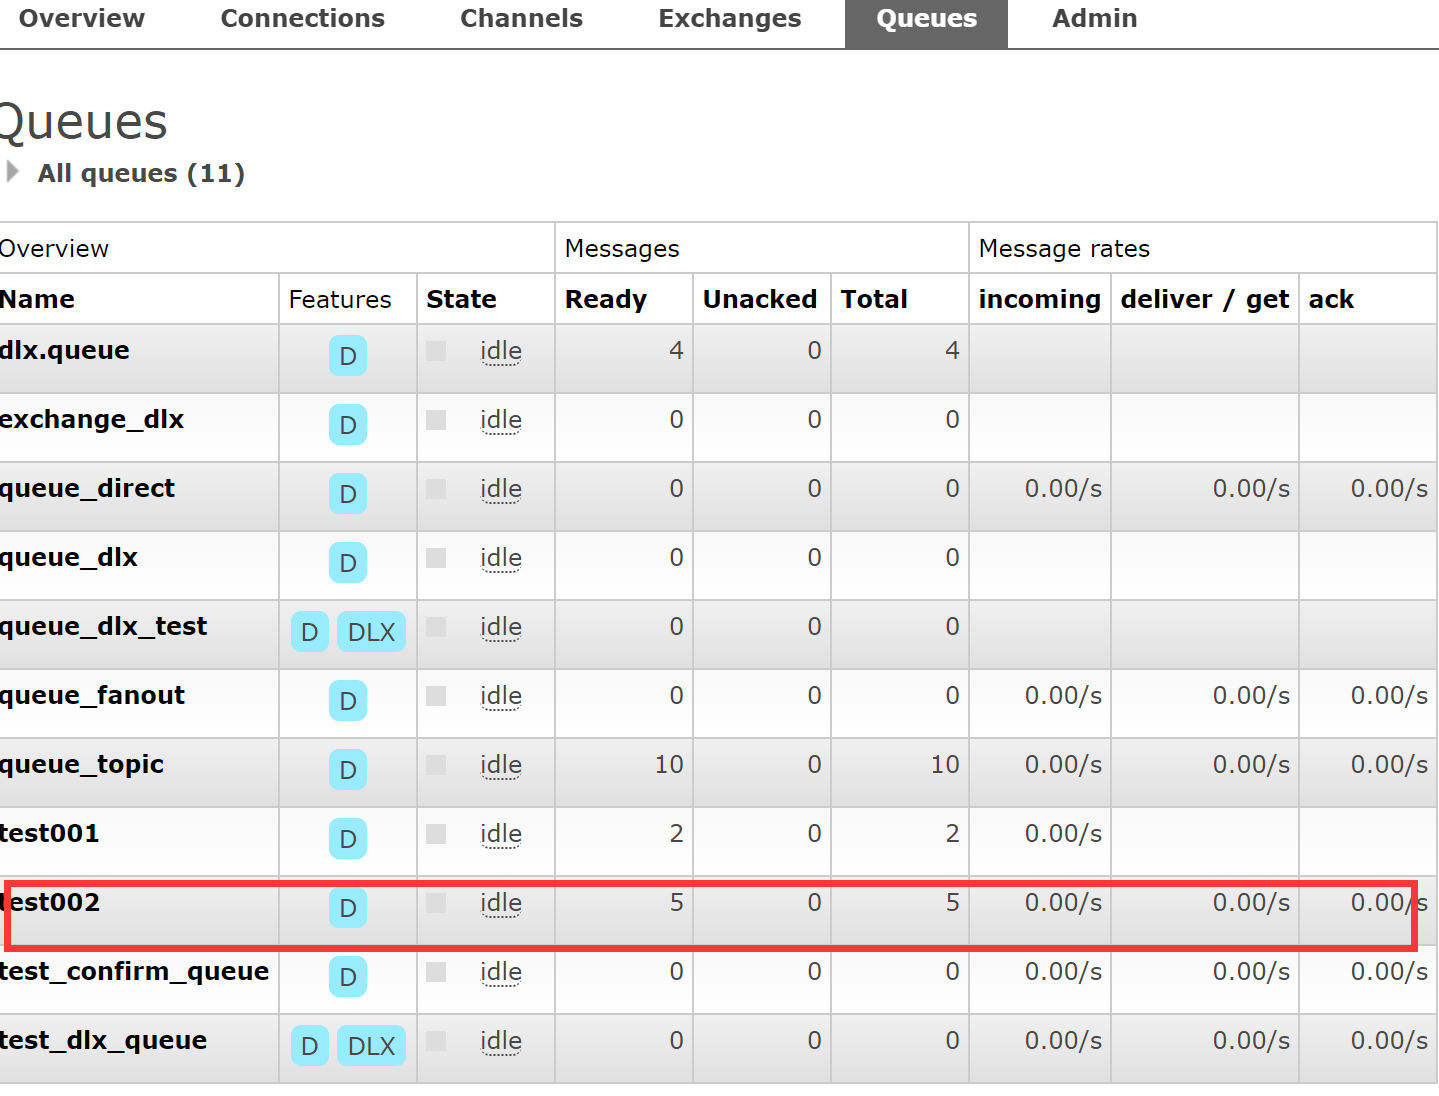
结果:
17:43:49.351 [main] INFO com.it.quickstart.Consumer - Hello RabbitMQ!

17:43:49.351 [main] INFO com.it.quickstart.Consumer - Hello RabbitMQ!

17:43:49.351 [main] INFO com.it.quickstart.Consumer - Hello RabbitMQ!

17:43:49.351 [main] INFO com.it.quickstart.Consumer - Hello RabbitMQ!

17:43:49.351 [main] INFO com.it.quickstart.Consumer - Hello RabbitMQ!
我们使用RabbitMQ,需要首先在可视化界面确定queue,exchange是否创建,对应关系是否正常,这是一个大前提
1.3、自定义消费者
之前接收message,通过while(true),感觉太low了,RabbitMQ支持实现自定义消费者,只需要集成DefaultConsumer,重写handlerDelivery,
构造器
public class MyConsumer extends DefaultConsumer {

    public MyConsumer(Channel channel) {

        super(channel);

    }

    @Override

    public void handleDelivery(String consumerTag, Envelope envelope, AMQP.BasicProperties properties, byte[] body) throws IOException {

        System.err.println("-----------consume message----------");

        System.err.println("consumerTag: " + consumerTag);

        System.err.println("envelope: " + envelope);

        System.err.println("properties: " + properties);

        System.err.println("body: " + new String(body));

    }

}
MyConsumer
而consumer只需要修改
//5 创建消费者

QueueingConsumer queueingConsumer = new QueueingConsumer(channel);            //去掉这一步

//6 设置Channel

channel.basicConsume("test002", true, new MyConsumer(channel));
结果:
-----------consume message----------

consumerTag: amq.ctag-YK7CnvWxTpm6hmuyUyqSkQ

envelope: Envelope(deliveryTag=1, redeliver=false, exchange=, routingKey=test002)

properties: #contentHeader<basic>(content-type=null, content-encoding=null, headers=null, delivery-mode=null, priority=null, correlation-id=null, reply-to=null, expiration=null, message-id=null, timestamp=null, type=null, user-id=null, app-id=null, cluster-id=null)

body: Hello RabbitMQ By MyConsumer!
二、Exchange
Exchange有四种方式Fanout、Direct、Topic、Headers,而我们上面的例子,并没有定义Exchange,RabbitMQ默认使用AMQP default,
要求routing key和queue name相同

本文只是介绍前三种,Headers几乎用不到
2.1、Fanout
fanout效率是最好的,不需要routing key,你可以随便设置都无所谓,只要consumer和producer的Exchange name相同
producer
public class Producer {

    public static void main(String[] args) throws Exception{

        ConnectionFactory factory = new ConnectionFactory();

        factory.setVirtualHost("/");

        factory.setHost("139.196.75.238");

        factory.setPort(5672);

        Connection connection = factory.newConnection();

        Channel channel = connection.createChannel();

        String exchangeName = "exchange_fanout";

        channel.basicPublish(exchangeName, "", null, "send message by fanout".getBytes());

    }

}
Producer Fanout
consumer
public class Consumer {

    public static void main(String[] args) throws Exception{

        ConnectionFactory factory = new ConnectionFactory();

        factory.setVirtualHost("/");

        factory.setHost("139.196.75.238");

        factory.setPort(5672);

        factory.setAutomaticRecoveryEnabled(true);

        factory.setNetworkRecoveryInterval(3000);

        Connection connection = factory.newConnection();

        Channel channel = connection.createChannel();

        String exchangeName = "exchange_fanout";

        String exchangeType = "fanout";

        String queueName = "queue_fanout";

        String routingKey = "";    //不设置路由键

        channel.exchangeDeclare(exchangeName, exchangeType, true, false, false, null);

        channel.queueDeclare(queueName, true, false, false, null);

        channel.queueBind(queueName, exchangeName, routingKey);

        channel.basicConsume(queueName, true, new MyConsumer(channel));

    }

}
Consumer Fanout
结果:
-----------consume message----------

consumerTag: amq.ctag-rXw7SbaR5aWVMQxZY6SfEA

envelope: Envelope(deliveryTag=1, redeliver=false, exchange=exchange_fanout, routingKey=)

properties: #contentHeader<basic>(content-type=null, content-encoding=null, headers=null, delivery-mode=null, priority=null, correlation-id=null, reply-to=null, expiration=null, message-id=null, timestamp=null, type=null, user-id=null, app-id=null, cluster-id=null)

body: send message by fanout
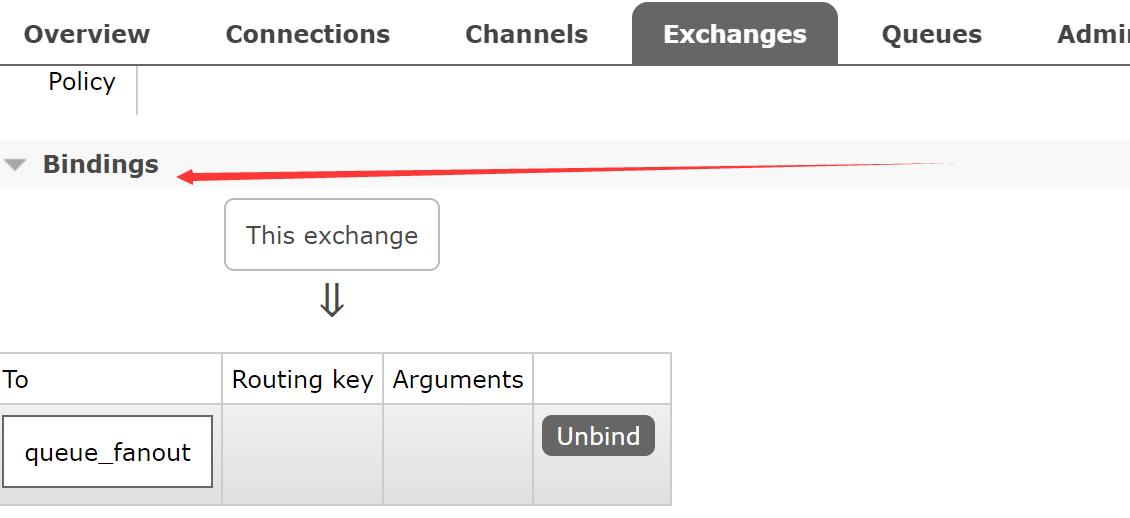
我们声明queue和exchange之后,要先观察exchange和queue对应关系
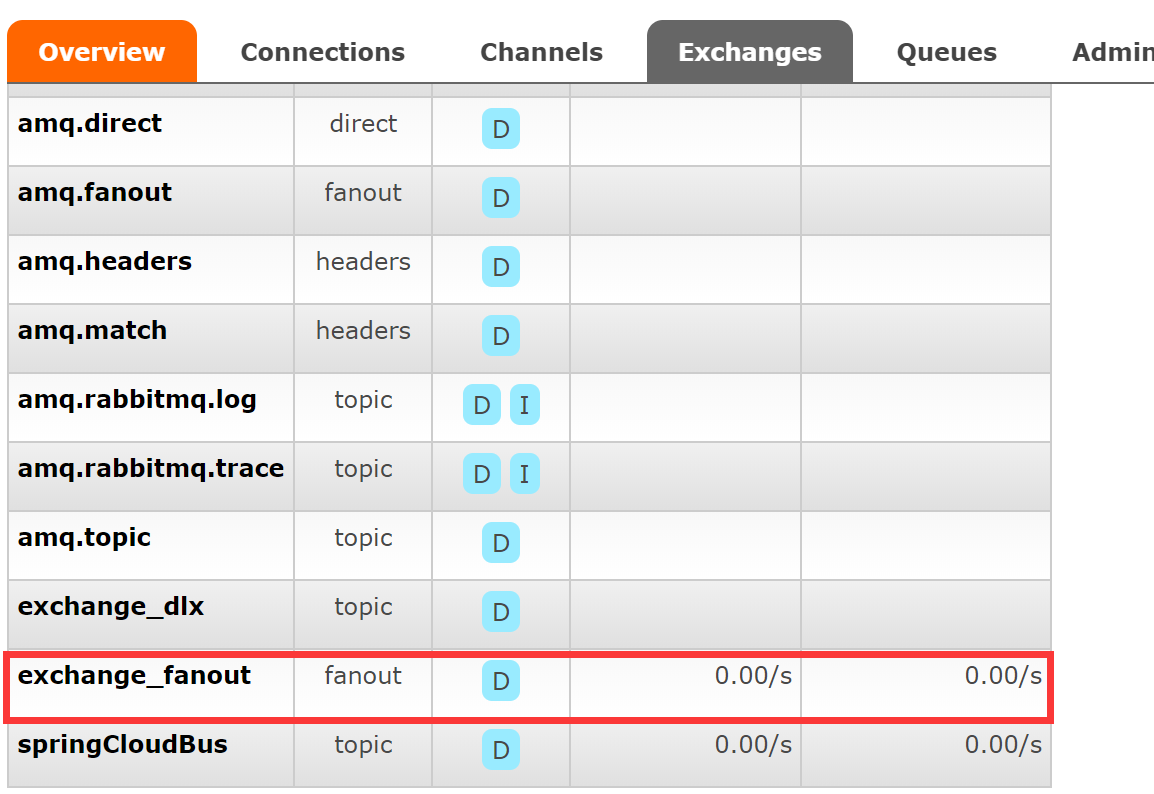
点击exchange name,进去查看是否binding成功,如果成功如下图
注意点:
1、fanout模式下不是直接操作Queue,而是把消息发送给Exchange,由Exchange把消息分发给与之绑定的Queue,也就是广播模式
2、Queue必须和Exchange进行绑定
3、每个Consumer的Queue name不能相同,个人测试下,相同的Queue name,只能有一个Consumer收到消息
2.2、Direct
完全把代码贴出来太浪费篇幅了,而且毫无意思,后面只说一下区别,顺便说一下,对于queue和exchange的declare无论放到producer还是
Consumer都可以的,个人习惯Consumer,而且二者启动顺序没有要求,因为RabbitMQ的消息具有堆积功能
Producer:
 String exchangeName = "exchange_direct";

 String routingKey = "key.direct";

 channel.basicPublish(exchangeName, routingKey, null, "send message by direct".getBytes());
Consumer:
String exchangeName = "exchange_direct";

String exchangeType = "direct";

String queueName = "queue_direct";

String routingKey = "key.direct";

channel.exchangeDeclare(exchangeName, exchangeType, true, false, false, null);

channel.queueDeclare(queueName, true, false, false, null);

channel.queueBind(queueName, exchangeName, routingKey);

channel.basicConsume(queueName, true, new MyConsumer(channel));
结果:
-----------consume message----------

consumerTag: amq.ctag-6UeNiGs1K-gMWbwvVn8F5A

envelope: Envelope(deliveryTag=1, redeliver=false, exchange=exchange_direct, routingKey=key.direct)

properties: #contentHeader<basic>(content-type=null, content-encoding=null, headers=null, delivery-mode=null, priority=null, correlation-id=null, reply-to=null, expiration=null, message-id=null, timestamp=null, type=null, user-id=null, app-id=null, cluster-id=null)

body: send message by direct
说明:
Direct要求routingKey完全一致
2.3、 topic
Producer:
String exchangeName = "exchange_topic";

String routingKey1 = "user.save";

String routingKey2 = "user.update";

String routingKey3 = "user.delete.abc";

//5 发送

String msg = "Send Message By topic";

channel.basicPublish(exchangeName, routingKey1 , null , msg.getBytes());

channel.basicPublish(exchangeName, routingKey2 , null , msg.getBytes());

channel.basicPublish(exchangeName, routingKey3 , null , msg.getBytes());
Consumer:
String exchangeName = "exchange_topic";

String exchangeType = "topic";

String queueName = "queue_topic";

String routingKey = "user.*";

channel.exchangeDeclare(exchangeName, exchangeType, true, false, false, null);

channel.queueDeclare(queueName, true, false, false, null);

channel.queueBind(queueName, exchangeName, routingKey);
说明:
Topic支持通配符匹配,#匹配一个或多个单词,*匹配一个单词
RabbitMQ系列(三)--Java API的更多相关文章
- Kafka系列三 java API操作
使用java API操作kafka 1.pom.xml <project xmlns="http://maven.apache.org/POM/4.0.0" xmlns:xs ...
- Apache Kafka系列(三) Java API使用
Apache Kafka系列(一) 起步 Apache Kafka系列(二) 命令行工具(CLI) Apache Kafka系列(三) Java API使用 摘要: Apache Kafka Java ...
- rabbitmq系列三 之发布/订阅
1.发布/订阅 在上篇教程中,我们搭建了一个工作队列,每个任务只分发给一个工作者(worker).在本篇教程中,我们要做的跟之前完全不一样 —— 分发一个消息给多个消费者(consumers).这种模 ...
- jvm系列(三):java GC算法 垃圾收集器
GC算法 垃圾收集器 概述 垃圾收集 Garbage Collection 通常被称为“GC”,它诞生于1960年 MIT 的 Lisp 语言,经过半个多世纪,目前已经十分成熟了. jvm 中,程序计 ...
- 消息中间件系列之Java API操作ActiveMQ
一.依赖 <dependency> <groupId>org.apache.activemq</groupId> <artifactId>activem ...
- 消息中间件系列三:使用RabbitMq原生Java客户端进行消息通信(消费者(接收方)自动确认模式、消费者(接收方)自行确认模式、生产者(发送方)确认模式)
准备工作: 1)安装RabbitMQ,参考文章:消息中间件系列二:RabbitMQ入门(基本概念.RabbitMQ的安装和运行) 2.)分别新建名为OriginalRabbitMQProducer和O ...
- Hadoop 系列(三)Java API
Hadoop 系列(三)Java API <dependency> <groupId>org.apache.hadoop</groupId> <artifac ...
- Redis总结(五)缓存雪崩和缓存穿透等问题 Web API系列(三)统一异常处理 C#总结(一)AutoResetEvent的使用介绍(用AutoResetEvent实现同步) C#总结(二)事件Event 介绍总结 C#总结(三)DataGridView增加全选列 Web API系列(二)接口安全和参数校验 RabbitMQ学习系列(六): RabbitMQ 高可用集群
Redis总结(五)缓存雪崩和缓存穿透等问题 前面讲过一些redis 缓存的使用和数据持久化.感兴趣的朋友可以看看之前的文章,http://www.cnblogs.com/zhangweizhon ...
- ElasticSearch实战系列三: ElasticSearch的JAVA API使用教程
前言 在上一篇中介绍了ElasticSearch实战系列二: ElasticSearch的DSL语句使用教程---图文详解,本篇文章就来讲解下 ElasticSearch 6.x官方Java API的 ...
随机推荐
- C语言之基本算法21—可逆素数
/* ================================================================== 题目:可逆素数是指一个数是素数,逆序后还是素数,如ABC是素 ...
- C++求解数组中出现超1/4的三个数字。
#include <iostream> using namespace std; //求x!中k因数的个数. int Grial(int x,int k) { int Ret = 0; w ...
- 分析Linux内核的启动过程
第一章 环境 Ubuntu 14.10 Linux Kernel 3.18.6 第二章 代码及调试过程 环境搭建与内核准备: cd ~/LinuxKernel/ wget https://www.ke ...
- VELT-0.1.6开发:载入根文件系统
快乐虾 http://blog.csdn.net/lights_joy/(QQ群:Visual EmbedLinux Tools 375515651) 欢迎转载,但请保留作者信息 VELT的全称是Vi ...
- 容器HashSet原理(学习)
一.概述 使用HashMap存储,非线程安全: 二.实现 HashSet 底层使用 HashMap 来保存所有元素,因此 HashSet 的实现比较简单,相关 HashSet 的操作,基本上都是直接调 ...
- centos7 安装8188eu驱动小记
最小化安装把lsusb和lspci装上 使用lsusb 和lspci的命令, centos上的安装命令: yum -y install usbutils yum -y install pciutils ...
- 服务器可用的Socket
"; IPAddress ServerIp = IPAddress.Parse("112.124.46.251"); IPEndPoint iep = new IPEnd ...
- memcached知识点梳理
Memcached概念: Memcached是一个免费开源的,高性能的,具有分布式对象的缓存系统,它可以用来保存一些经常存取的对象或数据,保存的数据像一张巨大的HASH表,该表以Key-valu ...
- Python---scikit-learn(sklearn)模块
Python在机器学习方面一个非常强力的模块---scikit-learn模块,它作为数据挖掘和数据分析方面的一个简单而有效的工具,主要包括6大功能:分类(Classification),回归(Reg ...
- vue-easytable
github地址:https://github.com/huangshuwei/vue-easytable