
Gitlab升级记
一: 验证gitlab备份是否可用
这里所使用的操作系统环境全部都基于Cetnos7, 防火墙以及selinux全部关闭。
1. 另外找一台机器,安装与服务器版本相同的gitlab,根据原服务器数据的大小,来决定验证数据服务器磁盘的大小。避免因磁盘空间不足而无法正常恢复数据。
- 配置yum源
shell> vi /etc/yum.repos.d/gitlab-ce.repo

[gitlab-ce]

name=Gitlab CE Repository

baseurl=https://mirrors.tuna.tsinghua.edu.cn/gitlab-ce/yum/el$releasever/

gpgcheck=

enabled=
- 安装指定版本
shell> yum install gitlab-ce-11.2.
- 将原服务器的配置文件拷贝至新部署的机器上,然后进行配置;
 #这里是我的 配置文件,这里我们使用了Windows AD来作为LDAP服务器

 external_url 'http://gitlab.mofangge.cc'

 gitlab_rails['ldap_enabled'] = true

  gitlab_rails['ldap_servers'] = YAML.load <<-'EOS'

    main: # 'main' is the GitLab 'provider ID' of this LDAP server

      label: 'LDAP'

      host: 'domainserver.mofangge.cc'

      port:

      uid: 'sAMAccountName'

      bind_dn: 'cn=gitadmin,cn=Users,dc=mofangge,dc=cc'

      password: 'ling4022@163.com'

      encryption: 'plain' # "start_tls" or "simple_tls" or "plain"

      verify_certificates: true

      active_directory: true

      allow_username_or_email_login: true

      lowercase_usernames: false

      block_auto_created_users: false

      base: 'OU=mofangge,DC=mofangge,DC=cc'

      user_filter: ''

      group_base: 'OU=mofangge,DC=mofangge,DC=cc'

      sync_ssh_keys: false

 EOS

 gitlab_rails['manage_backup_path'] = true

 gitlab_rails['backup_path'] = "/opt/data/backups"

 gitlab_rails['backup_archive_permissions'] =

 gitlab_rails['backup_keep_time'] =

  git_data_dirs({

    "default" => {

      "path" => "/opt/data/git-data"

     }

  })

 unicorn['worker_processes'] =

 sidekiq['concurrency'] =

 postgresql['shared_buffers'] = "1024MB"

 postgresql['max_worker_processes'] =
我的配置文件,仅供参考
shell> grep -Ev "^$|^[#;]" /etc/gitlab/gitlab.rb
shell> scp root@youserverip:/etc/gitlab/gitlab.rb /etc/gitlab/

#然后输入密码即可
shell> gitlab-ctl reconfigure
shell> gitlab-ctl status
#然后这里将host 解析写在wineos下的hosts文件中,访问域名进行校验
192.168.133.12  gitlab.mofangge.cc
然后进行登录验证,如果能正常访问的话,接下来进行恢复工作
二: 恢复数据
将原备份文件拷贝到指定目录下。
shell> scp root@192.168.200.27:/data/gitlabbackup/1589134406_2020_05_11_11..3_gitlab_backup.tar /opt/data/backups/

#由于我自定义了文件名称,这里还需要重命名

shell> mv /opt/data/backups/1589134406_2020_05_11_11..3_gitlab_backup.tar /opt/data/backups/1589134406_gitlab_backup.tar

#查看验证

shell> ls /opt/data/backups/

#进行恢复

shell> gitlab-rake gitlab:backup:restore BACKUP=

#重启之后进行登录验证

shell> gitlab-ctl restart
这里登录之后,查看数据以及配置均为正常。校验数据没有问题之后,进行升级的模拟操作。
三:进行升级
gitlab具有版本帝之称,版本更新之快让人望而却步,由于我们想要适用gitlab ci等新功能,所以还是选择进行升级。
这里我们可以参照官方建议的升级版本顺序进行选择,官方链接地址如:https://docs.gitlab.com/ee/policy/maintenance.html#upgrade-recommendations
建议安装官方推荐的升级版本路径进行升级,避免踩坑。

由于我目前的版本是11.2.3,这里我们先升级到11.11.8,然后升级到12.0.12,最后升级到现在的最新版本,12.10.3进行测试。希望能成功。
这里我在准备虚拟机的阶段已经将所需要的安装包已经下载到本地了。接下来我们进行升级工作。
[root@c7-node2 ~]# ll

total

-rw-r--r--  root root  May  : gitlab-ce-11.11.-ce..el7.x86_64.rpm  #第一次升级到的版本

-rw-r--r--  root root  May  : gitlab-ce-11.2.-ce..el7.x86_64.rpm   #现在版本

-rw-r--r--  root root  May  : gitlab-ce-12.0.-ce..el7.x86_64.rpm  #第二次升级到的版本

-rw-r--r--  root root  May  : gitlab-ce-12.10.-ce..el7.x86_64.rpm  #需要升级的最终版本
[root@c7-node2 ~]# yum install gitlab-ce-11.11.-ce..el7.x86_64.rpm

Loaded plugins: fastestmirror

Examining gitlab-ce-11.11.-ce..el7.x86_64.rpm: gitlab-ce-11.11.-ce..el7.x86_64

Marking gitlab-ce-11.11.-ce..el7.x86_64.rpm as an update to gitlab-ce-11.2.-ce..el7.x86_64

Resolving Dependencies

--> Running transaction check

---> Package gitlab-ce.x86_64 :11.2.-ce..el7 will be updated

---> Package gitlab-ce.x86_64 :11.11.-ce..el7 will be an update

--> Finished Dependency Resolution

Dependencies Resolved

====================================================================================================================================================================================

 Package                             Arch                             Version                                    Repository                                                    Size

====================================================================================================================================================================================

Updating:

 gitlab-ce                           x86_64                           11.11.-ce..el7                           /gitlab-ce-11.11.-ce..el7.x86_64                           1.5 G

Transaction Summary

====================================================================================================================================================================================

Upgrade   Package

Total size: 1.5 G

Is this ok [y/d/N]:
出现如下提示,则证明升级成功了。
sudo gitlab-ctl restart postgresql

gitlab Reconfigured!

Restarting previously running GitLab services

ok: run: alertmanager: (pid ) 1s

ok: run: gitaly: (pid ) 5s

ok: run: gitlab-monitor: (pid ) 4s

ok: run: gitlab-workhorse: (pid ) 5s

ok: run: logrotate: (pid ) 1s

ok: run: nginx: (pid ) 0s

ok: run: node-exporter: (pid ) 5s

ok: run: postgres-exporter: (pid ) 1s

ok: run: postgresql: (pid ) 6862s

ok: run: prometheus: (pid ) 3s

ok: run: redis: (pid ) 52s

ok: run: redis-exporter: (pid ) 4s

ok: run: sidekiq: (pid ) 1s

ok: run: unicorn: (pid ) 0s

     _______ __  __          __

    / ____(_) /_/ /   ____ _/ /_

   / / __/ / __/ /   / __ `/ __ \

  / /_/ / / /_/ /___/ /_/ / /_/ /

  \____/_/\__/_____/\__,_/_.___/

Upgrade complete! If your GitLab server is misbehaving try running

  sudo gitlab-ctl restart

before anything else.

If you need to roll back to the previous version you can use the database

backup made during the upgrade (scroll up for the filename).

  Verifying  : gitlab-ce-11.11.-ce..el7.x86_64                                                                                                                                /

  Verifying  : gitlab-ce-11.2.-ce..el7.x86_64                                                                                                                                 /

Updated:

  gitlab-ce.x86_64 :11.11.-ce..el7

Complete!
然后进行登录校验,这里我依然使用LDAP账户进行登录,因为我之前没有standard账户,root下是没有数据的。
然后继续进行升级,这次升级到10.0.12版本,因为11.11.8是11的最后一个版本。也是升级的必须步骤。
[root@c7-node2 ~]# yum install gitlab-ce-12.0.-ce..el7.x86_64.rpm -y

#这里出现的结果跟上次一样,就证明升级成功

Upgrade complete! If your GitLab server is misbehaving try running

  sudo gitlab-ctl restart

before anything else.

If you need to roll back to the previous version you can use the database

backup made during the upgrade (scroll up for the filename).

  Verifying  : gitlab-ce-12.0.-ce..el7.x86_64                                                                                                                                /

  Verifying  : gitlab-ce-11.11.-ce..el7.x86_64                                                                                                                                /

Updated:

  gitlab-ce.x86_64 :12.0.-ce..el7

Complete!
然后请继续进行登录和数据校验。有任何一个过程出问题,就需要考虑回滚。 数据最重要。
接下来,我将升级到最新版本,12.10.3。
[root@c7-node2 ~]# yum install gitlab-ce-12.10.-ce..el7.x86_64.rpm -y

Loaded plugins: fastestmirror

Examining gitlab-ce-12.10.-ce..el7.x86_64.rpm: gitlab-ce-12.10.-ce..el7.x86_64

Marking gitlab-ce-12.10.-ce..el7.x86_64.rpm as an update to gitlab-ce-12.0.-ce..el7.x86_64

Resolving Dependencies

--> Running transaction check

---> Package gitlab-ce.x86_64 :12.0.-ce..el7 will be updated

---> Package gitlab-ce.x86_64 :12.10.-ce..el7 will be an update

--> Finished Dependency Resolution
出现如下界面,则证明升级成功,最后也可以通过gitlab-ctl status进行验证。
Upgrade complete! If your GitLab server is misbehaving try running

  sudo gitlab-ctl restart

before anything else.

If you need to roll back to the previous version you can use the database

backup made during the upgrade (scroll up for the filename).

  Verifying  : gitlab-ce-12.10.-ce..el7.x86_64                                                                                                                                /

  Verifying  : gitlab-ce-12.0.-ce..el7.x86_64                                                                                                                                /

Updated:

  gitlab-ce.x86_64 :12.10.-ce..el7

Complete!

[root@c7-node2 ~]# gitlab-ctl status

run: alertmanager: (pid ) 13s; run: log: (pid ) 2186s

run: gitaly: (pid ) 62s; run: log: (pid ) 1559s

run: gitlab-exporter: (pid ) 13s; run: log: (pid ) 81s

run: gitlab-workhorse: (pid ) 12s; run: log: (pid ) 1525s

run: grafana: (pid ) 12s; run: log: (pid ) 1500s

run: logrotate: (pid ) 11s; run: log: (pid ) 2186s

run: nginx: (pid ) 11s; run: log: (pid ) 2186s

run: node-exporter: (pid ) 11s; run: log: (pid ) 2186s

run: postgres-exporter: (pid ) 10s; run: log: (pid ) 2186s

run: postgresql: (pid ) 162s; run: log: (pid ) 2186s

run: prometheus: (pid ) 10s; run: log: (pid ) 2186s

run: redis: (pid ) 152s; run: log: (pid ) 2186s

run: redis-exporter: (pid ) 9s; run: log: (pid ) 2186s

run: sidekiq: (pid ) 9s; run: log: (pid ) 1526s

run: unicorn: (pid ) 1299s; run: log: (pid ) 2186s
最后给大家来一张升级成功的图片,以示鼓励。加油~~
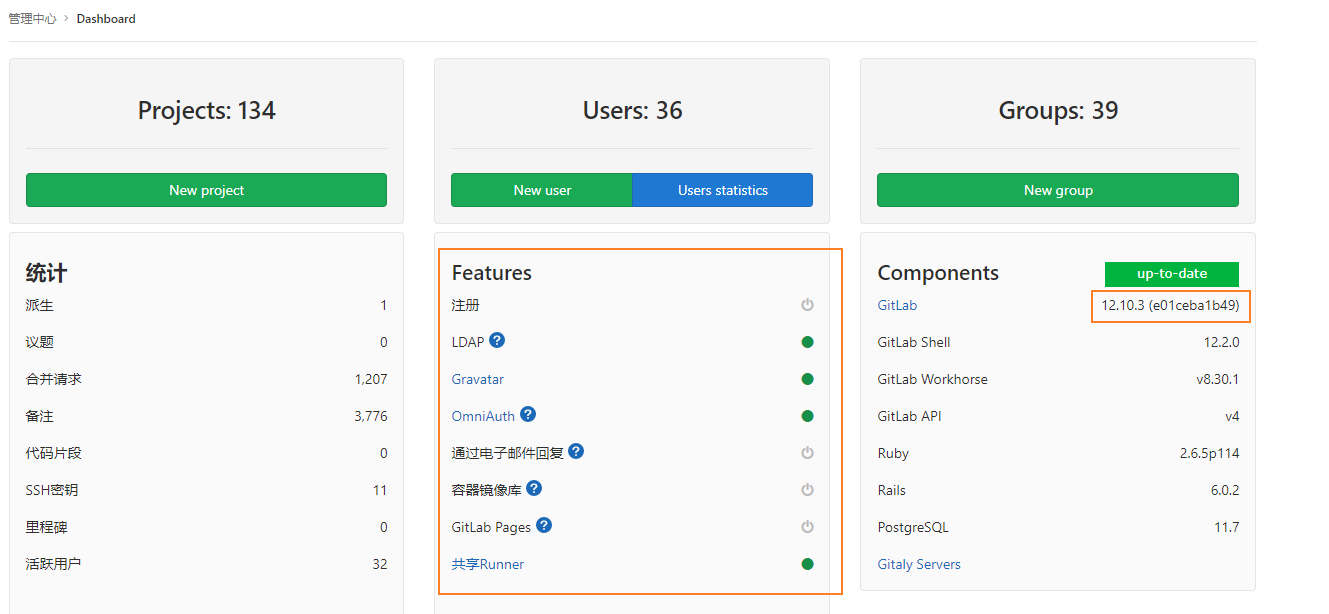
接下来大家可以在服务器端进行升级操作,如果服务器是虚拟机的话,建议先做快照,以便出问题时进行恢复,一定要做备份,数据最重要。
Gitlab升级记的更多相关文章
- 学习篇:TypeCodes的2015年博客升级记
原文: https://typecodes.com/mix/2015updateblog.html 2015年博客升级记 作者:vfhky | 时间:2015-05-23 17:25 | 分类:mix ...
- gitlab升级方法
gitlab升级方法:国内网络环境推荐方法二方法一:官网的升级方式 (1)停止git服务 gitlab-ctl stop unicorn gitlab-ctl stop sidekiq gitlab- ...
- gitlab升级迁移(二)
前面我们写了一篇gitlab升级迁移的文章(https://www.cnblogs.com/liangyou666/p/9434158.html),这次我们主要是讲另一种升级迁移方法和其中遇到的一些问 ...
- gitlab升级、汉化、修改root密码
1.gitlab升级 # 查看当前版本 head -1 /opt/gitlab/version-manifest.txt gitlab-ce 8.9.5 grep "^external_ur ...
- gitlab 升级
=============================================== 2017/10/21_第1次修改 ccb_warlock = ...
- gitlab升级和迁移
由于近期公司gitlab服务器老是卡顿和出现其他问题,然后也很久没有升级过了,现在版本还是8.10.5,而官网最新版本已经是11.2了.另一个原因是gitlab所在的这台服务器快到期了,想换一台配置更 ...
- gitlab 升级到 5.3 之后不能pull
升级gitlab到5.3之后pull出现下面的错误: /usr/local/lib/ruby/1.9.1/net/protocol.rb:146:in `rescue in rbuf_fill': T ...
- gitlab升级备份
一.备份有关备份和恢复的操作,详见我的另一篇博客:Gitlab的备份与恢复在开始升级之前,一定要做好备份工作,并记录好版本号.1.查看当前Gitlab的版本号 [root@gitlab ~]# cat ...
- GitLab升级(yum安装版v11.11.8~12.0.12)
参考官方升级建议(注意升级路线:Example upgrade paths) 升级前请自行备份(测试可忽略此步骤) 生成备份文件,在/var/opt/gitlab/backups/目录下生成备份文件 ...
随机推荐
- skynet启动流程及调用服务
3.基本原理 3.1启动流程 1.skynet-src/skynet_main.c 这个是main()函数所在,主要就是设置一下lua的环境.默认的配置.打开config配置文件,并修改默认配置. ...
- C++11<functional>深度剖析
自C++11以来,C++标准每3年修订一次.C++14/17都可以说是更完整的C++11:即将到来的C++20也已经特性完整了. C++11已经有好几年了,它的年龄比我接触C++的时间要长10倍不止吧 ...
- [Laravel框架学习二]:Laravel的CURD和查询构造器的CURD,以及聚合函数
public function index() { //return Member::getMember();//这是调用模型的方法 return view('lpc',[ 'age'=>18, ...
- 开源软件SoftEther使用
最近在寻找比较好用的开源VPN,感觉SoftEther很符合我的需求.一方面是SoftEther属于开源软件并且一直在更新,另一方面是功能强大,好用. VPN支持路由功能和NAT功能,还支持多种类型的 ...
- 基于spring的安全管理框架-Spring Security
什么是spring security? spring security是基于spring的安全框架.它提供全面的安全性解决方案,同时在Web请求级别和调用级别确认和授权.在Spring Framewo ...
- spring boot连接linux服务器上的redis
本文章为给新手学习spring boot远程连通redis提供一个学习参考. 环境是intellij idea(window)+ redis(linux虚拟机-vmware). 首先在linux安装好 ...
- tensorflow1.0 构建lstm做图片分类
import tensorflow as tf from tensorflow.examples.tutorials.mnist import input_data #this is data mni ...
- 2019-2020-1 20199308《Linux内核原理与分析》第三周作业
<Linux内核分析> 第二章 操作系统是如何工作的 2.1 函数调用堆栈 3个关键性的方法机制(3个法宝) 存储程序计算机 函数调用堆栈机制 中断 堆栈相关的寄存器 ESP:堆栈指针(s ...
- qt 怎么让程序自带字体,就是说在操作系统上没有的字体
字体要加到.qrc文件中 QString Widget::loadFontFamilyFromTTF() { static QString font; static bool loaded = fal ...
- 原生JS中获取位置的方案总结
获取鼠标当前位置 clientY.clientX: 鼠标当前位置 相对于 浏览器可视区域顶部.浏览器可视区域左部 的位置: pageY.pageX: 鼠标当前位置 相对于 文档顶部.文档左部的位置: ...