
Centos7.4 kafka集群安装与kafka-eagle1.3.9的安装
Centos7.4 kafka集群安装与kafka-eagle1.3.9的安装
集群规划:
| hostname | Zookeeper | Kafka | kafka-eagle |
|---|---|---|---|
| kafka01 | √ | √ | √ |
| kafka02 | √ | √ | |
| kafka03 | √ | √ |
准备工作:
网络配置
vim /etc/sysconfig/network-scripts/ifcfg-ens33
# kafka01

TYPE=Ethernet

PROXY_METHOD=none

BROWSER_ONLY=no

BOOTPROTO=static

DEFROUTE=yes

IPV4_FAILURE_FATAL=no

IPV6INIT=yes

IPV6_AUTOCONF=yes

IPV6_DEFROUTE=yes

IPV6_FAILURE_FATAL=no

IPV6_ADDR_GEN_MODE=stable-privacy

NAME=ens33

DEVICE=ens33

ONBOOT=yes

IPADDR=192.168.180.200 # 你的虚拟网卡VMNet8, 如果是桥接的改成桥接网卡VMNet1

PREFIX=24

GATEWAY=192.168.180.2

DNS1=114.114.114.114

IPV6_PRIVACY=no
# kafka02

TYPE=Ethernet

PROXY_METHOD=none

BROWSER_ONLY=no

BOOTPROTO=static

DEFROUTE=yes

IPV4_FAILURE_FATAL=no

IPV6INIT=yes

IPV6_AUTOCONF=yes

IPV6_DEFROUTE=yes

IPV6_FAILURE_FATAL=no

IPV6_ADDR_GEN_MODE=stable-privacy

NAME=ens33

DEVICE=ens33

ONBOOT=yes

IPADDR=192.168.180.201

PREFIX=24

GATEWAY=192.168.180.2

DNS1=114.114.114.114

IPV6_PRIVACY=no
# kafka03

TYPE=Ethernet

PROXY_METHOD=none

BROWSER_ONLY=no

BOOTPROTO=static

DEFROUTE=yes

IPV4_FAILURE_FATAL=no

IPV6INIT=yes

IPV6_AUTOCONF=yes

IPV6_DEFROUTE=yes

IPV6_FAILURE_FATAL=no

IPV6_ADDR_GEN_MODE=stable-privacy

NAME=ens33

DEVICE=ens33

ONBOOT=yes

IPADDR=192.168.180.200

PREFIX=24

GATEWAY=192.168.180.2

DNS1=114.114.114.114

IPV6_PRIVACY=no
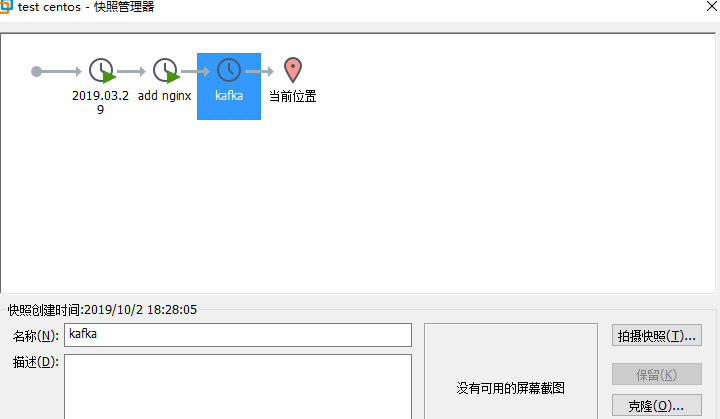
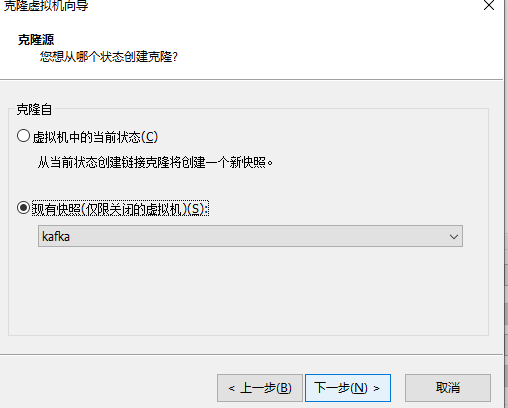
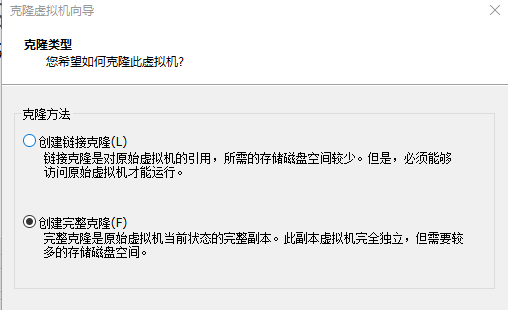
复制三台虚拟机
修改主机名及hosts
vim /etc/hostname
- 将三台主机的主机名分别修改为kafka01, kafka02, kafka03
vim /etc/hosts
修改为:
127.0.0.1 localhost

192.168.180.200 kafka01

192.168.180.201 kafka02

192.168.180.202 kafka03
关闭防火墙
# ps: 这里就不搞iptables防火墙了, 直接关, 不然开得一个个开放端口, 比较烦

service firewalld stop
免密登录
ssh-keygen

# 然后enter, enter, enter 直到生成RSA, 默认会在当前用户的家目录下生成.ssh

[root@kafka02 ~]# ls -ah

.                .bash_history  .bashrc  .cshrc                .pki     .viminfo      .xauthEJoei0

..               .bash_logout   .cache   .dbus                 .ssh     .xauthBayboq

anaconda-ks.cfg  .bash_profile  .config  initial-setup-ks.cfg  .tcshrc  .xauthcwYAMX
.ssh隐藏目录中有id_rsa(私钥) 和 id_rsa.pub(公钥)
cd ~/.ssh 创建authorized_keys,将三台虚拟机的公钥都存入其中:
ssh-rsa AAAAB3NzaC1yc2EAAAADAQABAAABAQCZJgAqbq+/peLIdV5ZpDSS3+8nYJSg/2ZON8rj9WmXlefGLgoegRFExCN4LPEN72/QEl/ZOBxtc00Tev+pSM30veOkxJTc+XXGu5LlFp3l5bbB0nIZG5hYKstT7FYPDfNqZkJrNp+6l0Yl/Eihv9R4LPT5K2A4TbxtFi7s9c0n2fUp5XOLjQWU9qj1x7bajV0nLjV3gOeejqNKVywr2xQqOJX7DQ/e1jlKekvUGHpa/fWVyTc/rK7dCvyddAqqrO5P+7Tu9CqLvcvV1hFtgVechCJ0VCw3tId3qczJzEj51KJb1hErzCFz+7azOMkLhw0/NkX36PjgPX6F59AOsPhX root@kafka01

ssh-rsa AAAAB3NzaC1yc2EAAAADAQABAAABAQC8XpLYRdcuaxXUOOW+OtfYYXmH8TS1ETd22A5898JCZgIIqiZjrqMoJCARxcAkkaLjJu4x6XaYA470i9mYy2lf1N2XWI2zxt1Fne8G22ZTtCeY7Qm1obVcPM3WqUNN/EvOXT9qDuitQnCEhS3rvnzp/h3ZuYgLv3r7XdDDVRqMxc4FdAIkGjJCu68lpvDeXHY1nBzcpoyAnXy8WhAnSmP8RSTh1XbDhwvgvcCmnQbGiaNHSGNTjYMU2a8mOEenoF4osB+Mys5WkNaJ0RYU39vU2RJdQb/YxGbbQdTszTz1Y0aRceONDr3Wpo2mCf9whvKpT7d72FFV9iIyPy0ax8sv root@kafka02

ssh-rsa AAAAB3NzaC1yc2EAAAADAQABAAABAQCft3A+poCNF6N//3hADQnaRgGDnPe/58FhSJNPPx64AermLE83Nj0E9tu5CD6Z30FE5LiRAAkLb1yXBIxtU4g5X88TQ8CfxNqE9ZkhAzeaaBXGJ8Kh9/HAAP5J63YCwXIMOFjJpA1RJ2QPxWC31jF+qLY33XSb5b643kGp0QX0m1FVjoh9y3ScTIF2Kznl5atzPG7j+100AQjBztgyZU1AdXqIzdnD6+vKTHYC1lxIkp2PWleMsN+pWlV6JFhhYZzVnKEsOtW9SDDgsUbKPr1y3ofowSTYvuZx8xSkk3gSXb6HUSedc92EiFrFoONazr+is7y3ZPdspxuN7NtISIwh root@kafka03
每台虚拟机的authorized_keys文件一致
免密登录测试:
[root@kafka03 bin]# ssh root@192.168.180.201

Last login: Fri Oct  4 13:06:53 2019

[root@kafka02 ~]#
ps: 第一次会提示是否将该秘钥保存, 保存后.ssh文件目录下会生成一个known_hosts,里面存有已知的主机sha(Security HashCode Algorithum)信息:
比如我的:
192.168.180.200 ecdsa-sha2-nistp256 AAAAE2VjZHNhLXNoYTItbmlzdHAyNTYAAAAIbmlzdHAyNTYAAABBBOozduEWhzGQL5NzN1ZTpRUqfXQBNCDEq4YHeElcxuk17xsGr6job8H5lxFkf+0FwcD2ZFkbZeUJS/UnR0EtdzA=

192.168.180.201 ecdsa-sha2-nistp256 AAAAE2VjZHNhLXNoYTItbmlzdHAyNTYAAAAIbmlzdHAyNTYAAABBBOozduEWhzGQL5NzN1ZTpRUqfXQBNCDEq4YHeElcxuk17xsGr6job8H5lxFkf+0FwcD2ZFkbZeUJS/UnR0EtdzA=

192.168.180.202 ecdsa-sha2-nistp256 AAAAE2VjZHNhLXNoYTItbmlzdHAyNTYAAAAIbmlzdHAyNTYAAABBBOozduEWhzGQL5NzN1ZTpRUqfXQBNCDEq4YHeElcxuk17xsGr6job8H5lxFkf+0FwcD2ZFkbZeUJS/UnR0EtdzA=
JDK安装
将jdk的tar包上传,然后tar -zxvf 该包 -C 想要解压到的目录
我这边是解压到了/opt/ronnie/目录, 并且 mv jdk1.8XXXX jdk1.8 将它改名为了jdk1.8
[root@kafka02 ronnie]# ll

总用量 0

drwxr-xr-x. 7   10  143 245 12月 16 2018 jdk1.8

drwxrwxrwx. 8 root root 120 10月  4 13:00 kafka

drwxr-xr-x. 8 root root 158 10月  2 20:20 zookeeper
修改系统配置文件
vim /etc/profile

# 添加jdk路径

export JAVA_HOME=/opt/ronnie/jdk1.8

export PATH=$JAVA_HOME/bin:$PATH
检查配置是否成功:
[root@kafka02 .ssh]# java -version

java version "1.8.0_202"

Java(TM) SE Runtime Environment (build 1.8.0_202-b08)

Java HotSpot(TM) 64-Bit Server VM (build 25.202-b08, mixed mode)

[root@kafka02 .ssh]# javac -version

javac 1.8.0_202
将配置好的jdk目录传送给其他几台机器:
scp -r /opt/ronnie/jdk1.8 root@192.168.180.xxx:/opt/ronnie
Zookeeper安装
上传Zookeeper的tar包, 我这里用的是3.5.5

tar -zxvf 该包 -C 你想要解压到的目录
我这里一样解压到了/opt/ronnie/下, 并 mv zookeeperXXXXX zookeeper 将其重命名为zookeeper
- 创建data目录:
mkdir -p /opt/ronnie/zookeeper/data
- 在data目录下创建日志目录:
mkdir -p /opt/ronnie/zookeeper/data/log
- 在data目录下创建zk目录:
mkdir -p /opt/ronnie/zookeeper/data/zk
cd zk/, 创建myid, 三台虚拟机kafka01, kafka02, kafka03 分别对应myid 1,2,3
进入zookeeper的配置文件目录, 创建并修改zoo.cfg
cd /opt/ronnie/zookeeper/conf

# 拷贝一份zoo_sample.cfg 为 zoo.cfg

cp zoo_sample.cfg zoo.cfg

# 修改zoo.cfg文件

vim zoo.cfg
zoo.cfg:
# The number of milliseconds of each tick

tickTime=2000

# The number of ticks that the initial

# synchronization phase can take

initLimit=10

# The number of ticks that can pass between

# sending a request and getting an acknowledgement

syncLimit=5

# the directory where the snapshot is stored.

# do not use /tmp for storage, /tmp here is just

# example sakes.

dataDir=/opt/ronnie/zookeeper/data/zk

dataLogDir=/opt/ronnie/zookeeper/data/log

# the port at which the clients will connect

clientPort=2181

# the maximum number of client connections.

# increase this if you need to handle more clients

#maxClientCnxns=60

#

# Be sure to read the maintenance section of the

# administrator guide before turning on autopurge.

#

# http://zookeeper.apache.org/doc/current/zookeeperAdmin.html#sc_maintenance

#

# The number of snapshots to retain in dataDir

#autopurge.snapRetainCount=3

# Purge task interval in hours

# Set to "0" to disable auto purge feature

#autopurge.purgeInterval=1

server.1=kafka01:2888:3888

server.2=kafka02:2888:3888

server.3=kafka03:2888:3888
将zookeeper添加至环境目录
vim /etc/profile

# 添加Zookeeper配置

export ZOOKEEPER_HOME=/opt/ronnie/zookeeper

export PATH=$ZOOKEEPER_HOME/bin:$PATH
将配置好的zookeeper目录传送给其他几台虚拟机
scp -r /opt/ronnie/zookeeper root@192.168.180.xxx:/opt/ronnie
启动Zookeeper: zkServer.sh start
检查Zookeeper启动状态: zkServer.sh status
成功启动案例:
[root@kafka02 conf]# zkServer.sh status

ZooKeeper JMX enabled by default

Using config: /opt/ronnie/zookeeper/bin/../conf/zoo.cfg

Client port found: 2181. Client address: localhost.

Mode: leader
如果报了: JMX enabled by default
Using config: /hadoop/zookeeper/bin/../conf/zoo.cfg
Error contacting service. It is probably not running.可能是配置文件的问题, 也可能是防火墙的问题, 可以cd logs 去查看下日志中的报错来定位问题
Kafka安装
- 上传kafka的tar包, 并tar -zxvf -C 你想要解压的目录,
我这用的是2.12-2.3.0版本的kafka
修改配置文件
vim /opt/ronnie/kafka/config/server.properties

# server.properties 服务器属性

# Licensed to the Apache Software Foundation (ASF) under one or more

# The ASF licenses this file to You under the Apache License, Version 2.0

# (the "License"); you may not use this file except in compliance with

#    http://www.apache.org/licenses/LICENSE-2.0

#

# Unless required by applicable law or agreed to in writing, software

# distributed under the License is distributed on an "AS IS" BASIS,

# WITHOUT WARRANTIES OR CONDITIONS OF ANY KIND, either express or implied.

# See the License for the specific language governing permissions and

# limitations under the License.

# see kafka.server.KafkaConfig for additional details and defaults

############################# Server Basics #############################

# The id of the broker. This must be set to a unique integer for each broker.

# brokerId 需要是唯一的, 这里我就把每台的brokerId分别设置成200,201 和 202 了

broker.id=200

# port 端口

port=9092

# hostname 主机名, 分别修改为各自对应的

host.name=kafka01

############################# Socket Server Settings #############################

# The address the socket server listens on. It will get the value returned from

# java.net.InetAddress.getCanonicalHostName() if not configured.

#   FORMAT:

#     listeners = listener_name://host_name:port

#   EXAMPLE:

#     listeners = PLAINTEXT://your.host.name:9092

# 监听者也需要将主机名设置为各自对应的

listeners=PLAINTEXT://kafka01:9092

#advertised.listeners=PLAINTEXT://your.host.name:9092

#listener.security.protocol.map=PLAINTEXT:PLAINTEXT,SSL:SSL,SASL_PLAINTEXT:SASL_PLAINTEXT,SASL_SSL:SASL_SSL

num.network.threads=3

socket.send.buffer.bytes=102400

# The receive buffer (SO_RCVBUF) used by the socket server

socket.receive.buffer.bytes=102400

# The maximum size of a request that the socket server will accept (protection against OOM)

socket.request.max.bytes=104857600

############################# Log Basics #############################

# A comma separated list of directories under which to store log files

log.dirs=/tmp/kafka-logs

# The default number of log partitions per topic. More partitions allow greater

# parallelism for consumption, but this will also result in more files across

# the brokers.

num.partitions=1

# The number of threads per data directory to be used for log recovery at startup and flushing at shutdown.

# This value is recommended to be increased for installations with data dirs located in RAID array.

num.recovery.threads.per.data.dir=1

############################# Internal Topic Settings  #############################

offsets.topic.replication.factor=1

transaction.state.log.replication.factor=1

transaction.state.log.min.isr=1

############################# Log Flush Policy #############################

# Messages are immediately written to the filesystem but by default we only fsync() to sync

# the OS cache lazily. The following configurations control the flush of data to disk.

# There are a few important trade-offs here:

#    1. Durability: Unflushed data may be lost if you are not using replication.

# The settings below allow one to configure the flush policy to flush data after a period of time or

# every N messages (or both). This can be done globally and overridden on a per-topic basis.

#log.flush.interval.ms=1000

# be set to delete segments after a period of time, or after a given size has accumulated.

# A segment will be deleted whenever *either* of these criteria are met. Deletion always happens

# from the end of the log.

# The minimum age of a log file to be eligible for deletion due to age

log.retention.hours=168

# A size-based retention policy for logs. Segments are pruned from the log unless the remaining

# segments drop below log.retention.bytes. Functions independently of log.retention.hours.

#log.retention.bytes=1073741824

# The maximum size of a log segment file. When this size is reached a new log segment will be created.

log.segment.bytes=1073741824

# The interval at which log segments are checked to see if they can be deleted according

# to the retention policies

log.retention.check.interval.ms=300000

############################# Zookeeper #############################

# Zookeeper connection string (see zookeeper docs for details).

# This is a comma separated host:port pairs, each corresponding to a zk

# server. e.g. "127.0.0.1:3000,127.0.0.1:3001,127.0.0.1:3002".

# You can also append an optional chroot string to the urls to specify the

# root directory for all kafka znodes.

# zookeeper的连接

zookeeper.connect=kafka01:2181,kafka02:2181,kafka03:2181

# Timeout in ms for connecting to zookeeper

zookeeper.connection.timeout.ms=6000

############################# Group Coordinator Settings #############################

# The following configuration specifies the time, in milliseconds, that the GroupCoordinator will delay the initial consumer rebalance.

# The rebalance will be further delayed by the value of group.initial.rebalance.delay.ms as new members join the group, up to a maximum of max.poll.interval.ms.

# The default value for this is 3 seconds.

# We override this to 0 here as it makes for a better out-of-the-box experience for development and testing.

# However, in production environments the default value of 3 seconds is more suitable as this will help to avoid unnecessary, and potentially expensive, rebalances during application startup.

group.initial.rebalance.delay.ms=0- 将配置好的kafka目录发送给其他虚拟机
scp -r /opt/ronnie/kafka root@192.168.180.xxx:/opt/ronnie
- 在三台虚拟机上启动kafka
cd /opt/ronnie/kafka

bin/kafka-server-start.sh config/server.properties&
- 检查kafka是否启动, 成功案例
[root@kafka02 ronnie]# jps

15857 Jps

11672 QuorumPeerMain

12569 Kafka
Kafka-eagle安装
- 下载
https://codeload.github.com/smartloli/kafka-eagle-bin/tar.gz/v1.3.9
- 上传tar包并 tar -zxvf -C /opt/ronnie/kafka, 然后 mv kafka-eagle-xxxxx kafka-eagle 将解压后的文件重命名为kafka-eagle
- 然后你会发现里面还有一个tar包..... tar -zxvf 该包 解压到当前目录并删除tar包
- 配置环境变量
vim /etc/profile

# profile

export KE_HOME=/opt/ronnie/kafka/kafka-eagle/kafka-eagle-web-1.3.9

export PATH=$KE_HOME/bin:$PATH
修改eagle设置
vim /opt/ronnie/kafka/kafka-eagle/kafka-eagle-web-1.3.9/conf/system-config.properties
######################################

# multi zookeeper&kafka cluster list

######################################

# 设置集群名和zookeeper集群列表

kafka.eagle.zk.cluster.alias=cluster1

cluster1.zk.list=kafka01:2181,kafka02:2181,kafka03:2181

# cluster2.zk.list=xdn10:2181,xdn11:2181,xdn12:2181

######################################

# zk client thread limit

######################################

kafka.zk.limit.size=25

######################################

# kafka eagle webui port

######################################

kafka.eagle.webui.port=8048

######################################

# kafka offset storage

######################################

cluster1.kafka.eagle.offset.storage=kafka

#cluster2.kafka.eagle.offset.storage=zk

######################################

# enable kafka metrics

######################################

# 是否使用图表, 使用的话需要创建一个JMX端口

kafka.eagle.metrics.charts=true

######################################

# kafka sql topic records max

######################################

kafka.eagle.sql.topic.records.max=5000

# alarm email configure

######################################

kafka.eagle.mail.enable=true

kafka.eagle.mail.sa=alert_sa@163.com

kafka.eagle.mail.username=alert_sa@163.com

kafka.eagle.mail.password=mqslimczkdqabbbh

kafka.eagle.mail.server.host=smtp.163.com

kafka.eagle.mail.server.port=25

######################################

# alarm im configure

######################################

#kafka.eagle.im.dingding.enable=true

#kafka.eagle.im.dingding.url=https://oapi.dingtalk.com/robot/send?access_token=

#kafka.eagle.im.wechat.enable=true

#kafka.eagle.im.wechat.token=https://qyapi.weixin.qq.com/cgi-bin/gettoken?corpid=xxx&corpsecret=xxx

#kafka.eagle.im.wechat.url=https://qyapi.weixin.qq.com/cgi-bin/message/send?access_token=

#kafka.eagle.im.wechat.touser=

#kafka.eagle.im.wechat.toparty=

#kafka.eagle.im.wechat.totag=

#kafka.eagle.im.wechat.agentid=

######################################

# delete kafka topic token

######################################

kafka.eagle.topic.token=keadmin

######################################

# kafka sasl authenticate

######################################

cluster1.kafka.eagle.sasl.enable=false

cluster1.kafka.eagle.sasl.protocol=SASL_PLAINTEXT

cluster1.kafka.eagle.sasl.mechanism=PLAIN

cluster1.kafka.eagle.sasl.jaas.config=org.apache.kafka.common.security.plain.PlainLoginModule required username="admin" password="kafka-eagle";

# cluster2.kafka.eagle.sasl.enable=false

# cluster2.kafka.eagle.sasl.protocol=SASL_PLAINTEXT

# cluster2.kafka.eagle.sasl.mechanism=PLAIN

# cluster2.kafka.eagle.sasl.jaas.config=org.apache.kafka.common.security.plain.PlainLoginModule required username="admin" password="kafka-eagle";

######################################

# kafka jdbc driver address

######################################

# 默认使用sqlite轻量级数据库, 可以配置为mysql, oracle, redis, mongodb等数据库

kafka.eagle.driver=org.sqlite.JDBC

kafka.eagle.url=jdbc:sqlite:/opt/ronnie/kafka/kafka-eagle/kafka-eagle-web-1.3.9/db/ke.db

kafka.eagle.username=root

kafka.eagle.password=123456- 创建JMX端口
vim /opt/ronnie/kafka/bin/kafka-server-start.sh

# kafka-server-start.sh 在 export KAFKA_HEAP_OPTS="-Xmx1G -Xms1G"后添加JMX端口

if [ "x$KAFKA_HEAP_OPTS" = "x" ]; then

    export KAFKA_HEAP_OPTS="-Xmx1G -Xms1G"

    export JMX_PORT="9999"

fi- 修改ke.sh权限
cd /opt/ronnie/kafka/kafka-eagle/kafka-eagle-web-1.3.9/bin/

chmod 777 ke.sh
- 开启kafka-eagle
ke.sh start

# 创建成功

*******************************************************************

* Kafka Eagle system monitor port successful...

*******************************************************************

[2019-10-04 13:27:09] INFO: Status Code[0]

[2019-10-04 13:27:09] INFO: [Job done!]

Welcome to

    __ __    ___     ____    __ __    ___            ______    ___    ______    __     ______

   / //_/   /   |   / __/   / //_/   /   |          / ____/   /   |  / ____/   / /    / ____/

  / ,<     / /| |  / /_    / ,<     / /| |         / __/     / /| | / / __    / /    / __/

 / /| |   / ___ | / __/   / /| |   / ___ |        / /___    / ___ |/ /_/ /   / /___ / /___

/_/ |_|  /_/  |_|/_/     /_/ |_|  /_/  |_|       /_____/   /_/  |_|\____/   /_____//_____/

Version 1.3.9

*******************************************************************

* Kafka Eagle Service has started success.

* Welcome, Now you can visit 'http://192.168.180.200:8048/ke'

* Account:admin ,Password:123456

*******************************************************************
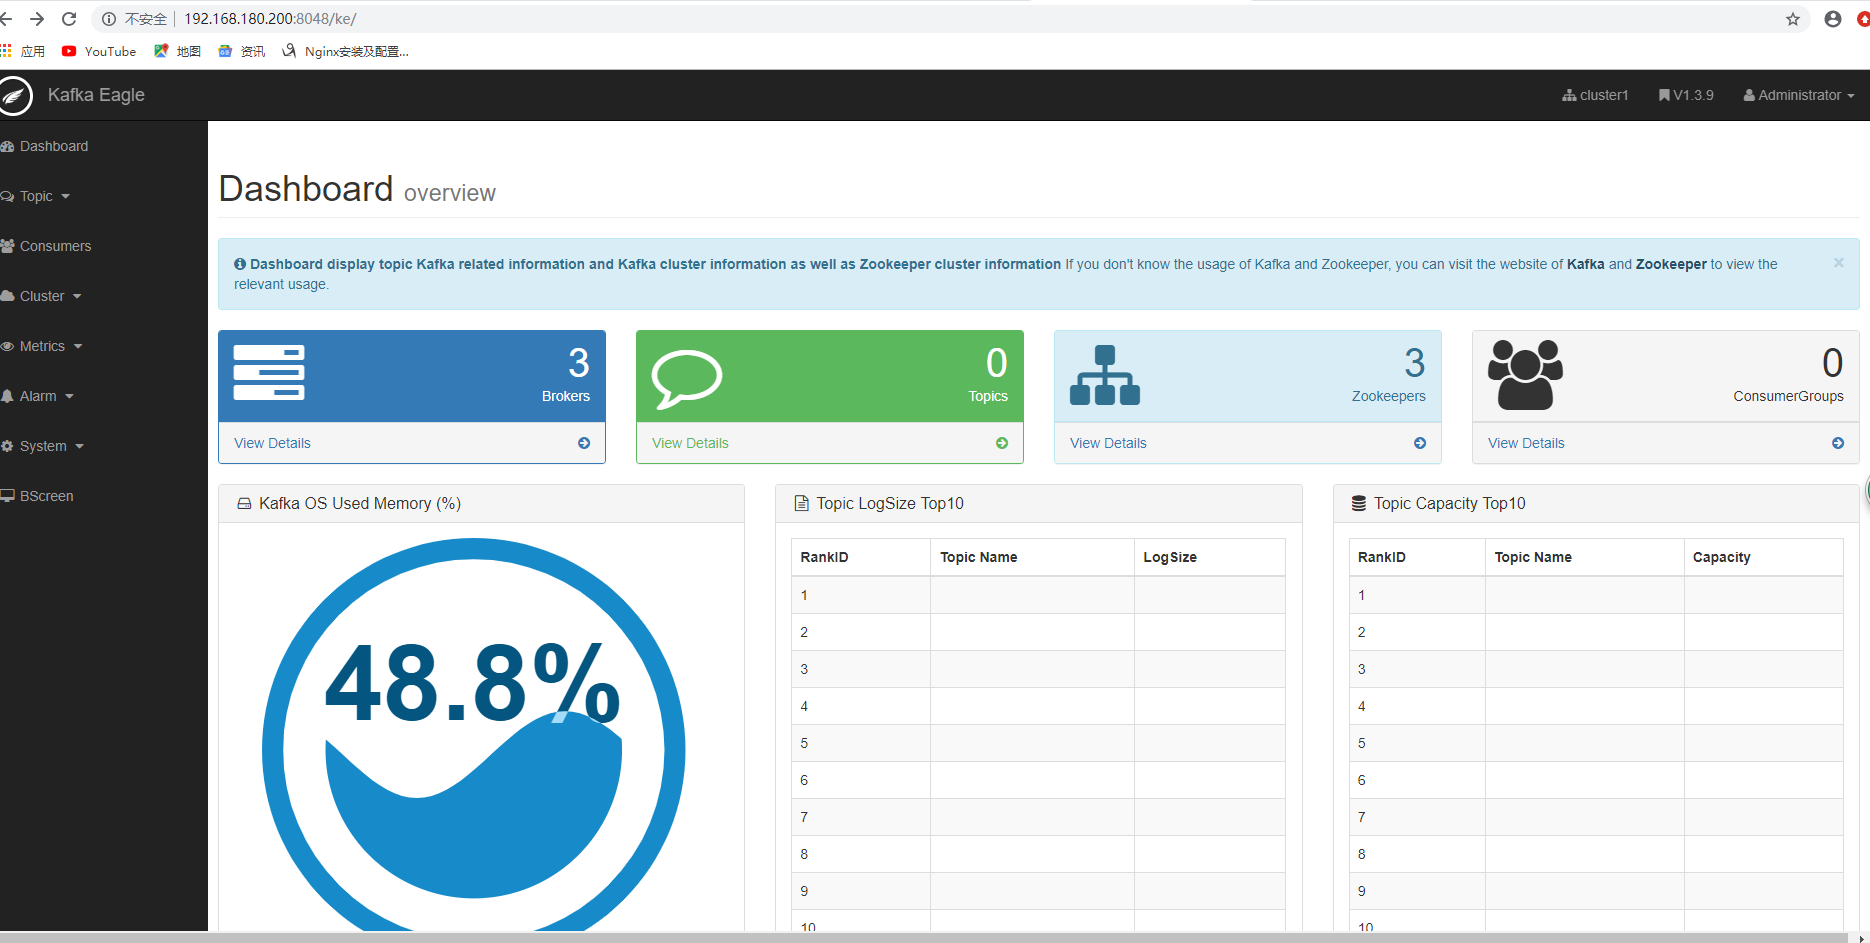
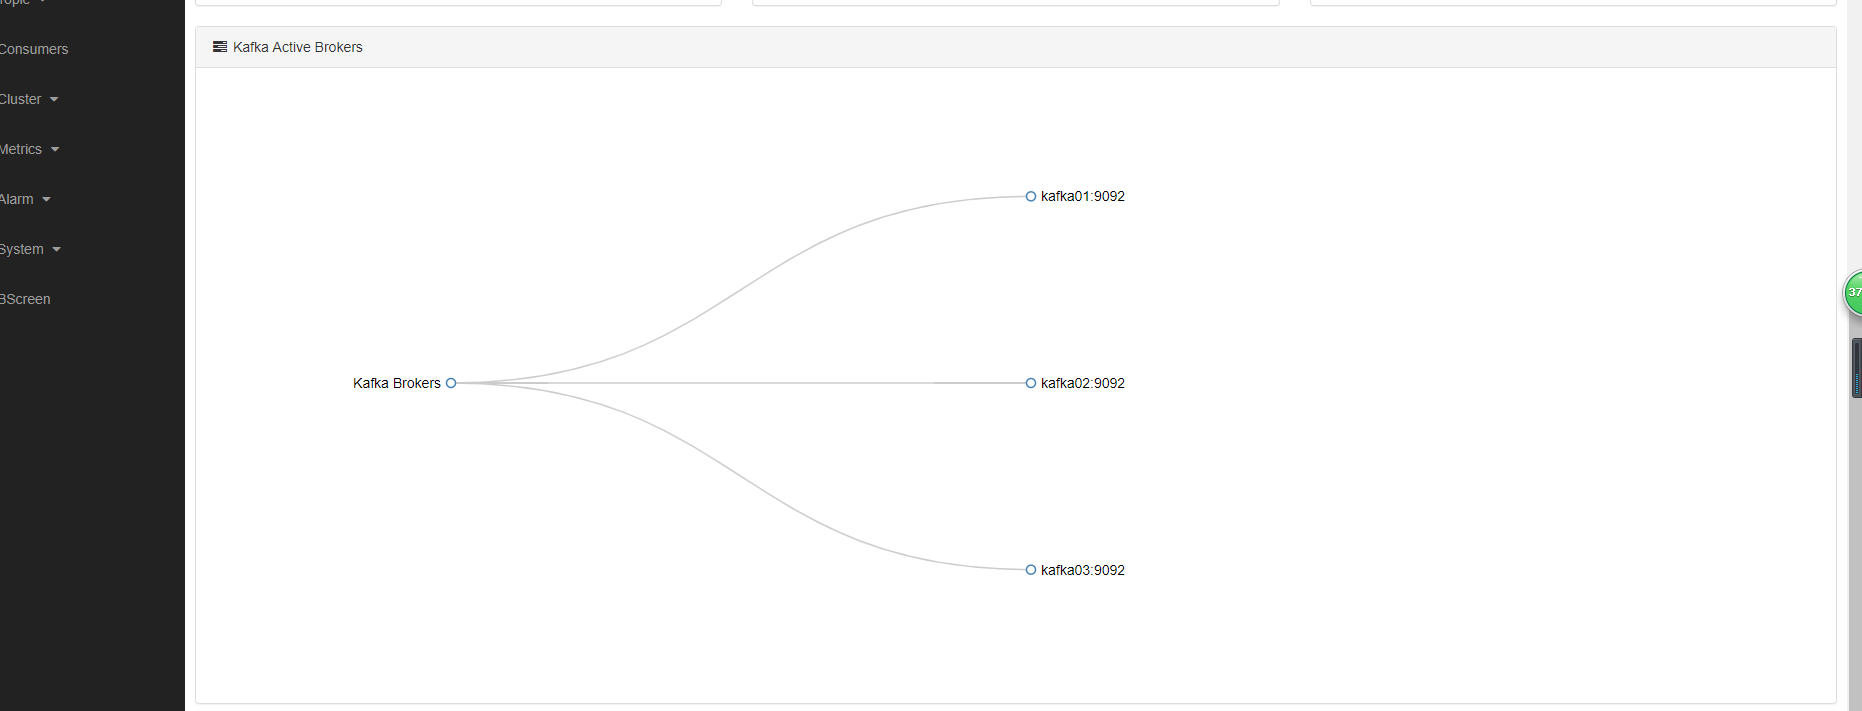
进入http://192.168.180.200:8048/ke, 以admin为用户名, 123456为密码即可进入kafka eagle dashboard
Centos7.4 kafka集群安装与kafka-eagle1.3.9的安装的更多相关文章
- Zookeeper、Kafka集群与Filebeat+Kafka+ELK架构
Zookeeper.Kafka集群与Filebeat+Kafka+ELK架构 目录 Zookeeper.Kafka集群与Filebeat+Kafka+ELK架构 一.Zookeeper 1. Zook ...
- 启动kafka集群,关闭kafka集群脚本
启动kafka集群,关闭kafka集群脚本 在$KAFKA_HOME/bin下新建如下脚本文件 start-kafka.sh #!/bin/bash BROKERS="mini41 mini ...
- 4 kafka集群部署及kafka生产者java客户端编程 + kafka消费者java客户端编程
本博文的主要内容有 kafka的单机模式部署 kafka的分布式模式部署 生产者java客户端编程 消费者java客户端编程 运行kafka ,需要依赖 zookeeper,你可以使用已有的 zo ...
- kafka集群监控工具之三--kafka Offset Monitor
1.介绍 一般情况下,功能简单的kafka项目 使用运维命令+kafka Offset Monitor 就足够用了. 2.使用2.1 部署 github下载jar包 KafkaOffsetMonit ...
- Centos7.5安装kafka集群
Tags: kafka Centos7.5安装kafka集群 Centos7.5安装kafka集群 主机环境 软件环境 主机规划 主机安装前准备 安装jdk1.8 安装zookeeper 安装kafk ...
- Kafka集群模式安装(二)
我们来安装Kafka的集群模式,三台机器: 192.168.131.128 192.168.131.130 192.168.131.131 Kafka集群需要依赖zookeeper,所以需要先安装好z ...
- Kafka相关内容总结(Kafka集群搭建手记)
简介 Kafka is a distributed,partitioned,replicated commit logservice.它提供了类似于JMS的特性,但是在设计实现上完全不同,此外它并不是 ...
- kafka集群操作指南
目录 kafka集群操作指南 (一)单机版安装 (二)集群安装 (三)集群启停操作 (四)topic相关的操作 (五)某个broker挂掉,本机器可重启 (六)某个broker挂掉且无法重启,需要其它 ...
- 如何为Kafka集群选择合适的Partitions数量
转载:http://blog.csdn.net/odailidong/article/details/52571901 这是许多kafka使用者经常会问到的一个问题.本文的目的是介绍与本问题相关的一些 ...
- 如何为Kafka集群确定合适的分区数以及分区数过多带来的弊端
通过之前的文章<Kafka分区分配策略>和<Kafka高性能揭秘>,我们了解到:Kafka高吞吐量的原因之一就是通过partition将topic中的消息保存到Kafka集群中 ...
随机推荐
- thinkPHP5.0中使用header跳转没作用
我在controller中的方法中这样写: header("Location:".$url); 但是一直没动静,不会跳转,最后还是官方文档解决了 https://www.kancl ...
- day13-Python运维开发基础(递归与尾递归)
递归与尾递归 # ### 递归函数 """ 递归函数: 自己调用自己的函数 递:去 归:回 有去有回是递归 """ # 简单递归 def d ...
- IAR 设置问题
IAR 设置问题 1.worksplace 的设置问题:edit configuration 这样,每个工程都可以有一个workplace,方便切换. 2.文件夹包含问题 3.包含.dat文件问题 . ...
- 9.2.1 hadoop mapreduce任务输出的默认排序
任务的默认排序 MapTask和ReduceTask都会默认对数据按照key进行排序,不管逻辑上是否需要.默认是按照字典顺序排序,且实现该排序的方法是快速排序.但是map和reduce任务只能保证单个 ...
- jenkins 2.204.2 安装, 使用国内源安装, 并且跳过插件界面, 更新成国内插件源.
需要java环境支持,自行百度. jenkins 安装源在国外, 下载会比较慢, 尤其在linux下, 使用yum或者apt install jenkins方式安装时,经常会下载失败. 由于yum或者 ...
- 《Netlogo多主体建模入门》笔记3
3- 用“生命游戏”认识Patch 代码: patches-own[living] to setup clear-all ask patches [ < 0.3[ set pcolo ...
- Java枚举类型enum使用详解
java的Enum枚举类型终于在j2se1.5出现了.之前觉得它只不过是鸡肋而已,可有可无.毕竟这么多年来,没有它,大家不都过得很好吗?今日看<Thinking in Java>4th ...
- 2 JVM 运行机制
- ASP.NETCore -----导入Excel文件
前端上传excel文件利用npoi读取数据转换成datatable(netcore坑爹啊,用的vs2017竟然不能可视化) 前端界面 @{ Layout = null; } <!DOCTYPE ...
- cmd命令打开本地*.db数据文件的一些坑
昨天刚看了下sqlite数据库,用的是cmd窗口 写的,建了几个表,今天在次打开,发现.问题有点小多啊.. 我也不知道我的数据库名字后面为啥会带 (“ : ”) 下面是我的数据文件: 刚开始看了下, ...