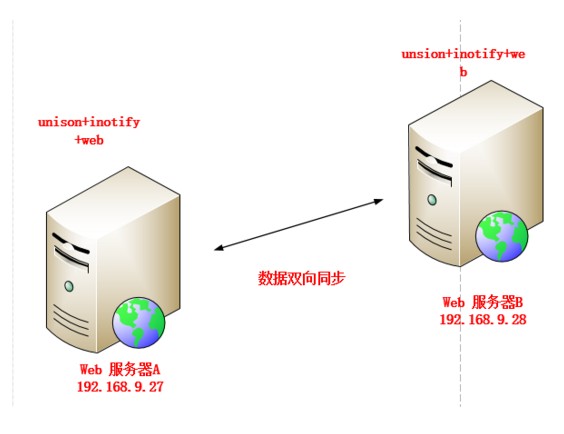
unison 是一款跨平台的文件同步对象,不仅支撑本地对本地同步,也支持通过SSH,RSH和Socket 等网络协议进行同步。unison 支持双向同步,你可以同A同步到B ,也可以从B同步到A,这些都需要额外的设定。
源码包下载地址:链接:https://pan.baidu.com/s/1b8DU70 密码:sby7
1. 两台服务器都编译安装这三个源码包,在此只写在一台服务器上的编译安装的过程,另一台请自行安装
[root@localhost ~]# cd soft/
[root@localhost soft]# ls
inotify-tools-3.14.tar.gz ocaml-3.10.2.tar.gz v2.3.0.zip
jdk-7u21-linux-x64.rpm unison-2.32.52.tar.gz
[root@localhost soft]# tar xf inotify-tools-3.14.tar.gz -C /usr/src
[root@localhost soft]# tar xf ocaml-3.10.2.tar.gz -C /usr/src
[root@localhost soft]# tar xf unison-2.32.52.tar.gz -C /usr/src
[root@localhost soft]# cd /usr/src/inotify-tools-3.14/
[root@localhost inotify-tools-3.14]# yum -y install gcc gcc-c++ make
[root@localhost inotify-tools-3.14]# ./configure --prefix=/usr/local/inotify && make && make install
[root@localhost inotify-tools-3.14]# cd /usr/local/inotify/
##修改PATH 环境变量:
[root@localhost inotify]# echo "PATH=/usr/local/inotify/bin:$PATH" > /etc/profile.d/inotify.sh
[root@localhost inotify]# source /etc/profile.d/inotify.sh
##添加库文件到系统识别的路径:
[root@localhost inotify]# echo "/usr/local/inotify/lib" > /etc/ld.so.conf.d/inotify.conf
[root@localhost inotify]# ldconfig -v | grep inotify
/usr/local/inotify/lib:
libinotifytools.so.0 -> libinotifytools.so.0.4.1
##链接库文件到系统识别的路径:
[root@localhost inotify]# ln -sv /usr/local/inotify/include/ /usr/include/inotify
`/usr/include/inotify' -> `/usr/local/inotify/include/'
##编译安装ocaml,unison依赖于ocaml
[root@localhost ocaml-3.10.2]# cd /usr/src/ocaml-3.10.2/
[root@localhost ocaml-3.10.2]# ./configure
[root@localhost ocaml-3.10.2]# make world opt
[root@localhost ocaml-3.10.2]# make install
[root@localhost ocaml-3.10.2]# cd /usr/src/unison-2.32.52/
[root@localhost unison-2.32.52]# yum -y install ctags-etags
[root@localhost unison-2.32.52]# make UISTYLE=text
[root@localhost unison-2.32.52]# make install
mv /root/bin//unison /tmp/unison-29781
mv: 无法获取"/root/bin//unison" 的文件状态(stat): 没有那个文件或目录
make: [doinstall] 错误 1 (忽略)
cp unison /root/bin/
cp: 无法创建普通文件"/root/bin/": 是一个目录
make: *** [doinstall] 错误 1
报错信息,依据提示操作:此错误就是要把unison 复制到/usr/local/bin下
[root@localhost unison-2.32.52]# find / -name unison -type f
/usr/src/unison-2.32.52/unison
[root@localhost unison-2.32.52]# cp /usr/src/unison-2.32.52/unison /usr/local/bin/
[root@localhost unison-2.32.52]# make install //在次执行 make install
mv /root/bin//unison /tmp/unison-29807
cp unison /root/bin/
cp unison /root/bin/unison-2.32
服务器B 上的安装同上,在此省略。
2.服务器A 生成的公钥传到服务器B 上:
[root@localhost unison-2.32.52]# ssh-keygen -t rsa
[root@localhost ~]# scp ~/ .ssh/id_rsa.pub 192.168.9.28:/root/
##在服务器B 上移动公钥并重命名
[root@localhost ~]# mv id_rsa.pub ./.ssh/authorized_keys
##公钥授权为600
[root@localhost ~]# chmod 600 .ssh/authorized_keys
## 服务器B 重启sshd服务
[root@localhost ~]# service sshd restart
3. 服务器B 上生成的公钥传到服务器A 上
##服务器B 上生成公钥
[root@localhost ~]# ssh-keygen -t rsa
##将服务器B 上公钥传到服务器A 上
[root@localhost ~]# scp ~/ .ssh/id_rsa.pub 192.168.9.27:/root/
##将服务器B 的公钥移动并·重命名
[root@localhost ~]# mv id_rsa.pub .ssh//authorized_keys
## 修改权限为600
[root@localhost ~]# chmod 600 .ssh/authorized_keys
##重启服务器A sshd服务
[root@localhost ~]# service sshd restart
4.测试两台服务器是否可以免密钥登陆
## 服务器A 登陆服务器B
[root@localhost ~]# ssh root@192.168.9.28
Last login: Wed Nov 29 13:47:07 2017 from 192.168.10.245
[root@localhost ~]# exit
logout
Connection to 192.168.9.28 closed.
## 服务器B 登陆服务器A
[root@localhost ~]# ssh root@192.168.9.27
Last login: Wed Nov 29 13:46:59 2017 from 192.168.10.245
[root@localhost ~]# exit
logout
Connection to 192.168.9.27 closed.
5、分别搭建web服务器,两台服务器的代码根目录统一设定为/usr/local/zx-runtime/zx
## 服务器A httpd 的搭建
[root@localhost ~]# rpm -q httpd
package httpd is not installed
[root@localhost ~]# yum -y install httpd
[root@localhost ~]# vim /etc/httpd/conf/httpd.conf
136 Listen 80
949 <VirtualHost *:80>
950 DocumentRoot "/usr/local/zx-runtime/zx/"
951 CustomLog logs/access_log combined
952 ErrorLog logs/error_log
953 <Directory /usr/local/zx-runtime/zx>
954 Options FollowSymLinks
955 AllowOverride None
956 Order deny,allow
957 Deny from all
958 Allow from all
959 </Directory>
960 </VirtualHost>
[root@localhost ~]# httpd -t
Syntax OK
[root@localhost ~]# /etc/init.d/httpd start
正在启动 httpd:
##创建apache 根目录
[root@localhost zx]# pwd
/usr/local/zx-runtime/zx
[root@localhost zx]# ls
index.html
[root@localhost zx]# cat index.html
9.27 页面正常
## 服务器B httpd 服务的搭建
[root@localhost ~]# rpm -q httpd
package httpd is not installed
[root@localhost ~]# yum -y install httpd
[root@localhost ~]# vim /etc/httpd/conf/httpd.conf
1003 <VirtualHost *:80>
1004 DocumentRoot "/usr/local/zx-runtime/zx/"
1005 CustomLog logs/access_log combined
1006 ErrorLog logs/error_log
1007 <Directory /usr/local/zx-runtime/zx>
1008 Options FollowSymLinks
1009 AllowOverride None
1010 Order deny,allow
1011 Deny from all
1012 Allow from all
1013 </Directory>
[root@localhost ~]# /etc/init.d/httpd start
正在启动 httpd:
##创建apache 根目录
[root@localhost zx]# pwd
/usr/local/zx-runtime/zx
[root@localhost zx]# ls
index.html
[root@localhost zx]# cat index.html
9.28 页面正常
6. 编辑unison 同步的脚本进行测试
## 服务器A 的脚本
[root@localhost ~]# mkdir scripts
[root@localhost ~]# cd scripts/
[root@localhost scripts]# vim serA.sh
#!/bin/bash
ipB="192.168.9.28"
srcA="/usr/local/zx-runtime/zx"
dstB="/usr/local/zx-runtime/zx"
/usr/local/inotify/bin/inotifywait -mrq -e create,delete,modify,move $srcA | while read line; do
/usr/local/bin/unison -batch $srcA ssh://$ipB/$dstB
echo -n "$line " >> /var/log/inotify.log
echo `date | cut -d " " -f1-4` >> /var/log/inotify.log
done
##服务器B 的脚本
[root@localhost ~]# mkdir scripts
[root@localhost ~]# cd scripts/
[root@localhost scripts]# vim serB.sh
#/bin/bash
ipA="192.168.9.27"
srcB="/usr/local/zx-runtime/zx"
dstA="/usr/local/zx-runtime/zx"
/usr/local/inotify/bin/inotifywait -mrq -e create,delete,modify,move $srcB | while read line; do
/usr/local/bin/unison -batch $srcB ssh://$ipA/$dstA
echo -n "$line " >> /var/log/inotify.log
echo `date | cut -d " " -f1-4` >> /var/log/inotify.log
done
7.测试webA webB 上传代码是否同步
a .启动webA,webB上的脚本
[root@localhost scripts]# sh -x serA.sh
[root@localhost scripts]# sh -x serB.sh
b.在webA上在开个终端,创建{1-5}.txt
[root@localhost zx]# pwd
/usr/local/zx-runtime/zx
[root@localhost zx]# ls
include index.html log
[root@localhost zx]# touch {1..5}.txt
[root@localhost zx]# ls
1.txt 2.txt 3.txt 4.txt 5.txt include index.html log
在webB上查看:目标文件都已经同步过来
[root@localhost zx]# ls
1.txt 2.txt 3.txt 4.txt 5.txt include index.html log
c. 在webB上创建{a..e}.txt, 在web1上查看
[root@localhost zx]# touch {a..e}.txt
[root@localhost zx]# ls
1.txt 2.txt 3.txt 4.txt 5.txt a.txt b.txt c.txt d.txt e.txt include index.html log
在webA上查看: 目标文件都已同步过来
[root@localhost zx]# ls
1.txt 2.txt 3.txt 4.txt 5.txt a.txt b.txt c.txt d.txt e.txt include index.html log
d. 删除webA上的*.txt 文件
[root@localhost zx]# ls
1.txt 2.txt 3.txt 4.txt 5.txt a.txt b.txt c.txt d.txt e.txt include index.html log
[root@localhost zx]# rm -rf *.txt
[root@localhost zx]# ls
include index.html log
在webB上查看: 目标文件已被删除
[root@localhost zx]# ls
include index.html log
扩展:在实际生产环境,apache 根目录有log目录和compiled缓存目录不需要同步。unison 工具支持排除指定目录功能
模式匹配:
如下参数 ignore/ignorenot, follow, sortfirst/sortlast, backup, merge 定义各自的匹配模式。 例如: ignore = pattern pattern 的语法格式
● Regex regexp 即常规表达式。
● Name name 路径的最后一部分与 “name" 匹配。可以使用通配符,见下面描述。
● Path path 全路径与 "path" 匹配。可以使用通配符,见下面描述。
以下通配符可以用在 Path 和 Name 中:
● ? 匹配除了 "/" 之外,任意单个字符;
● * 匹配除了 "/" 之外的任意字符;如果用在 "Name" 中,则不和以 "."开始的文件匹配,而用在 "Path" 中,可以和 "." 开始的向匹配。
● [xyz] 匹配 {x,y,z} 中任一字符;
● {a,bb,ccc} 匹配 a, bb, ccc 中任何一个;
示例:
● 忽略 CVS 目录以及以 .cmo 结尾的文件: ignore = Name {CVS,*.cmo}
● 忽略路径 a/b: ignore = Path a/b
● 忽略路径 */tmp。当 * 用在 Path 中,可以和以 "." 开始的文件、目录名匹配,如下面的和 ".foo/tmp" 匹配; ignore = Path */tmp
● 忽略 a/b/ 开始,结尾是 .ml 的文件。 ignore = Regex a/b/.*\.ml
生产环境要求忽略log及compiled 目录
在webA webB 中 添加:
[root@localhost scripts]# vim /root/.unison/default.prf
# Unison preferences file
ignore = Name {log,compiled}
启动jwebA webB 脚本
[root@localhost scripts]# sh -x serA.sh
[root@localhost scripts]# sh -x serB.sh
a . webA上创建 9-27compiled 文件
[root@localhost zx]# ls
include index.html log
[root@localhost zx]# cd include/compiled/
[root@localhost compiled]# ls
[root@localhost compiled]# touch 9-27compiled
[root@localhost compiled]# ls
9-27compiled
webB上查询: 9-27compiled 缓存文件没有同步过来,验证成功
[root@localhost zx]# ls
include index.html log
[root@localhost zx]# cd include/compiled/
[root@localhost compiled]# ls
[root@localhost compiled]#
[root@localhost compiled]#
b. webA上创建log 日志文件
[root@localhost compiled]# cd ../../log/
[root@localhost log]# ls
[root@localhost log]# touch 9-27.log
[root@localhost log]# ls
9-27.log
webB上查询: 9-27.log 日志文件没有同步过来,验证成功
[root@localhost compiled]# cd ../../log/
[root@localhost log]# ls
[root@localhost log]#
c. webA zx目录 下创建{1..5}.txt
[root@localhost log]# cd ../
[root@localhost zx]# ls
include index.html log
[root@localhost zx]# touch {1..5}.txt
[root@localhost zx]# ls
1.txt 2.txt 3.txt 4.txt 5.txt include index.html log
webB上查询: 验证成功
[root@localhost log]# cd ../
[root@localhost zx]# ls
1.txt 2.txt 3.txt 4.txt 5.txt include index.html log
d. webA 上创建log 日志 compiled 缓存文件
[root@localhost zx]# cd log/
[root@localhost log]# ls
[root@localhost log]# touch 9-28.log
[root@localhost log]# ls
9-28.log
[root@localhost log]# cd ../include/compiled/
[root@localhost compiled]# ls
[root@localhost compiled]# touch 9-28compiled
[root@localhost compiled]# ls
9-28compiled
webA上查询: 没有同步过来,验证成功
[root@localhost zx]# cd log/
[root@localhost log]# ls
9-27.log
[root@localhost log]# cd ../include/compiled/
[root@localhost compiled]# ls
9-27compiled
[root@localhost compiled]#
webA webB上脚本后台启动并添加到开机启动
[root@localhost scripts]# chmod +x serA.sh
[root@localhost scripts]# ll
总用量 8
-rwxr-xr-x. 1 root root 406 11月 30 13:48 serA.sh
[root@localhost scripts]# nohup ./serA.sh &
[root@localhost scripts]# echo "/root/scripts/serA.sh" >> /etc/rc.local
[root@localhost scripts]# cat /etc/rc.local
#!/bin/sh
#
# This script will be executed *after* all the other init scripts.
# You can put your own initialization stuff in here if you don't
# want to do the full Sys V style init stuff.
touch /var/lock/subsys/local
/root/scripts/serA.sh