
Vue04——vue自定义事件、Router、Vue-cli、发布上线
一、Vue的自定义事件
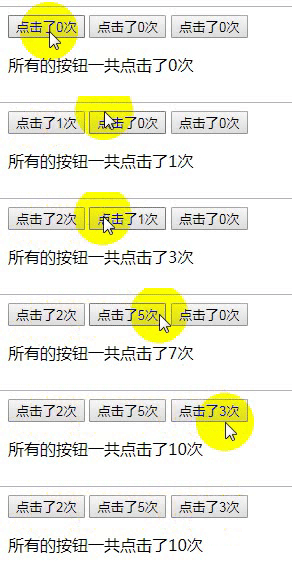
点击任何一个按钮,按钮本身计数累加,但是每点击三个按钮中的一个,totalCounter 都要累加。
<body>

<div id="app">

    <my_btn @total="allCounter()"></my_btn>

    <my_btn @total="allCounter()"></my_btn>

    <my_btn @total="allCounter()"></my_btn>

    <p>所有的按钮一共点击了{{totalCounter}}次</p>

</div>

<template id="my_btn">

    <button @click="total()">点击了{{counter}}次</button>

</template>

<script src="js/vue.js"></script>

<script>

    Vue.component('my_btn',{

        template:'#my_btn',

        data(){

            return {counter : 0}

        },

        methods:{

            total(){

                this.counter += 1;

                // 通知外部,这个方法执行过了

                this.$emit('total'); // 这里把total 传出去,也可以叫别的名字,外面通过@total来监听

            }

        }

    });

    new Vue({

        el:'#app',

        data:{

            totalCounter:0,

        },

        methods:{

            allCounter(){

                this.totalCounter += 1;

            }

        }

    })

</script>

</body>
二、插槽
1.匿名插槽
<body>

<div id="app">

    <my_slot></my_slot>

</div>

<template id="my_slot">

    <div id="panel">

        <header>header.....</header>

        <!--这里放一个插槽占位-->

        <slot>我是插槽,如果不插入内容,就显示默认的内容。</slot>

        <footer>footer......</footer>

    </div>

</template>

<script src="js/vue.js"></script>

<script>

    Vue.component('my_slot',{

        template: '#my_slot',

    });

    new Vue({

        el:'#app',

        data:{}

    })

</script>

</body>

如果改为
<div id="app">

    <my_slot>

        <img src="img/img_01.jpg" width="200px" alt="">

    </my_slot>

</div>
那新增加的 img 通过插槽显示出来了。

2.实名插槽
实名插槽就是,每个插槽都已经限制好要插入什么样的内容,只有插槽的name符合才会被正常显示
<body>

<div id="app">

    <my_computer>

        <p slot="cpu">因特尔 酷睿i8</p>

        <p slot="memory">16g 金士顿</p>

        <p>当当当,这些内容都不会显示的,因为插槽对不上</p>

        <p slot="hard-disk">西部数据</p>

    </my_computer>

</div>

<template id="computer">

    <div id="pc">

        <p>电脑组件:</p>

        <slot name="cpu">cpu插槽</slot>

        <slot name="memory">内存条插槽</slot>

        <slot name="hard-disk">硬盘插槽</slot>

        <p>end.......</p>

    </div>

</template>

<script src="js/vue.js"></script>

<script>

    Vue.component('my_computer',{

        template:'#computer'

    });

    new Vue({

        el:'#app',

        data:{}

    })

</script>

</body>

三、VueRouter
Vue Router 是 Vue.js 官方的路由管理器。它和 Vue.js 的核心深度集成,让构建单页面应用变得易如反掌。
功能:
- 嵌套的路由/视图表
- 模块化的、基于组件的路由配置
- 路由参数、查询、通配符
- 基于 Vue.js 过渡系统的视图过渡效果
- 细粒度的导航控制
- 带有自动激活的 CSS class 的链接
- HTML5 历史模式或 hash 模式,在 IE9 中自动降级
- 自定义的滚动条行为
哒哒哒。。。。。。。。。。。。。。。。。。。。。。。。
https://router.vuejs.org/zh/api/
创建一个路由的例子:
<!DOCTYPE html>

<html lang="en">

<head>

    <meta charset="UTF-8">

    <title>Title</title>

    <link rel="stylesheet" href="bs/css/bootstrap.css">

</head>

<body>

    <div id="app">

        <div class="row">

            <div class="col-xs-2 col-xs-offset-2">

                <!-- 使用 router-link 组件来导航. -->

                <!-- 通过传入 `to` 属性指定链接. -->

                <!-- <router-link> 默认会被渲染成一个 `<a>` 标签 -->

                <router-link class="list-group-item" to="/one">one</router-link>

                <router-link class="list-group-item" to="/two">two</router-link>

                <router-link class="list-group-item" to="/three">three</router-link>

            </div>

            <div class="col-xs-6">

                <div class="panel">

                    <!-- 路由出口 -->

                    <!-- 路由匹配到的组件将渲染在这里 -->

                    <router-view></router-view>

                </div>

            </div>

        </div>

    </div>

<!--子组件-->

<template id="one">

    <div>

        <h3>first</h3>

        <p>111111111111111</p>

    </div>

</template>

<template id="two">

    <div>

        <h3>two</h3>

        <p>222222222222222</p>

    </div>

</template>

<template id="three">

    <div>

        <h3>three</h3>

        <p>33333333333333</p>

    </div>

</template>

    <script src="js/vue.js"></script>

    <script src="js/vue-router.js"> </script>

    <script>

        // 1.创建组件

        const one_tmp = Vue.extend({

            template:'#one'

        });

        const two_tmp = Vue.extend({

            template:'#two'

        });

        const three_tmp = Vue.extend({

            template:'#three'

        });

        // 2.创建路由

        const routes = [

            {path:'/one',component:one_tmp},

            {path:'/two',component:two_tmp},

            {path:'/three',component:three_tmp},

            // 配置根路由

            {path:'/',redirect:'/one'}

        ];

        // 3.创建路由实例

        const router = new VueRouter({

            routes  // (缩写) 相当于 routes: routes

        });

        // 4.创建Vue实例

        new Vue({

            router

        }).$mount('#app'); // el:'#app' 是自动挂载,.$mount() 叫手动挂载

    </script>

</body>

</html>

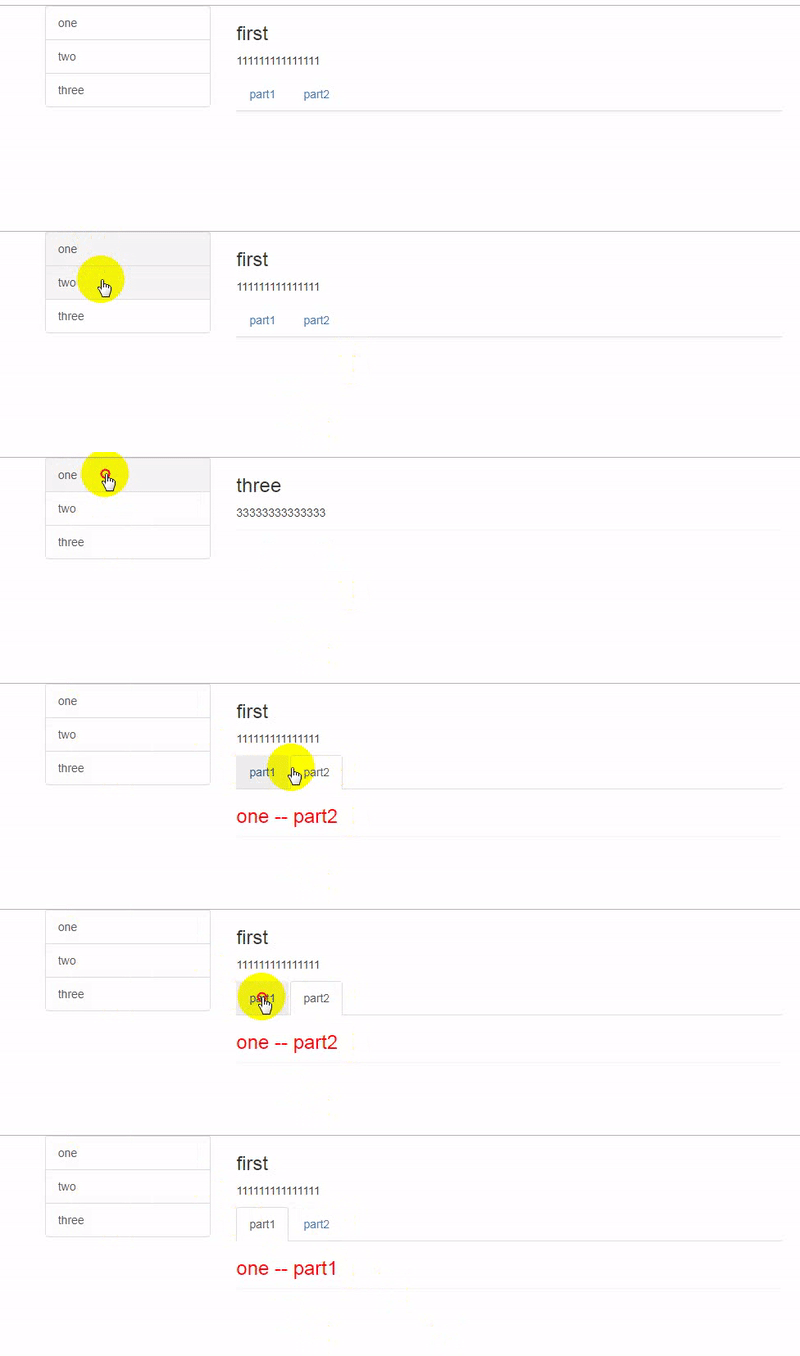
路由里面再创建路由:
<!DOCTYPE html>

<html lang="en">

<head>

    <meta charset="UTF-8">

    <title>Title</title>

    <link rel="stylesheet" href="bs/css/bootstrap.css">

</head>

<body>

<div id="app">

    <div class="row">

        <div class="col-xs-2 col-xs-offset-2">

            <!-- 使用 router-link 组件来导航. -->

            <!-- 通过传入 `to` 属性指定链接. -->

            <!-- <router-link> 默认会被渲染成一个 `<a>` 标签 -->

            <router-link class="list-group-item" to="/one">one</router-link>

            <router-link class="list-group-item" to="/two">two</router-link>

            <router-link class="list-group-item" to="/three">three</router-link>

        </div>

        <div class="col-xs-6">

            <div class="panel">

                <!-- 路由出口 -->

                <!-- 路由匹配到的组件将渲染在这里 -->

                <router-view></router-view>

            </div>

        </div>

    </div>

</div>

<!--子组件-->

<template id="one">

    <div>

        <h3>first</h3>

        <p>111111111111111</p>

        <div>

            <ul class="nav nav-tabs">

                <!-- role="presentation" 是bootstrap的标签  active-class 是激活时候的样式,tag 是vue的,表示渲染成li标签,默认是渲染成a标签-->

                <router-link tag="li" to="/one/part1" role="presentation"  active-class="active"><a href="#">part1</a></router-link>

                <router-link tag="li" to="/one/part2" role="presentation"  active-class="active"><a href="#">part2</a></router-link>

            </ul>

            <div class="tab-content">

                <!-- 路由出口 -->

                <!-- 路由匹配到的组件将渲染在这里 -->

                <router-view></router-view>

            </div>

        </div>

    </div>

</template>

<template id="part1">

    <div>

        <h3 style="color:red">one -- part1</h3>

    </div>

</template>

<template id="part2">

    <div>

        <h3 style="color:red">one -- part2</h3>

    </div>

</template>

<template id="two">

    <div>

        <h3>two</h3>

        <p>222222222222222</p>

    </div>

</template>

<template id="three">

    <div>

        <h3>three</h3>

        <p>33333333333333</p>

    </div>

</template>

<script src="js/vue.js"></script>

<script src="js/vue-router.js"> </script>

<script>

    // 1.创建组件

    const one_tmp = Vue.extend({

        template:'#one'

    });

    const one_part1 = Vue.extend({

        template:'#part1'

    });

    const one_part2 = Vue.extend({

        template:'#part2'

    });

    const two_tmp = Vue.extend({

        template:'#two'

    });

    const three_tmp = Vue.extend({

        template:'#three'

    });

    // 2.创建路由

    const routes = [

        {path:'/one',

         component:one_tmp,

            children:[

                {path:'part1',component:one_part1},

                {path:'part2',component:one_part2}

            ]

        },

        {path:'/two',component:two_tmp},

        {path:'/three',component:three_tmp},

        // 配置根路由

        {path:'/',redirect:'/one'}

    ];

    // 3.创建路由实例

    const router = new VueRouter({

        routes  // (缩写) 相当于 routes: routes

    });

    // 4.创建Vue实例

    new Vue({

        router

    }).$mount('#app'); // el:'#app' 是自动挂载,.$mount() 叫手动挂载

</script>

</body>

</html>
四、Vue-cli
vue-cli是vue官方提供的脚手架工具,默认搭建好了一个项目的基本架子.https://github.com/vuejs/vue-cli
## 全局安装vue-cli

npm install -g vue-cli

## 创建项目,并将 webpack 放进去,根据提示填写project name 等等配置项目

vue init webpack demo1

## 进入项目目录

cd demo1

## 安装依赖

npm install

## 运行

npm run dev
然后访问 http://localhost:8080/ ,就可以访问创建好的脚手架了。
五、发布上线
1.本地服务器:
- 打包
npm run build,生产dist文件 - 此处利用 serve 这个工具演示,安装:
npm install -g serve - 运行:
serve dist,访问命令行窗口显示的地址即可。
2.线上服务器:
- 打包
npm run build - 把dist文件夹名称修改为项目的名称,部署上线(上传到服务器指定文件夹)
- 根据目录地址访问即可
Vue04——vue自定义事件、Router、Vue-cli、发布上线的更多相关文章
- Vue自定义事件
前面的话 父组件使用props传递数据给子组件,子组件怎么跟父组件通信呢?这时,Vue的自定义事件就派上用场了.本文将详细介绍Vue自定义事件 事件绑定 每个 Vue 实例都实现了事件接口 (Even ...
- (尚031)Vue_案例_自定义事件(组件间通信第2种方式:vue自定义事件)
自定义事件: 我们知道,父组件使用prop传递数据的子组件,但子组件怎么跟父组件通信呢? 这个时候Vue的自定义事件系统就派得上用场了. 自定义事件知道两件事: (1).绑定 (2).触发 注意:$o ...
- 由自定义事件到vue数据响应
前言 除了大家经常提到的自定义事件之外,浏览器本身也支持我们自定义事件,我们常说的自定义事件一般用于项目中的一些通知机制.最近正好看到了这部分,就一起看了下自定义事件不同的实现,以及vue数据响应的基 ...
- Vue 自定义事件 && 组件通信
1 App.vue 2 <template> 3 <!-- 4 组件的自定义事件: 5 1.一种组件间通信的方式,使用于:子组件===>父组件 6 2.使用场景:A是父组件,B ...
- Vue自定义事件,$on(eventName) 监听事件,$emit(eventName) 触发事件
<!--自定义事件 使用 $on(eventName) 监听事件 使用 $emit(eventName) 触发事件--> <div id="app15"> ...
- vue自定义事件 子组件把数据传出去
每个 Vue 实例都实现了事件接口(Events interface),即: 使用 $on(eventName) 监听事件 使用 $emit(eventName) 触发事件 1.使用v-on绑定自定义 ...
- 关于vue自定义事件中,传递参数的一点理解
例如有如下场景 先熟悉一下Vue事件处理 <!-- 父组件 --> <template> <div> <!--我们想在这个dealName的方法中传递额外参数 ...
- vue自定义组件(vue.use(),install)+全局组件+局部组件
相信大家都用过element-ui.mintui.iview等诸如此类的组件库,具体用法请参考:https://www.cnblogs.com/wangtong111/p/11522520.html ...
- vue自定义组件(通过Vue.use()来使用)即install的使用
在vue项目中,我们可以自定义组件,像element-ui一样使用Vue.use()方法来使用,具体实现方法: 1.首先新建一个loading.vue文件 // Cmponent.vue <te ...
随机推荐
- 粘性页脚 Sticky Footer 最佳方式
前段时间工作中遇到粘性页脚的需求,以前用过JS控制过,最后发现flex布局是解决这类问题的好帮手. 粘性页脚:即使没有足够的内容填充页面,也要将页脚固定到窗口的底部. <!DOCTYPE htm ...
- 关于iFrame特性总计和iFrame跨域解决办法
1.iframe 定义和用法 iframe 元素会创建包含另外一个文档的内联框架(即行内框架). HTML 与 XHTML 之间的差异 在 HTML 4.1 Strict DTD 和 XHTML 1. ...
- jq中的isArray方法分析,如何判断对象是否是数组
<!DOCTYPE html> <html> <head> <title>jq中的isArray方法分析</title> <meta ...
- Ubuntu增加一个用户并给普通用户赋予root权限的方法
1.添加用户,首先用adduser命令添加一个普通用户,命令如下: #adduser tommy //添加一个名为tommy的用户#passwd tommy //修改密码Changing pass ...
- 个人小项目——Java实现WC功能
这个小项目用了两种方法解决了该功能的实现. 1.两种方法的功能和具体实现 代码可以成功运行,但是有一些情况考虑不完整,一种方法用了FileOutputStream输出流,为了解决空格无法统计问题,对文 ...
- RHEL生命周期管理 -- Should I stay, or should I go?
1. RHEL的支持策略是怎么样的? 标准支持(一般7年)+ 延长支持(3年) 2. 升级RHEL的好处有哪些? More advantageous to upgrade completely to ...
- 7.bootstrap HTML编码规范
Bootstrap HTML编码规范 语法 用两个空格来代替制表符(tab) -- 这是唯一能保证在所有环境下获得一致展现的方法. 嵌套元素应当缩进一次(即两个空格). 对于属性的定义,确保全部使用双 ...
- FTP自动上传
注:该脚本上传的压缩文件,通过文件资源管理器拿下来后会提示压缩文件损坏.使用 ftp -s:d:\audit_log\ftp_upload.txt 方法可行(http://www.cnblogs.co ...
- Vscode rg.exe cpu 占用过高
文件-> 首选项 -> 设置 -> 搜索search.followSymlinks 或者 修改settings.json 添加 "search.followSymlinks ...
- Attempt to load Oracle client libraries threw BadImageFormatException. This problem will occur when running in 64 bit mode with the 32 bit Oracle client components installed.
System.Data.OracleClient 已经过时了.微软不再支持它. 因此,我建议你为. NET 使用Oracle数据提供程序:ODP.Net. 你可以从以下位置下载: 版本:Release ...