
Linux 入侵检测
一、检查系统日志
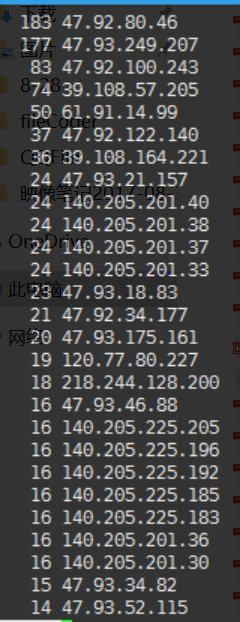
检查系统错误登陆日志,统计IP重试次数
# 这里使用了lastb命令,该命令需要root权限,可以显示所有登陆信息。这里仅仅显示的root用户的,读者可以更具实际情况自行确定,或者直接全部都显示,你会有不一样的收获,每个人的脚本都不一样,更具实际情况自行编写。
# lastb root | awk '{print $3}' | sort | uniq -c | sort -nr| more
以下是我部署在阿里云上主机被多次扫描的日志
isadmin ssh:notty 121.42.165.44 Mon Aug 7 23:56 - 23:56 (00:00)
deploy ssh:notty 121.42.165.44 Mon Aug 7 23:54 - 23:54 (00:00)
deploy ssh:notty 121.42.165.44 Mon Aug 7 23:54 - 23:54 (00:00)
vagrant ssh:notty 121.42.165.44 Mon Aug 7 23:51 - 23:51 (00:00)
vagrant ssh:notty 121.42.165.44 Mon Aug 7 23:51 - 23:51 (00:00)
Iqadmin ssh:notty 121.42.165.44 Mon Aug 7 23:47 - 23:47 (00:00)
Iqadmin ssh:notty 121.42.165.44 Mon Aug 7 23:47 - 23:47 (00:00)
debian ssh:notty 121.42.165.44 Mon Aug 7 23:45 - 23:45 (00:00)
debian ssh:notty 121.42.165.44 Mon Aug 7 23:45 - 23:45 (00:00)
gpadmin ssh:notty 121.42.165.44 Mon Aug 7 23:43 - 23:43 (00:00)
gpadmin ssh:notty 121.42.165.44 Mon Aug 7 23:43 - 23:43 (00:00)
oracle ssh:notty 121.42.165.44 Mon Aug 7 23:40 - 23:40 (00:00)
oracle ssh:notty 121.42.165.44 Mon Aug 7 23:40 - 23:40 (00:00)
tomovic ssh:notty 121.42.165.44 Mon Aug 7 23:38 - 23:38 (00:00)
tomovic ssh:notty 121.42.165.44 Mon Aug 7 23:38 - 23:38 (00:00)
nginx ssh:notty 185.56.146.16 Mon Aug 7 23:37 - 23:37 (00:00)
nginx ssh:notty 185.56.146.16 Mon Aug 7 23:36 - 23:36 (00:00)
root ssh:notty 121.42.165.44 Mon Aug 7 23:36 - 23:36 (00:00)
root ssh:notty 121.42.165.44 Mon Aug 7 23:34 - 23:34 (00:00)
aaa ssh:notty 121.42.165.44 Mon Aug 7 23:12 - 23:12 (00:00)
aaa ssh:notty 121.42.165.44 Mon Aug 7 23:12 - 23:12 (00:00)
通过检测,我们可以发现可以得到该恶意ip,然后添加到过滤名单中
二、检查系统用户
1、cat /etc/passwd 查看是否有异常的系统用户
2、grep “0” /etc/passwd 查看是否产生了新用户,UID和GID为0的用户
3、ls -l /etc/passwd 查看passwd的修改时间,判断是否在不知的情况下添加用户
4、查看是否存在特权用户 awk -F":" '{if($3 == 0){print $1}}' /etc/passwd
5、查看是否存在空口令帐户 awk -F: '{if(length($2)==0) {print $1}}' /etc/passwd
三、检查系统异常进程
1、注意UID为0的进程 使用ps -ef命令查看进程
2、察看该进程所打开的端口和文件 lsof -p pid命令查看
3、检查隐藏进程# ps -ef | awk '{print $2}'| sort -n | uniq >1 ls /proc |sort -n|uniq >2 diff 1 2
“linux即文件,所有的进程在/proc均有记录,需要注意,这里的信息是最详细的,一些系统指令可能会出现被替换的的问题。”
四、检查系统异常文件
# find / -uid 0 -perm 4000 -print
# find / -size +10000k –print
# find / -name “…” –print
# find / -name “.. ” –print
# find / -name “. ” –print
# find / -name ” ” –print
注意SUID文件,可疑大于10M和空格文件
# find / -name core -exec ls -l {} \ (检查系统中的core文件)find -perm 高级用法
-perm mode:文件许可正好符合mode
-perm +mode:文件许可部分符合mode
-perm -mode: 文件许可完全符合mode
五、检查系统文件的完整性
# rpm –qf /bin/ls
# rpm -qf /bin/login
# md5sum –b 文件名
# md5sum –t 文件名
六、检查系统安装包的完整性(这里主要检验的rpm包)
# rpm –Va 输出格式:
S – File size differs
M – Mode differs (permissions)
5 – MD5 sum differs
D – Device number mismatch
L – readLink path mismatch
U – user ownership differs
G – group ownership differs
T – modification time differs
注意相关的 /sbin, /bin, /usr/sbin, and /usr/bin
对于不同的linux系统,你需要根据实际情况进行检查。
七、检查网络
# ip link | grep PROMISC(正常网卡不该在promisc混杂模式,可能存在sniffer)
网卡处于混杂模式,这样通过网卡的流量都会被监听
# lsof –i 如查看所有打开80端口的进程: lsof –i :80
查看恶意程序开放的端口
# netstat –nap(察看不正常打开的TCP/UDP端口)
# arp –a 查看流量在内网是否被劫持
八、检查系统计划任务
注意root和UID是0的schedule
# crontab –u root –l
# cat /etc/crontab
# ls /etc/cron.*
九、检查系统后门
# cat /etc/crontab
# ls /var/spool/cron/
# cat /etc/rc.d/rc.local
# ls /etc/rc.d # ls /etc/rc3.d
# find / -type f -perm 4000
十、检查系统服务
# chkconfig —list
# rpcinfo -p(查看RPC服务)
这个主要检测的是启动服务,目前在centos7以上都采用systemd 来管理相应的服务。Systemd是一个系统管理守护进程、工具和库的集合,用于取代System V初始进程。Systemd的功能是用于集中管理和配置类UNIX系统。
查看所有的可用单元
# systemctl list-unit-files
十一、检查rootkit
# rkhunter -c
# chkrootkit -q
年纪大了,记忆力越来越差,有些东西还是记下来比较好。
转载请注明
Linux 入侵检测的更多相关文章
- Linux 入侵检测小结
Linux 入侵检测小结 0x00 审计命令 在linux中有5个用于审计的命令: last:这个命令可用于查看我们系统的成功登录.关机.重启等情况:这个命令就是将/var/log/wtmp文件格式 ...
- Linux入侵检测工具 - RKHunter
RKHunter是Linux系统平台下的一款开源入侵检测工具 特点 (1)安装便捷,运行快速 (2)扫描范围全,能够检测各种已知的rootkit特征码.端口扫描.常用程序文件的变动情况检查 主要功能 ...
- Linux入侵检测工具
原文:https://www.cnblogs.com/lvcisco/p/4045203.html 一.rootkit简介 rootkit是Linux平台下最常见的一种木马后门工具,它主要通过替换系统 ...
- Linux入侵检测常用命令
find / -mtime 0 #0代表目前时间,表示从现在开始到24小时以前,有改动过内容的文件全都会被列出来.如果是3天前24小时内,则使用find / -mtime 3 find /etc -n ...
- linux入侵检测系统snort安装配置
队长让俺瞅瞅snort,没想到安装配置都遇到问题...整理下过程,给跟我一样的家伙看看.. 由于本人机器是ubuntu,apt-get 几下就可以了,其实网上有不少这样的文章...之所以还要写就是.. ...
- 安全运维之:Linux后门入侵检测工具的使用
安全运维之:Linux后门入侵检测工具的使用 https://blog.csdn.net/exitgogo/article/details/39547113
- Linux主机入侵检测
检查系统信息.用户账号信息 ● 操作系统信息 cat /proc/version 用户信息 用户信息文件 /etc/passwd root:x:0:0:root:/root:/bin/bash 用户名 ...
- Linux 上搭建 Snort+BASE 入侵检测系统
配置实验环境 由于本人电脑的存储空间不足,无法再承担安装一个虚拟机的开销,因此在阿里云上申请了一个云服务器进行本次实验.服务器配置如下: 1 核 - 2GB 内存 - 40GB 系统盘 操作系统:Ub ...
- 入侵检测课设之Libnids开发包
Libnids开发包介绍 Libnids是一个用于网络入侵检测开发的专业编程接口,它使用了Libpcap所以它具有捕获数据包的功能.同时,Libnids提供了TCP数据流重组功能,所以对于分析 ...
随机推荐
- web 常用富文本编辑器
1. 百度家的 UEditor 官网地址http://ueditor.baidu.com/website/;在线演示地址:http://ueditor.baidu.com/website/onlin ...
- 采用Serverless架构搭建Web应用
本文会向你介绍一种新的可能,一种无服务器的方案来搭建Web应用.使用这个方案大部分运维方面的问题就不需要你自己操心了,而且也省去运行服务器的费用.本文从无服务的优势与限制两方面带您初识Serverle ...
- Hadoop/Spark入门学习笔记(完结)
Hadoop基础及演练 ---第1章 初识大数据 大数据是一个概念也是一门技术,是在以Hadoop为代表的大数据平台框架上进行各种数据分析的技术. ---第2章 Hadoop核心HDFS Hadoop ...
- CUDA 安装完成以后如何判断安装是否成功
最近在家里过寒假,可能这是还在学校里带着最大的福利了,无意之中翻出了多年前买的几本关于CUDA编程的书,于是随便在自己电脑上配置了一下环境,试试能不能把当年没有看完的书给看完了,于是有了今天这个判断C ...
- mysql下,保存时间时具体时间丢失,只保存了日期的问题
将日志信息记入数据库时增加了一个时间字段,发现存入数据库时只保留了日期,而没有时分秒信息. 我这边环境是(SRPINGMVC+Mybatis,mysql版本5.6.28以上),java层使用类型为ja ...
- ES6必知必会 (六)—— Class
1.在之前的JS面向对象编程中,如果定义一个构造函数,一般来说是这样: function Person( name , age ) { this.name = name; this.age = age ...
- chaos-engineering 的一些开源工具
Chaos Monkey - A resiliency tool that helps applications tolerate random instance failures. The Simi ...
- Windows 7 x64 安装 Oracle 11g Express
1. 下载 在这里下载文件: Oracle Database Express Edition 11g Release 2 for Windows x32 Oracle 不提供 window ...
- 理解JAVA虚拟机(上)
2016-04-16 23:10:50 在这里,我们进一步认识JAVA及JAVA虚拟机,包括它的体系结构和垃圾回收机制等,并通过虚拟机监控工具进行简单的性能调优. 一. JVM相关概念 ...
- bs的过滤器功能例子
第一步 #src链接要符合下面要求,这里返回是 false or true def valid_img(src): return src.endswith('jpg') and 'img.jandan ...