PCL提取圆柱系数
网上看了很多教程,没看到圆柱提取后的系数解释。
源码如下:
#include <pcl/ModelCoefficients.h>
#include <pcl/io/pcd_io.h>
#include <pcl/point_types.h>
#include <pcl/filters/extract_indices.h>
#include <pcl/filters/passthrough.h>
#include <pcl/features/normal_3d.h>
#include <pcl/sample_consensus/method_types.h>
#include <pcl/sample_consensus/model_types.h>
#include <pcl/segmentation/sac_segmentation.h>
#include <pcl/visualization/pcl_visualizer.h>
#include <boost/thread/thread.hpp> #include <pcl/filters/radius_outlier_removal.h> typedef pcl::PointXYZ PointT; // All the objects needed
pcl::PCDReader reader;
pcl::PassThrough<PointT> pass;
pcl::NormalEstimation<PointT, pcl::Normal> ne;
pcl::SACSegmentationFromNormals<PointT, pcl::Normal> seg;
pcl::PCDWriter writer;
pcl::ExtractIndices<PointT> extract; pcl::search::KdTree<PointT>::Ptr tree(new pcl::search::KdTree<PointT>()); // Datasets
pcl::PointCloud<PointT>::Ptr cloud(new pcl::PointCloud<PointT>); pcl::PointCloud<pcl::Normal>::Ptr cloud_normals(new pcl::PointCloud<pcl::Normal>); pcl::ModelCoefficients::Ptr coefficients_plane(new pcl::ModelCoefficients), coefficients_cylinder(new pcl::ModelCoefficients);
pcl::PointIndices::Ptr inliers_plane(new pcl::PointIndices), inliers_cylinder(new pcl::PointIndices); boost::shared_ptr<pcl::visualization::PCLVisualizer> viewer(new pcl::visualization::PCLVisualizer("viewer"));
pcl::PointCloud<pcl::PointXYZ>::Ptr clicked_points_3d(new pcl::PointCloud<pcl::PointXYZ>);
int num = ; void pp_callback(const pcl::visualization::AreaPickingEvent& event, void* args)
{ clicked_points_3d->points.clear();
pcl::PointCloud<pcl::PointXYZ>::Ptr final(new pcl::PointCloud<pcl::PointXYZ>);
std::vector< int > indices;
if (event.getPointsIndices(indices) == -)
return; for (int i = ; i < indices.size(); ++i)
{
clicked_points_3d->points.push_back(cloud->points.at(indices[i]));
}
//clicked_points_3d->width = 1;
//clicked_points_3d->height = clicked_points_3d->size();
//if (!clicked_points_3d->points.empty())
//{
// writer.write("Selected.pcd", *clicked_points_3d, false);
//} // Estimate point normals
ne.setSearchMethod(tree);
ne.setInputCloud(clicked_points_3d);
ne.setKSearch();
ne.compute(*cloud_normals); // Create the segmentation object for cylinder segmentation and set all the parameters
seg.setOptimizeCoefficients(true);
seg.setModelType(pcl::SACMODEL_CYLINDER);
seg.setMethodType(pcl::SAC_RANSAC);
seg.setNormalDistanceWeight(0.1);
seg.setMaxIterations();
double threshold;
std::cout << "threshold: ";
std::cin >> threshold;
seg.setDistanceThreshold(threshold); //单位米
double radius;
std::cout << "radius: ";
std::cin >> radius;
seg.setRadiusLimits(, radius); //单位米
seg.setInputCloud(clicked_points_3d);
seg.setInputNormals(cloud_normals); // Obtain the cylinder inliers and coefficients
seg.segment(*inliers_cylinder, *coefficients_cylinder);
std::cerr << "Cylinder coefficients: " << *coefficients_cylinder << std::endl; // Write the cylinder inliers to disk
extract.setInputCloud(clicked_points_3d);
extract.setIndices(inliers_cylinder);
extract.setNegative(false);
pcl::PointCloud<PointT>::Ptr cloud_cylinder(new pcl::PointCloud<PointT>());
extract.filter(*cloud_cylinder);
if (cloud_cylinder->points.empty())
std::cerr << "Can't find the cylindrical component." << std::endl;
else
{
std::cerr << "PointCloud representing the cylindrical component: " << cloud_cylinder->points.size() << " data points." << std::endl;
cloud_cylinder->width = ;
cloud_cylinder->height = cloud_cylinder->size();
writer.write("table_scene_mug_stereo_textured_cylinder.pcd", *cloud_cylinder, false);
}
system("pause"); std::stringstream ss;
std::string cloudName;
ss << num++;
ss >> cloudName;
cloudName += "_cloudName"; pcl::visualization::PointCloudColorHandlerCustom<pcl::PointXYZ> red(clicked_points_3d, , , );
viewer->addPointCloud(clicked_points_3d, red, cloudName);
viewer->setPointCloudRenderingProperties(pcl::visualization::PCL_VISUALIZER_POINT_SIZE, , cloudName); //std::stringstream ss;
//std::string cloudName;
ss << num++;
ss >> cloudName;
cloudName += "_cloudName";
pcl::visualization::PointCloudColorHandlerCustom<pcl::PointXYZ> blue(cloud_cylinder, , , );
viewer->addPointCloud(cloud_cylinder, blue, cloudName);
viewer->setPointCloudRenderingProperties(pcl::visualization::PCL_VISUALIZER_POINT_SIZE, , cloudName);
} int main (int argc, char** argv)
{
//std::string location;
//std::getline(std::cin, location);
//if (location[0] == '"')
//{
// location = location.substr(1, location.length() - 2);
//}
//if (pcl::io::loadPCDFile<pcl::PointXYZ>(location, *cloud) == -1)
//{
// PCL_ERROR("Couldn't read file \n");
// system("pause");
//}
//std::cout << "Reading Success" << std::endl; //生成圆柱点云
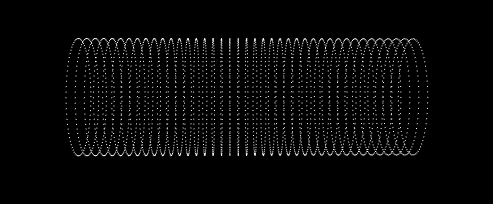
for (float z(-); z <= ; z += 0.5)
{
for (float angle(0.0); angle <= 360.0; angle += 5.0)
{
pcl::PointXYZ basic_point;
basic_point.x = +3.5*cos(angle / * M_PI);
basic_point.y = +3.5*sin(angle / * M_PI);
basic_point.z = z;
cloud->points.push_back(basic_point);
}
} //// Read in the cloud data
//reader.read ("table_scene_mug_stereo_textured.pcd", *cloud);
//std::cerr << "PointCloud has: " << cloud->points.size () << " data points." << std::endl; // Build a passthrough filter to remove spurious NaNs
//pass.setInputCloud (cloud);
//pass.setFilterFieldName ("z");
//pass.setFilterLimits (0, 1.5);
//pass.filter (*#);
//std::cerr << "PointCloud after filtering has: " << cloud_filtered->points.size () << " data points." << std::endl;
viewer->addPointCloud(cloud, "bunny");
viewer->setCameraPosition(, , -, , -, , );
viewer->registerAreaPickingCallback(pp_callback, (void*)&cloud); while (!viewer->wasStopped())
{
viewer->spinOnce();
boost::this_thread::sleep(boost::posix_time::microseconds());
} return ();
}
程序运行后看不见点云按R键
接着按下X键选中点云,再按下X键
设置偏差阈值为1
圆柱的半径大于3.5
就可以得到如下结果
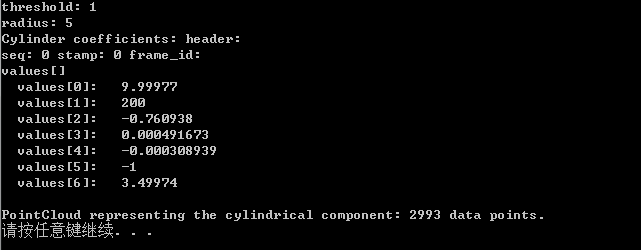
系数0、1、2代表圆柱轴线上的原点,3、4、5代表这条轴线的方向向量,系数6就是圆柱的半径。
PCL提取圆柱系数的更多相关文章
- 基于DCT系数的实时监控中运动目标检测
本文的主要内容来自2009 Advanced Video and Signal Based Surveillance会议的一篇论文“Real-Time Moving Object Detection ...
- MSCN(Mean Subtracted Contrast Normalized)系数的直方图
MSCN系数是无参考的空间域图像质量评估算法BRISQUE(No-Reference Image Quality Assessment in the Spatial Domain)中提出的,MSCN系 ...
- 基于GPU的高分一号影像正射校正的设计与实现
一 RPC正射校正的原理 影像正射校正的方法有很多,主要包含两大类:一类是严格的几何纠正模型,另一类是近似几何纠正模型.当遥感影像的成像模型和有关参数已知时,可以根据严格的成像模型来校正图像,这种方法 ...
- 基于FPGA的音频信号的FIR滤波(Matlab+Modelsim验证)
1 设计内容 本设计是基于FPGA的音频信号FIR低通滤波,根据要求,采用Matlab对WAV音频文件进行读取和添加噪声信号.FFT分析.FIR滤波处理,并分析滤波的效果.通过Matlab的分析验证滤 ...
- 基于HTK语音工具包进行孤立词识别的使用教程
选自:http://my.oschina.net/jamesju/blog/116151 1前言 最近一直在研究HTK语音识别工具包,前几天完成了工具包的安装编译和测试,这几天又按耐不住好奇,决定自己 ...
- ECG信号读出,检测QRS,P,T 波(小波去噪,并根据检测),基于BP辨识的神经网络
这学期的课程选择神经网络.最后的作业处理ECG信号,并利用神经网络识别. 1 ECG引进和阅读ECG信号 1)ECG介绍 详细ECG背景应用就不介绍了,大家能够參考百度 谷歌.仅仅是简单说下ECG ...
- OO第一单元总结
OO第一单元作业总结 一.前言 开学四周,不知不觉已经做了三次OO作业.事实上,每一次作业对我来说都是很大的挑战,需要花费大量的时间和精力来学习. 虽然学得很艰苦,但最后还是连滚带爬地完成了.(好惨一 ...
- Nature重磅:Hinton、LeCun、Bengio三巨头权威科普深度学习
http://wallstreetcn.com/node/248376 借助深度学习,多处理层组成的计算模型可通过多层抽象来学习数据表征( representations).这些方法显著推动了语音识别 ...
- [译]用R语言做挖掘数据《七》
时间序列与数据挖掘 一.实验说明 1. 环境登录 无需密码自动登录,系统用户名shiyanlou,密码shiyanlou 2. 环境介绍 本实验环境采用带桌面的Ubuntu Linux环境,实验中会用 ...
随机推荐
- Nessus简单使用
1.更新插件 上次搭建完后总觉得不踏实,因为老是提示插件多久没更新了,然后果断花了1.25美刀买了台vps,终于把最新的插件下载下来了,总共190M,需要的QQ私信我.
- Python调用win32 API绘制正弦波
Python调用win32 API新建窗口与直接创建窗口的流程相同 流程:注册窗口→创建窗口→显示窗口→更新窗口→消息循环 代码: # -*- coding: utf-8 -*- import win ...
- (五)Cisco dhcp snooping实例3-多交换机环境(DHCP服务器和DHCP客户端位于同VLAN)
试验拓扑 环境:dhcp server和dhcp客户端属于同vlan,但是客户端属于不同的交换机,在L2和L3交换机开启dhcp snooping后得出如下结论 L3交换机的配置 ip dhcp po ...
- 东站七雄保C位!论三线楼市网红板块的自我修养
不对!东站板块才是伍家岗的C位.这里有东站七雄! 前些天发了一篇城东C位之路的文章,居然引发了诸葛说房聊天群内大佬的激烈纷争.公说公有理婆说婆有理,一时争的是不可开交,大有约架之势.所以我决定提前写& ...
- 013-在 Shell 脚本中调用另一个 Shell 脚本的三种方式
如下: fork: 如果脚本有执行权限的话,path/to/foo.sh.如果没有,sh path/to/foo.sh. exec: exec path/to/foo.sh source: sourc ...
- Zookeeper 安装与简单使用
一.安装Zookeeper 其实Zookeeper的安装特别简单,也不能算安装了,只需要将Zookeeper下载后解压,就完成了安装操作. 下载地址:http://zookeeper.apache.o ...
- 使用C++调用并部署pytorch模型
1.背景(Background) 上图显示了目前深度学习模型在生产环境中的方法,本文仅探讨如何部署pytorch模型! 至于为什么要用C++调用pytorch模型,其目的在于:使用C++及多线程可以加 ...
- eclipse :代码自动补全不生效解决办法
参考文章:https://blog.csdn.net/qq_35033270/article/details/79285821 请见下图! 恢复缺省值即可!
- 思维导图Xmind8
Xmind——一款强大的思维导图工具,方便记忆和理清思路,同时思维导图特殊的记录方式也便于捕捉跳跃思考. 五款思维导图软件:MindManager.iMindMap.XMind.MindMapper. ...
- c++ std::cout重定向到文件
cout默认是与监视器(屏幕)相连,cout出来的内容会输出到屏幕上,通常是会在命令行窗口之中.但有时,我们希望将cout出来的具体日志.错误信息写到某个文件之中,而屏幕上仅仅显示出当前进行的任务,以 ...