python操作mysql(增、删、改、查)
用python操作数据库,特别是做性能测试造存量数据时特别简单方便,比存储过程方便多了。
连接数据库
前提:安装mysql、python,参考:https://www.cnblogs.com/UncleYong/p/10530261.html
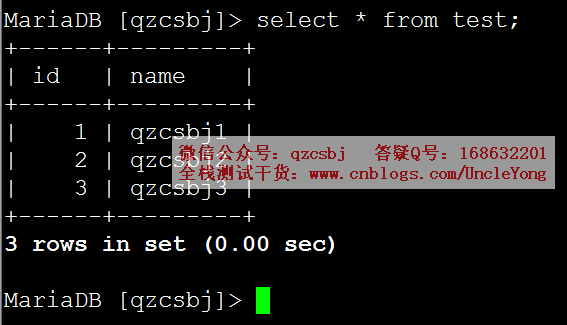
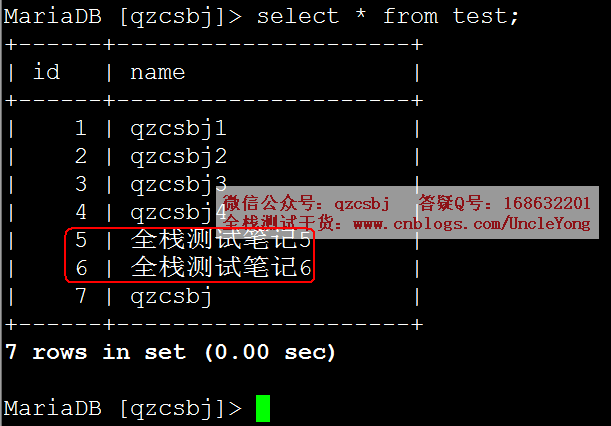
数据库qzcsjb的test表中初始化的数据:
安装pymysql模块,pip install pymysql
import pymysql

# 建立数据库连接

conn=pymysql.connect(

    host='192.168.168.168',

    port=3306,

    user='root',

    password='mysql',

    db='qzcsbj',

    charset='utf8'

)

# 获取游标

cursor=conn.cursor()

# 执行sql语句

sql = 'select * from test where name = "%s" and id="%s"' %('qzcsbj1','1')

rows=cursor.execute(sql)  # 返回结果是受影响的行数

# 关闭游标

cursor.close()

# 关闭连接

conn.close()

# 判断是否连接成功

if rows >= 0:

    print('连接数据库成功')

else:

    print('连接数据库失败')
增加数据
单条
import pymysql # 建立数据库连接
conn=pymysql.connect(
host='192.168.168.168',
port=3306,
user='root',
password='mysql',
db='qzcsbj',
charset='utf8'
) # 获取游标
cursor=conn.cursor() # 执行sql语句
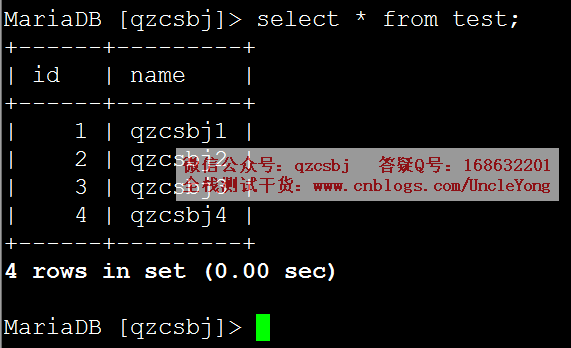
sql='insert into test(id,name) values(%s,%s)'
rows=cursor.execute(sql,('4','qzcsbj4')) # 提交
conn.commit() # 关闭游标
cursor.close() # 关闭连接
conn.close()
多条
import pymysql # 建立数据库连接
conn=pymysql.connect(
host='192.168.168.168',
port=3306,
user='root',
password='mysql',
db='qzcsbj',
charset='utf8'
) # 获取游标
cursor=conn.cursor() # 执行sql语句
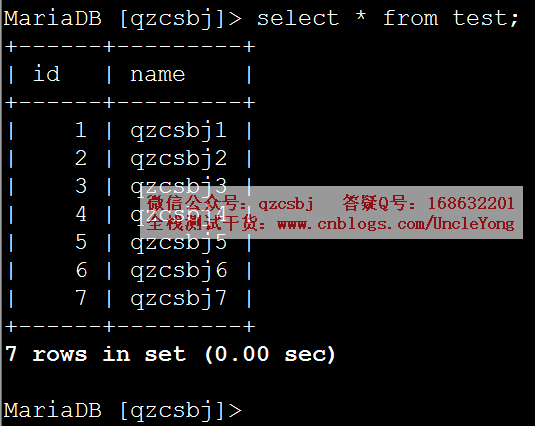
sql='insert into test(id,name) values(%s,%s)'
rows=cursor.executemany(sql,[('5','qzcsbj5'),('6','qzcsbj6'),('7','qzcsbj7')]) # 提交
conn.commit() # 关闭游标
cursor.close() # 关闭连接
conn.close()
大批量新增
import pymysql

# 建立数据库连接

conn=pymysql.connect(

    host='192.168.168.168',

    port=3306,

    user='root',

    password='mysql',

    db='qzcsbj',

    charset='utf8'

)

# 获取游标

cursor=conn.cursor(pymysql.cursors.DictCursor)

# 执行sql语句

values=[]

for i in range(100, 201):

    values.append((i, 'qzcsbj'+str(i)))

sql='insert into test(id,name) values(%s,%s)'

rows=cursor.executemany(sql,values)

# 提交

conn.commit()

# 关闭游标

cursor.close()

# 关闭连接

conn.close()
修改数据
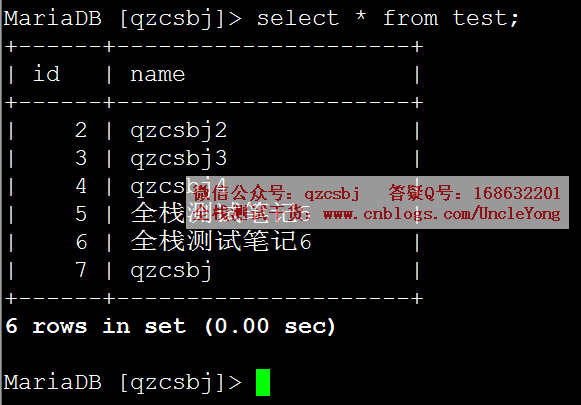
把上面大批量新增的数据删除,delete from test where id>=100;
单条
import pymysql # 建立数据库连接
conn=pymysql.connect(
host='192.168.168.168',
port=3306,
user='root',
password='mysql',
db='qzcsbj',
charset='utf8'
) # 获取游标
cursor=conn.cursor() # 执行sql语句
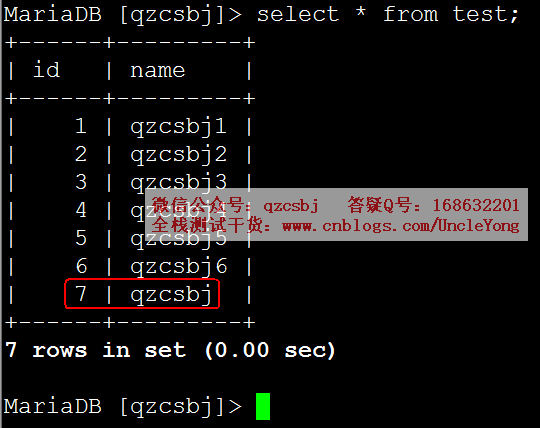
sql='update test set name = %s where id = %s'
rows=cursor.execute(sql,('qzcsbj','7')) # 提交
conn.commit() # 关闭游标
cursor.close() # 关闭连接
conn.close()
多条
import pymysql

# 建立数据库连接

conn=pymysql.connect(

    host='192.168.168.168',

    port=3306,

    user='root',

    password='mysql',

    db='qzcsbj',

    charset='utf8'

)

# 获取游标

cursor=conn.cursor()

# 执行sql语句

sql='update test set name = %s where id = %s'

rows=cursor.executemany(sql,[('全栈测试笔记5','5'),('全栈测试笔记6','6')])

# 提交

conn.commit()

# 关闭游标

cursor.close()

# 关闭连接

conn.close()
删除数据
单条
下面脚本和上面增加数据,除了执行sql语句部分不一样,其余都一样
# 执行sql语句

sql='delete from test where id = %s'

rows=cursor.execute(sql,('1',))
多条
下面脚本和上面增加数据,除了执行sql语句部分不一样,其余都一样
# 执行sql语句

sql='delete from test where id = %s'

rows=cursor.executemany(sql,[('2'),('3')])

查询数据
fetchone
有点像从管道中取一个,如果再来一个fetchone,会又取下一个,如果取完了再取,就返回None
每条记录为元组格式
下面脚本和上面增加数据,除了执行sql语句部分不一样,其余都一样
# 执行sql语句

rows=cursor.execute('select * from test;')

print(cursor.fetchone())

print(cursor.fetchone())

print(cursor.fetchone())

print(cursor.fetchone())

print(cursor.fetchone())
运行结果:
(4, 'qzcsbj4')
(5, '全栈测试笔记5')
(6, '全栈测试笔记6')
(7, 'qzcsbj')
None
每条记录为字典格式
# 获取游标

cursor=conn.cursor(pymysql.cursors.DictCursor)

# 执行sql语句

rows=cursor.execute('select * from test;')

print(cursor.fetchone())

print(cursor.fetchone())

print(cursor.fetchone())

print(cursor.fetchone())

print(cursor.fetchone())
运行结果:
{'id': 4, 'name': 'qzcsbj4'}
{'id': 5, 'name': '全栈测试笔记5'}
{'id': 6, 'name': '全栈测试笔记6'}
{'id': 7, 'name': 'qzcsbj'}
None
fetchmany
# 获取游标

cursor=conn.cursor(pymysql.cursors.DictCursor)

# 执行sql语句

rows=cursor.execute('select * from test;')

print(cursor.fetchmany(2))
运行结果:
[{'id': 4, 'name': 'qzcsbj4'}, {'id': 5, 'name': '全栈测试笔记5'}]
fetchall
# 获取游标

cursor=conn.cursor(pymysql.cursors.DictCursor)

# 执行sql语句

rows=cursor.execute('select * from test;')

print(cursor.fetchall())

print(cursor.fetchall())
运行结果:
[{'id': 4, 'name': 'qzcsbj4'}, {'id': 5, 'name': '全栈测试笔记5'}, {'id': 6, 'name': '全栈测试笔记6'}, {'id': 7, 'name': 'qzcsbj'}]
[]
相对绝对位置移动
从头开始跳过n个
# 获取游标

cursor=conn.cursor(pymysql.cursors.DictCursor)

# 执行sql语句

rows=cursor.execute('select * from test;')

cursor.scroll(3,mode='absolute')

print(cursor.fetchone())
运行结果:
{'id': 7, 'name': 'qzcsbj'}
相对当前位置移动
# 获取游标

cursor=conn.cursor(pymysql.cursors.DictCursor)

# 执行sql语句

rows=cursor.execute('select * from test;')

print(cursor.fetchone())

cursor.scroll(2,mode='relative')

print(cursor.fetchone())
运行结果:
{'id': 4, 'name': 'qzcsbj4'}
{'id': 7, 'name': 'qzcsbj'}
python操作mysql(增、删、改、查)的更多相关文章
- php5.4以上 mysqli 实例操作mysql 增,删,改,查
<?php //php5.4以上 mysqli 实例操作mysql header("Content-type:text/html;charset=utf8"); $conn ...
- Go语言之进阶篇mysql增 删 改 查
一.mysql操作基本语法 1.创建名称nulige的数据库 CREATE DATABASE nulige DEFAULT CHARSET utf8 COLLATE utf8_general_ci; ...
- 好用的SQL TVP~~独家赠送[增-删-改-查]的例子
以前总是追求新东西,发现基础才是最重要的,今年主要的目标是精通SQL查询和SQL性能优化. 本系列主要是针对T-SQL的总结. [T-SQL基础]01.单表查询-几道sql查询题 [T-SQL基础] ...
- iOS sqlite3 的基本使用(增 删 改 查)
iOS sqlite3 的基本使用(增 删 改 查) 这篇博客不会讲述太多sql语言,目的重在实现sqlite3的一些基本操作. 例:增 删 改 查 如果想了解更多的sql语言可以利用强大的互联网. ...
- django ajax增 删 改 查
具于django ajax实现增 删 改 查功能 代码示例: 代码: urls.py from django.conf.urls import url from django.contrib impo ...
- iOS FMDB的使用(增,删,改,查,sqlite存取图片)
iOS FMDB的使用(增,删,改,查,sqlite存取图片) 在上一篇博客我对sqlite的基本使用进行了详细介绍... 但是在实际开发中原生使用的频率是很少的... 这篇博客我将会较全面的介绍FM ...
- ADO.NET 增 删 改 查
ADO.NET:(数据访问技术)就是将C#和MSSQL连接起来的一个纽带 可以通过ADO.NET将内存中的临时数据写入到数据库中 也可以将数据库中的数据提取到内存中供程序调用 ADO.NET所有数据访 ...
- MVC EF 增 删 改 查
using System;using System.Collections.Generic;using System.Linq;using System.Web;//using System.Data ...
- 洗礼灵魂,修炼python(91)-- 知识拾遗篇 —— pymysql模块之python操作mysql增删改查
首先你得学会基本的mysql操作语句:mysql学习 其次,python要想操作mysql,靠python的内置模块是不行的,而如果通过os模块调用cmd命令虽然原理上是可以的,但是还是不太方便,那么 ...
- python基础中的四大天王-增-删-改-查
列表-list-[] 输入内存储存容器 发生改变通常直接变化,让我们看看下面列子 增---默认在最后添加 #append()--括号中可以是数字,可以是字符串,可以是元祖,可以是集合,可以是字典 #l ...
随机推荐
- [LeetCode] 525. Contiguous Array 相连的数组
Given a binary array, find the maximum length of a contiguous subarray with equal number of 0 and 1. ...
- Asp.Net Core 减少Controller获取重复注入对象
原文:Asp.Net Core 减少Controller获取重复注入对象 版权声明:本文为博主原创文章,未经博主允许不得转载. https://blog.csdn.net/u012770274/art ...
- 北漂不易,逆风前行[给想在北京工作的java同学们诚恳的建议!]
作为一个北漂程序员(java开发),从业6年,北漂十一年,走了不少弯路,也曾孤独彷徨,楼主今天特地总结了一些经验,希望能给大家(准备做北漂 或 北漂的朋友们)一点启发.从生活.专业和薪水这2个方向来分 ...
- 关于阻止百度滥用cookies的想法
Chrome浏览器支持禁止指定的cookies,因此可以作为阻止百度滥用cookies的突破口,最好的方案应该是制作chrome插件(国内厂商的浏览器基本都是基于谷歌开源的 Chromium计划,基本 ...
- Eureka工作原理分析
demo源码地址:https://github.com/flyingJiang/SpringCloud 首先,单独使用Eureka. Eureka整合Ribbon 未完待续……
- NOI 2010 海拔(最小割转最短路)
题意 https://www.lydsy.com/JudgeOnline/problem.php?id=2007 思路 首先可以发现一个结论,每个位置的海拔只有能是 \(0\) 和 \(1\) ,然后 ...
- 第19课 lambda vs std::bind
一. std::bind (一)std::bind实现的关键技术 [编程实验]探索bind原理,实现自己的bind函数 #include <iostream> #include <t ...
- Beta冲刺(5/7)——2019.5.27
作业描述 课程 软件工程1916|W(福州大学) 团队名称 修!咻咻! 作业要求 项目Beta冲刺(团队) 团队目标 切实可行的计算机协会维修预约平台 开发工具 Eclipse 团队信息 队员学号 队 ...
- Python【每日一问】38
问: 基础题: 设计一个经营杠杆系数函数DOL,它包含三个参数,S为营业收入,C为变动成本总额,F为固定成本的总额. 已知2018年的S为20,C为11,F为3,求2019年的经营杠杆系数. 提高题: ...
- 书籍推荐-An introduction to Data Science
为什么要读这本书? 该书是由我们老师推荐的,通过学习此数,可以了解R语言的使用,也可以知道基本的数据分析方法. 看到Creating a Data Set in R -- 24页面