[技术博客] 利用Vagrant+virtualbox在windows下进行linux开发
作者:庄廓然
在windows下进行linux开发:利用Vagrant+virtualbox
基本教程在此
加速box安装的方法
在网址中点击打开要安装的系统,在vagrant文件夹中执行
$ vagrant init ubuntu/xenial64

A `Vagrantfile` has been placed in this directory. You are now

ready to `vagrant up` your first virtual environment! Please read

the comments in the Vagrantfile as well as documentation on

`vagrantup.com` for more information on using Vagrant.
我安装的是ubuntu/xenial64,接下来执行
$ vagrant up

Bringing machine 'default' up with 'virtualbox' provider...

==> default: Box 'ubuntu/xenial64' could not be found. Attempting to find and install...

    default: Box Provider: virtualbox

    default: Box Version: >= 0

==> default: Loading metadata for box 'ubuntu/xenial64'

    default: URL: https://vagrantcloud.com/ubuntu/xenial64

==> default: Adding box 'ubuntu/xenial64' (v20190325.0.0) for provider: virtualbox

    default: Downloading: https://vagrantcloud.com/ubuntu/boxes/xenial64/versions/20190325.0.0/providers/virtualbox.box

    default: Download redirected to host: cloud-images.ubuntu.com

    default: Progress: 0% (Rate: 61440/s, Estimated time remaining: 4:03:53)
Ctrl+C终止下载,得到下载网址https://vagrantcloud.com/ubuntu/boxes/xenial64/versions/20190325.0.0/providers/virtualbox.box 然后复制到迅雷链接里下载。
下载得到文件virtualbox.box,复制文件夹下,执行指令
$ vagrant box add ubuntu/xenial64 virtualbox.box
查看是否安装成功:
$ vagrant list

ubuntu/xenial64 (virtualbox, 0)
接下来
$ vagrant up
用xshell登录
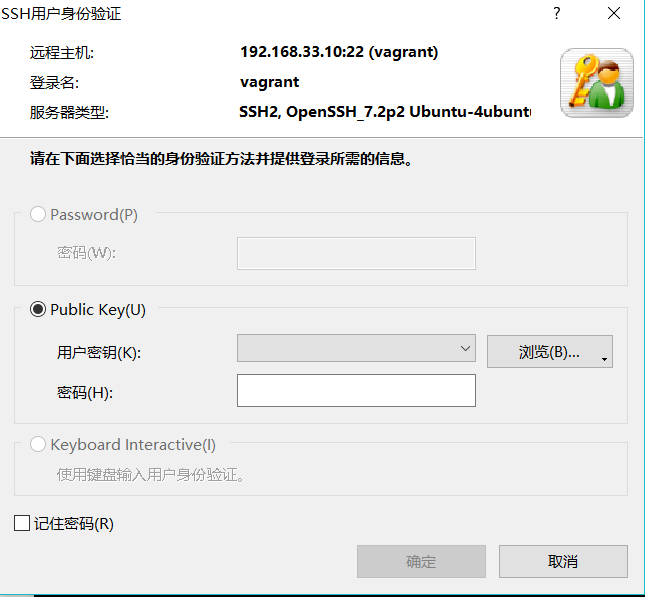
在vagrant文件夹下输入
$ vagrant ssh-config

Host default

  HostName 127.0.0.1

  User vagrant

  Port 2222

  UserKnownHostsFile /dev/null

  StrictHostKeyChecking no

  PasswordAuthentication no

  IdentityFile C:/vagrant/ubuntu/.vagrant/machines/default/virtualbox/private_key

  IdentitiesOnly yes

  LogLevel FATAL
得到private_key的地址
root账户登录
https://blog.csdn.net/github_38097011/article/details/83688607
$ sudo -i
换源教程
其他源:https://blog.csdn.net/qq_35451572/article/details/79516563
1、备份源文件:
$ cd /etc/apt/

$ sudo cp sources.list sources.list.bak

$ sudo vim sources.list
2、删除原来的内容,替换以下
deb http://mirrors.aliyun.com/ubuntu/ xenial main restricted universe multiverse

deb http://mirrors.aliyun.com/ubuntu/ xenial-security main restricted universe multiverse

deb http://mirrors.aliyun.com/ubuntu/ xenial-updates main restricted universe multiverse

deb http://mirrors.aliyun.com/ubuntu/ xenial-backports main restricted universe multiverse

##测试版源

deb http://mirrors.aliyun.com/ubuntu/ xenial-proposed main restricted universe multiverse

# 源码

deb-src http://mirrors.aliyun.com/ubuntu/ xenial main restricted universe multiverse

deb-src http://mirrors.aliyun.com/ubuntu/ xenial-security main restricted universe multiverse

deb-src http://mirrors.aliyun.com/ubuntu/ xenial-updates main restricted universe multiverse

deb-src http://mirrors.aliyun.com/ubuntu/ xenial-backports main restricted universe multiverse

##测试版源

deb-src http://mirrors.aliyun.com/ubuntu/ xenial-proposed main restricted universe multiverse

# Canonical 合作伙伴和附加

deb http://archive.canonical.com/ubuntu/ xenial partner

deb http://extras.ubuntu.com/ubuntu/ xenial main
3、更新源和软件
$ sudo apt-get update  #更新源

$ sudo apt-get upgrade #更新软件
- 一些命令
sudo apt-get update  更新源

sudo apt-get install package 安装包

sudo apt-get remove package 删除包

sudo apt-cache search package 搜索软件包

sudo apt-cache show package  获取包的相关信息,如说明、大小、版本等

sudo apt-get install package --reinstall  重新安装包

sudo apt-get -f install  修复安装

sudo apt-get remove package --purge 删除包,包括配置文件等

sudo apt-get build-dep package 安装相关的编译环境

sudo apt-get upgrade 更新已安装的包

sudo apt-get dist-upgrade 升级系统

sudo apt-cache depends package 了解使用该包依赖那些包

sudo apt-cache rdepends package 查看该包被哪些包依赖

sudo apt-get source package  下载该包的源代码

sudo apt-get clean && sudo apt-get autoclean 清理无用的包

sudo apt-get check 检查是否有损坏的依赖
安装rvm
网络不是很稳定。。要是尝试很多次
$ sudo curl -L get.rvm.io | bash -s stable
- 换掉源镜像
$ echo "ruby_url=https://cache.ruby-china.com/pub/ruby" > ~/.rvm/user/db
访问rails server
rails server默认只对本机有效,这个地方。。。坑了我太久了。。。
由于我是用的虚拟机,所以实用rails server的时候不能用windows本地浏览器访问
如要其他机器访问,请使用
$ rails server -b 0.0.0.0
然后通过虚拟机的ip地址进行访问rails
RubyMine连接虚拟机上的解释器
https://www.jetbrains.com/help/ruby/configuring-remote-interpreters-using-vagrant.html
1、在settings里的Languages&Frameworks
Ctrl+Alt+S调出Ruby SDK and Gems,Alt+Insert添加new remote
2、选择Vagrant,找到vagrant虚拟机的路径
3、然后指定rvm或者ruby在该虚拟机下的路径 ,点击ok即可
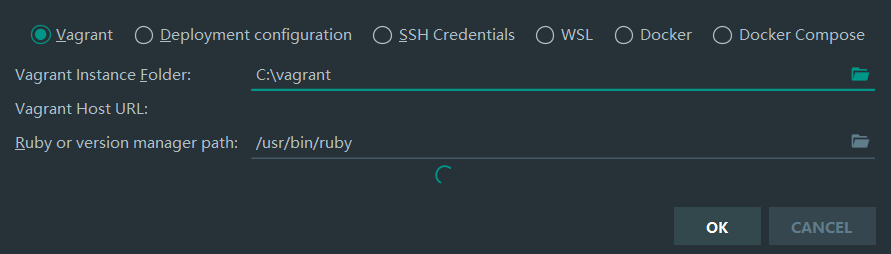
4、接下来就可以在本地调试了
[技术博客] 利用Vagrant+virtualbox在windows下进行linux开发的更多相关文章
- [技术博客] 利用SharedPreferences来实现登录状态的记忆功能
[技术博客] 利用SharedPreferences来实现登录状态的记忆功能 一.SharedPreferences简介 SharedPreferences是Android平台上一个轻量级的存储辅助类 ...
- 在windows下进行linux开发:利用Vagrant+virtualbox(ShowDoc与mp3dish的作者)
1,介绍Vagrant 我们做web开发的时候经常要安装各种本地测试环境,比如apache,php,mysql,redis等等.出于个人使用习惯,可能我们还是比较习惯用windows.虽然说在wind ...
- 在windows下进行linux开发:利用Vagrant+virtualbox
1,介绍Vagrant 我们做web开发的时候经常要安装各种本地测试环境,比如apache,php,mysql,redis等等.出于个人使用习惯,可能我们还是比较习惯用windows.虽然说在wind ...
- [技术博客] 【vagrant】硬盘扩容
同样,这也是少昂早年走过的坑,这里直接贴出少昂个人博客链接:https://www.cnblogs.com/HansBug/p/9447020.html PS:有一位经验丰富的后端大佬坐镇指挥是多么幸 ...
- Windows下模拟Linux开发
1.背景 Linux环境下开发是大势所趋,也是开发者必须掌握的技能.然windows系统已深入人心,实在不想放弃windows下的成熟应用,因此可以在Windows上模拟一个Linux系统.这样就满足 ...
- [技术博客]利用第三方框架react-native-swipeout实现左右滑动出现按钮
在之前的开发中,为了实现用户不同手势操作能够对应不同的功能,我们考虑使用React-Native的API--PanResponder,实现识别用户的手势,实现不同的功能.但我们很快就发现,这样简单的实 ...
- 利用Winscp,Putty实现Windows下编写Linux程序
本文讲的方案实现以下功能:利用winscp和putty的脚本功能,实现在Window平台上编写代码,上传到Linux进行编译,然后取编译结果.需要用到3个文件,分别如下: (1) synchroniz ...
- 技术人如何利用 github+Jekyll ,搭建一个独立免费的技术博客
上次有人留言说,技术博客是程序员的标配,但据我所知绝大部分技术同学到现在仍然没有自己的技术博客.原因有很多,有的是懒的写,有的是怕写不好,还有的是一直想憋个大招,幻想做到完美再发出来,结果一直胎死腹中 ...
- 【技术博客】利用handler实现线程之间的消息传递
[技术博客]利用handler实现线程之间的消息传递 一.handler简介 在Android Studio的开发中,经常需要启动多个线程.比如向远程发送请求时,必须新开一个子线程,否则会造成程序崩溃 ...
随机推荐
- React组件中对子组件children进行加强
React组件中对子组件children进行加强 问题 如何对组件的children进行加强,如:添加属性.绑定事件,而不是使用<div>{this.props.children}< ...
- map字典,储存cookie,切换账户,展示购物车不同商品
1:首页 1,静态html5+css做好基本样式 html5,css,jQery, sass 2,jsonp的方式src引入模拟的json数据//这里用的jsonp方式拿数据,详情有使用ajax 遍历 ...
- JavaScript 之 创建元素
方式一: 使用 document.write() 语法格式: document.write('新设置的内容<p>标签也可以生成</p>'); 注意:在使用方式的时候,writ ...
- android studio学习----打包
Gradle打包APP签名 默认情况下,debug被配置成使用一个debug keystory.debug keystory使用了默认的密码和默认key及默认的key密码.debug构建类型会自动使用 ...
- 使用SAP CRM中间件XIF(External Interface)一步步创建服务订单
tcode WE19, choose an existing IDOC in the system: Just change the existing IDOC Service Order ID to ...
- kbmmw 中使用带验证的REST 服务
前面介绍的rest 服务,虽然很方便,但是存在任何人都可以访问的安全问题. 今天说一下,如何在kbmmw 中使用带验证的REST 服务? 首先我们在工程中放一个 认证控件TkbmMWAuthoriza ...
- window10自动更换bing壁纸
问题描述: bing的每日推荐的首页壁纸很不错,想当做系统壁纸! https://cn.bing.com/ 问题解决: 在window-store商店搜索 “Dynamic Theme”,安装即可! ...
- Shell 编程 循环语句
本篇主要写一些shell脚本循环语句的使用. for 循环 指定次数 #!/bin/bash for ((i=1;i<=10;i++)) do echo $i done [root@localh ...
- Odoo销售模块
转载请注明原文地址:https://www.cnblogs.com/ygj0930/p/10825988.html 一:销售模块 销售模块的用途: 1)管理销售团队.销售人员:维护销售产品: 2)管理 ...
- 详解Apache服务与高级配置,(主配置文件每行都有描述)
HTTP服务---> http://httpd.apache.org/(官方网站) httpd service :纯粹的web服务器,同时开源(不是GPL). 特性:1.在进程特性上通常是事先 ...