
利用卷积神经网络处理cifar图像分类
这是一个图像分类的比赛CIFAR( CIFAR-10 - Object Recognition in Images )
首先我们需要下载数据文件,地址:
http://www.cs.toronto.edu/~kriz/cifar.html
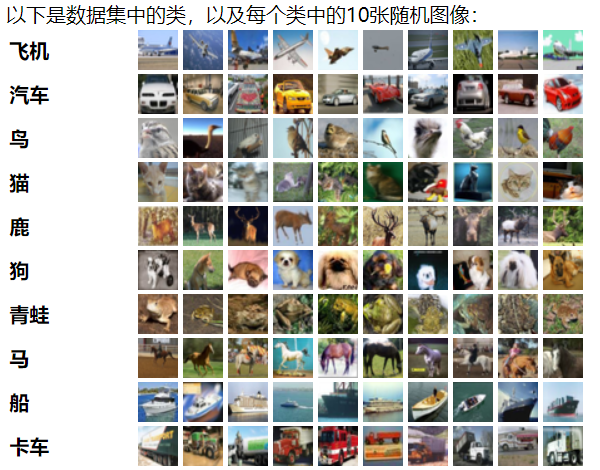
CIFAR-10数据集包含10个类别的60000个32x32彩色图像,每个类别6000个图像。有50000张训练图像和10000张测试图像。
数据集分为五个训练批次和一个测试批次,每个批次具有10000张图像。测试批次包含每个类别中恰好1000张随机选择的图像。训练批次按随机顺序包含其余图像,但是某些训练批次可能包含比另一类更多的图像。在它们之间,培训批次精确地包含每个班级的5000张图像。
这些类是完全互斥的。汽车和卡车之间没有重叠。“汽车”包括轿车,SUV和类似的东西。“卡车”仅包括大型卡车。都不包括皮卡车。
详细代码:
1.导包
 import numpy as np

 # 序列化和反序列化

 import pickle

 from sklearn.preprocessing import OneHotEncoder

 import warnings

 warnings.filterwarnings('ignore')

 import tensorflow as tf
2.数据加载
 def unpickle(file):


     with open(file, 'rb') as fo:

         dict = pickle.load(fo, encoding='ISO-8859-1')

     return dict

 # def unpickle(file):

 #     import pickle

 #     with open(file, 'rb') as fo:

 #         dict = pickle.load(fo, encoding='bytes')

 #     return dict

 labels = []

 X_train = []

 for i in range(1,6):

     data = unpickle('./cifar-10-batches-py/data_batch_%d'%(i))

     labels.append(data['labels'])

     X_train.append(data['data'])

 # 将list类型转换为ndarray

 y_train = np.array(labels).reshape(-1)

 X_train = np.array(X_train)

 # reshape

 X_train = X_train.reshape(-1,3072)

 # 目标值概率

 one_hot = OneHotEncoder()

 y_train =one_hot.fit_transform(y_train.reshape(-1,1)).toarray()

 display(X_train.shape,y_train.shape)
3.构建神经网络
 X = tf.placeholder(dtype=tf.float32,shape = [None,3072])

 y = tf.placeholder(dtype=tf.float32,shape = [None,10])

 kp = tf.placeholder(dtype=tf.float32)

 def gen_v(shape):

     return tf.Variable(tf.truncated_normal(shape = shape))

 def conv(input_,filter_,b):

     conv = tf.nn.relu(tf.nn.conv2d(input_,filter_,strides=[1,1,1,1],padding='SAME') + b)

     return tf.nn.max_pool(conv,[1,3,3,1],[1,2,2,1],'SAME')

 def net_work(input_,kp):

 #     形状改变,4维

     input_ = tf.reshape(input_,shape = [-1,32,32,3])

 #     第一层

     filter1 = gen_v(shape = [3,3,3,64])

     b1 = gen_v(shape = [64])

     conv1 = conv(input_,filter1,b1)

 #     归一化

     conv1 = tf.layers.batch_normalization(conv1,training=True)

 #     第二层

     filter2 = gen_v([3,3,64,128])

     b2 = gen_v(shape = [128])

     conv2 = conv(conv1,filter2,b2)

     conv2 = tf.layers.batch_normalization(conv2,training=True)

 #     第三层

     filter3 = gen_v([3,3,128,256])

     b3 = gen_v([256])

     conv3 = conv(conv2,filter3,b3)

     conv3 = tf.layers.batch_normalization(conv3,training=True)

 #     第一层全连接层

     dense = tf.reshape(conv3,shape = [-1,4*4*256])

     fc1_w = gen_v(shape = [4*4*256,1024])

     fc1_b = gen_v([1024])

     fc1 = tf.matmul(dense,fc1_w) + fc1_b

     fc1 = tf.layers.batch_normalization(fc1,training=True)

     fc1 = tf.nn.relu(fc1)

 #     fc1.shape = [-1,1024]

 #     dropout

     dp = tf.nn.dropout(fc1,keep_prob=kp)

 #     第二层全连接层

     fc2_w = gen_v(shape = [1024,1024])

     fc2_b = gen_v(shape = [1024])

     fc2 = tf.nn.relu(tf.layers.batch_normalization(tf.matmul(dp,fc2_w) + fc2_b,training=True))

 #     输出层

     out_w = gen_v(shape = [1024,10])

     out_b = gen_v(shape = [10])

     out = tf.matmul(fc2,out_w) + out_b

     return out
4.损失函数准确率
 out = net_work(X,kp)

 loss = tf.reduce_mean(tf.nn.softmax_cross_entropy_with_logits_v2(labels=y,logits=out))

 # 准确率

 y_ = tf.nn.softmax(out)

 # equal 相当于 ==

 accuracy = tf.reduce_mean(tf.cast(tf.equal(tf.argmax(y,axis = -1),tf.argmax(y_,axis = 1)),tf.float16))

 accuracy
5.最优化
 opt = tf.train.AdamOptimizer().minimize(loss)

 opt
6.开启训练
 epoches = 50000

 saver = tf.train.Saver()

 index = 0

 def next_batch(X,y):

     global index

     batch_X = X[index*128:(index+1)*128]

     batch_y = y[index*128:(index+1)*128]

     index+=1

     if index == 390:

         index = 0

     return batch_X,batch_y

 test = unpickle('./cifar-10-batches-py/test_batch')

 y_test = test['labels']

 y_test = np.array(y_test)

 X_test = test['data']

 y_test = one_hot.transform(y_test.reshape(-1,1)).toarray()

 y_test[:10]

 with tf.Session() as sess:

     sess.run(tf.global_variables_initializer())

     for i in range(epoches):

         batch_X,batch_y = next_batch(X_train,y_train)

         opt_,loss_ = sess.run([opt,loss],feed_dict = {X:batch_X,y:batch_y,kp:0.5})

         print('----------------------------',loss_)

         if i % 100 == 0:

             score_test = sess.run(accuracy,feed_dict = {X:X_test,y:y_test,kp:1.0})

             score_train = sess.run(accuracy,feed_dict = {X:batch_X,y:batch_y,kp:1.0})

             print('iter count:%d。mini_batch loss:%0.4f。训练数据上的准确率:%0.4f。测试数据上准确率:%0.4f'%

                   (i+1,loss_,score_train,score_test))
这个准确率只达到了百分之80
如果想提高准确率,还需要进一步优化,调参
利用卷积神经网络处理cifar图像分类的更多相关文章
- TensorFlow系列专题(十四): 手把手带你搭建卷积神经网络实现冰山图像分类
目录: 冰山图片识别背景 数据介绍 数据预处理 模型搭建 结果分析 总结 一.冰山图片识别背景 这里我们要解决的任务是来自于Kaggle上的一道赛题(https://www.kaggle.com/c/ ...
- Neuromation新研究:利用卷积神经网络进行儿童骨龄评估
近日,Neuromation 团队在 Medium 上撰文介绍其最新研究成果:利用卷积神经网络(CNN)评估儿童骨龄,这一自动骨龄评估系统可以得到与放射科专家相似或更好的结果.该团队评估了手骨不同区域 ...
- 【翻译】TensorFlow卷积神经网络识别CIFAR 10Convolutional Neural Network (CNN)| CIFAR 10 TensorFlow
原网址:https://data-flair.training/blogs/cnn-tensorflow-cifar-10/ by DataFlair Team · Published May 21, ...
- 利用卷积神经网络(CNN)构造社区问答系统
/* 版权声明:能够随意转载,转载时请标明文章原始出处和作者信息 .*/ author: 张俊林 ...
- 利用卷积神经网络(VGG19)实现火灾分类(附tensorflow代码及训练集)
源码地址 https://github.com/stephen-v/tensorflow_vgg_classify 1. VGG介绍 1.1. VGG模型结构 1.2. VGG19架构 2. 用Ten ...
- Tensorflow学习教程------利用卷积神经网络对mnist数据集进行分类_利用训练好的模型进行分类
#coding:utf-8 import tensorflow as tf from PIL import Image,ImageFilter from tensorflow.examples.tut ...
- 利用卷积神经网络实现MNIST手写数据识别
代码: import torch import torch.nn as nn import torch.utils.data as Data import torchvision # 数据库模块 im ...
- SIGAI深度学习第八集 卷积神经网络2
讲授Lenet.Alexnet.VGGNet.GoogLeNet等经典的卷积神经网络.Inception模块.小尺度卷积核.1x1卷积核.使用反卷积实现卷积层可视化等. 大纲: LeNet网络 Ale ...
- 直白介绍卷积神经网络(CNN)【转】
英文地址:https://ujjwalkarn.me/2016/08/11/intuitive-explanation-convnets/ 中文译文:http://mp.weixin.qq.com/s ...
随机推荐
- 花样流水灯的verilog实现
LED(Light emitting diode)发光二极管将电能转化为可见光,正向电压导通,反向电压截止.对于该板子,二极管用低电压导通,其实验原理图为: 所谓流水灯,即让LED像水一样的点亮,从左 ...
- shell脚本编程基础之文件测试
文件测试判断条件 -e FILE:测试文件是否存在 -f FILE:测试文件是否为普通文件 -d FILE:测试指定路径是否为目录 -r FILE:测试当前用户对指定文件是否有读权限 -w FILE: ...
- undefined null 与 字符串相加
在进行一个字符串的判断的时候. 如下一段内容 const queryObj = {}; const str = queryObj.criteriaStr + "" con ...
- golang 斐波那契数
golang 斐波那契数 package main import "fmt" /* 斐波那契数,亦称之为斐波那契数列(意大利语: Successione di Fibonacci) ...
- svn服务备份与还原
1.dump备份方式: svnadmin dump /data/svn/xxxx > /data/beifen/`date +/%Y%m%d`.bak xxxx:项目名称(项目库) 将xxxx这 ...
- 在Ubuntu 18.04 下安装mysql,没有初始密码,重设root密码
在Ubuntu 18.04 下安装mysql 不知道是由于mysql更新为新版还是.Ubuntu18.04中的特性,安装过程中没有设置密码的环节,在网络上找了半天,总算解决了!特此记录下来,以便以后查 ...
- Windows 实例远程桌面报错“没有远程桌面授权服务器可以提供许可证”
参考阿里云帮助文档: https://help.aliyun.com/knowledge_detail/40859.html?spm=5176.10695662.1996646101.searchcl ...
- 2019 SDN上机第一次实验作业
1. 安装轻量级网络仿真工具Mininet 先从GitHub上获取mininet源码,再输入命令进行安装,代码分别如下: git clone https://github.com/mininet/mi ...
- phpstorm 使用xdebug断点
1.下载对应版本 xdebug 下载地址:https://download.csdn.net/download/q2104574/11185239 比如你用的php7.0.12以上的版本,xdebug ...
- 替换分隔符 ^p, 或者是回车
1 Excel 里面的数据, 粘出来到notepad上,再从notepad 粘到word, 再把world里面的分隔符或者是回车符替换成 其他的 .