Using Open Source Static Libraries in Xcode 4
Using Open Source Static Libraries in Xcode 4
Xcode 4.0.1 allows us to more easily create and use third party libraries in iOS projects. I think the process is still more complicated than it needs to be. Xcode’s documentation suggests that it should automatically detect implicit dependencies and index
classes across workspaces but I have not found this to be the case. Here I’ll cover the steps I have found for creating and sharing code between projects and with other developers.
Background
Workspaces:
Xcode 4 introduced the concept of workspaces as
containers for multiple projects. There are a couple of key behaviors of workspaces which we want to build on when choosing how to share code across projects.
- By default, all the Xcode projects in a workspace are built in the same directory, referred to as the workspace build directory.
- Xcode examines the files in the build directory to discover implicit dependencies.
- Each project in a workspace continues to have its own independent identity.
Schemes:
Within a workspace or within a project which is a member of a workspace we have schemes.
Schemes replace the Active Target, Build Configuration, and Executable settings from Xcode 3 and define which targets to build, the order in which to build them, and what action to take when a build is complete. We’ll want our shared code to easily fit into
the scheme of any projects which use it. The Xcode
4 Transition Guide covers this new structure in more detail.
Targets:
Within a scheme we have one or more build targets which
define a set of source files to build, the settings used to build those files, and any dependencies on the build products of other targets which must be completed first. Ultimately we would like a consumer of our code to be able to state that their project’s
build target depends on our shared code and have Xcode build this shared code and make it available to the active build target. We can achieve that by providing a project containing the code to be shared and a static library build target which packages it
into a build product other developers can add as a build target dependency.
Using a static library
- Creating
a workspace - Adding
projects to a workspace - Adding
build target dependencies - Adding
the static library’s headers - Configuring
the project’s scheme - Fixing
indexing
Creating a workspace
We can create a new empty workspace from Xcode’s file menu or open an existing project and select “Save As Workspace…” to create a new workspace containing our project. This will create a “.xcworkspace” package in the file system.
An empty Xcode 4 workspace
Adding projects to a workspace
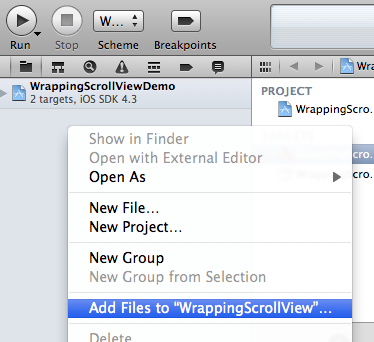
Once we have a workspace we can right-click in the workspace’s navigator to create a new project or add an existing “.xcodeproj” package.
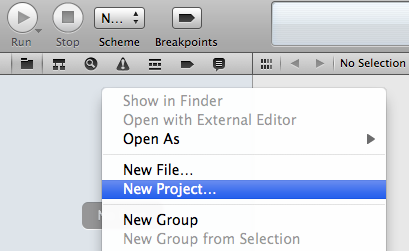
Adding a new project to a workspace
Adding an existing project to a workspace
We want to end up with a single workspace containing our app’s project and the projects for any static libraries we are going to depend on. It is worth noting that these projects are all siblings in the workspace, our static libraries are not added as references
within our app’s project.
Adding build target dependencies
With all of the projects we need available in our workspace we can select our app’s build target and add a static library to the “Link Binary With Libraries” build phase.
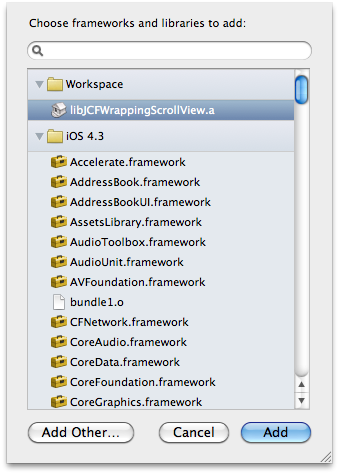
Libraries and frameworks available to add to the "Link Binary With Libraries" build phase
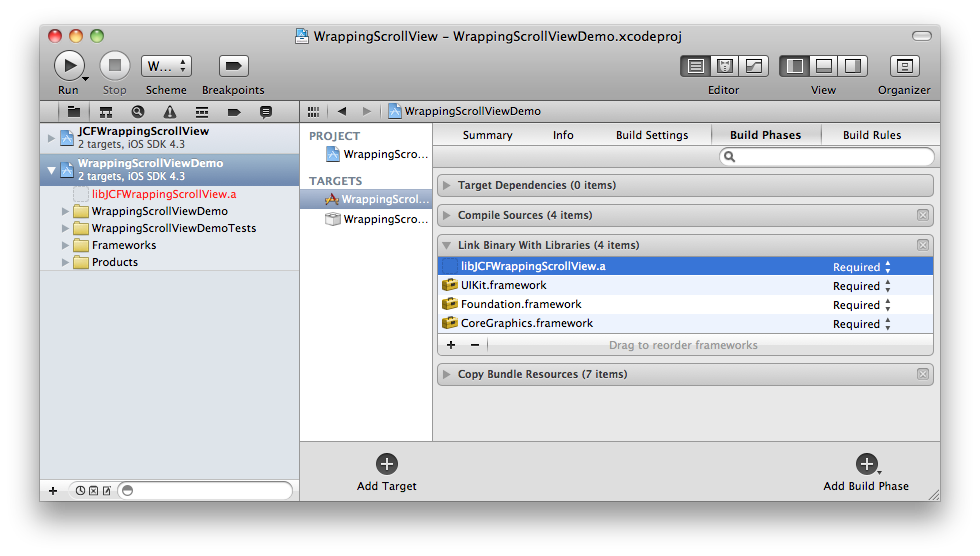
A static library added to the "Link Binary With Libraries" build phase
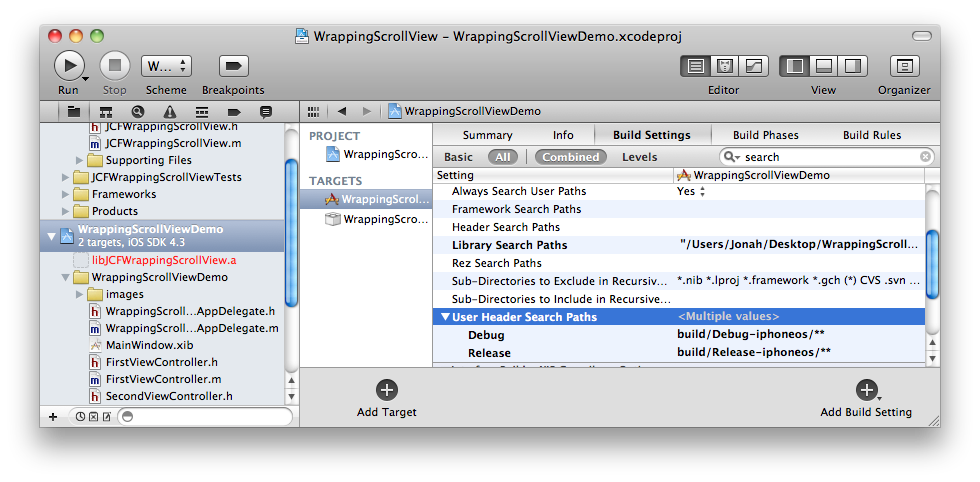
Adding the static library’s headers
We also need to make sure that our app’s build target can locate the public headers used in this static library. Open the “Build Settings” tab and locate the “User Header Search Paths” setting. Set this to “$(BUILT_PRODUCTS_DIR)” (or “$(BUILT_PRODUCTS_DIR)/static_library_name”
if we want to be more specific but then we’ll have to update this setting every time we add another library) and check the “Recursive” check box. Now our built target will search our workspace’s shared build directory to locate linkable header files.
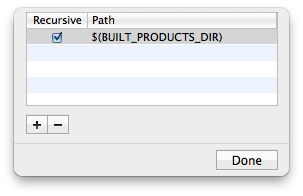
Setting the User Header Search Paths
User Header Search Paths set
The “User Header Search Paths” setting defines the headers available as quoted imports (eg “#import “MyLibraryClass.h”) while the “Header Search Paths” setting defines those headers available as bracketed imports (eg “#import ). I’ve found that Xcode will only
autocomplete header names in the quoted form so I always add libraries to the user header search path even though, from my project’s perspective, they might be more appropriate as system level (angle bracketed) libraries.
When using a static library which includes categories we will also have to add the “-ObjC” flag to the “Other Linker Flags” build setting. This will force the linker to load all objective-c classes and categories from the library. If the library contains only
categories “-all_load” or “-force_load” may be needed as well. See Technical
Q&A QA1490 for a more detailed explanation of these settings.
Configuring the project’s scheme
At this point Xcode should have detected this implicit dependency between our app’s project and the static library’s project and have automatically configured our schemes correctly. Unfortunately I haven’t found this to be the case in practice. Instead we will
have to edit our current scheme and add the static library’s build target before our app’s build target.
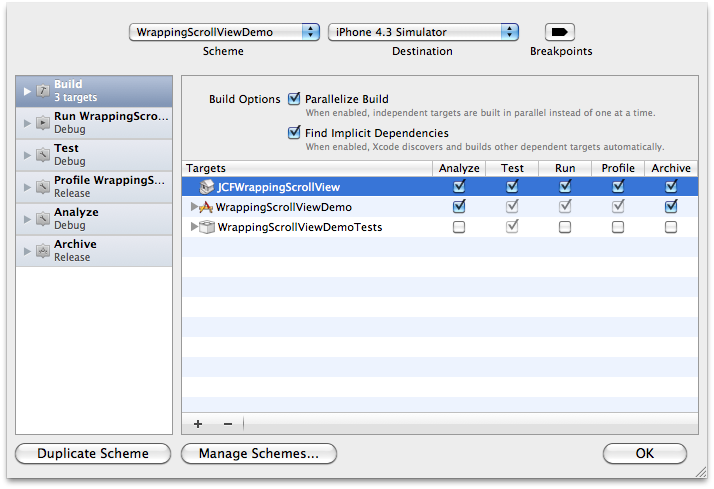
Setting the scheme's target build order
Fixing indexing
At this point we should be able to include headers from dependent static libraries, use the included classes, and still successfully build our app. Unfortunately Xcode will not show any classes from these linked static libraries in code completion despite the
workspace documentation stating that “indexing is done across the entire workspace, extending the scope of content-aware features such as code completion and refactoring.”
As a workaround we can drag the public headers from the static library’s project into our app’s project, adding them as references. These headers do not need to be included in any of our build targets, simply having references to the headers in our project
will allow their classes to appear in code completion.
Creating a Static Library
If we plan on releasing some of our own code for reuse as a static library there are several things we should do to make sure that the process described above is as easy and simple as possible for our library’s users.
- Namespace
classes appropriately - Create
a build target - Expose
public headers - Set
the installation directory - Set
the public header path - Exclude
user specific files from VCS
Namespace classes appropriately
Use an appropriate prefix for
classes, protocols, functions, and constants in the library to prevent collisions with names in the library’s user’s project.
Create a build target
Provide a static library build target in the project for our users to link against. Xcode provides templates for creating projects with static libraries or adding static library build targets to existing projects.
Expose public headers
Determine which header files should be visible to users of the library. Provide a clearly named group containing these headers so that our library’s users can easily locate them as part of the workaround described in “Fixing Indexing” above. This also helps
us clarify what the public interface our library provides is and what classes are implementation details which are likely to change as the library evolves.
For each public header file make sure it is set as “public” in the “Target Membership” section of the inspector pane. Only public headers are going to be available for our users to import.
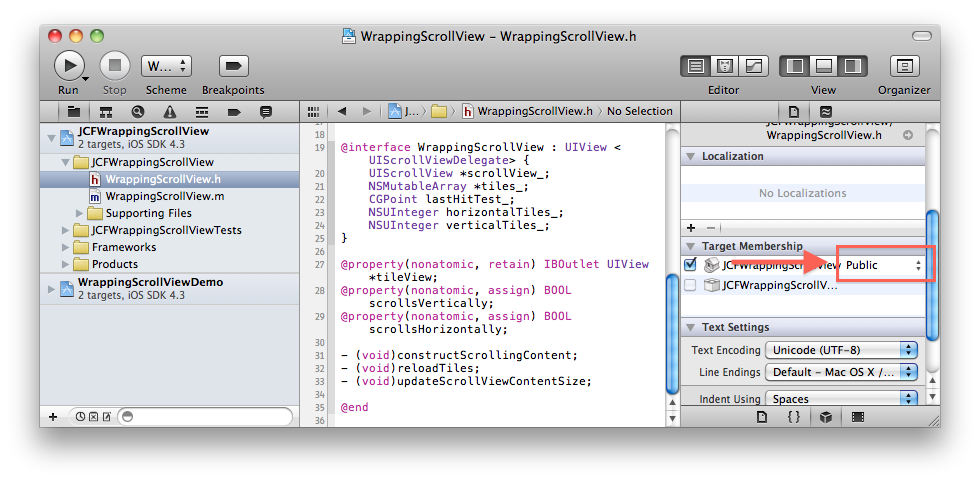
Making a header file public
Set installation directory
Our static library build target is going to be a member of a user’s workspace and subject to that workspace’s installation rules. Our static library build product could therefore be installed in a location set by Xcode’s preferences, in the derived data path,
or in a path specified by our build target. Since we can’t control the user’s settings we should make sure our library is well behaved in all cases. I set the “Installation Directory” build setting to “$(BUILT_PRODUCTS_DIR)” so that the static library build
product can be found in a known location and set the “Skip Install” build setting to “Yes” to avoid accidentally installing iOS libraries into “/usr/local/lib”.
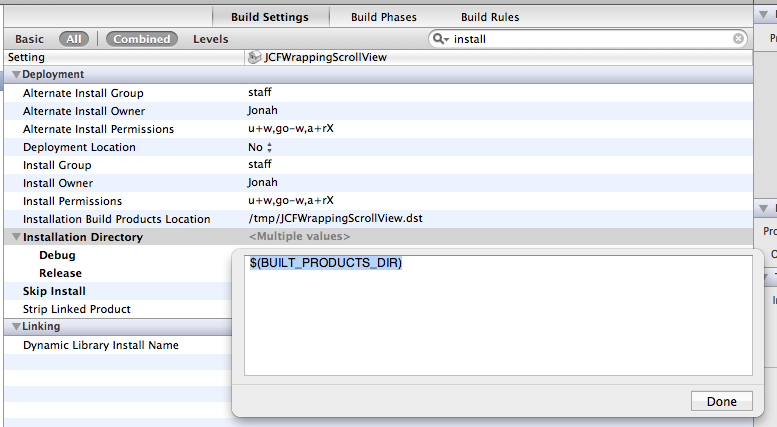
Setting the installation directory
Set the public header path
We need to specify a location to copy our static library’s public headers to so that they can be included in our users’ header search paths. Setting the “Public Headers Folder Path” to “$(TARGET_NAME)” will create a folder named after our static library build
target in the workspace’s shared build directory and be indexed by the “User Header Search Paths” setting described above.
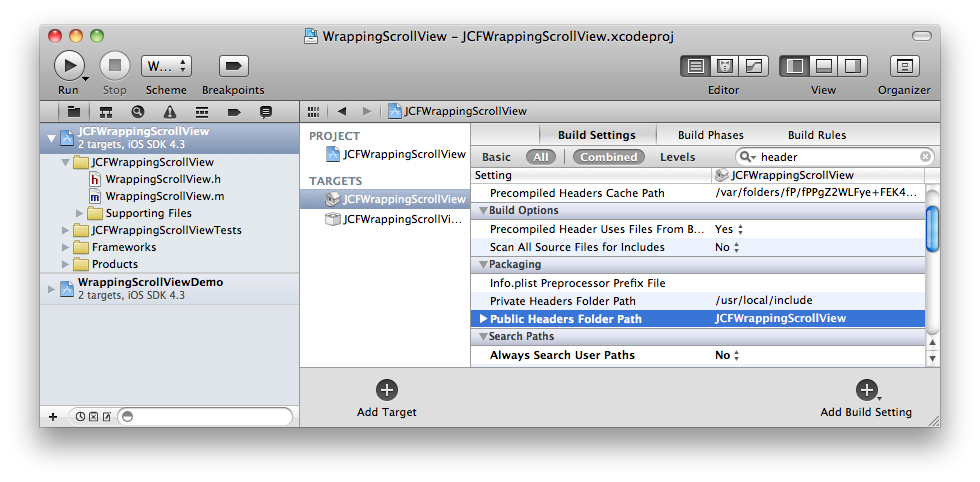
Setting the public headers path for the static library
Exclude user specific files from VCS
Our workspace and project include a number of files which contain data relevant only to our user account; window positions, open files, and so on. There’s no need to check these into source control, at least not in our release branch, so let’s set some reasonable
ignore rules in git or whatever VCS we are using. Github provides a convenient set of .gitignore
files
Future Improvements
Hopefully Xcode 4 will eventually live up to the promise of it’s documentation and consistently auto-detect implicit dependencies and index files across the workspace correctly. There certainly seem to be a number of other developers struggling with this behavior:[1],
[2], [3],
[4], [5],
[6], [7],
[8].
Until that indexing improves I find that this process is at least somewhat simpler and cleaner than trying to maintain simulator and device compatible static library builds in Xcode 3.
I’ve found this pattern preferable to copying third party classes directly into my projects as it allows me to easily keep version history and make updates to static library projects in my workspace and avoids coupling my project too closely to the private
structure and contents of the static library.
Please let me know if you can see any areas where this pattern could be improved or if you’ve found your own alternative means of sharing code.
Using Open Source Static Libraries in Xcode 4的更多相关文章
- Creating and Using Static Libraries for iPhone using Xcode 4.3
Recently, after developing a collection of applications for iPhone that were intended to be used as ...
- Building Objective-C static libraries with categories
Q: How do I fix "selector not recognized" runtime exceptions when trying to use category m ...
- 「操作系统」:Linker Use static Libraries
While static libraries are useful and essential tools, they are also a source of confusion to progra ...
- Building Objective-C static libraries with categories(ObjC、all_load、force_load)
https://developer.apple.com/library/mac/qa/qa1490/_index.html 之所以使用该标志,和Objective-C的一个重要特性:类别(cat ...
- zz A list of open source C++ libraries
A list of open source C++ libraries < cpp | links http://en.cppreference.com/w/cpp/links/libs Th ...
- The Ultimate List of Open Source Static Code Analysis Security Tools
https://www.checkmarx.com/2014/11/13/the-ultimate-list-of-open-source-static-code-analysis-security- ...
- Openssl - Static libraries (w32, mingw) 以及对Qt静态编译时的设置
Openssl static libraries created for Windows 32bit using MinGW compiler Compiled with: ./Con ...
- Static, Shared Dynamic and Loadable Linux Libraries
转载:http://www.yolinux.com/TUTORIALS/LibraryArchives-StaticAndDynamic.html Why libraries are used: Th ...
- Build fat static library (device + simulator) using Xcode and SDK 4+
155down votefavorite 185 It appears that we can - theoretically - build a single static library that ...
随机推荐
- Unity Editor not displaying Android textures properly
最近入门学习shader,语法倒没什么,有一个奇怪的问题,如果把编译平台从pc转换为android模式的话,如果你的shader 带 Normal Mapping 的 话,效果和android上的真机 ...
- 暑假学习日记:Splay树
从昨天开始我就想学这个伸展树了,今天花了一个上午2个多小时加下午2个多小时,学习了一下伸展树(Splay树),学习的时候主要是看别人博客啦~发现下面这个博客挺不错的http://zakir.is-pr ...
- poj 2253 Frogger (最短路变种,连通图的最长边)
题目 这里的dijsktra的变种代码是我看着自己打的,终于把代码和做法思路联系上了,也就是理解了算法——看来手跟着画一遍真的有助于理解. #define _CRT_SECURE_NO_WARNING ...
- UVA 10000 Longest Paths (SPFA算法,模板题)
题意:给出源点和边,边权为1,让你求从源点出发的最长路径,求出路径长度和最后地点,若有多组,输出具有最小编号的最后地点. #include <iostream> #include < ...
- POJ 2568/ZOJ 1965 Decode the Tree
题意:在树中,每次删去节点值最小的叶子结点. 每删去一个点,就给出与这相连的点的值,直到最后只剩下一个根结点,给这N-1个数,重新建立这个树. 思路: 给出的节点号按次序存入到数组a中,将未给出的数存 ...
- java基础知识回顾之javaIO类--RandomAccessFile类
java.io 类 RandomAccessFile java.lang.Object java.io.RandomAccessFile1.该类不是IO流中的子类.2.该类既能读又能写.3.该对象内部 ...
- java基础知识回顾之---java String final类普通方法的应用之字符串数组排序
/* * 1,给定一个字符串数组.按照字典顺序进行从小到大的排序. * {"nba","abc","cba","zz", ...
- 2013 ACM-ICPC长沙赛区全国邀请赛——Bottles Arrangement
这题当时竟然没看啊…… 找规律:求和m+m+m-1+m-1+……前n项 ;}
- Windows Azure VM的两种shut down 方式
今天在调查Azure的价格时,发现下面的语句,来自http://azure.microsoft.com/en-us/pricing/details/virtual-machines/ * If my ...
- Java学习笔记之:Java的变量
一.介绍 在Java语言中,所有的变量在使用前必须声明.声明变量的基本格式如下: type identifier [ = value][, identifier [= value] ...] ; 格式 ...