eclipse+webservice开发实例
1.參考文献:
1.利用Java编写简单的WebService实例 http://nopainnogain.iteye.com/blog/791525
2.Axis2与Eclipse整合开发Web Service http://tech.ddvip.com/2009-05/1242968642120461.html
3.http://blog.csdn.net/lightao220/article/details/3489015
4.http://clq9761.iteye.com/blog/976029
5.使用Eclipse+Axis2+Tomcat构建Web Services应用(实例解说篇)
2.实例1(主要看到[2])
2.1.系统功能:
2.2.开发前准备:
- 安装Eclipse-jee;
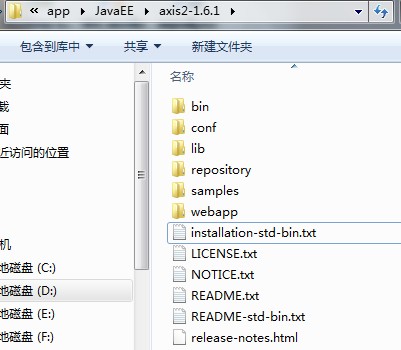
- 下载最新版本号的Axis2,网址http://axis.apache.org/axis2/java/core/download.cgi ,选择Standard Binary Distribution的zip包,解压缩得到的文件夹名axis2-1.4.1,文件夹内的文件结构例如以下:
2.3.开发前配置:
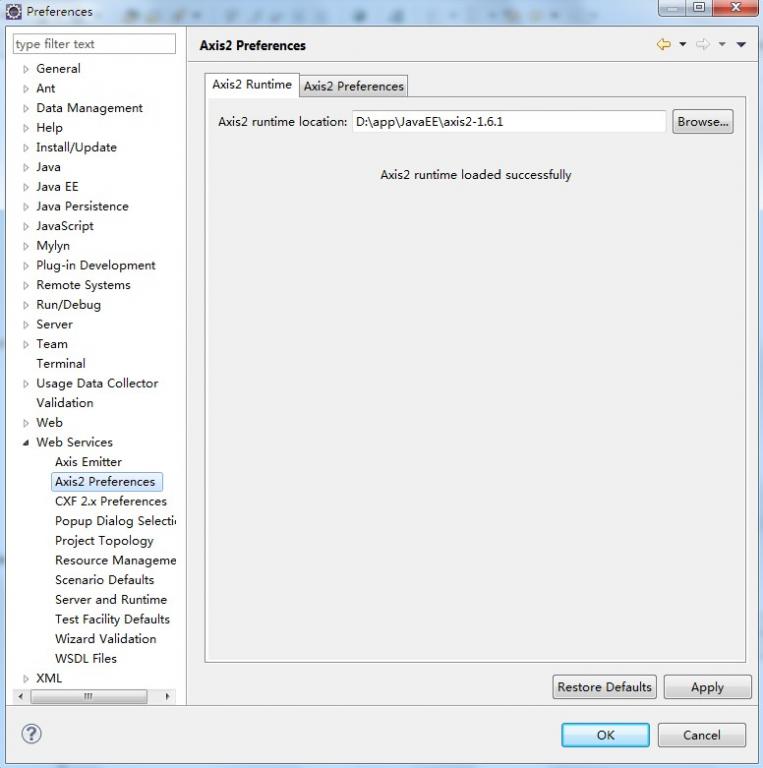
在Eclipse的菜单条中,Window --> Preferences --> Web Service --> Axis2 Perferences,在Axis2 runtime location中选择Axis2解压缩包的位置,设置好后,点"OK"即行。(如图)
2.4.开发Web Service:
(1)新建一个Java Project,命名为"WebServiceTest1"
(2)新建一个class,命名为"CalculateService",完整代码例如以下:
package edu.sjtu.webservice;

/**

 * 计算器运算

 * @author rongxinhua

 */

public class CalculateService {

	//加法

	public float plus(float x, float y) {

		return x + y;

	}

	//减法

	public float minus(float x, float y) {

		return x - y;

	}

	//乘法

	public float multiply(float x, float y) {

		return x * y;

	}

	//除法

	public float divide(float x, float y) {

		if(y!=0)

		{

			return x / y;

		}

		else

			return -1;

	}

}
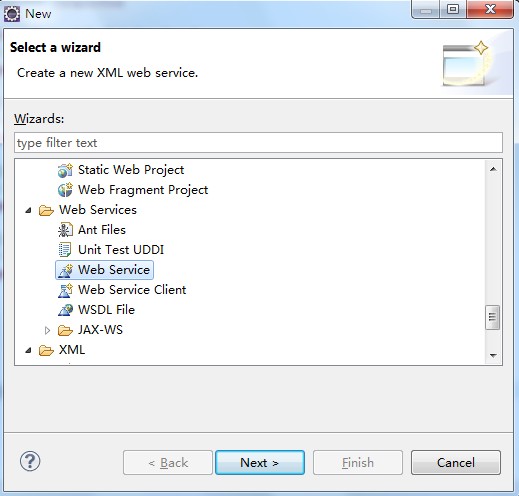
(3)在"WebServiceTest1"项目上new --> other,找到"Web Services"以下的"Web Service";
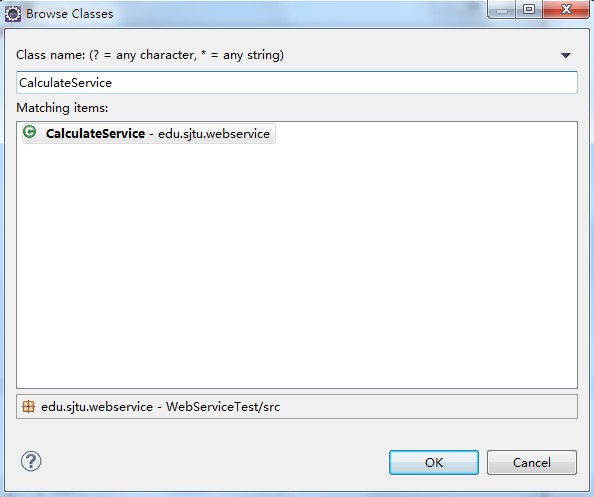
(4)下一步(next),在出现的Web Services对象框,在Service implementation中点击"Browse",进入Browse Classes对象框,查找到我们刚才写的写的CalculateService类。(例如以下图)。点击"ok",则回到Web Service话框。
(5)在Web Service对话框中,将Web Service type中的滑块,调到"start service“的位置,将Client type中的滑块调到"Test client"的位置。
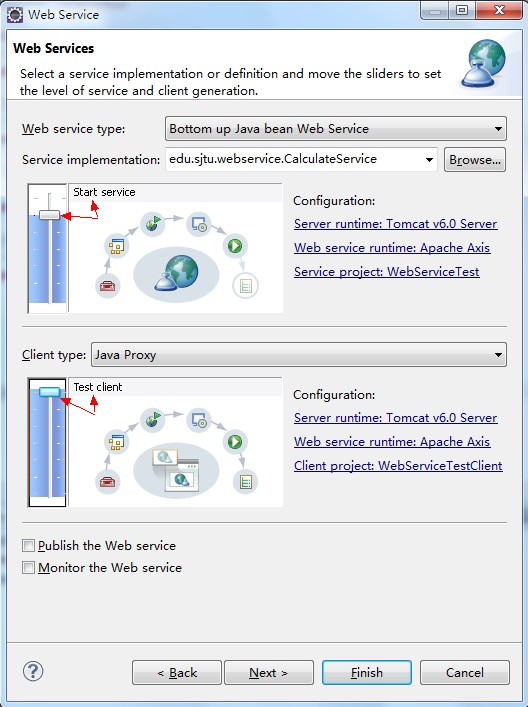
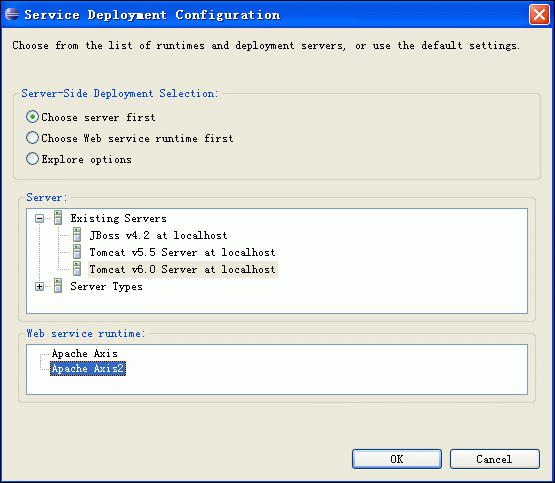
(6)在Web Service type滑块图的右边有个"Configuration",点击它以下的选项,进入Service Deployment Configuration对象框,在这里选择对应的Server(我这里用Tomcat6.0)和Web Service runtime(选择Apache Axis2),例如以下图:
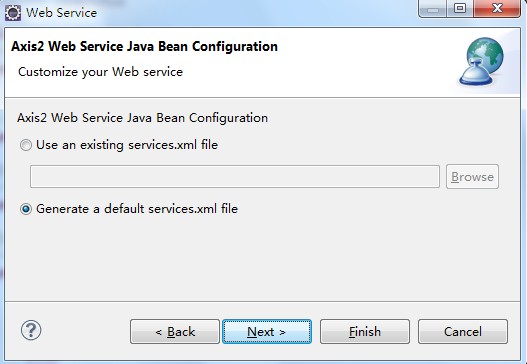
(7)点OK后,则返回到Web Service对话框,同理,Client type中的滑块右边也有"Configuration",也要进行对应的置,步骤同上。完毕后,Next --> next即行。进入到Axis2 Web Service Java Bean Configuration,我们选择Generate a default services.xml,例如以下图所看到的:
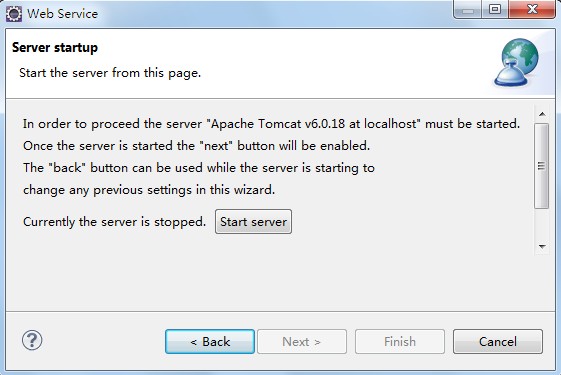
(8)到了Server startup对话框,有个按键"start server"(例如以下图),点击它,则可启动Tomcat服务器了。
(9)等启完后,点击"next -- > next",一切默认即行,最后,点击完毕。最后,出现例如以下界面:(Web Service Explorer),我们在这里便可測试我们的Web服务。(使用浏览器打开的话使用例如以下地址:http://127.0.0.1:19189/wse/wsexplorer/wsexplorer.jsp?org.eclipse.wst.ws.explorer=3)。例如以下图所看到的:
注:在浏览器中打开Web Service Explorer(有时候在eclipse中关闭了webservice explorer,能够用这样的方法打开)
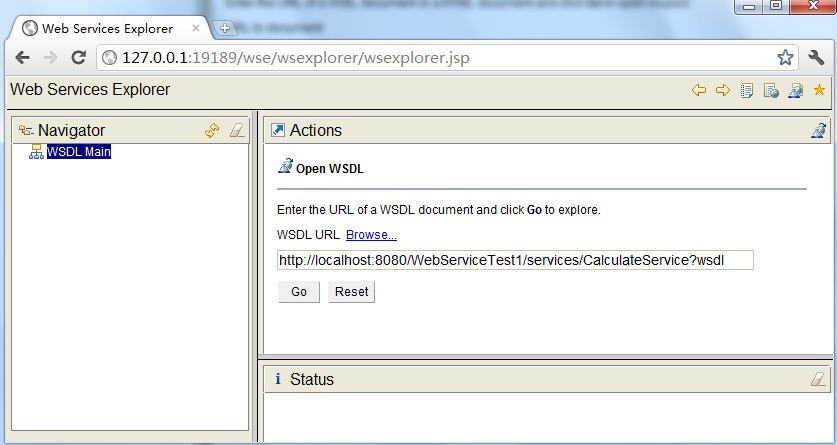
首先登录地址:http://127.0.0.1:19189/wse/wsexplorer/wsexplorer.jsp。然后在网页右上角选择Web Service Exoplorer标签。然后输入WSDL地址:http://localhost:8080/WebServiceTest1/services/CalculateService?wsdl 。这个wsdl地址就是我们刚才公布服务的那个wsdl。点击go,例如以下图所看到的:
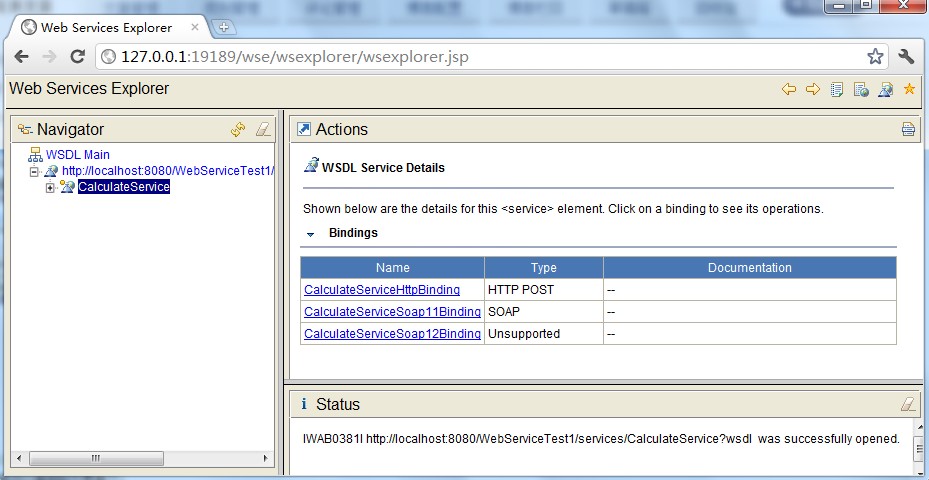
然后就能够看到例如以下界面了:
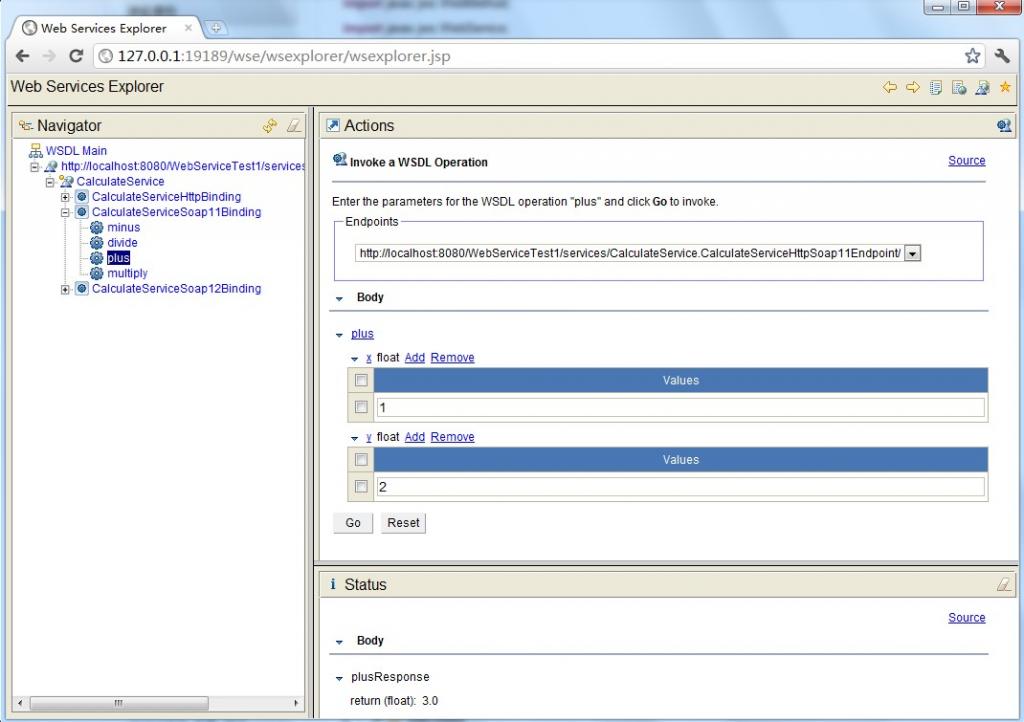
(10)測试比較简单,比如,我们选择一个"plus"的Operation(必须是CalculateServiceSoap11Binding),出现下图,在x的输入框中输入1,在y的输入框中输入2,点击"go",便会在status栏中显示结果3.0。其它方法的測试也类似。结果如上图所看到的。
2.5.CalculateServiceclient调用程序
package edu.sjtu.webservice.test;

import javax.xml.namespace.QName;

import org.apache.axis2.AxisFault;

import org.apache.axis2.addressing.EndpointReference;

import org.apache.axis2.client.Options;

import org.apache.axis2.rpc.client.RPCServiceClient;

public class CalculateServiceTest {

	/**

	 * @param args

	 * @throws AxisFault

	 */

	public static void main(String[] args) throws AxisFault {

		// TODO Auto-generated method stub

		// 使用RPC方式调用WebService

		RPCServiceClient serviceClient = new RPCServiceClient();

		Options options = serviceClient.getOptions();

		// 指定调用WebService的URL

		EndpointReference targetEPR = new EndpointReference(

				"http://localhost:8080/WebServiceTest1/services/CalculateService");

		options.setTo(targetEPR);

		// 指定要调用的计算机器中的方法及WSDL文件的命名空间:edu.sjtu.webservice。

		QName opAddEntry = new QName("http://webservice.sjtu.edu","plus");//加法

		QName opAddEntryminus = new QName("http://webservice.sjtu.edu","minus");//减法

		QName opAddEntrymultiply = new QName("http://webservice.sjtu.edu","multiply");//乘法

		QName opAddEntrydivide = new QName("http://webservice.sjtu.edu","divide");//除法

		// 指定plus方法的參数值为两个,各自是加数和被加数

		Object[] opAddEntryArgs = new Object[] { 1,2 };

		// 指定plus方法返回值的数据类型的Class对象

		Class[] classes = new Class[] { float.class };

		// 调用plus方法并输出该方法的返回值

		System.out.println(serviceClient.invokeBlocking(opAddEntry,opAddEntryArgs, classes)[0]);

		System.out.println(serviceClient.invokeBlocking(opAddEntryminus,opAddEntryArgs, classes)[0]);

		System.out.println(serviceClient.invokeBlocking(opAddEntrymultiply,opAddEntryArgs, classes)[0]);

		System.out.println(serviceClient.invokeBlocking(opAddEntrydivide,opAddEntryArgs, classes)[0]);

	}

}
执行结果:
3.0

-1.0

2.0

0.5
3.实例2.HelloService
(1)首先定义服务方法,代码例如以下所看到的:
package edu.sjtu.webservice;

public class HelloService {

	public String sayHelloNew() {

		return "hello";

	}

	public String sayHelloToPersonNew(String name) {

		if (name == null) {

			name = "nobody";

		}

		return "hello," + name;

	}

	public void updateData(String data) {

		System.out.println(data + " 已更新。");

	}

}
(2)參考实例1将这种方法公布为服务。
(3)编写client代码调用WebService(主要參考[5])
本文样例与其它样例最大的不同就在这里,其它样例一般须要依据刚才的服务wsdl生成clientstub,然后通过stub来调用服务,这样的方式显得比較单一,client必须须要stub存根才可以訪问服务,非常不方面。本样例的client不採用stub方式,而是一种实现通用的调用方式,不须要不论什么client存根就可以訪问服务。仅仅须要指定对于的web servce地址、操作名、參数和函数返回类型就可以。代码例如以下所看到的:
HelloServiceTest2.java
package edu.sjtu.webservice.test;

import javax.xml.namespace.QName;

import org.apache.axis2.AxisFault;

import org.apache.axis2.addressing.EndpointReference;

import org.apache.axis2.client.Options;

import org.apache.axis2.rpc.client.RPCServiceClient;

public class HelloServiceTest2 {

	private RPCServiceClient serviceClient;

	private Options options;

	private EndpointReference targetEPR;

	public HelloServiceTest2(String endpoint) throws AxisFault {

		serviceClient = new RPCServiceClient();

		options = serviceClient.getOptions();

		targetEPR = new EndpointReference(endpoint);

		options.setTo(targetEPR);

	}

	public Object[] invokeOp(String targetNamespace, String opName,

			Object[] opArgs, Class<?>[] opReturnType) throws AxisFault,

			ClassNotFoundException {

		// 设定操作的名称

		QName opQName = new QName(targetNamespace, opName);

		// 设定返回值

		// Class<?>[] opReturn = new Class[] { opReturnType };

		// 操作须要传入的參数已经在參数中给定,这里直接传入方法中调用

		return serviceClient.invokeBlocking(opQName, opArgs, opReturnType);

	}

	/**

	 * @param args

	 * @throws AxisFault

	 * @throws ClassNotFoundException

	 */

	public static void main(String[] args) throws AxisFault,

			ClassNotFoundException {

		// TODO Auto-generated method stub

		final String endPointReference = "http://localhost:8080/WebServiceTest1/services/HelloService";

		final String targetNamespace = "http://webservice.sjtu.edu";

		HelloServiceTest2 client = new HelloServiceTest2(endPointReference);

		String opName = "sayHelloToPersonNew";

		Object[] opArgs = new Object[] { "My Friends" };

		Class<?>[] opReturnType = new Class[] { String[].class };

		Object[] response = client.invokeOp(targetNamespace, opName, opArgs,

				opReturnType);

		System.out.println(((String[]) response[0])[0]);

	}

}
执行该程序,点击Run As->Java application,能够看到控制台端口的输出是:Hello, My Friends,表明客户端调用成功。该样例最大的不同和优势表如今客户端的调用方式,或者说是发起服务调用的方式,尽管比起客户端stub存根的方式,代码稍多,可是这样的方式统一,不须要生产stub存根代码,攻克了客户端有非常多类的问题。假设读者对这些代码进一步封装,我想调用方式非常easy,仅仅须要传递相关參数,这更好地说明了服务调用的优势。并且这样的方式更加简单明了,一看便知详细含义。而不须要弄得stub类的一些机制。
(4)改写client调用服务的代码
(3)中提到的client应用代码写的稍微有些繁杂,以下将上面的client调用service程序进行改写,简洁了很多。代码例如以下:
HelloServiceTest.java
import javax.xml.namespace.QName;

import org.apache.axis2.AxisFault;

import org.apache.axis2.addressing.EndpointReference;

import org.apache.axis2.client.Options;

import org.apache.axis2.rpc.client.RPCServiceClient;

public class HelloServiceTest {

	public static void main(String args[]) throws AxisFault {

		// 使用RPC方式调用WebService

		RPCServiceClient serviceClient = new RPCServiceClient();

		Options options = serviceClient.getOptions();

		// 指定调用WebService的URL

		EndpointReference targetEPR = new EndpointReference("http://localhost:8080/WebServiceTest1/services/HelloService");

		options.setTo(targetEPR);

		// 指定要调用的sayHelloToPerson方法及WSDL文件的命名空间

		QName opAddEntry = new QName("http://webservice.sjtu.edu","sayHelloToPersonNew");

		// 指定sayHelloToPerson方法的參数值

		Object[] opAddEntryArgs = new Object[] { "xuwei" };

		// 指定sayHelloToPerson方法返回值的数据类型的Class对象

		Class[] classes = new Class[] { String.class };

		// 调用sayHelloToPerson方法并输出该方法的返回值

		System.out.println(serviceClient.invokeBlocking(opAddEntry,opAddEntryArgs, classes)[0]);

	}

}
eclipse+webservice开发实例的更多相关文章
- 转:Eclipse+webservice开发实例
原文地址:http://blog.csdn.net/xw13106209/article/details/7049614 1.参考文献: 1.利用Java编写简单的WebService实例 http ...
- eclipse+axis2+webservice开发实例
myeclipse10安装axis2插件 第一步:下载axis2-1.6的插件压缩包,axis2-eclipse-codegen-plugin-1.6.2.zip 和 axis2-eclipse-se ...
- 基于JAX-WS的webService开发实例
最近因为工作原因接触到webService,所以记录下开发中碰到的问题,方便自己以后复习,顺便发扬一下开源精神.刚刚接触webServie如果有什么错误欢迎大家指正. 本地环境:myEclipse10 ...
- WebService开发实例(Axis2实现,无需安装,快速实现)
曾经做过的项目里涉及Android客户端向服务器发送请求,服务器访问数据库获得数据并返回给Android客户端.当时Android客户端与服务器的通信已经实现,我只负责客户端布局和数据呈现的部分,近日 ...
- eclipse下的webservice开发
关于eclipse下的webservice开发,有非常多的教程,这里只记下学习过程中的弯路: 1.无论是CXF模式还是AXIS模式,在出现start server之后,点击next报错:"s ...
- VS2008中C#开发webservice简单实例
1.创建工程 文件-> 新建->网站 如下图. 工程建好后,会自动添加如下代码: using System; using System.Linq; using System.Web; us ...
- 【eclipse插件开发实战】 Eclipse插件开发6——eclipse在线翻译插件Translator开发实例详解
Eclipse插件开发6--eclipse在线翻译插件Translator开发实例详解 在上一篇文章中讲到了一个简单的eclipse插件开发实例,主要是对插件工程的基本创建步骤进行了讲解,这篇文章当中 ...
- 【eclipse插件开发实战】 Eclipse插件开发5——时间插件Timer开发实例详解
Eclipse插件开发5--时间插件Timer开发实例详解 这里做的TimeHelper插件设定为在菜单栏.工具栏提供快捷方式,需要在相应地方设置扩展点,最后弹出窗体显示时间. 在上一篇文章里创建好了 ...
- 使用eclipse搭建第一个python+Django的web开发实例
python+Django的web开发实例 一.创建一个项目如果这是你第一次使用Django,那么你必须进行一些初始设置.也就是通过自动生成代码来建立一个Django项目--一个Django项目的 ...
随机推荐
- python sort()和sorted()方法
直接上代码: list_a=['a','c','z','E','T','C','b','A','Good','Tack'] list_b=['a','c','z','E','T','C','b','A ...
- 用shell写个100以内的所有数字之和
#!/bin/bash i=2 while ((i<=100));do j=2 while ((j<=i/2));do if ((i%j==0));then break fi let j+ ...
- bzoj3572
通过这题我知道了一个鬼故事,trunc(ln(128)/ln(2))=6……以后不敢轻易这么写了 好了言归正传,这题明显的构建虚树,但构建虚树后怎么树形dp呢? 由于虚树上的点不仅是议事会还有可能是议 ...
- 存储过程 分页【NOT IN】和【>】效率大PK 千万级别数据测试结果
use TTgoif exists (select * from sysobjects where name='Tonge')drop table Tongecreate table Tonge( I ...
- hibernate注解影射表
@MappedSuperclass的用法 用在实体的继承过程中的父类上: 父类Cat package com.xj.model; import javax.persistence.GeneratedV ...
- 【转】iOS手势识别的详细使用(拖动,缩放,旋转,点击,手势依赖,自定义手势) -- 不错不错
原文网址:http://blog.csdn.net/totogo2010/article/details/8615940 1.UIGestureRecognizer介绍 手势识别在iOS上非常重要,手 ...
- golang资料整理 (整理 中...)
网站guide 官方文档 国内镜像 安装go 之后,用godoc 来安装自己本地的文档服务器, godoc -http=:8080 打开浏览器 输入localhost:8080 就可以看到文档说明了. ...
- hbase shell下如何使用删除键
今天刚安装好了hbase,通过Secure CRT登录hbase shell,敲入错误命令无法使用删除键(Backspace或是Ctrl+Backspace都不管用)删除,后来在终端-->仿真下 ...
- java语言实现简单接口工具--粗简版
2016注定是变化的一年,忙碌.网红.项目融资失败,现在有点时间整整帖子~~ 目标: 提高工作效率与质量,能支持平台全量接口回归测试与迭代测试也要满足单一接口联调测试. 使用人员: 测试,开发 工具包 ...
- 如何制作网页小动画?——gif or png
一.场景与动画 为了拉动网站氛围,或者吸引用户浏览焦点,需要使用一些小动画.这种动画不是(gif)单纯的重复,而是需要需要一些控制和交互,比如在动画完成后打开一个对话框.动画有几个基本要素(时间控制, ...