
Keras实现MNIST分类
仅仅为了学习Keras的使用,使用一个四层的全连接网络对MNIST数据集进行分类,网络模型各层结点数为:784: 256: 128 : 10;
使用整体数据集的75%作为训练集,25%作为测试集,最终在测试集上的正确率也就只能达到92%,太低了:
              precision    recall  f1-score   support

         0.0       0.95      0.96      0.96      1721

         1.0       0.95      0.97      0.96      1983

         2.0       0.91      0.90      0.91      1793

         3.0       0.91      0.88      0.89      1833

         4.0       0.92      0.93      0.92      1689

         5.0       0.87      0.86      0.87      1598

         6.0       0.92      0.95      0.94      1699

         7.0       0.94      0.93      0.93      1817

         8.0       0.89      0.87      0.88      1721

         9.0       0.89      0.90      0.89      1646

   micro avg       0.92      0.92      0.92     17500

   macro avg       0.91      0.92      0.91     17500

weighted avg       0.92      0.92      0.92     17500
训练过程中,损失和正确率曲线:
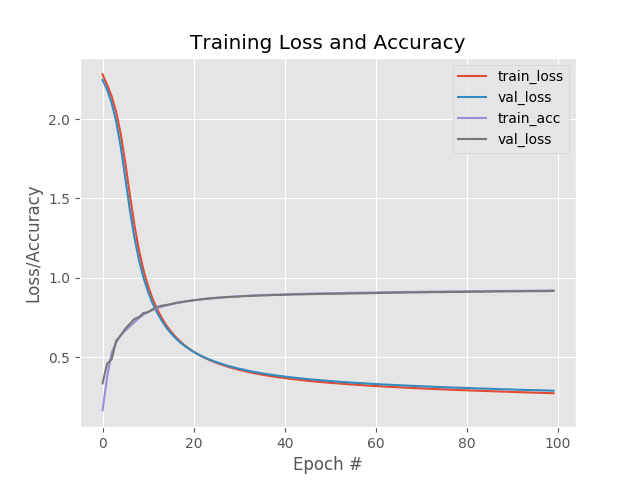
上面使用的优化方法是SGD,下面在保持所有参数不变的情况下,使用RMSpro进行优化,最后的结果看起来好了不少啊达到98%:
              precision    recall  f1-score   support

         0.0       0.99      0.99      0.99      1719

         1.0       0.99      0.99      0.99      1997

         2.0       0.99      0.97      0.98      1785

         3.0       0.97      0.98      0.97      1746

         4.0       0.98      0.98      0.98      1654

         5.0       0.97      0.97      0.97      1556

         6.0       0.99      0.99      0.99      1740

         7.0       0.98      0.97      0.98      1845

         8.0       0.97      0.98      0.97      1669

         9.0       0.96      0.97      0.97      1789

   micro avg       0.98      0.98      0.98     17500

   macro avg       0.98      0.98      0.98     17500

weighted avg       0.98      0.98      0.98     17500

这相差有些大了啊,损失一开始就比较低,正确率就比较高;
在执行一些epoch之后,训练集损失降低到一定程度并趋于平缓,而测试集的损失却在逐渐升高,看来是过拟合了啊。
也就是说大概在最初几个epoch的时候训练集的损失比较低,而且测试集的损失达到最低,正确率也都不错;应该就可以停止了。
代码:
#!/usr/bin/env python

# -*- coding: utf-8 -*-

# @Time : 19-5-9

"""

implement simple neural networks using the Keras libary

"""

__author__ = 'Zhen Chen'

# import the necessary packages

from sklearn.preprocessing import LabelBinarizer

from sklearn.model_selection import train_test_split

from sklearn.metrics import classification_report

from keras.models import Sequential

from keras.layers.core import Dense

from keras.optimizers import SGD

from sklearn import datasets

import matplotlib.pyplot as plt

import numpy as np

import argparse

# construct the argument parse and parse the arguments

parser = argparse.ArgumentParser()

parser.add_argument("-o", "--output", default="./Training Loss and Accuracy.png",

                    help="path to the output loss/accuracy plot")

args = parser.parse_args()

# grab the MNIST datset (if this is your first time running this

# script, the download may take a minute -- the 55MB MNIST datset

# will be downloaded

print("[INFO] loading MNIST (full) dataset...")

dataset = datasets.fetch_mldata("MNIST Original")

# scale the raw pixel intensities to the range [0, 1.0], then

# construct the training and testing splits

data = dataset.data.astype("float") / 255.0

(trainX, testX, trainY, testY) = train_test_split(data, dataset.target, test_size=0.25)

# convert the labels form integers to vectors

lb = LabelBinarizer()

trainY = lb.fit_transform(trainY)

testY = lb.fit_transform(testY)

# define the 784-256-128-10 architecture using Keras

model = Sequential()

model.add(Dense(256, input_shape=(784,), activation="sigmoid"))

model.add(Dense(128, activation="sigmoid"))

model.add(Dense(10, activation="softmax"))

# train the model using SGD

print("[INFO] training network...")

sgd = SGD(0.01)

model.compile(loss="categorical_crossentropy", optimizer=sgd, metrics=["accuracy"])

H = model.fit(trainX, trainY, validation_data=(testX, testY), epochs=100, batch_size=128)

# evaluate the network

print("[INFO] evaluating network...")

predictions = model.predict(testX, batch_size=128)

print(classification_report(testY.argmax(axis=1),

                            predictions.argmax(axis=1),

                            target_names=[str(x) for x in lb.classes_]))

# plot the training loss and accuracy

plt.style.use("ggplot")

plt.figure()

plt.plot(np.arange(0, 100), H.history["loss"], label="train_loss")

plt.plot(np.arange(0, 100), H.history["val_loss"], label="val_loss")

plt.plot(np.arange(0, 100), H.history["acc"], label="train_acc")

plt.plot(np.arange(0, 100), H.history["val_acc"], label="val_loss")

plt.title("Training Loss and Accuracy")

plt.xlabel("Epoch #")

plt.ylabel("Loss/Accuracy")

plt.legend()

plt.savefig(args.output)
Keras实现MNIST分类的更多相关文章
- 芝麻HTTP:TensorFlow LSTM MNIST分类
本节来介绍一下使用 RNN 的 LSTM 来做 MNIST 分类的方法,RNN 相比 CNN 来说,速度可能会慢,但可以节省更多的内存空间. 初始化 首先我们可以先初始化一些变量,如学习率.节点单元数 ...
- TensorFlow入门(三)多层 CNNs 实现 mnist分类
欢迎转载,但请务必注明原文出处及作者信息. 深入MNIST refer: http://wiki.jikexueyuan.com/project/tensorflow-zh/tutorials/mni ...
- keras实现mnist数据集手写数字识别
一. Tensorflow环境的安装 这里我们只讲CPU版本,使用 Anaconda 进行安装 a.首先我们要安装 Anaconda 链接:https://pan.baidu.com/s/1AxdGi ...
- 用Pytorch训练MNIST分类模型
本次分类问题使用的数据集是MNIST,每个图像的大小为\(28*28\). 编写代码的步骤如下 载入数据集,分别为训练集和测试集 让数据集可以迭代 定义模型,定义损失函数,训练模型 代码 import ...
- 利用CNN神经网络实现手写数字mnist分类
题目: 1)In the first step, apply the Convolution Neural Network method to perform the training on one ...
- keras如何求分类问题中的准确率和召回率
https://www.zhihu.com/question/53294625 由于要用keras做一个多分类的问题,评价标准采用precision,recall,和f1_score:但是keras中 ...
- 深度学习原理与框架-Tensorflow卷积神经网络-卷积神经网络mnist分类 1.tf.nn.conv2d(卷积操作) 2.tf.nn.max_pool(最大池化操作) 3.tf.nn.dropout(执行dropout操作) 4.tf.nn.softmax_cross_entropy_with_logits(交叉熵损失) 5.tf.truncated_normal(两个标准差内的正态分布)
1. tf.nn.conv2d(x, w, strides=[1, 1, 1, 1], padding='SAME') # 对数据进行卷积操作 参数说明:x表示输入数据,w表示卷积核, stride ...
- 深度学习原理与框架-Tensorflow卷积神经网络-神经网络mnist分类
使用tensorflow构造神经网络用来进行mnist数据集的分类 相比与上一节讲到的逻辑回归,神经网络比逻辑回归多了隐藏层,同时在每一个线性变化后添加了relu作为激活函数, 神经网络使用的损失值为 ...
- 深度学习之神经网络核心原理与算法-caffe&keras框架图片分类
之前我们在使用cnn做图片分类的时候使用了CIFAR-10数据集 其他框架对于CIFAR-10的图片分类是怎么做的 来与TensorFlow做对比. Caffe Keras 安装 官方安装文档: ht ...
随机推荐
- 爬虫-【selenium——webElement常用方法】
a)clear——清除元素的内容 driver.find_element_by_id("**").clesr() b)send_keys——在元素上模拟按键输入 driver.fi ...
- java基础语言 运算符
/* ++,--运算符的使用: 单独使用: 放在操作数的前面和后面效果一样.(这种用法是我们比较常见的) 参与运算使用: 放在操作数的前面,先自增或者自减,然后再参与运算. 放在操作数的后面,先参与运 ...
- python调试利器:最直观简洁的错误日志
#!/usr/bin/env python # -*- coding: utf-8 -*- # @Date : 2018-08-30 17:12:27 # @Author : Sheldon (thi ...
- 【tensorflow】tensorflow学习记录——安装、第一个程序篇
机器学习,人工智能往后肯定是一个趋势,现阶段有必要研究一两个人工智能的工具,以免自己技术落伍,其中tensorflow就是一个很不错的项目,有谷歌开发后开源,下面开始学习安装和使用 安装篇: 很不幸, ...
- Java for LeetCode 080 Remove Duplicates from Sorted Array II
Follow up for "Remove Duplicates": What if duplicates are allowed at most twice? For examp ...
- event loop笔记
注意四个对象: 主进程 执行栈 异步进程 任务队列 1.主进程读取js代码,形成对应的堆和执行栈(此时在同步环境) 2.当遇见异步任务,转交给异步进程进行处理 3.异步任务完成,将其推入任务队列 4. ...
- hdu 2015校赛1002 Dual horsetail (思维题 )
Dual horsetail Time Limit: 2000/1000 MS (Java/Others) Memory Limit: 32768/32768 K (Java/Others)To ...
- win8+sdk8+vs2012+freeglut+glew开发opengl
写给想要学习opengl的同学们. 刚开始学习opengl的时候,对于整个环境的搭建以及一些概念不太清晰,网上的资料又比较凌乱,因此在此总结一下,方便大家. 首先,是有一个windows系统,我用的是 ...
- html5--1.20 课程小结与若干点补充
html5--1.20 课程小结与若干点补充 学习要点: 1.第一章HTML5基础知识做一个小结2.对本章课程中部分内容做几点补充 课程小结 对本章的知识点做一个简单的回顾,并对其中个别知识点做若干补 ...
- LinkedList_1.打印两个有序链表的公共部分
思路: 实例化出两个链表($link_a, $link_b),比较连个链表当前元素的大小,谁小谁执行next()方法继续比较,当出现相当的时候把相等的值塞入数组$common里,当两个链表有一个元素比 ...