
Android学习总结(三)——IntentService的用法
一.IntentService的基本概念
IntentService是继承于Service并处理异步请求的一个类,在IntentService内有一个工作线程来处理耗时操作,启动IntentService的方式和启动传统Service一样,同时,当任务执行完后,IntentService会自动停止,而不需要我们去手动控制。另外,可以启动IntentService多次,而每一个耗时操作会以工作队列的方式在IntentService的onHandleIntent回调方法中执行,并且,每次只会执行一个工作线程,执行完第一个再执行第二个,以此类推。所有请求都在一个单线程中,不会阻塞应用程序的主线程(UI Thread),同一时间只处理一个请求。那么,用IntentService有什么好处呢?首先,我们省去了在Service中手动开线程的麻烦,第二,当操作完成时,我们不用手动停止Service,第三,it's so easy to use!
二.开启代码之旅
OK!接下看看如何去使用,新建工程,新建一个继承IntentService的类,代码如下:
package com.nyl.intentservicesummarize;

import android.app.IntentService;

import android.content.Intent;

import android.os.IBinder;

import android.util.Log;

/**

 * Created by Administrator on 2017/3/4 0004.

 */

public class ServiceTest extends IntentService{

    private static final String TAG = ServiceTest.class.getSimpleName();

    //必须实现父类的构造方法

    public ServiceTest() {

        super("aa");

    }

    /**

     * 必须重写的核心方法

     * @param intent

     */

    @Override

    protected void onHandleIntent(Intent intent) {

        //Intent是从Activity发过来的,携带识别参数,根据参数不同执行不同的任务

        String action = intent.getExtras().getString("param");

        if (action.equals("s1")) {

            Log.i(TAG,"启动第一个service");

        }else if (action.equals("s2")){

            Log.i(TAG,"启动第二个service");

        }else if (action.equals("s3")){

            Log.i(TAG,"启动第三个service");

            try {

                //让服务休眠2秒

                Thread.sleep(2000);

            } catch (InterruptedException e) {

                e.printStackTrace();

            }

        }

    }

    /**

     * 重写其他方法,用于查看方法的调用顺序

     * @param intent

     * @return

     */

    @Override

    public IBinder onBind(Intent intent) {

        Log.i(TAG,"onBind");

        return super.onBind(intent);

    }

    @Override

    public void onCreate() {

        super.onCreate();

    }

    @Override

    public int onStartCommand(Intent intent, int flags, int startId) {

        Log.i(TAG,"onStartCommand");

        return super.onStartCommand(intent, flags, startId);

    }

    @Override

    public void setIntentRedelivery(boolean enabled) {

        super.setIntentRedelivery(enabled);

        Log.i(TAG,"setIntentRedelivery");

    }

    @Override

    public void onDestroy() {

        Log.i(TAG,"onDestroy");

        super.onDestroy();

    }

}
AndroidManifest.xml注册下Service
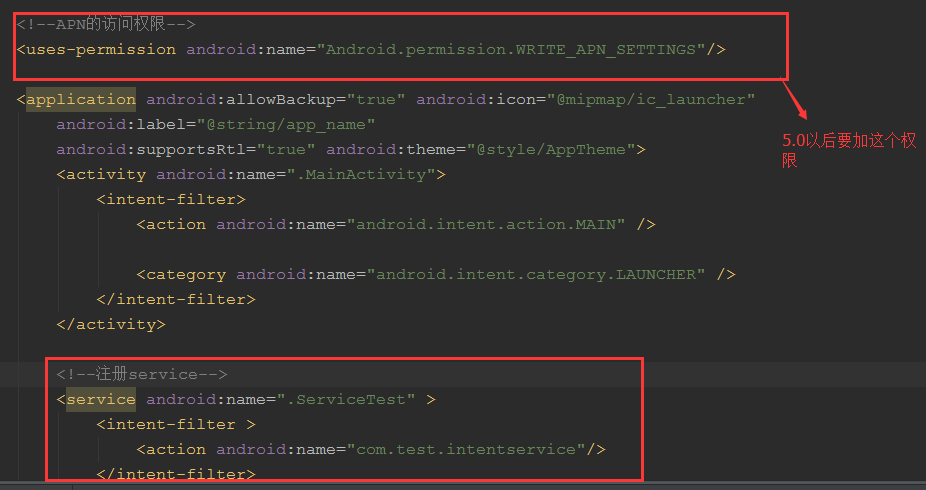
在MainActivity启动三次服务,代码如下:
package com.nyl.intentservicesummarize;

import android.app.Activity;

import android.content.Intent;

import android.os.Bundle;

import android.view.View;

import android.widget.Button;

public class MainActivity extends Activity implements View.OnClickListener {

    private Button btnStartIntentService;

    @Override

    protected void onCreate(Bundle savedInstanceState) {

        super.onCreate(savedInstanceState);

        setContentView(R.layout.activity_main);

        btnStartIntentService = (Button) findViewById(R.id.btnStartIntentService);

        btnStartIntentService.setOnClickListener(this);

    }

    @Override

    public void onClick(View view) {

        if (view.getId() == R.id.btnStartIntentService){

            /**

             * 有些时候我们使用Service的时需要采用隐私启动的方式,

             * 但是Android 5.0一出来后,其中有个特性就是Service Intent  must be explitict,

             * 也就是说从Lollipop开始,service服务必须采用显示方式启动。

             * 解决方法:

             设置Intent的Action和packageName

             */

            Intent it1 = new Intent();

            it1.setAction("com.test.intentservice");

            it1.setPackage(getPackageName());

            Bundle b1 = new Bundle();

            b1.putString("param", "s1");

            it1.putExtras(b1);

            Intent it2 = new Intent("com.test.intentservice");

            it2.setPackage(getPackageName());

            Bundle b2 = new Bundle();

            b2.putString("param", "s2");

            it2.putExtras(b2);

            Intent it3 = new Intent("com.test.intentservice");

            it3.setPackage(getPackageName());

            Bundle b3 = new Bundle();

            b3.putString("param", "s3");

            it3.putExtras(b3);

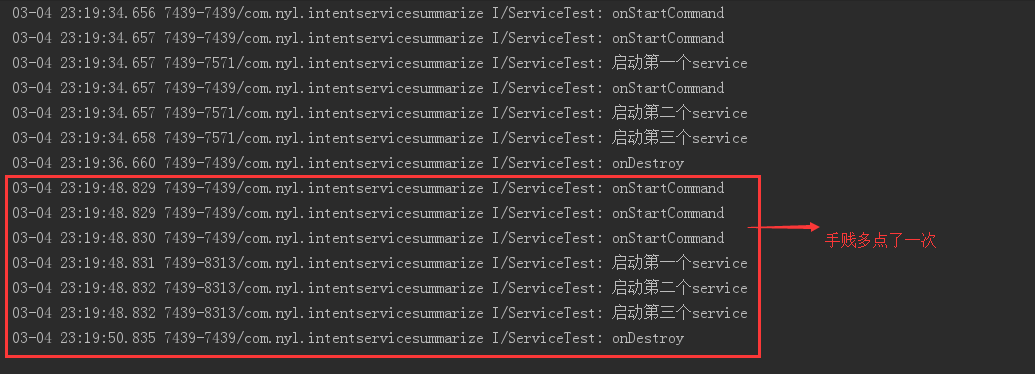
            //接着启动多次IntentService,每次启动,都会新建一个工作线程

            //但始终只有一个IntentService实例

            startService(it1);

            startService(it2);

            startService(it3);

        }

    }

}
代码之路已经完成了,我们来看看打印的结果吧,如下图:
关于IntentService的内容总结暂时就这么多,文章如果有写得不对的地方,欢迎广大园友指正!
Android学习总结(三)——IntentService的用法的更多相关文章
- 三、Android学习第三天——Activity的布局初步介绍(转)
(转自:http://wenku.baidu.com/view/af39b3164431b90d6c85c72f.html) 三.Android学习第三天——Activity的布局初步介绍 今天总结下 ...
- Android学习第三天-打包常用命令
在前面<Android学习第一天-adb常用命令>和 <Android学习第二天-android常用命令>两篇博文中,我们重点讲解了adb和android的常用命令,下面我们讲 ...
- 【Android】完善Android学习(三:API 3.0)
备注:之前Android入门学习的书籍使用的是杨丰盛的<Android应用开发揭秘>,这本书是基于Android 2.2API的,目前Android已经到4.4了,更新了很多的API,也增 ...
- Android学习(三)
学号 20189214 <Android程序开发>第八周学习总结 教材学习内容总结 GridView GridView和ListView一样是AbsListView的子类; 都需要一个Ad ...
- android学习笔记三
GUI==>Graphics User Interface,图形用户界面. android UI 建立在View.ViewGroup基础上,采用组合器设计模式设计View和ViewGoup. V ...
- Android学习--持久化(三) SQLite & LitePal
SQLite & LitePal 自己做为一个iOS开发,看到安卓这一块的时候,那中浓烈的熟悉味道更加强烈,SQLite这种轻量级的关系型数据库的使用在移动端相差不多,iOS有FMDB,And ...
- Android学习第三天-签名常用命令
由于怕篇幅过长,所以把这个打包常用命令分开成两篇博文来进行讲解,下面我们直接进入主题吧. 8.keytool 这是我们JDK自带的密钥和证书管理工具 命令: -certreq 生成证书请求 -chan ...
- Android学习笔记三:用Intent串联activity
转载请注明原文地址:http://www.cnblogs.com/ygj0930/p/7513399.html 一:Intent Intent可以理解为 意图. 我们可以通过创建intent实例来定义 ...
- Android学习(三) 自动完成的使用
1.AutoCompleteTextView 自动完成功能,在文本框中输入字符,会出现匹配的自动提示.类似百度搜索. XML代码 <?xml version="1.0" en ...
- Android学习笔记(三)
ContentProvider简单介绍 ContentProvider是不同应用程序之间进行数据交换的标准API,当一个应用程序须要把自己的数据暴露给其它程序使用时.该应用程序便可通过提供Conten ...
随机推荐
- Git简单教程
该笔记总结廖雪峰Git教程, 参考网站: https://www.liaoxuefeng.com/wiki/0013739516305929606dd18361248578c67b8067c8c017 ...
- C和FORTRAN的快速傅里叶/余弦/正弦变换(Fast Fourier/Cosine/Sine Transform)开源库分享
Takuya Ooura: General Purpose FFT Package, http://www.kurims.kyoto-u.ac.jp/~ooura/fft.html. Free C & ...
- Qt-MVC图形视图框架初识
使用QPushButton.QLabel.QCheckBox等构成GUI的控件或自定义图形时,开发应用程序会变得很简单.但是如果想在GUI中使用数十个或者数百个图形对象,向用户完美展示控制场景,则会受 ...
- Tomcat 容器的安全认证和鉴权
大量的 Web 应用都有安全相关的需求,正因如此,Servlet 规范建议容器要有满足这些需求的机制和基础设施,所以容器要对以下安全特性予以支持: 身份验证:验证授权用户的用户名和密码 资源访问控制: ...
- Pro Android学习笔记(一五四):传感器(4):陀螺仪、加速传感器
文章转载只能用于非商业性质,且不能带有虚拟货币.积分.注册等附加条件.转载须注明出处http://blog.csdn.net/flowingflying/以及作者@恺风Wei. 陀螺仪 陀螺仪(Gyr ...
- DataGridView DataSource 如何实现排序
将数据绑定在下面的类中就可以实现排序 public class SortableBindingList<T> : BindingList<T> { private ArrayL ...
- c# IOCP.ClientEx2.ReadWrite 加断点遭遇System.AccessViolationException 问题
起因: 如果在Debug模式下,在IOCP.ClientEx2.ReadWrite.cs while (0 > (nPackSize = _ipcp.Pack(arg_n64PackId, ar ...
- [Xcode 实际操作]八、网络与多线程-(15)使用网址会话对象URLSession下载图片并存储在沙箱目录中
目录:[Swift]Xcode实际操作 本文将演示如何通过网址会话对象URLSession下载图片并存储在沙箱目录中. 网址会话对象URLSession具有在后台上传和下载.暂停和恢复网络操作.丰富的 ...
- 关于MySQL集群架构优劣势与适用场景的分析与思考
http://blog.itpub.net/25723371/viewspace-1977389/
- cobian backup 11 使用
主机和备份机器创建备份用户(bf) 在备份机器上 设置备份用户, 备份目录右键安全,添加刚刚创建的备份bf用户,并授予所有权限 设置文件夹共享,并设置共享用户为刚刚创建的bf用户 并且在高级共享设置去 ...