A WPF/MVVM Countdown Timer
Introduction
This article describes the construction of a countdown timer application written in C# and WPF, using Laurent Bugnion's MVVMLight Toolkit. This article is based on the work of some previous articles I've written:
- A WPF Short TimeSpan Custom Control
- A WPF Spinner Custom Control
- A XAML Only Font ComboBox
- MVVMLight Using Two Views
As usual most of the code shown in this article is elided, particularly since no-one likes scrolling through five screens worth of XAML to see one line of interest. Please download the source zip file to see the whole thing.
This was written, and more importantly, tested, on a Windows 7, 64-bit box, but uses the .NET 4.0 framework, so should 'just work'!
Requirements and Features
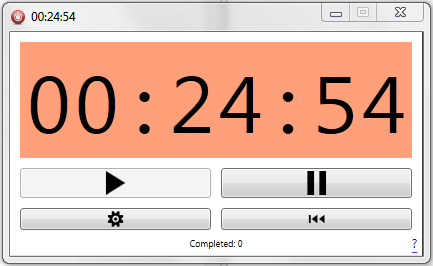
The Countdown Timer is going to be relatively simple:
- The starting time can be chosen by the user.
- Notify the user visually (in the application and task bar) and audibly.
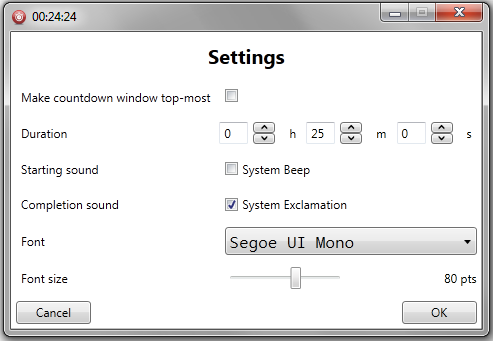
- The application has settings that the user can change.
- The Windows 7 taskbar icon shows the progress of the timer.
The original motivation for this was that I came across the Pomodoro Technique whilst browsing the web and thought it would be fun to write a countdown timer that could be used for this. It is, in short, a 'getting things done' idea which can be boiled down to:
- work for 25 minutes
- break for 5 minutes
- repeat
So I decided that the default setting for the timer is 25 minutes, and that it should record the number of completed countdowns unobtrusively, should someone wish to use this application in that way.
Choosing the Underlying Timer
We use the WPF DispatchTimer to perform a count. We are not making any guarantees about the accuracy of the timer.
In fact neither does the documentation:
Timers are not guaranteed to execute exactly when the time interval occurs, but they are guaranteed to not execute before the time interval occurs. This is because
DispatcherTimeroperations are placed on the Dispatcher queue like other operations. When theDispatcherTimeroperation executes is dependent on the other jobs in the queue and their priorities.
By leveraging the .NET Framework, we use a TimeSpan that allows us to increment, and importantly, decrement by a specified amount. We then simply decrement our starting value every time the DispatchTimer ticks, until we get a negative TimeSpan, and then we stop.
The code is written in such a way that the TimerModel is just a concrete implementation of ITimerModel and the concrete instantiation of an ITimerModel is generated from a single factory method: in other words, you could write your own ITimerModel derived class instead and update the factory method as required (e.g., useSystem.Threading.Timer instead).
MVVM
Since this is a WPF application, we will use the MVVM pattern to layout the code.
What does this mean? The application will be divided into:
- Views - XAML-only layouts that the application uses: i.e., the GUI and all its windows!
- ViewModels - translate the data between the Views and the Models.
- Models - the actual code that does the work (and everything else).
If you find this confusing or want to know more, please see another of my articles: WPF/MVVM Quick Start Tutorial.
Application Settings
All applications have settings and this one is no different: to persist the application's settings, we take advantage of the class System.Configuration.ApplicationSettingsBase. This is subclassed for the WPF application when you create it, so you can then just address the application settings programmatically, for example:
_timer.Duration = Properties.Settings.Default.Duration;
where we have created a Duration property.
In the same way that we hide the implementation of the Timer behind a ITimerModel interface, we also use an interface called ISettingsModel, and use a concrete instance called SettingsModel, along with a builder method to retrieve an instance of the class. This gives us the option, as before, to change the settings backing store, to something else in the future (ini file anyone?).
Updating Settings Between Application Versions
To cater for updates to the application, we can use the following method: define UpgradeRequired in our settings, and set to True by default. We then use:
if (Properties.Settings.Default.UpgradeRequired)

{

  Properties.Settings.Default.Upgrade();

  Properties.Settings.Default.UpgradeRequired = false;

  Properties.Settings.Default.Save();

}
to force the upgrade of the application settings only when the UpgradeRequired flag is true. For newly versioned assemblies, all settings take their default values, this code is triggered, and the settings are copied from a previous application version, if it exists, to the new one.
It is worth noting that for this 'trick' to work, you always need to define this field in your application settings inthe very first version of your application.
The Views and ViewModels
The application has several views that are all UserControls and hosted in the MainWindow. This means no pop-up dialogs! They are:
- The main
TimerView - The
SettingsView - The
AboutView
with the corresponding ViewModels:
- The
TimerViewModel - The
SettingsViewModel - The
AboutViewModel
Changing Views and Messaging
As we want to use 'separation of concerns', or 'encapsulation' (if you prefer), we do not want view-models to communicate directly. In order to do this, we simply use message passing, in other words:
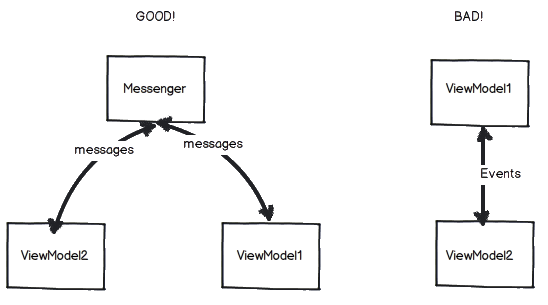
The MVVMLight Toolkit provides us with a singleton Messenger class that we can register message consumers and message producers with. So to raise an 'event' in one view model from another, we simple pass a message, for example:
public class MainViewModel : ViewModelBase

{

    public MainViewModel()

    {

        //  Lastly, listen for messages from other view models.

        Messenger.Default.Register<SimpleMessage>(this, ConsumeMessage);

    }

    private void ConsumeMessage(SimpleMessage message)

    {

        switch (message.Type)

        {

            case MessageType.TimerTick:

                WindowTitle = message.Message;

                break;

            // ....

        }

    }

}
and in the TimerViewModel:
public class TimerViewModel : ViewModelBase

{

    private void OnTick(object sender, TimerModelEventArgs e)

    {

        Messenger.Default.Send(new SimpleMessage(MessageType.TimerTick, TimerValue));

    }

}
What this achieves is as follows: the TimerViewModel updates the TimerView countdown clock in the main window's ContentControl, but we want to update the window's title to also show the countdown. The main window View is bound to the MainViewModel, so to do this, and to keep the view-models separate, we pass a message containing the time remaining. The reason we update the window title bar is discussed a little later.
The TaskBar Preview and the Window Title
As you can see in this screenshot:
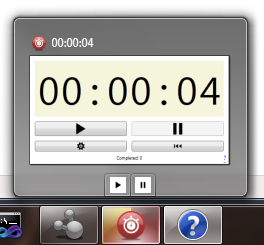
The countdown value is shown in the taskbar item thumbnail, and in the main window's title. The reason we update the window's title is that when a window is minimzed, the taskbar item thumbnail is not updated by Windows, so if you were to hover your mouse pointer over the icon on the task bar when the item is minimized, the thumbnail preview will display the countdown at the time you minimized the window. Fortunately, the title of the window is updated in the thumbnail preview, so we ensure that we update that to provide a visual clue to the user.
TaskBar Messages
We need a second message type to communicate task bar progress updates in Windows 7: since theMainWindow 'view' is bound to the MainViewModel, we need to receive messages from the TimerViewModelthat are appropriate to update the task bar progress indicator. Fortunately this is relatively straightforward, and once again we make use of the Messenger.Default.Register and Messenger.Default.Send pattern we saw earlier.
The second message class is simply:
public class TaskbarItemMessage

{

    public TaskbarItemMessage()

    {

        State = TaskbarItemProgressState.None;

        Value = -1.0;

    }

    public TaskbarItemProgressState State { get; set; }

    public double Value { get; set; }

    public bool HasValue { get { return ! (Value < 0.0); } }

}
Our TimerViewModel just sends instances of these messages and the MainViewModel receives them, and via the magic of data-binding, between the view model (MainViewModel) and the view (MainWindow) the taskbar progress indicator just updates:
<Window x:Class="Btl.MainWindow"

        DataContext="{Binding Main,

                              Source={StaticResource Locator}}">

    <Window.TaskbarItemInfo>

        <TaskbarItemInfo ProgressState="{Binding ProgressState}"

                      ProgressValue="{Binding ProgressValue}">

            <TaskbarItemInfo.ThumbButtonInfos>

                <ThumbButtonInfoCollection>

                    <ThumbButtonInfo Command="{Binding PlayCommand}"

                                     Description="Start"

                                     DismissWhenClicked="False"

                                     ImageSource="Resources\icon.play.png" />

                    <ThumbButtonInfo Command="{Binding PauseCommand}"

                                     Description="Pause"

                                     DismissWhenClicked="False"

                                     ImageSource="Resources\icon.pause.png" />

                </ThumbButtonInfoCollection>

            </TaskbarItemInfo.ThumbButtonInfos>

        </TaskbarItemInfo>

    </Window.TaskbarItemInfo>

    <!-- ELIDED  -->

</Window>
Since the TaskBarItemInfo thumbnail previews offer us more than just the preview, we can add a thumbnail 'Start' and 'Pause' button (just like Media Player), so we can control the countdown timer from the thumbnail preview, hence the ThumbButtonInfo elements above.
A Note on the UI Design
There is some method to the madness of the Countdown Timer UI: since the Play and Pause buttons are likely to be the most used, they are the largest, then the settings and reset buttons are smaller so they are less likely to be clicked on. The 'About' window is accessed by a small '?' in the bottom right hand corner.
Similarly, the 'OK' and 'Cancel' buttons are widely separated in the Settings view so it is clear which one you want to click on.
And lastly, aside from the button icons (play, pause, etc.), I've left the theming of the application alone, so that the OS can choose how to theme it. Of course, since this is an MVVM application, you can take the source code, fire up Blend, and change it however you like.
There are even some third-party libraries that will do a lot of the work for you, e.g., MahApps.Metro.
A WPF/MVVM Countdown Timer的更多相关文章
- WPF MVVM 验证
WPF MVVM(Caliburn.Micro) 数据验证 书接前文 前文中仅是WPF验证中的一种,我们暂且称之为View端的验证(因为其验证规是写在Xaml文件中的). 还有一种我们称之为Model ...
- jQuery Countdown Timer 倒计时效果
这个一款简单的 jQuery 倒计时插件,用于显示剩余的天数,小时,分钟和秒.倒计时功能是非常有用的一个小功能,可以告诉用户多久以后您的网站将会发布或者关闭进行维护,还可以用于举办活动的开始和停止的倒 ...
- WPF MVVM初体验
首先MVVM设计模式的结构, Views: 由Window/Page/UserControl等构成,通过DataBinding与ViewModels建立关联: ViewModels:由一组命令,可以绑 ...
- WPF MVVM实现TreeView
今天有点时间,做个小例子WPF MVVM 实现TreeView 只是一个思路大家可以自由扩展 文章最后给出了源码下载地址 图1 图2 模版加上了一个checkbox,选中父类的checkb ...
- WPF/MVVM 快速开始指南(译)(转)
WPF/MVVM 快速开始指南(译) 本篇文章是Barry Lapthorn创作的,感觉写得很好,翻译一下,做个纪念.由于英文水平实在太烂,所以翻译有错或者译得不好的地方请多指正.另外由于原文是针对W ...
- 使用Prism提供的类实现WPF MVVM点餐Demo
使用Prism提供的类实现WPF MVVM点餐Demo 由于公司开发的技术需求,近期在学习MVVM模式开发WPF应用程序.进过一段时间的学习,感受到:学习MVVM模式,最好的方法就是用MVVM做几个D ...
- WPF MVVM使用prism4.1搭建
WPF MVVM使用prism4.1搭建 MVVM即Model-View-ViewModel,MVVM模式与MVP(Model-View-Presenter)模式相似,主要目的是分离视图(View)和 ...
- ViewModel从未如此清爽 - 轻量级WPF MVVM框架Stylet
Stylet是我最近发现的一个WPF MVVM框架, 在博客园上搜了一下, 相关的文章基本没有, 所以写了这个入门的文章推荐给大家. Stylet是受Caliburn Micro项目的启发, 所以借鉴 ...
- WPF MVVM 架构 Step By Step(6)(把actions从view model解耦)
到现在为止,我们创建了一个简单的MVVM的例子,包含了实现了的属性和命令.我们现在有这样一个包含了例如textbox类似的输入元素的视图,textbox用绑定来和view model联系,像点击but ...
随机推荐
- 解决编译apache出现的问题:configure: error: APR not found . Please read the documentation - ____哊.時^随记 - 51CTO技术博客
解决编译apache出现的问题:configure: error: APR not found . Please read the documentation - ____哊.時^随记 - 51CTO ...
- Android内存管理
首先Android理机制相当复杂.想要讲清楚比較困难.其次对于绝大多数用户来说.仅仅关心内存够不够用,至于内存怎样管理的这样的技术细节,不是用户须要去考虑的,写这样一个专题有没有意义?毕竟我们是用手机 ...
- MongoDB在实际项目
MongoDB在实际项目中的使用 MongoDB简介 MongoDB是近些年来流行起来的NoSql的代表,和传统数据库最大的区别是支持文档型数据库.当然,现在的一些数据库通过自定义复合类型,可变长 ...
- Codeforces Round #296 (Div. 2) A B C D
A:模拟辗转相除法时记录答案 B:3种情况:能降低2,能降低1.不能降低分别考虑清楚 C:利用一个set和一个multiset,把行列分开考虑.利用set自带的排序和查询.每次把对应的块拿出来分成两块 ...
- SSDTHook实例--编写稳定的Hook过滤函数
解说怎样写Hook过滤函数,比方NewZwOpenProcess.打开进程. 非常多游戏保护都会对这个函数进行Hook. 因为我们没有游戏保护的代码,无法得知游戏公司是怎样编写这个过滤函数. 我看到非 ...
- OC -- 第一个类
OC -- 第一个类 类名:Car 属性:轮胎个数.时速 行为:跑 完整写一个类:类的声明和实现 1. 类的声明 代码: // NSObject 再Foundation框架中 #import & ...
- windows 2003 自动安全设置
@echo offecho.echo.echo.echo 〓〓〓〓〓〓〓〓〓〓〓〓〓〓〓〓〓〓〓〓〓〓〓〓〓〓echo.echo.echo windows 2003 自动安全设置程序 echo. ec ...
- 30岁生日,媳妇赏的,U-BOAT手表一枚-数字尾巴
http://bbs.dgtle.com/thread-139611-1-1.html
- 谨记给UpdatePanel中动态添加的控件赋ID
原文:谨记给UpdatePanel中动态添加的控件赋ID 昨天下定决 心对上次做的布局编辑器控件加以改进,其中最主要变化的就是要完全使用ASP.NET AJAX!但是很遗憾,虽然耳闻已久,但目前对AS ...
- 后台使用oracle前台使用easyui分页机制
前台easyui 的datagrid中设置分页属性: pagination:true,//显示分页 pagePosition:'bottom',//分页栏位置 both 上下 bottom.top p ...